
Users Manual - English and Spanish
Page 35
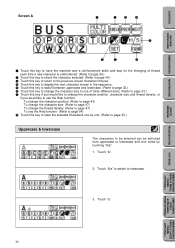
... this key if you would like to change the thread density: (Refer to lowercase. 3. Touch "A". 2. Touch "A/a" to switch to page 47) To use the Help function. To change the character position: (Refer to page 43) To change the character size: (Refer to page 47) To change the character position, character... size and thread density, or if you would like to use the Help function: (Refer to page 54) 8 Touch this key to clear the selected characters one by one. (Refer to page 33.) Uppercase & lowercase The...
... this key if you would like to change the thread density: (Refer to lowercase. 3. Touch "A". 2. Touch "A/a" to switch to page 47) To use the Help function. To change the character position: (Refer to page 43) To change the character size: (Refer to page 47) To change the character position, character... size and thread density, or if you would like to use the Help function: (Refer to page 54) 8 Touch this key to clear the selected characters one by one. (Refer to page 33.) Uppercase & lowercase The...
Users Manual - English and Spanish
Page 39
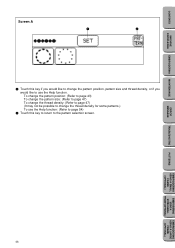
CONTENTS MACHINE KNOWLEDGE EMBROIDERING MAINTENANCE Screen A 1 2 1 Touch this key to return to use the Help function: (Refer to page 54) 2 Touch this key if you would like to change the pattern position, pattern size and thread density, or if you ...) To change the thread density: (Refer to page 47) (It may not be possible to change the thread density for some patterns.) To use the Help function. ERROR MESSAGE TROUBLESHOOTING PATTERNS EMBROIDERING USING A SMALL FRAME (OPTIONAL) EMBROIDERING USING A EXTRA-SMALL FRAME (OPTIONAL) EMBROIDERING USING A LARGE FRAME (OPTIONAL) 36...
CONTENTS MACHINE KNOWLEDGE EMBROIDERING MAINTENANCE Screen A 1 2 1 Touch this key to return to use the Help function: (Refer to page 54) 2 Touch this key if you would like to change the pattern position, pattern size and thread density, or if you ...) To change the thread density: (Refer to page 47) (It may not be possible to change the thread density for some patterns.) To use the Help function. ERROR MESSAGE TROUBLESHOOTING PATTERNS EMBROIDERING USING A SMALL FRAME (OPTIONAL) EMBROIDERING USING A EXTRA-SMALL FRAME (OPTIONAL) EMBROIDERING USING A LARGE FRAME (OPTIONAL) 36...
Users Manual - English and Spanish
Page 41
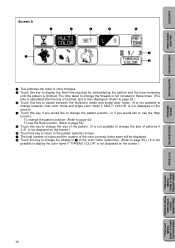
... not displayed on the screen). 4 Touch this key if you would like to change the pattern position, or if you would like to use the Help function: (Refer to page 54) 5 Touch this key to change the size of the pattern. (It is not possible to change the size of patterns... order of the color currently being sewn will be displayed. 8 Touch this key to change the pattern position: (Refer to page 43) To use the Help function. The time taken to change the threads is not included in 1 to the color name (reference). (Refer to page 39.) ( It is not possible...
... not displayed on the screen). 4 Touch this key if you would like to change the pattern position, or if you would like to use the Help function: (Refer to page 54) 5 Touch this key to change the size of the pattern. (It is not possible to change the size of patterns... order of the color currently being sewn will be displayed. 8 Touch this key to change the pattern position: (Refer to page 43) To use the Help function. The time taken to change the threads is not included in 1 to the color name (reference). (Refer to page 39.) ( It is not possible...

Users Manual - English and Spanish
Page 57
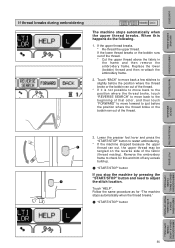
..." will be advanced in 9-stitch jumps starting from the 6th single stitch) 6 Touch this key to return to the previous screen and allow embroidery to "HELP". Touch "HELP", then the following screen options will appear 1 2 3 4 5 6 1 Touch this key to move back to the start position for a pattern. 2 Touch this key to move...
..." will be advanced in 9-stitch jumps starting from the 6th single stitch) 6 Touch this key to return to the previous screen and allow embroidery to "HELP". Touch "HELP", then the following screen options will appear 1 2 3 4 5 6 1 Touch this key to move back to the start position for a pattern. 2 Touch this key to move...
Users Manual - English and Spanish
Page 58
... or the bobbin runs out of the thread. * Cut the upper thread above the fabric in the frame and then remove the embroidery frame. Touch "HELP".
... or the bobbin runs out of the thread. * Cut the upper thread above the fabric in the frame and then remove the embroidery frame. Touch "HELP".
Users Manual - English and Spanish
Page 65
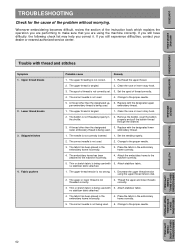
... has been placed in the embroidery frame correctly. 5. Attach stabilizer fabric. Set the needle properly. 2. If you still have difficulty, the following check list may help you still experience difficulties, contact your dealer or nearest authorized service center. The correct needle is not being used with 3. The upper thread tension is...
... has been placed in the embroidery frame correctly. 5. Attach stabilizer fabric. Set the needle properly. 2. If you still have difficulty, the following check list may help you still experience difficulties, contact your dealer or nearest authorized service center. The correct needle is not being used with 3. The upper thread tension is...
Users Manual - English and Spanish
Page 67
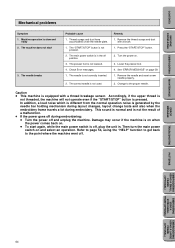
... the presser foot. 4. Damage may occur if the machine is on when the power comes back on page 59. 1. Refer to page 54, using the "HELP" function to get back to the proper needle. ERROR MESSAGE TROUBLESHOOTING PATTERNS EMBROIDERING USING A SMALL FRAME (OPTIONAL) EMBROIDERING USING A EXTRA-SMALL FRAME (OPTIONAL) EMBROIDERING USING...
... the presser foot. 4. Damage may occur if the machine is on when the power comes back on page 59. 1. Refer to page 54, using the "HELP" function to get back to the proper needle. ERROR MESSAGE TROUBLESHOOTING PATTERNS EMBROIDERING USING A SMALL FRAME (OPTIONAL) EMBROIDERING USING A EXTRA-SMALL FRAME (OPTIONAL) EMBROIDERING USING...


