
Users Manual - English
Page 2
...Do not pull or push fabric while stitching. "SAVE THESE INSTRUCTIONS" "This embroidery machine is required around the embroidery machine needle. 11. Return the embroidery machine to be left unattended while plugged in this embroidery machine if it has a damaged cord or plug, if it is not working properly...accessories recommended by pulling on cord. Never drop or insert any opening. 6. DANGER - Always unplug the embroidery machine from the electrical outlet when removing covers, lubricating, or when making any air openings blocked. Replace bulb with any adjustments in...
...Do not pull or push fabric while stitching. "SAVE THESE INSTRUCTIONS" "This embroidery machine is required around the embroidery machine needle. 11. Return the embroidery machine to be left unattended while plugged in this embroidery machine if it has a damaged cord or plug, if it is not working properly...accessories recommended by pulling on cord. Never drop or insert any opening. 6. DANGER - Always unplug the embroidery machine from the electrical outlet when removing covers, lubricating, or when making any air openings blocked. Replace bulb with any adjustments in...
Users Manual - English
Page 3
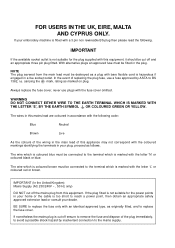
... lead are coloured in the plug. The wire which is marked with bare flexible cord is coloured brown must be destroyed as follows. If your embroidery machine is too short to BS 1362, i.e. The wires in this equipment, it should be connected to the mains supply. If the plug fitted is not...
... lead are coloured in the plug. The wire which is marked with bare flexible cord is coloured brown must be destroyed as follows. If your embroidery machine is too short to BS 1362, i.e. The wires in this equipment, it should be connected to the mains supply. If the plug fitted is not...

Users Manual - English
Page 4
...neutral soaps or detergents to change for improvement without notice. 1 For a longer service life 1. PLEASE READ BEFORE USING YOUR EMBROIDERY MACHINE For safe operation 1. Remember to turn off the power switch and unplug the cord when: ● Operation is complete ●.... For repair or adjustment In the event a malfunction occurs or adjustment is an advanced computerized home embroidery machine. CONGRATULATIONS ON CHOOSING OUR COMPUTER EMBROIDERY MACHINE Your machine is required, first follow the troubleshooting table in the card slot while your nearest authorized service center....
...neutral soaps or detergents to change for improvement without notice. 1 For a longer service life 1. PLEASE READ BEFORE USING YOUR EMBROIDERY MACHINE For safe operation 1. Remember to turn off the power switch and unplug the cord when: ● Operation is complete ●.... For repair or adjustment In the event a malfunction occurs or adjustment is an advanced computerized home embroidery machine. CONGRATULATIONS ON CHOOSING OUR COMPUTER EMBROIDERY MACHINE Your machine is required, first follow the troubleshooting table in the card slot while your nearest authorized service center....

Users Manual - English
Page 5
... 17 PREPARATION BEFORE EMBROIDERING 18 Attaching stabilizer material 18 Embroidering different types of fabric 18 Setting the fabric in the embroidery frame 20 Fitting the embroidery frame to the machine 22 Removing the embroidery frame ...... 22 THREAD TENSION ADJUSTMENT....... 23 ADJUSTING THE LCD SCREEN CONTRAST 24 If the LCD is hard to see when...
... 17 PREPARATION BEFORE EMBROIDERING 18 Attaching stabilizer material 18 Embroidering different types of fabric 18 Setting the fabric in the embroidery frame 20 Fitting the embroidery frame to the machine 22 Removing the embroidery frame ...... 22 THREAD TENSION ADJUSTMENT....... 23 ADJUSTING THE LCD SCREEN CONTRAST 24 If the LCD is hard to see when...
Users Manual - English
Page 6
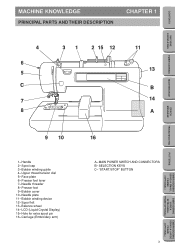
... lever 7- Spool felt 13- Spool cap 3- Carriage (Embroidery arm) 16 A- MAIN POWER SWITCH AND CONNECTORS B- "START/STOP" BUTTON EMBROIDERING USING A EXTRA-SMALL FRAME (OPTIONAL) EMBROIDERING USING A LARGE FRAME (OPTIONAL) 3 Needle threader 8- Bobbin cover 10- Hole for extra spool pin 16- CONTENTS MACHINE KNOWLEDGE EMBROIDERING MAINTENANCE MACHINE KNOWLEDGE PRINCIPAL PARTS AND THEIR DESCRIPTION CHAPTER...
... lever 7- Spool felt 13- Spool cap 3- Carriage (Embroidery arm) 16 A- MAIN POWER SWITCH AND CONNECTORS B- "START/STOP" BUTTON EMBROIDERING USING A EXTRA-SMALL FRAME (OPTIONAL) EMBROIDERING USING A LARGE FRAME (OPTIONAL) 3 Needle threader 8- Bobbin cover 10- Hole for extra spool pin 16- CONTENTS MACHINE KNOWLEDGE EMBROIDERING MAINTENANCE MACHINE KNOWLEDGE PRINCIPAL PARTS AND THEIR DESCRIPTION CHAPTER...

Users Manual - English
Page 7
... plug in a polarized outlet only one blade wider than the other). To reduce the risk of the machine must have the plug removed from the socket-outlet. - When leaving the embroidery machine unattended, the main switch of electric shock, this plug is intended to install the proper outlet. If... the plug does not fit fully in the outlet, contact a qualified electrician to fit in any way. When servicing the sewing machine, or when removing covers ...
... plug in a polarized outlet only one blade wider than the other). To reduce the risk of the machine must have the plug removed from the socket-outlet. - When leaving the embroidery machine unattended, the main switch of electric shock, this plug is intended to install the proper outlet. If... the plug does not fit fully in the outlet, contact a qualified electrician to fit in any way. When servicing the sewing machine, or when removing covers ...
Users Manual - English
Page 8
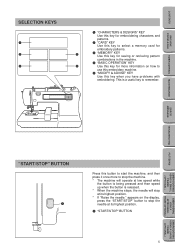
... speed up when the button is a useful key to remember. appears on how to use this embroidery machine. 5 "MODIFY & ADVISE" KEY Use this button to start the machine, and then press it once more to stop the machine. * The machine will stop at its highest position. 1 "START/STOP" BUTTON 5 EMBROIDERING USING A LARGE FRAME (OPTIONAL) EMBROIDERING...
... speed up when the button is a useful key to remember. appears on how to use this embroidery machine. 5 "MODIFY & ADVISE" KEY Use this button to start the machine, and then press it once more to stop the machine. * The machine will stop at its highest position. 1 "START/STOP" BUTTON 5 EMBROIDERING USING A LARGE FRAME (OPTIONAL) EMBROIDERING...
Users Manual - English
Page 9
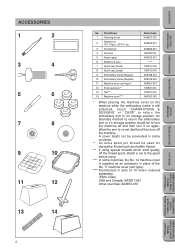
... 4 Scissors 5 Seam ripper 6 Bobbins (4 pcs) 7 Spool cap (Small) 8 Spool cap (Large) 9 Embroidery sheet (Regular) 10 Embroidery frame (Regular) 11 Machine cover (soft type)* 12 Extra spool pin** 13 Net*** 14 Machine cover**** Parts Code XA4527-001 X59535-001 X53666-001 184783-001 X54243-001 ***** 130013-003 130012-003... X58739-003 X59351-001 130920-051 127610-000 XA0181-051 * When placing the machine cover on the machine while the embroidery frame is supplied as an accessory in place of the No. 11 machine cover (soft type). ***** Distributed in sets of 10 when ordered separately. (...
... 4 Scissors 5 Seam ripper 6 Bobbins (4 pcs) 7 Spool cap (Small) 8 Spool cap (Large) 9 Embroidery sheet (Regular) 10 Embroidery frame (Regular) 11 Machine cover (soft type)* 12 Extra spool pin** 13 Net*** 14 Machine cover**** Parts Code XA4527-001 X59535-001 X53666-001 184783-001 X54243-001 ***** 130013-003 130012-003... X58739-003 X59351-001 130920-051 127610-000 XA0181-051 * When placing the machine cover on the machine while the embroidery frame is supplied as an accessory in place of the No. 11 machine cover (soft type). ***** Distributed in sets of 10 when ordered separately. (...

Users Manual - English
Page 10
... (Regular) SA417 XA3727-001 2 Embroidery set (Large) SA418 XA3733-001 3 Embroidery set (Small) SA416 XA3730-001 4 Embroidery set (Extra-small) SA415 XA3713-001 5 Brother poly 40 color thread set SA740 X80928-100 6 Brother poly #90 bobbin thread EBT-PE X80919-001 7 Backing material (Stabilizer ...Designs SA320 XA2869-001 No. 21 Needlework SA321 XA2873-001 No. 25 Horse SA325 XA3791-001 WARNING Embroidery Cards purchased in foreign countries may not work with your machine. 7 EMBROIDERING USING A LARGE FRAME (OPTIONAL) EMBROIDERING USING A EXTRA-SMALL FRAME (OPTIONAL) EMBROIDERING ...
... (Regular) SA417 XA3727-001 2 Embroidery set (Large) SA418 XA3733-001 3 Embroidery set (Small) SA416 XA3730-001 4 Embroidery set (Extra-small) SA415 XA3713-001 5 Brother poly 40 color thread set SA740 X80928-100 6 Brother poly #90 bobbin thread EBT-PE X80919-001 7 Backing material (Stabilizer ...Designs SA320 XA2869-001 No. 21 Needlework SA321 XA2873-001 No. 25 Horse SA325 XA3791-001 WARNING Embroidery Cards purchased in foreign countries may not work with your machine. 7 EMBROIDERING USING A LARGE FRAME (OPTIONAL) EMBROIDERING USING A EXTRA-SMALL FRAME (OPTIONAL) EMBROIDERING ...
Users Manual - English
Page 18
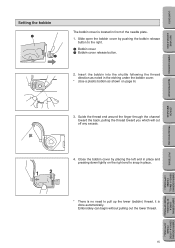
... you which will cut off any excess. Insert the bobbin into the shuttle following the thread direction as shown on page 6) EMBROIDERING MAINTENANCE ERROR MESSAGE 3. Embroidery can begin without pulling out the lower thread. 15 EMBROIDERING USING A LARGE FRAME (OPTIONAL) TROUBLESHOOTING PATTERNS EMBROIDERING USING A SMALL FRAME (OPTIONAL) EMBROIDERING USING A ... by pushing the bobbin release button to pull up the lower (bobbin) thread, it is located in front of the needle plate. 1. CONTENTS MACHINE KNOWLEDGE Setting the bobbin 1 2 The bobbin cover is done automatically.
... you which will cut off any excess. Insert the bobbin into the shuttle following the thread direction as shown on page 6) EMBROIDERING MAINTENANCE ERROR MESSAGE 3. Embroidery can begin without pulling out the lower thread. 15 EMBROIDERING USING A LARGE FRAME (OPTIONAL) TROUBLESHOOTING PATTERNS EMBROIDERING USING A SMALL FRAME (OPTIONAL) EMBROIDERING USING A ... by pushing the bobbin release button to pull up the lower (bobbin) thread, it is located in front of the needle plate. 1. CONTENTS MACHINE KNOWLEDGE Setting the bobbin 1 2 The bobbin cover is done automatically.
Users Manual - English
Page 21
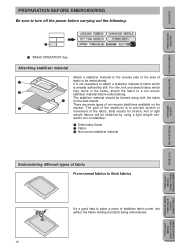
... to be obtained by using a light weight nonwoven iron-on the market. Best results for the best results. CONTENTS MACHINE KNOWLEDGE EMBROIDERING MAINTENANCE ERROR MESSAGE TROUBLESHOOTING PREPARATION BEFORE EMBROIDERING Be sure to turn off the power before embroidering. The stabilizer material...and stretch fabric which is to prevent stretch or movement of the fabric. The goal of non-woven stabilizers available on stabilizer. 1 Embroidery frame 2 Fabric 3 Non-woven stabilizer material Embroidering different types of fabric From normal fabrics to thick fabrics It's a good idea to...
... to be obtained by using a light weight nonwoven iron-on the market. Best results for the best results. CONTENTS MACHINE KNOWLEDGE EMBROIDERING MAINTENANCE ERROR MESSAGE TROUBLESHOOTING PREPARATION BEFORE EMBROIDERING Be sure to turn off the power before embroidering. The stabilizer material...and stretch fabric which is to prevent stretch or movement of the fabric. The goal of non-woven stabilizers available on stabilizer. 1 Embroidery frame 2 Fabric 3 Non-woven stabilizer material Embroidering different types of fabric From normal fabrics to thick fabrics It's a good idea to...
Users Manual - English
Page 23
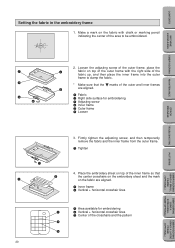
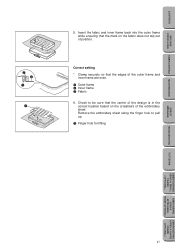
...then temporarily remove the fabric and the inner frame from the outer frame. 1 Tighten 4. CONTENTS MACHINE KNOWLEDGE EMBROIDERING MAINTENANCE ERROR MESSAGE TROUBLESHOOTING Setting the fabric in the embroidery frame 1. Make a mark on the fabric with the right side of the fabric up, and ...2 Vertical + horizontal crosshair lines 1 Area available for embroidering 3 Adjusting screw 4 Inner frame 5 Outer frame 6 Loosen 3. Place the embroidery sheet on top of the outer frame with chalk or marking pencil indicating the center of the crosshairs and the pattern 20 PATTERNS EMBROIDERING USING...
...then temporarily remove the fabric and the inner frame from the outer frame. 1 Tighten 4. CONTENTS MACHINE KNOWLEDGE EMBROIDERING MAINTENANCE ERROR MESSAGE TROUBLESHOOTING Setting the fabric in the embroidery frame 1. Make a mark on the fabric with the right side of the fabric up, and ...2 Vertical + horizontal crosshair lines 1 Area available for embroidering 3 Adjusting screw 4 Inner frame 5 Outer frame 6 Loosen 3. Place the embroidery sheet on top of the outer frame with chalk or marking pencil indicating the center of the crosshairs and the pattern 20 PATTERNS EMBROIDERING USING...
Users Manual - English
Page 24
... be sure that the center of the design is in the correct location based on the fabric does not slip out of the embroidery sheet. Check to pull up. 1 Finger hole for lifting 21 PATTERNS EMBROIDERING USING A SMALL FRAME (OPTIONAL) EMBROIDERING USING A ...EXTRA-SMALL FRAME (OPTIONAL) EMBROIDERING USING A LARGE FRAME (OPTIONAL) CONTENTS MACHINE KNOWLEDGE EMBROIDERING MAINTENANCE ERROR MESSAGE TROUBLESHOOTING 5. Insert the fabric and inner frame back into the outer frame while ensuring that the edges of ...
... be sure that the center of the design is in the correct location based on the fabric does not slip out of the embroidery sheet. Check to pull up. 1 Finger hole for lifting 21 PATTERNS EMBROIDERING USING A SMALL FRAME (OPTIONAL) EMBROIDERING USING A ...EXTRA-SMALL FRAME (OPTIONAL) EMBROIDERING USING A LARGE FRAME (OPTIONAL) CONTENTS MACHINE KNOWLEDGE EMBROIDERING MAINTENANCE ERROR MESSAGE TROUBLESHOOTING 5. Insert the fabric and inner frame back into the outer frame while ensuring that the edges of ...
Users Manual - English
Page 25
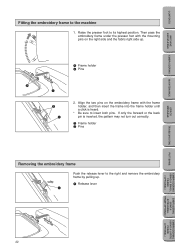
... fabric right side up . 1 Release lever 22 PATTERNS EMBROIDERING USING A SMALL FRAME (OPTIONAL) EMBROIDERING USING A EXTRA-SMALL FRAME (OPTIONAL) EMBROIDERING USING A LARGE FRAME (OPTIONAL) CONTENTS MACHINE KNOWLEDGE EMBROIDERING MAINTENANCE ERROR MESSAGE TROUBLESHOOTING Fitting the embroidery frame to its highest position. Raise the presser foot to the...
... fabric right side up . 1 Release lever 22 PATTERNS EMBROIDERING USING A SMALL FRAME (OPTIONAL) EMBROIDERING USING A EXTRA-SMALL FRAME (OPTIONAL) EMBROIDERING USING A LARGE FRAME (OPTIONAL) CONTENTS MACHINE KNOWLEDGE EMBROIDERING MAINTENANCE ERROR MESSAGE TROUBLESHOOTING Fitting the embroidery frame to its highest position. Raise the presser foot to the...
Users Manual - English
Page 26
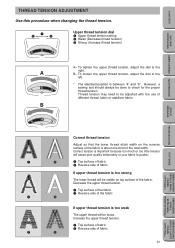
... fabric If upper thread tension is too weak The upper thread will cause poor quality embroidery or your fabric to the left. * The standard position is about one-third of the fabric is between "4" and "6". CONTENTS MACHINE KNOWLEDGE EMBROIDERING MAINTENANCE THREAD TENSION ADJUSTMENT Use this procedure when changing the thread tension. However...
... fabric If upper thread tension is too weak The upper thread will cause poor quality embroidery or your fabric to the left. * The standard position is about one-third of the fabric is between "4" and "6". CONTENTS MACHINE KNOWLEDGE EMBROIDERING MAINTENANCE THREAD TENSION ADJUSTMENT Use this procedure when changing the thread tension. However...

Owner's Manual (Español) - Spanish
Page 2
... outlet immediately after using and before changing the light bulb. Do not pull or push fabric while stitching. The embroidery machine should always be used or where oxygen is being used as contained in the instruction manual. To reduce the risk...fire, electric shock, or injury to persons. 1. Always unplug the embroidery machine from outlet. 9. "IMPORTANT SAFETY INSTRUCTIONS" When using a embroidery machine, basic safety precautions should never be left unattended while plugged in this embroidery machine to be taken, including the following: "Read all moving parts. ...
... outlet immediately after using and before changing the light bulb. Do not pull or push fabric while stitching. The embroidery machine should always be used or where oxygen is being used as contained in the instruction manual. To reduce the risk...fire, electric shock, or injury to persons. 1. Always unplug the embroidery machine from outlet. 9. "IMPORTANT SAFETY INSTRUCTIONS" When using a embroidery machine, basic safety precautions should never be left unattended while plugged in this embroidery machine to be taken, including the following: "Read all moving parts. ...

Owner's Manual (Español) - Spanish
Page 3
... equipment. The wire which is coloured blue must be connected to reach a power point, then obtain an appropriate safely approved extension lead or consult your embroidery machine is fitted with the coloured markings identifying the terminals in a live socket outlet. Always replace the fuse cover, never use a fuse approved by inadvertent connection...
... equipment. The wire which is coloured blue must be connected to reach a power point, then obtain an appropriate safely approved extension lead or consult your embroidery machine is fitted with the coloured markings identifying the terminals in a live socket outlet. Always replace the fuse cover, never use a fuse approved by inadvertent connection...

Owner's Manual (Español) - Spanish
Page 4
... any other parts to inspect and adjust the machine yourself. For a longer service life 1. CONGRATULATIONS ON CHOOSING OUR COMPUTER EMBROIDERY MACHINE Your machine is required, first follow the troubleshooting table in the card slot while your machine turns on the needle while sewing. Do not... direct sunlight and high humidity locations. Remember to turn off the main power switch when inserting and removing the embroidery card. When storing your embroidery machine beside a space heater, iron, or other moving parts. 2. Always consult the operation manual or use extension cords....
... any other parts to inspect and adjust the machine yourself. For a longer service life 1. CONGRATULATIONS ON CHOOSING OUR COMPUTER EMBROIDERY MACHINE Your machine is required, first follow the troubleshooting table in the card slot while your machine turns on the needle while sewing. Do not... direct sunlight and high humidity locations. Remember to turn off the main power switch when inserting and removing the embroidery card. When storing your embroidery machine beside a space heater, iron, or other moving parts. 2. Always consult the operation manual or use extension cords....

Owner's Manual (Español) - Spanish
Page 7
... be switched off and the plug removed from the socket-outlet. - only This appliance has a polarized plug (one way. When leaving the embroidery machine unattended, the main switch of electric shock, this plug is intended to install the proper outlet. If the plug does not fit fully in the ...
... be switched off and the plug removed from the socket-outlet. - only This appliance has a polarized plug (one way. When leaving the embroidery machine unattended, the main switch of electric shock, this plug is intended to install the proper outlet. If the plug does not fit fully in the ...

Owner's Manual (Español) - Spanish
Page 8
... retrieving pattern combinations in the machine. 4 "BASIC OPERATION" KEY 5 Use this key for more information on the display, press the "START/STOP" button to remember. appears on how to use this embroidery machine. 5 "MODIFY & ADVISE" KEY Use this button to start the machine, and then press it once... more to stop the machine. * The machine will operate at low speed while the button is being pressed and then speed...
... retrieving pattern combinations in the machine. 4 "BASIC OPERATION" KEY 5 Use this key for more information on the display, press the "START/STOP" button to remember. appears on how to use this embroidery machine. 5 "MODIFY & ADVISE" KEY Use this button to start the machine, and then press it once... more to stop the machine. * The machine will operate at low speed while the button is being pressed and then speed...


