

Users Manual - English
Page 30
... and then attach the frame to the machine. (See page 20 - 22) 1 Carriage (embroidery arm) 2 Embroidery frame NOTE Do not push down position 4. The ... lever down the carriage too hard as not to move the carriage sideways. * It is easier to start the machine. 1 "START/STOP" button 27 PATTERNS EMBROIDERING USING A SMALL FRAME (OPTIONAL) EMBROIDERING USING A EXTRA-SMALL FRAME... A LARGE FRAME (OPTIONAL) Lower the presser foot lever and press the "START/STOP" button to move the embroidery frame under the presser foot if the presser foot lever is turned on the power. Turn on . 5. Select...
... and then attach the frame to the machine. (See page 20 - 22) 1 Carriage (embroidery arm) 2 Embroidery frame NOTE Do not push down position 4. The ... lever down the carriage too hard as not to move the carriage sideways. * It is easier to start the machine. 1 "START/STOP" button 27 PATTERNS EMBROIDERING USING A SMALL FRAME (OPTIONAL) EMBROIDERING USING A EXTRA-SMALL FRAME... A LARGE FRAME (OPTIONAL) Lower the presser foot lever and press the "START/STOP" button to move the embroidery frame under the presser foot if the presser foot lever is turned on the power. Turn on . 5. Select...
Users Manual - English
Page 55
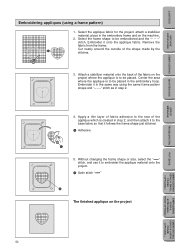
... Cut neatly around the outside of the applique which is to be placed in the embroidery hoop. Select the applique fabric for the project, attach a stabilizer material, place in the embroidery frame and on the machine. 2. Select the frame shape to be embroidered and the "- - -" stitch. ... where the applique is created in step 2, and then attach it to the rear of the shape made by the stitches. 3. CONTENTS MACHINE KNOWLEDGE EMBROIDERING MAINTENANCE ERROR MESSAGE TROUBLESHOOTING Embroidering appliques (using the same frame pattern shape and "- - -" stitch as in step 2. 4. ...
... Cut neatly around the outside of the applique which is to be placed in the embroidery hoop. Select the applique fabric for the project, attach a stabilizer material, place in the embroidery frame and on the machine. 2. Select the frame shape to be embroidered and the "- - -" stitch. ... where the applique is created in step 2, and then attach it to the rear of the shape made by the stitches. 3. CONTENTS MACHINE KNOWLEDGE EMBROIDERING MAINTENANCE ERROR MESSAGE TROUBLESHOOTING Embroidering appliques (using the same frame pattern shape and "- - -" stitch as in step 2. 4. ...


