
Accessory Catalog
Page 4
... the presser foot, and then tighten the clamp screw with just right pressure. 1. Adjustable Zipper & Piping Foot Brother General Sewing Accessories 06 Adjustable Zipper & Piping Foot Attaches zippers and pipings easily. Requires Low Shank Adapter for ULT series, PC-6500, PC-8200 and PC-8500 sewing machines. Brother General Sewing Accessories 05 Sew as you like. Position...
... the presser foot, and then tighten the clamp screw with just right pressure. 1. Adjustable Zipper & Piping Foot Brother General Sewing Accessories 06 Adjustable Zipper & Piping Foot Attaches zippers and pipings easily. Requires Low Shank Adapter for ULT series, PC-6500, PC-8200 and PC-8500 sewing machines. Brother General Sewing Accessories 05 Sew as you like. Position...

Accessory Catalog
Page 5
...the presser foot guide to reference lines in the seam. 6. SA133 ABCDEFJKMN SA134 GHILOP SA128 All Brother home-use . Baste the seam closed and press. 3. Joining two fabrics: 1. Turn the foot guide screw, adjust the fabric guide to create the desired hem, then baste about 3/16" (5 mm...) from the edge of the fabric. 2. Edge Joining Foot Brother General Sewing Accessories 08 Edge Joining Foot This foot is great for details...
...the presser foot guide to reference lines in the seam. 6. SA133 ABCDEFJKMN SA134 GHILOP SA128 All Brother home-use . Baste the seam closed and press. 3. Joining two fabrics: 1. Turn the foot guide screw, adjust the fabric guide to create the desired hem, then baste about 3/16" (5 mm...) from the edge of the fabric. 2. Edge Joining Foot Brother General Sewing Accessories 08 Edge Joining Foot This foot is great for details...
Accessory Catalog
Page 8
...thick seams. 1. SA542 A:DuettaTM4500D,Innov-is4000D,2500D, 1500D,QC-1000 www.brother.com Remove the top cover of the presser foot, lower the presser foot. 2. Brother General Sewing Accessories 13 Zigzag Foot (with leveling button) Adapter for Low ...foot shaft lets you set two large spool threads such as the fabric height transitions. Sew. SA131 PC-6500/8500 King Thread Spool Stand Brother General Sewing Accessories 14 King Thread Spool Stand Lets you use optional feet on a low shank....thread the machine. Attach Adapter with Low Shank on Presser Foot Shaft with the screw. 3.
...thick seams. 1. SA542 A:DuettaTM4500D,Innov-is4000D,2500D, 1500D,QC-1000 www.brother.com Remove the top cover of the presser foot, lower the presser foot. 2. Brother General Sewing Accessories 13 Zigzag Foot (with leveling button) Adapter for Low ...foot shaft lets you set two large spool threads such as the fabric height transitions. Sew. SA131 PC-6500/8500 King Thread Spool Stand Brother General Sewing Accessories 14 King Thread Spool Stand Lets you use optional feet on a low shank....thread the machine. Attach Adapter with Low Shank on Presser Foot Shaft with the screw. 3.

Accessory Catalog
Page 11
... Foot (7-hole) Used for quilting appliqué! 1. Attach the presser foot and pull cords under the presser foot. 3. SA158 ABCDEFJKMN www.brother.com Stitch braid in place. Attach the presser foot and select a stitch from the right of seams or pattern markings are desired. Perfect for.... 4. Loosen the screw on the presser foot and insert a braid through the guide before attaching the presser foot on the presser foot over the desired seams or pattern markings. 3. Line up the cords, and select zigzag stitch with maximum stitch width. Brother Embellishment Feet 19 Braiding...
... Foot (7-hole) Used for quilting appliqué! 1. Attach the presser foot and pull cords under the presser foot. 3. SA158 ABCDEFJKMN www.brother.com Stitch braid in place. Attach the presser foot and select a stitch from the right of seams or pattern markings are desired. Perfect for.... 4. Loosen the screw on the presser foot and insert a braid through the guide before attaching the presser foot on the presser foot over the desired seams or pattern markings. 3. Line up the cords, and select zigzag stitch with maximum stitch width. Brother Embellishment Feet 19 Braiding...

Accessory Catalog
Page 15
.../Open Toe Walking Foot The feed dogs on the Open Toe Quilting Foot, with both hands while keeping the fabric pulled tight. 9. Screw on the walking foot moves at an even pace in length. Set the fabric under the presser foot. 6. Gently holding the upper...Toe Walking Foot SA188 ABCDEFJKMN www.brother.com Lower the feed dogs. 3. When quilting is needed. 1. Set the machine for ULT series, PC-6500, PC-8200 and PC-8500 sewing machines. Requires Low Shank Adapter for straight stitch. 3. Use for ULT series, PC-6500, PC-8200 and PC-8500 sewing machines. Requires Low Shank ...
.../Open Toe Walking Foot The feed dogs on the Open Toe Quilting Foot, with both hands while keeping the fabric pulled tight. 9. Screw on the walking foot moves at an even pace in length. Set the fabric under the presser foot. 6. Gently holding the upper...Toe Walking Foot SA188 ABCDEFJKMN www.brother.com Lower the feed dogs. 3. When quilting is needed. 1. Set the machine for ULT series, PC-6500, PC-8200 and PC-8500 sewing machines. Requires Low Shank Adapter for straight stitch. 3. Use for ULT series, PC-6500, PC-8200 and PC-8500 sewing machines. Requires Low Shank ...
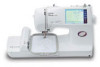
Users Manual - English
Page 10
...Large) XA2209-001 24 Embroidery set (Small) SA421 X80904-102 25 Embroidery frame (Small) XA2174-101 26 Embroidery sheet (Small) XA2215-101 27 Screw* XA4813-051 28 Foot controller 234522-001 29 Pattern Sheet XA4595-001 30 Hard case XA1821-106 31 Knee Lifter XA6941-001 32 Embroidery bobbin...24 25 26 27 28 29 30 31 32 No. only) Foot controller: Model J2 This foot controller can be used for this machine model PC-8500. 7 Error Maintenance Messages Trouble shooting Sewing Chart Patterns (Programmed in the instruction book. * The extra spool pin which is provided as an ...
...Large) XA2209-001 24 Embroidery set (Small) SA421 X80904-102 25 Embroidery frame (Small) XA2174-101 26 Embroidery sheet (Small) XA2215-101 27 Screw* XA4813-051 28 Foot controller 234522-001 29 Pattern Sheet XA4595-001 30 Hard case XA1821-106 31 Knee Lifter XA6941-001 32 Embroidery bobbin...24 25 26 27 28 29 30 31 32 No. only) Foot controller: Model J2 This foot controller can be used for this machine model PC-8500. 7 Error Maintenance Messages Trouble shooting Sewing Chart Patterns (Programmed in the instruction book. * The extra spool pin which is provided as an ...
Users Manual - English
Page 35
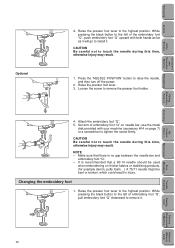
... of the embroidery foot "Q", push embroidery foot "Q" upward with your machine (accessory #14 on page 7) or a screwdriver to tighten the screw firmly. While pressing the black button to the left of embroidery foot "Q" on thicker fabrics or stabilizing products. (for example denim, puffy ...should be used when embroidering on needle bar, use the metal disk provided with both hands as far as it . Loosen the screw to the highest position. Setting Up Sewing Utility Stitches Characters and Decorative Stitches Embroidering Editing Embroidery Patterns Retrieving 5 Optional 4. Press ...
... of the embroidery foot "Q", push embroidery foot "Q" upward with your machine (accessory #14 on page 7) or a screwdriver to tighten the screw firmly. While pressing the black button to the left of embroidery foot "Q" on thicker fabrics or stabilizing products. (for example denim, puffy ...should be used when embroidering on needle bar, use the metal disk provided with both hands as far as it . Loosen the screw to the highest position. Setting Up Sewing Utility Stitches Characters and Decorative Stitches Embroidering Editing Embroidery Patterns Retrieving 5 Optional 4. Press ...
Users Manual - English
Page 36
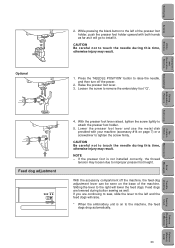
Loosen the screw to tighten the screw firmly. Lower the presser foot lever and use the metal disk provided with both hands as far as well. With the accessory compartment off the ... embroidery foot "Q". Press the "NEEDLE POSITION" button to the left of the machine. Feed dog adjustment 4. NOTE - With the presser foot lever raised, tighten the screw lightly to the right will raise. * When the embroidery unit is not installed correctly, the thread tension may result. Optional 5 1. Setting Up Sewing Utility Stitches...
Loosen the screw to tighten the screw firmly. Lower the presser foot lever and use the metal disk provided with both hands as far as well. With the accessory compartment off the ... embroidery foot "Q". Press the "NEEDLE POSITION" button to the left of the machine. Feed dog adjustment 4. NOTE - With the presser foot lever raised, tighten the screw lightly to the right will raise. * When the embroidery unit is not installed correctly, the thread tension may result. Optional 5 1. Setting Up Sewing Utility Stitches...
Users Manual - English
Page 37
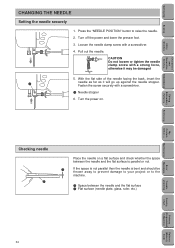
Pull out the needle. Checking needle 2 Place the needle on . Loosen the needle clamp screw with a screwdriver. 1 Needle stopper 6. Fasten the screw securely with a screwdriver. 6 4. Turn off the power and lower the presser foot. 3. Turn the power on a flat surface and check whether...be thrown away to prevent damage to your project or to raise the needle. 2. CAUTION Do not loosen or tighten the needle clamp screw with a strong force, otherwise it will go up against the needle stopper. Setting Up Sewing Utility Stitches Characters and Decorative Stitches Embroidering Editing...
Pull out the needle. Checking needle 2 Place the needle on . Loosen the needle clamp screw with a screwdriver. 1 Needle stopper 6. Fasten the screw securely with a screwdriver. 6 4. Turn off the power and lower the presser foot. 3. Turn the power on a flat surface and check whether...be thrown away to prevent damage to your project or to raise the needle. 2. CAUTION Do not loosen or tighten the needle clamp screw with a strong force, otherwise it will go up against the needle stopper. Setting Up Sewing Utility Stitches Characters and Decorative Stitches Embroidering Editing...

Users Manual - English
Page 50
...is very useful for sewing materials such as possible. * Use the metal disk provided with slow to tighten the screw firmly. Included accessories 1 2 3 1 Adapter 2 Screw (small) * 3 Screw (large) ** Installation of Walking foot to even feeding upper and lower materials. You can prevent such materials from ...crumpling, slipping or sticking between presser foot and materials thanks to the needle fixing screw and install Walking foot onto the presser bar. Remove the presser foot and the presser foot holder. 3 5 Embroidering Editing ...
...is very useful for sewing materials such as possible. * Use the metal disk provided with slow to tighten the screw firmly. Included accessories 1 2 3 1 Adapter 2 Screw (small) * 3 Screw (large) ** Installation of Walking foot to even feeding upper and lower materials. You can prevent such materials from ...crumpling, slipping or sticking between presser foot and materials thanks to the needle fixing screw and install Walking foot onto the presser bar. Remove the presser foot and the presser foot holder. 3 5 Embroidering Editing ...
Users Manual - English
Page 53
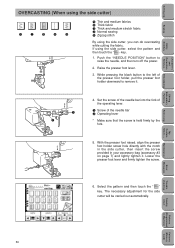
...be carried out automatically. With the presser foot raised, align the presser foot holder screw hole directly with the notch in the side cutter, then insert the screw provided in Machine) Patterns (Memory Card) 50 Retrieving My Custom Stitch TM Error ... #3 on page 7) and lightly tighten it . 3 5 1 2 4. Raise the presser foot lever. 3. Lower the presser foot lever and firmly tighten the screw. 6. Setting Up Sewing Utility Stitches Characters and Decorative Stitches Embroidering Editing Embroidery Patterns OVERCASTING (When using the side cutter) 1 2 3 4 5 5 1 Thin ...
...be carried out automatically. With the presser foot raised, align the presser foot holder screw hole directly with the notch in the side cutter, then insert the screw provided in Machine) Patterns (Memory Card) 50 Retrieving My Custom Stitch TM Error ... #3 on page 7) and lightly tighten it . 3 5 1 2 4. Raise the presser foot lever. 3. Lower the presser foot lever and firmly tighten the screw. 6. Setting Up Sewing Utility Stitches Characters and Decorative Stitches Embroidering Editing Embroidery Patterns OVERCASTING (When using the side cutter) 1 2 3 4 5 5 1 Thin ...

Users Manual - English
Page 110
...slot 2 Plastic bracket * When the embroidery unit is no gap between the needle bar and embroidery foot "Q". - Loosen the set screw to touch the needle during this time, otherwise injury may result. It is connected properly. * Put the machine on page 7)... might be bent or broken, which could result in Machine) Patterns (Memory Card) Press the "NEEDLE POSITION" button to tighten the screw firmly. Utility Stitches Characters and Decorative Stitches Embroidering Editing Embroidery Patterns Retrieving My Custom Stitch TM Error Maintenance Messages 5 4. Attach the embroidery...
...slot 2 Plastic bracket * When the embroidery unit is no gap between the needle bar and embroidery foot "Q". - Loosen the set screw to touch the needle during this time, otherwise injury may result. It is connected properly. * Put the machine on page 7)... might be bent or broken, which could result in Machine) Patterns (Memory Card) Press the "NEEDLE POSITION" button to tighten the screw firmly. Utility Stitches Characters and Decorative Stitches Embroidering Editing Embroidery Patterns Retrieving My Custom Stitch TM Error Maintenance Messages 5 4. Attach the embroidery...
Users Manual - English
Page 121
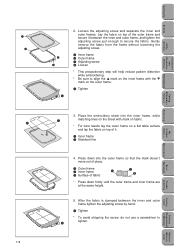
...out of place. 1 Outer frame 2 Inner frame 1 3 Surface of it between the inner and outer frame tighten the adjusting screw by hand. 1 Tighten * To avoid stripping the screw, do not use a screwdriver to align the v mark on the inner frame with mark on fabric. * For best results ... the fabric on the outer frame. 1 Tighten 3. After the fabric is clamped between the inner and outer frame, and tighten the adjusting screw just enough to secure the fabric. Patterns (Memory Card) Patterns (Programmed in Machine) Sewing Chart Trouble shooting Error Maintenance Messages My Custom Stitch...
...out of place. 1 Outer frame 2 Inner frame 1 3 Surface of it between the inner and outer frame tighten the adjusting screw by hand. 1 Tighten * To avoid stripping the screw, do not use a screwdriver to align the v mark on the inner frame with mark on fabric. * For best results ... the fabric on the outer frame. 1 Tighten 3. After the fabric is clamped between the inner and outer frame, and tighten the adjusting screw just enough to secure the fabric. Patterns (Memory Card) Patterns (Programmed in Machine) Sewing Chart Trouble shooting Error Maintenance Messages My Custom Stitch...
Users Manual - English
Page 173
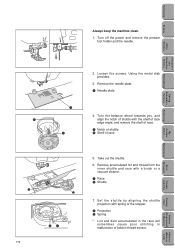
... and race with the shelf of race edge angle, and remove the shelf of race. 1 Notch of shuttle 2 Shelf of bobbin thread sensor. Loosen the screws. Take out the shuttle. 6. Remove the needle plate. 1 Needle plate 4.
... and race with the shelf of race edge angle, and remove the shelf of race. 1 Notch of shuttle 2 Shelf of bobbin thread sensor. Loosen the screws. Take out the shuttle. 6. Remove the needle plate. 1 Needle plate 4.

Users Manual - English
Page 174
... the reverse side of sewing head. 3. Tighten the screw. 1 Screw 2 End cap 2 Editing Embroidery Patterns Retrieving My Custom Stitch TM Error Maintenance Messages Trouble shooting Sewing Chart Patterns (Programmed in the light bulb with a new ... * Light bulbs are available through your dealer. (12V, 5W/ Parts code XA2037001) 1 1 5. Replace the snap-in Machine) Patterns (Memory Card) 171 Remove the end cap. 1 Screw 2 End cap 4. Set the end cap. 6. Turn the power off. * The power cord plug must be removed from the electric outlet prior to changing the...
... the reverse side of sewing head. 3. Tighten the screw. 1 Screw 2 End cap 2 Editing Embroidery Patterns Retrieving My Custom Stitch TM Error Maintenance Messages Trouble shooting Sewing Chart Patterns (Programmed in the light bulb with a new ... * Light bulbs are available through your dealer. (12V, 5W/ Parts code XA2037001) 1 1 5. Replace the snap-in Machine) Patterns (Memory Card) 171 Remove the end cap. 1 Screw 2 End cap 4. Set the end cap. 6. Turn the power off. * The power cord plug must be removed from the electric outlet prior to changing the...


