

Users Manual - English
Page 2
Always unplug before using." Replace bulb with any adjustments in the needle area, such as contained in this manual. 3. WARNING To reduce the risk of burns, fire, electric shock, or injury to the symbol "0" position when making any opening. 6....any of electric shock. 1. DANGER To reduce the risk of the user servicing adjustments mentioned in the instruction manual. Never drop or insert any object into water. Never operate this manual. "IMPORTANT SAFETY INSTRUCTIONS" When using the sewing machine, basic safety precautions should never be followed, including the...
Always unplug before using." Replace bulb with any adjustments in the needle area, such as contained in this manual. 3. WARNING To reduce the risk of burns, fire, electric shock, or injury to the symbol "0" position when making any opening. 6....any of electric shock. 1. DANGER To reduce the risk of the user servicing adjustments mentioned in the instruction manual. Never drop or insert any object into water. Never operate this manual. "IMPORTANT SAFETY INSTRUCTIONS" When using the sewing machine, basic safety precautions should never be followed, including the...
Users Manual - English
Page 3
...COMPUTER SEWING MACHINE CONTENTS CHAPTER 1 Your machine is Sewing curve 30 required, first follow the troubleshooting table in the back of the operation manual to inspect and ad- SETTING UP To fully enjoy all the features incorporated, howev- 3 er, we suggest that you can select from... consult your sewing machine, avoid direct sunlight and high humidity locations. Plug the machine directly into the wall. Always consult the operation manual when replacing or installing any THREAD TENSION 16 other parts to turn off the power switch and unplug the cord when: • ...
...COMPUTER SEWING MACHINE CONTENTS CHAPTER 1 Your machine is Sewing curve 30 required, first follow the troubleshooting table in the back of the operation manual to inspect and ad- SETTING UP To fully enjoy all the features incorporated, howev- 3 er, we suggest that you can select from... consult your sewing machine, avoid direct sunlight and high humidity locations. Plug the machine directly into the wall. Always consult the operation manual when replacing or installing any THREAD TENSION 16 other parts to turn off the power switch and unplug the cord when: • ...

Users Manual - English
Page 17
Quick adjustment reference chart for stitch width and stitch length STITCH Straight (Left) Straight (Middle) Zigzag WV Overcasting AA. AAA Buttonhole =, CD Applique Faggoting Patchwork Elastic zigzag Stretch stitching Blind stitch Bar tacking M LEE %'toAt,% A ,i v V : E E2 a C AIV W \ / "V --. \ 'AveAAAAAAA Scallop ENE N Darning Basting Lateral sewing (Straight) Lateral sewing (Zigzag) - - - -
Quick adjustment reference chart for stitch width and stitch length STITCH Straight (Left) Straight (Middle) Zigzag WV Overcasting AA. AAA Buttonhole =, CD Applique Faggoting Patchwork Elastic zigzag Stretch stitching Blind stitch Bar tacking M LEE %'toAt,% A ,i v V : E E2 a C AIV W \ / "V --. \ 'AveAAAAAAA Scallop ENE N Darning Basting Lateral sewing (Straight) Lateral sewing (Zigzag) - - - -

Users Manual - English
Page 18
... TENSION UTILITY STITCH BASIC SEWING CARD CHARACTER BASIC SEWING OPERATION MEMORY DECORATIVE SEWING STITCH STITCH APPLICATION ADJUSTMENT Use this procedure when changing upper thread tension manually. "S" (Strong) O Every touch tightens upper thread tension. "W" (Weak) O Every touch loosens upper thread tension. * Thread tension is automatically set at "AUTO" position normally. 16...
... TENSION UTILITY STITCH BASIC SEWING CARD CHARACTER BASIC SEWING OPERATION MEMORY DECORATIVE SEWING STITCH STITCH APPLICATION ADJUSTMENT Use this procedure when changing upper thread tension manually. "S" (Strong) O Every touch tightens upper thread tension. "W" (Weak) O Every touch loosens upper thread tension. * Thread tension is automatically set at "AUTO" position normally. 16...
Users Manual - English
Page 37
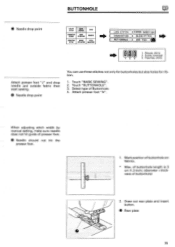
Select type of presser foot. @ Needle should not hit the presser foot. 1. When adjusting stitch width by manual setting, make sure needle does not hit guide of Buttonhole. 4. Max. Draw out rear plate and insert button. 0 Rear plate 35 Touch "BASIC SEWING". 2. Mark ...
Select type of presser foot. @ Needle should not hit the presser foot. 1. When adjusting stitch width by manual setting, make sure needle does not hit guide of Buttonhole. 4. Max. Draw out rear plate and insert button. 0 Rear plate 35 Touch "BASIC SEWING". 2. Mark ...

Users Manual - English
Page 82
Tips for neater sewing results Refer to page 72 "Tips for these stitches. * Enforce stitch at end of sewing manually and then cut at end of sewing and needle is positioned at the start and end of sewing. • Decorative, Satin and Cross stitches Automatic ...
Tips for neater sewing results Refer to page 72 "Tips for these stitches. * Enforce stitch at end of sewing manually and then cut at end of sewing and needle is positioned at the start and end of sewing. • Decorative, Satin and Cross stitches Automatic ...


