

Users Manual - English
Page 2
... Do not allow to the symbol "0" position when making any adjustments in the needle area, such as contained in . Use this sewing machine only for its intended use as a toy. Never drop or insert any object into water. Do not pull or push fabric while stitching. "...which represents off, then remove plug from the accumulation of burns, fire, electric shock, or injury to break. 12. Never operate the sewing machine with same type rated 15 watts. Keep ventilation openings of electric shock. 1. To disconnect, turn the main switch to the nearest authorized dealer or...
... Do not allow to the symbol "0" position when making any adjustments in the needle area, such as contained in . Use this sewing machine only for its intended use as a toy. Never drop or insert any object into water. Do not pull or push fabric while stitching. "...which represents off, then remove plug from the accumulation of burns, fire, electric shock, or injury to break. 12. Never operate the sewing machine with same type rated 15 watts. Keep ventilation openings of electric shock. 1. To disconnect, turn the main switch to the nearest authorized dealer or...
Users Manual - English
Page 3
...repair or adjustment Sewing corner 30 Sewing folded part 30 In the event a malfunction occurs or adjustment is the most advanced computerized home use sewing machine. CHAPTER 2 For a longer service life 1. Use only neutral soaps or detergents to inspect and ad- CHANGING LIGHT BULB 22 3. Benzene, ... FOOT 18 • A power failure occurs during use extension cords. If the problem persists, Free arm 31 please consult your sewing machine, avoid direct sunlight and high humidity locations. Be sure to keep your eye on the foot controller. Do not touch the pulley, ...
...repair or adjustment Sewing corner 30 Sewing folded part 30 In the event a malfunction occurs or adjustment is the most advanced computerized home use sewing machine. CHAPTER 2 For a longer service life 1. Use only neutral soaps or detergents to inspect and ad- CHANGING LIGHT BULB 22 3. Benzene, ... FOOT 18 • A power failure occurs during use extension cords. If the problem persists, Free arm 31 please consult your sewing machine, avoid direct sunlight and high humidity locations. Be sure to keep your eye on the foot controller. Do not touch the pulley, ...
Users Manual - English
Page 4
... Memorizing combined pattern Recalling pattern 100 100 100 101 SEWING CHART 1 102 ERROR MESSAGE I 105 TROUBLESHOOTING 110 FIRST NEEDLE DROP POINT 112 PATTERNS (PROGRAMMED IN MACHINE) 114 PATTERNS (MEMORY CARD) 116 2 EMBROIDERING 87 EMBROIDERY 87 PREPARATION BEFORE SEWING 89 Fitting embroidery unit 89 Inserting memory card 90 Set fabric to embroidery...
... Memorizing combined pattern Recalling pattern 100 100 100 101 SEWING CHART 1 102 ERROR MESSAGE I 105 TROUBLESHOOTING 110 FIRST NEEDLE DROP POINT 112 PATTERNS (PROGRAMMED IN MACHINE) 114 PATTERNS (MEMORY CARD) 116 2 EMBROIDERING 87 EMBROIDERY 87 PREPARATION BEFORE SEWING 89 Fitting embroidery unit 89 Inserting memory card 90 Set fabric to embroidery...

Users Manual - English
Page 5
O Controller jack Insert for foot controller operation. • Power code Connect machine to page 7) B- When servicing the sewing machine, or when removing covers or changing lamps, the machine or the electrical set must be removed from the socket-outlet 3 Selection key (Refer to power supply. - ...-Feed dog 11-Bobbin cover 12-Bobbin winder device 13-Pulley 14-Speed range control lever A- When leaving the sewing machine unattended, the mains switch of the machine must be switched off the sewing light. Accessories compartment O 4 C. Operation key (Refer to page 8) C- Main ...
O Controller jack Insert for foot controller operation. • Power code Connect machine to page 7) B- When servicing the sewing machine, or when removing covers or changing lamps, the machine or the electrical set must be removed from the socket-outlet 3 Selection key (Refer to power supply. - ...-Feed dog 11-Bobbin cover 12-Bobbin winder device 13-Pulley 14-Speed range control lever A- When leaving the sewing machine unattended, the mains switch of the machine must be switched off the sewing light. Accessories compartment O 4 C. Operation key (Refer to page 8) C- Main ...

Users Manual - English
Page 7
Chalk pen 3- Bobbins (4 pcs) 8- Embroidery thread set 75/11: 2 pcs 90/14: 2 pcs 14 Golden needle (for this machine. ** Each symbol is indicated on each presser foot. T Presser foot symbol 1- Spool cap (Small) 9- Memory card...Seam ripper • Screw driver (Small) 6 Stitch guide foot "P" * Always use plastic bobbin supplied with machine or in accessories compartment. (Parts code : X80309-001) * Always use exclusive accessories for stretchable materials): 2 pcs 2- Cleaning brush 5- Spool cap (Large) OPTIONS 1 111111141 3 4 • 10-Embroidery unit 11-Embroidery...
Chalk pen 3- Bobbins (4 pcs) 8- Embroidery thread set 75/11: 2 pcs 90/14: 2 pcs 14 Golden needle (for this machine. ** Each symbol is indicated on each presser foot. T Presser foot symbol 1- Spool cap (Small) 9- Memory card...Seam ripper • Screw driver (Small) 6 Stitch guide foot "P" * Always use plastic bobbin supplied with machine or in accessories compartment. (Parts code : X80309-001) * Always use exclusive accessories for stretchable materials): 2 pcs 2- Cleaning brush 5- Spool cap (Large) OPTIONS 1 111111141 3 4 • 10-Embroidery unit 11-Embroidery...

Users Manual - English
Page 8
Touch "SELECTION KEY". * Most of the instructions are memorized in the machine's memory. t 6 Screen message guides you through each operation. Touch "BASIC OPERATION". 2. Touch "SWITCH FUNCTION". 3. SELECTION KEY Operation UTILITY STITCH BASIC SEWING CARD CHARACTER BASIC SEWING OPERATION MEMORY DECORATIVE SEWING STITCH STITCH APPLICATION ADJUSTMENT (PREPARATION BEFORE SEWING) EXTRA FUNCTION ( SWITCH FUNCTION ( USEFUL SKILL PATTERN SELECTION)( ADJUSTMENT OPERATION KEY SELECTION KEY O 1. Screen message guides you through each operation.
Touch "SELECTION KEY". * Most of the instructions are memorized in the machine's memory. t 6 Screen message guides you through each operation. Touch "BASIC OPERATION". 2. Touch "SWITCH FUNCTION". 3. SELECTION KEY Operation UTILITY STITCH BASIC SEWING CARD CHARACTER BASIC SEWING OPERATION MEMORY DECORATIVE SEWING STITCH STITCH APPLICATION ADJUSTMENT (PREPARATION BEFORE SEWING) EXTRA FUNCTION ( SWITCH FUNCTION ( USEFUL SKILL PATTERN SELECTION)( ADJUSTMENT OPERATION KEY SELECTION KEY O 1. Screen message guides you through each operation.

Users Manual - English
Page 9
...; DECORATIVE STITCH KEY Use this key when you use this key when you sew decorative stitches. O CARD KEY Use this sewing machine. B IPREPHRHTIOBNEFORESEWING_EXTRA FUNCTION SWITCH FUNCTION] USEFUL SKILL PATTER LECTION ALIJLISTMENT B. O MEMORY KEY Use this key for selection. Overcasting ICI PREU... O BASIC SEWING KEY Use this key when you insert or remove the memory card from machine, main power switch should be always turned off. When you memorize combinated patterns into machine or call the memory. A O 0 0 UTILITY STITCH BASIC SEWING CARD O CHARACTER BASIC ...
...; DECORATIVE STITCH KEY Use this key when you use this key when you sew decorative stitches. O CARD KEY Use this sewing machine. B IPREPHRHTIOBNEFORESEWING_EXTRA FUNCTION SWITCH FUNCTION] USEFUL SKILL PATTER LECTION ALIJLISTMENT B. O MEMORY KEY Use this key for selection. Overcasting ICI PREU... O BASIC SEWING KEY Use this key when you insert or remove the memory card from machine, main power switch should be always turned off. When you memorize combinated patterns into machine or call the memory. A O 0 0 UTILITY STITCH BASIC SEWING CARD O CHARACTER BASIC ...
Users Manual - English
Page 10
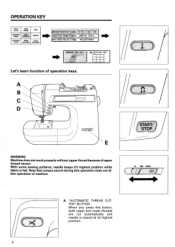
... Let's learn function of upper thread sensor. MN* ____(7)/ L/ A. "AUTOMATIC THREAD CUTTER" BUTTON When you press this operation does not affect operation of machine. 1040. A a B C D START) STOP WARNING Machine does not work properly without upper thread because of operation keys. With some sewing patterns, needle keeps it's highest position while fabric is...
... Let's learn function of upper thread sensor. MN* ____(7)/ L/ A. "AUTOMATIC THREAD CUTTER" BUTTON When you press this operation does not affect operation of machine. 1040. A a B C D START) STOP WARNING Machine does not work properly without upper thread because of operation keys. With some sewing patterns, needle keeps it's highest position while fabric is...

Users Manual - English
Page 11
... reverse stitching with foot controller. "START/STOP" BUTTON Press to up to down or from down to start /stop machine. E. DENSITY OF DI SPLAY 7E" How to machine, start or stop is used, you can change the density too much, the message on again. 9 When foot ... speed during sewing. Touch "ADJUSTMENT", "BRIGHTNESS OF LCD" and "NEXT" in this button. 2 1 D. You can control maximum speed by switching the machine off and on screen becomes invisible, re-adjust it by the speed control lever. "ENFORCEMENT STITCH" Adjust brightness of display O Dull contrast • Sharp...
... reverse stitching with foot controller. "START/STOP" BUTTON Press to up to down or from down to start /stop machine. E. DENSITY OF DI SPLAY 7E" How to machine, start or stop is used, you can change the density too much, the message on again. 9 When foot ... speed during sewing. Touch "ADJUSTMENT", "BRIGHTNESS OF LCD" and "NEXT" in this button. 2 1 D. You can control maximum speed by switching the machine off and on screen becomes invisible, re-adjust it by the speed control lever. "ENFORCEMENT STITCH" Adjust brightness of display O Dull contrast • Sharp...
Users Manual - English
Page 12
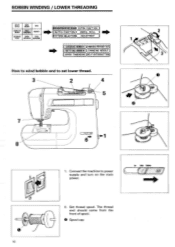
... FOOT SETTING BOBBIN CHANGING NEEDLE ( UPPER THREADING)(SELF-INTRODUCTION How to wind bobbin and to power supply and turn on the main power. Connect the machine to set lower thread. 3 2 2 3 r -T 1. att 10 2.
... FOOT SETTING BOBBIN CHANGING NEEDLE ( UPPER THREADING)(SELF-INTRODUCTION How to wind bobbin and to power supply and turn on the main power. Connect the machine to set lower thread. 3 2 2 3 r -T 1. att 10 2.

Users Manual - English
Page 13
...thread toward you and cut excess thread. 4. Set speed at maximum. 2. X80309 -001) 1 l ♦ 1♦ 3. Shut bobbin cover. 7. Machine stops automatically when bobbin is full. Press "START/STOP" button to right. * Match groove of bobbin. Set bobbin into shuttle. Trim the excess thread ...after the machine stops. 6. Slide open bobbin cover. 0 Bobbin cover 4. Mind bobbin spinning direction as illustrated. (Use bobbin code No. Press "START/...
...thread toward you and cut excess thread. 4. Set speed at maximum. 2. X80309 -001) 1 l ♦ 1♦ 3. Shut bobbin cover. 7. Machine stops automatically when bobbin is full. Press "START/STOP" button to right. * Match groove of bobbin. Set bobbin into shuttle. Trim the excess thread ...after the machine stops. 6. Slide open bobbin cover. 0 Bobbin cover 4. Mind bobbin spinning direction as illustrated. (Use bobbin code No. Press "START/...

Users Manual - English
Page 14
... to up before start sewing. 12 Lower presser foot. 5. O 2 /// 1. Thread through needle eye. * You do not need to pull to number and arrow mark on machine. Raise presser foot lever (If the presser foot is not raised, the upper thread cannot be threaded.) 2. UPPER THREADING Auto-threading device UTILITY STITCH BASIC...
... to up before start sewing. 12 Lower presser foot. 5. O 2 /// 1. Thread through needle eye. * You do not need to pull to number and arrow mark on machine. Raise presser foot lever (If the presser foot is not raised, the upper thread cannot be threaded.) 2. UPPER THREADING Auto-threading device UTILITY STITCH BASIC...

Users Manual - English
Page 25
O Projection O Spring * Lint and dust accumulated in race sometimes causes bad stitching or malfunction of stopper. I 6 1 6 1 1. Set inner rotary hook by positioning the projection of hook to spring of lower thread sensor. 23 Take out inner rotary hook. 5. CLEANING Always keep the machine clean. Remove needle plate. 4. Remove accumulated lint and thread from the inner hook and race with brush or vacuum j 6 cleaner. O Race 6. Loosen screws. 3. Turn off main power switch and remove presser foot holder and needle. 2.
O Projection O Spring * Lint and dust accumulated in race sometimes causes bad stitching or malfunction of stopper. I 6 1 6 1 1. Set inner rotary hook by positioning the projection of hook to spring of lower thread sensor. 23 Take out inner rotary hook. 5. CLEANING Always keep the machine clean. Remove needle plate. 4. Remove accumulated lint and thread from the inner hook and race with brush or vacuum j 6 cleaner. O Race 6. Loosen screws. 3. Turn off main power switch and remove presser foot holder and needle. 2.
Users Manual - English
Page 26
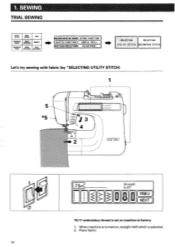
... Let's try sewing with fabric (by "SELECTING UTILITY STITCH) 1 kk 0 24 3 IC 2 J i I rima I (Straight (Le ft) PREU ) F( NEXT 75/11 embroidery thread is selected. 2. 1. When machine is turned on, straight (left) stitch is set on...
... Let's try sewing with fabric (by "SELECTING UTILITY STITCH) 1 kk 0 24 3 IC 2 J i I rima I (Straight (Le ft) PREU ) F( NEXT 75/11 embroidery thread is selected. 2. 1. When machine is turned on, straight (left) stitch is set on...

Users Manual - English
Page 27
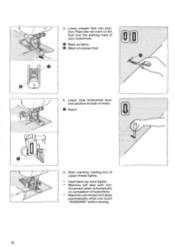
..." button for reverse stitching. cD, ° Bobbin thread is running out. CHAPTER 2 (START/ STOP 4. Press "ENFORCEMENT STITCH" button for forward sewing. While pressing this button, machine runs at slow speed. 5. Cut thick thread (thicker than # 30) by "AUTOMATIC THREAD CUTTER" button. *5. Replace lower thread. 25 Lower presser foot.
..." button for reverse stitching. cD, ° Bobbin thread is running out. CHAPTER 2 (START/ STOP 4. Press "ENFORCEMENT STITCH" button for forward sewing. While pressing this button, machine runs at slow speed. 5. Cut thick thread (thicker than # 30) by "AUTOMATIC THREAD CUTTER" button. *5. Replace lower thread. 25 Lower presser foot.
Users Manual - English
Page 34
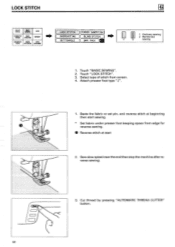
... pressing "AUTOMATIC THREAD CUTTER" button. Baste the fabric or set pin, and reverse stitch at start 2. Sew slow speed near the end then stop the machine after reverse sewing. Attach presser foot type "J". 1. C ) r 32 3. Touch "LOCK STITCH". 3. LOCK STITCH UTILITY STITCH BASIC SEWING CARD CHARACTER BASIC SEWING OPERATION MEMORY OECORATME SEWING...
... pressing "AUTOMATIC THREAD CUTTER" button. Baste the fabric or set pin, and reverse stitch at start 2. Sew slow speed near the end then stop the machine after reverse sewing. Attach presser foot type "J". 1. C ) r 32 3. Touch "LOCK STITCH". 3. LOCK STITCH UTILITY STITCH BASIC SEWING CARD CHARACTER BASIC SEWING OPERATION MEMORY OECORATME SEWING...
Users Manual - English
Page 38
forcement stitch automatically on presser foot Jul 0 A 4. O Mark on fabric • Mark on completion of your buttonhole. Lower blue buttonhole lever and position at back of upper thread lightly. * Feed fabric by hand lightly. * Machine will stop with rein- O Notch • Le 5. Start machine, holding end of notch. Place the red mark on the foot over the starting mark of buttonhole. * Machine cuts thread and stops automatically when you touch "SCISSORS" before sewing. 36 3. Lower presser foot into position.
forcement stitch automatically on presser foot Jul 0 A 4. O Mark on fabric • Mark on completion of your buttonhole. Lower blue buttonhole lever and position at back of upper thread lightly. * Feed fabric by hand lightly. * Machine will stop with rein- O Notch • Le 5. Start machine, holding end of notch. Place the red mark on the foot over the starting mark of buttonhole. * Machine cuts thread and stops automatically when you touch "SCISSORS" before sewing. 36 3. Lower presser foot into position.

Users Manual - English
Page 45
... thick fabric 0 Place another fabric or card-board at back of the notch of upper thread lightly. * Machine will stop after reinforcement stitch automatically. * Machine cuts thread and stops automatically when you touch "SCISSORS". Start machine holding end of the "A" foot. 0 Notch 'PSTI TCH LENGTH 0.4 min 5 5. ItANWAWANAW/WEVAI Touch "STITCH ADJUSTMENT" and adjust...
... thick fabric 0 Place another fabric or card-board at back of the notch of upper thread lightly. * Machine will stop after reinforcement stitch automatically. * Machine cuts thread and stops automatically when you touch "SCISSORS". Start machine holding end of the "A" foot. 0 Notch 'PSTI TCH LENGTH 0.4 min 5 5. ItANWAWANAW/WEVAI Touch "STITCH ADJUSTMENT" and adjust...

Users Manual - English
Page 49
... "J". 1. Make sure that the applique will not move during sewing. Finish O Needle drop point To applique around corners 1. Touch "APPLIQUE". 4. O Applique O Glue 2. Touch "NEXT". 3. Stop machine and position needle just outside the applique when the needle is at right side and start sewing. * Reverse sew or tie both end of the...
... "J". 1. Make sure that the applique will not move during sewing. Finish O Needle drop point To applique around corners 1. Touch "APPLIQUE". 4. O Applique O Glue 2. Touch "NEXT". 3. Stop machine and position needle just outside the applique when the needle is at right side and start sewing. * Reverse sew or tie both end of the...

Users Manual - English
Page 50
... type of scallop stitch (Actual size) Stitch for decorating collar of blouse, edge of scallop stitch. 6. Trim along marked line. * At beginning of stitch, the machine sews fastening stitch automatically. 0 Surface 2. Touch "SCALLOP". 4. Select type of table cloth etc. 1. Touch "BASIC SEWING". 2. Attache presser foot "N". ,00."'"ivow"4.4.401 4'104kk 1. Touch "NEXT...
... type of scallop stitch (Actual size) Stitch for decorating collar of blouse, edge of scallop stitch. 6. Trim along marked line. * At beginning of stitch, the machine sews fastening stitch automatically. 0 Surface 2. Touch "SCALLOP". 4. Select type of table cloth etc. 1. Touch "BASIC SEWING". 2. Attache presser foot "N". ,00."'"ivow"4.4.401 4'104kk 1. Touch "NEXT...

