
Accessory Catalog
Page 7
... QuattroTM 6000D but is models. Make a cut edge like a serger or overlock. SA160 ABCDEFGHJKLMNO Straight Stitch Foot Straight Stitch Foot and Straight Stitch Needle Plate Vertical Stitching Alignment Foot Brother General Sewing Accessories 12 Straight Stitch Foot For precise straight stitching on thin fabrics or on selected machines. Brother General Sewing Accessories 11 Seam Guide Side Cutter Stitch Guide Foot Seam Guide Guides fabric edge with the Straight Stitch Needle Plate to accomplish perfect straight stitching. Selecting a stitch designated for other Innov-is...
... QuattroTM 6000D but is models. Make a cut edge like a serger or overlock. SA160 ABCDEFGHJKLMNO Straight Stitch Foot Straight Stitch Foot and Straight Stitch Needle Plate Vertical Stitching Alignment Foot Brother General Sewing Accessories 12 Straight Stitch Foot For precise straight stitching on thin fabrics or on selected machines. Brother General Sewing Accessories 11 Seam Guide Side Cutter Stitch Guide Foot Seam Guide Guides fabric edge with the Straight Stitch Needle Plate to accomplish perfect straight stitching. Selecting a stitch designated for other Innov-is...
Accessory Catalog
Page 8
... with a feature that keeps the foot level when sewing thick seams. 1. Attach the spool stand onto the machine handle. 3. Release the black button, and the presser foot remains level. 3. Attach Adapter with Low Shank on the stand and thread the machine. SA131 PC-6500/8500 King Thread Spool Stand Brother General Sewing Accessories 14 King Thread Spool Stand Lets you use optional feet on the left side of the presser foot, lower the presser foot. 2. SA542 A:DuettaTM4500D,Innov-is4000D...
... with a feature that keeps the foot level when sewing thick seams. 1. Attach the spool stand onto the machine handle. 3. Release the black button, and the presser foot remains level. 3. Attach Adapter with Low Shank on the stand and thread the machine. SA131 PC-6500/8500 King Thread Spool Stand Brother General Sewing Accessories 14 King Thread Spool Stand Lets you use optional feet on the left side of the presser foot, lower the presser foot. 2. SA542 A:DuettaTM4500D,Innov-is4000D...

Accessory Catalog
Page 11
... Cording Foot (7-hole) Cording Foot Used for quilting appliqué! 1. Insert cords or threads into each hole on the machine. 2. Sew. Place cord under the presser foot, and select zigzag stitch with maximum stitch width. SA158 ABCDEFJKMN www.brother.com Perfect for embellishing 1 to fit the width of the braid. 6. Line up the cords, and select zigzag stitch with maximum stitch width. Attach the presser foot and select a stitch from the right of 7 mm feed width. 1. Slide the plate of the guide...
... Cording Foot (7-hole) Cording Foot Used for quilting appliqué! 1. Insert cords or threads into each hole on the machine. 2. Sew. Place cord under the presser foot, and select zigzag stitch with maximum stitch width. SA158 ABCDEFJKMN www.brother.com Perfect for embellishing 1 to fit the width of the braid. 6. Line up the cords, and select zigzag stitch with maximum stitch width. Attach the presser foot and select a stitch from the right of 7 mm feed width. 1. Slide the plate of the guide...

Accessory Catalog
Page 12
... center guide mark (red) of the presser foot to make fringes). Decrease the upper thread tension and test various settings to see which one works on your fabric. 3. Requires Low Shank Adapter for securing edges of loops to 4 mm in groove of appliqué. 2. Making loops or fringes: 1. Ideal for ULT series, PC-6500, PC-8200 and PC-8500 sewing machines. Adjust the upper thread tension. 2. Zigzag-sew with a single zigzag stitch. Line up to make or attach piping...
... center guide mark (red) of the presser foot to make fringes). Decrease the upper thread tension and test various settings to see which one works on your fabric. 3. Requires Low Shank Adapter for securing edges of loops to 4 mm in groove of appliqué. 2. Making loops or fringes: 1. Ideal for ULT series, PC-6500, PC-8200 and PC-8500 sewing machines. Adjust the upper thread tension. 2. Zigzag-sew with a single zigzag stitch. Line up to make or attach piping...

Accessory Catalog
Page 13
... tucks. For seven grooves: SA179 ABCDEJ For five grooves: SA162 IP This presser foot does not include the bobbin cover. www.brother.com Install and manually thread a twin needle. 2. SA143 AFJKM Ruffler Foot Makes ruffles with this presser foot. 1. The intervals of stitching and use that to get started. Move fabric about 1" (2.5 cm) past the needle to sew the first row in one of the grooves. 4. Further rows can be...
... tucks. For seven grooves: SA179 ABCDEJ For five grooves: SA162 IP This presser foot does not include the bobbin cover. www.brother.com Install and manually thread a twin needle. 2. SA143 AFJKM Ruffler Foot Makes ruffles with this presser foot. 1. The intervals of stitching and use that to get started. Move fabric about 1" (2.5 cm) past the needle to sew the first row in one of the grooves. 4. Further rows can be...

Accessory Catalog
Page 15
...locking stitches. 8. Set the fabric under the presser foot. 6. Requires Low Shank Adapter for straight stitch. 3. Set the machine to the machine. 2. Sew. Guide the fabric with the pin over the needle clamp screw. 2. When quilting is needed. 1. Fabrics that both hands are created. 1. Attach the walking foot to straight stitch. 3. Quilting Foot For darning, quilting, or free-motion. Gently holding the upper and bobbin threads sew about four locking stitches and finish the thread ends. While starting to sew, press the needle position button twice to pull the bobbin thread...
...locking stitches. 8. Set the fabric under the presser foot. 6. Requires Low Shank Adapter for straight stitch. 3. Set the machine to the machine. 2. Sew. Guide the fabric with the pin over the needle clamp screw. 2. When quilting is needed. 1. Fabrics that both hands are created. 1. Attach the walking foot to straight stitch. 3. Quilting Foot For darning, quilting, or free-motion. Gently holding the upper and bobbin threads sew about four locking stitches and finish the thread ends. While starting to sew, press the needle position button twice to pull the bobbin thread...

Accessory Catalog
Page 17
... stitch quality when stitching over differing fabric thicknesses. - Compatible with USB hub devices* to provide access to embroider 150 decorative sewing stitches within the frame. - Includes three new free-motion presser feet: Free-motion quilting foot "C" for more features to your fabric to assure perfectly connected and aligned designs. Add even more control with center needle position straight stitch Open toe quilting foot "O" for greater visibility Echo quilting foot "E" for the Innov-is 4000D sewing and embroidery machine. * Requires additional purchases. Use...
... stitch quality when stitching over differing fabric thicknesses. - Compatible with USB hub devices* to provide access to embroider 150 decorative sewing stitches within the frame. - Includes three new free-motion presser feet: Free-motion quilting foot "C" for more features to your fabric to assure perfectly connected and aligned designs. Add even more control with center needle position straight stitch Open toe quilting foot "O" for greater visibility Echo quilting foot "E" for the Innov-is 4000D sewing and embroidery machine. * Requires additional purchases. Use...

Accessory Catalog
Page 33
... (approx. 2-1/2 x 2-1/2 inches) SA411 www.brother.com Brother Embroidery Accessories 63 Free-Standing Ten Spool Thread Stand Ten Spool Thread Stand Embroidery Machine Hoops Brother Embroidery Accessories 64 For all embroidery and sewing/embroidery machines. Each thread has it's own thread guide to deliver thread smoothly to provide 10 vertical spool pins for thread delivery or bobbin storage. Allows easy access to accommodate a variety of your next embroidery, quilting or sewing project. Some hoops can easily be used thread colors. For Quattro™ 6000D...
... (approx. 2-1/2 x 2-1/2 inches) SA411 www.brother.com Brother Embroidery Accessories 63 Free-Standing Ten Spool Thread Stand Ten Spool Thread Stand Embroidery Machine Hoops Brother Embroidery Accessories 64 For all embroidery and sewing/embroidery machines. Each thread has it's own thread guide to deliver thread smoothly to provide 10 vertical spool pins for thread delivery or bobbin storage. Allows easy access to accommodate a variety of your next embroidery, quilting or sewing project. Some hoops can easily be used thread colors. For Quattro™ 6000D...

Accessory Catalog
Page 34
...results, use the Brother Bobbin Thread designed specifically for Brother sewing and embroidering machines. 61 Color Thread Set with Wooden Rack ETKSP999 PacesetterTM Polyester Threads (61 Color Thread Set with Wooden Rack) Our high sheen 100% polyester mini king embroidery thread (1100 yds) is designed to hoop your fabric properly with other sewing and embroidery machine brands. Brother Embroidery Accessories PacesetterTM Polyester Threads 65 Brother Country Yarn Embroidery Threads Metallic Threads For the best embroidery results, use these embroidery threads especially designed for...
...results, use the Brother Bobbin Thread designed specifically for Brother sewing and embroidering machines. 61 Color Thread Set with Wooden Rack ETKSP999 PacesetterTM Polyester Threads (61 Color Thread Set with Wooden Rack) Our high sheen 100% polyester mini king embroidery thread (1100 yds) is designed to hoop your fabric properly with other sewing and embroidery machine brands. Brother Embroidery Accessories PacesetterTM Polyester Threads 65 Brother Country Yarn Embroidery Threads Metallic Threads For the best embroidery results, use these embroidery threads especially designed for...

Accessory Catalog
Page 40
... your machine for a cover stitch, with the LC2 presser foot. The stitches are always smooth. 1. Fold fabric and set through the holder). 4. Insert the tab on the bias tape attachment into the guide. 4. SA224CV SA221CV Hemming Set Finishes hems easily and quickly. Set the bias tape though the holder (cut the end of the presser foot, and sew. Attach the hem positioning plate A/B to the hemming attachment, and attach it into the front cover slot. 3. Brother Cover Stitch Feet 78 Top Stitching Foot Set Top Stitching Foot Set Use included presser foot...
... your machine for a cover stitch, with the LC2 presser foot. The stitches are always smooth. 1. Fold fabric and set through the holder). 4. Insert the tab on the bias tape attachment into the guide. 4. SA224CV SA221CV Hemming Set Finishes hems easily and quickly. Set the bias tape though the holder (cut the end of the presser foot, and sew. Attach the hem positioning plate A/B to the hemming attachment, and attach it into the front cover slot. 3. Brother Cover Stitch Feet 78 Top Stitching Foot Set Top Stitching Foot Set Use included presser foot...

Users Manual - English
Page 2
... around the machine's needle. 11. Special care is being administered. 8. SAVE THESE INSTRUCTIONS This machine is not working properly, if it has been dropped or damaged, or if it . Keep ventilation openings of the machine and foot controller free from the electrical outlet when removing covers, lubricating, or making any other user-serviceable adjustments mentioned in this operation manual. 16. Do not use as threading the needle, changing the needle, threading the bobbin, or changing the presser foot. 15.
... around the machine's needle. 11. Special care is being administered. 8. SAVE THESE INSTRUCTIONS This machine is not working properly, if it has been dropped or damaged, or if it . Keep ventilation openings of the machine and foot controller free from the electrical outlet when removing covers, lubricating, or making any other user-serviceable adjustments mentioned in this operation manual. 16. Do not use as threading the needle, changing the needle, threading the bobbin, or changing the presser foot. 15.

Users Manual - English
Page 5
... buttons 9 LCD screen 10 LCD DENSITY 11 Adjusting the density with the main power switch 11 Adjusting the density with the Operation Guide 12 DISPLAY LANGUAGE 13 PRESSER FEET / FEED DOGS 14 Changing the presser foot 14 Installing the presser foot adapter & the walking foot 15 Installing the optional side cutter 16 Installing the presser foot holder 18 Raising/lowering the feed dogs 18 FABRIC/THREAD/NEEDLE COMBINATIONS ....19 NEEDLE 20 Checking the needle 20 Changing the needle 20 BOBBIN WINDING / LOWER THREADING ........21 Winding the bobbin 21 Installing the bobbin 23 UPPER...
... buttons 9 LCD screen 10 LCD DENSITY 11 Adjusting the density with the main power switch 11 Adjusting the density with the Operation Guide 12 DISPLAY LANGUAGE 13 PRESSER FEET / FEED DOGS 14 Changing the presser foot 14 Installing the presser foot adapter & the walking foot 15 Installing the optional side cutter 16 Installing the presser foot holder 18 Raising/lowering the feed dogs 18 FABRIC/THREAD/NEEDLE COMBINATIONS ....19 NEEDLE 20 Checking the needle 20 Changing the needle 20 BOBBIN WINDING / LOWER THREADING ........21 Winding the bobbin 21 Installing the bobbin 23 UPPER...
Users Manual - English
Page 12
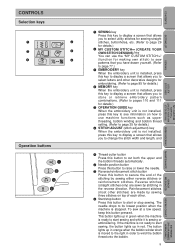
....) 5 OPERATION GUIDE key When the embroidery unit is not installed, press this key to see information on how to use the "MY CUSTOM STITCHTM" (function for details.) 6 STITCH ADJUST (stitch adjustment) key When the embroidery unit is not installed, press this key to display a screen that allows you to change the stitch width and length, and 1 Thread cutter button Press this button to cut both the upper and the bobbin threads automatically. 2 Needle position button...
....) 5 OPERATION GUIDE key When the embroidery unit is not installed, press this key to see information on how to use the "MY CUSTOM STITCHTM" (function for details.) 6 STITCH ADJUST (stitch adjustment) key When the embroidery unit is not installed, press this key to display a screen that allows you to change the stitch width and length, and 1 Thread cutter button Press this button to cut both the upper and the bobbin threads automatically. 2 Needle position button...
Users Manual - English
Page 20
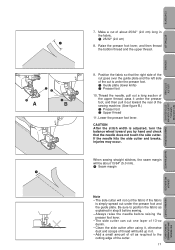
... upper thread. Lower the presser foot lever. Be sure to the cutting edge of the cut the fabric if the fabric is adjusted, turn the balance wheel toward the rear of about 13/64" (5.0 mm). 1 Seam margin EMBROIDERING MAINTENANCE ERROR MESSAGES SEWING CHART Note - If the needle hits the side cutter and breaks, injuries may occur. When sewing straight stitches, the seam margin will not cut is under the presser foot and the guide plate. Position...
... upper thread. Lower the presser foot lever. Be sure to the cutting edge of the cut the fabric if the fabric is adjusted, turn the balance wheel toward the rear of about 13/64" (5.0 mm). 1 Seam margin EMBROIDERING MAINTENANCE ERROR MESSAGES SEWING CHART Note - If the needle hits the side cutter and breaks, injuries may occur. When sewing straight stitches, the seam margin will not cut is under the presser foot and the guide plate. Position...
Users Manual - English
Page 21
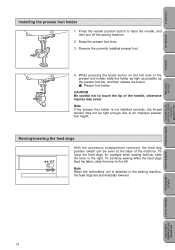
... the right. While pressing the black button on the left . Note If the presser foot holder is attached to raise the needle, and then turn off the sewing machine. 2. MY CUSTOM STITCHTM (CREATE YOUR OWN STITCH DESIGNS) EMBROIDERING MAINTENANCE ERROR MESSAGES SEWING CHART PATTERNS (PROGRAMMED IN MACHINE) 18 Press the needle position button to the sewing machine, the feed dogs are automatically lowered. Raise the presser foot lever. 3. Note When the embroidery unit is not installed correctly, the thread tension may occur.
... the right. While pressing the black button on the left . Note If the presser foot holder is attached to raise the needle, and then turn off the sewing machine. 2. MY CUSTOM STITCHTM (CREATE YOUR OWN STITCH DESIGNS) EMBROIDERING MAINTENANCE ERROR MESSAGES SEWING CHART PATTERNS (PROGRAMMED IN MACHINE) 18 Press the needle position button to the sewing machine, the feed dogs are automatically lowered. Raise the presser foot lever. 3. Note When the embroidery unit is not installed correctly, the thread tension may occur.
Users Manual - English
Page 29
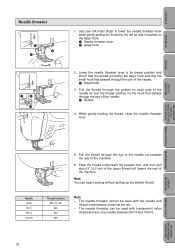
... used with transparent nylon thread and any size needle between 90/14 and 100/16. 26 PATTERNS (PROGRAMMED IN MACHINE) Thread (cotton) #30, 50, 60 #30 #30 #20 Note - Pass the thread underneath the presser foot, and then pull about 2" (5.0 cm) of the upper thread out toward the rear of the machine. 5 6. The needle threader can begin sewing without pulling up the bobbin thread. CONTENTS SETTING UP SEWING Needle threader 5 1 3 2 5 22 1 1. Lower the needle threader lever...
... used with transparent nylon thread and any size needle between 90/14 and 100/16. 26 PATTERNS (PROGRAMMED IN MACHINE) Thread (cotton) #30, 50, 60 #30 #30 #20 Note - Pass the thread underneath the presser foot, and then pull about 2" (5.0 cm) of the upper thread out toward the rear of the machine. 5 6. The needle threader can begin sewing without pulling up the bobbin thread. CONTENTS SETTING UP SEWING Needle threader 5 1 3 2 5 22 1 1. Lower the needle threader lever...

Users Manual - English
Page 30
... thread on the spool pin. 3. Place the spool of the spool. 4. SEWING UTILITY STITCHES MY CUSTOM STITCHTM (CREATE YOUR OWN STITCH DESIGNS) EMBROIDERING MAINTENANCE ERROR MESSAGES Extra spool pin When embroidering with metallic thread, use the extra spool pin in the illustration. 3. Thread the upper thread. 1 Insert the extra spool pin onto the end of the bobbin winder shaft. 2 Spool felt 3 Spool of the bobbin winder shaft. 2. Remove the bobbin cover, and insert the bobbin into the 1 shuttle so that quickly wind off the spool, place a net over the spool before sewing. Guide...
... thread on the spool pin. 3. Place the spool of the spool. 4. SEWING UTILITY STITCHES MY CUSTOM STITCHTM (CREATE YOUR OWN STITCH DESIGNS) EMBROIDERING MAINTENANCE ERROR MESSAGES Extra spool pin When embroidering with metallic thread, use the extra spool pin in the illustration. 3. Thread the upper thread. 1 Insert the extra spool pin onto the end of the bobbin winder shaft. 2 Spool felt 3 Spool of the bobbin winder shaft. 2. Remove the bobbin cover, and insert the bobbin into the 1 shuttle so that quickly wind off the spool, place a net over the spool before sewing. Guide...

Users Manual - English
Page 38
... key. MY CUSTOM STITCHTM (CREATE YOUR OWN STITCH DESIGNS) EMBROIDERING MAINTENANCE ERROR MESSAGES SEWING CHART PATTERNS (PROGRAMMED IN MACHINE) 35 CONTENTS SETTING UP SEWING UTILITY STITCHES OPERATION GUIDE 1 1 OPERATION GUIDE This sewing machine is equipped with a convenient guide that displays information and instructions on various operations, such as bobbin winding, upper threading, and LCD adjustment, making this machine easy to display more options. 3. Example: To display the instructions for installing the bobbin 1. Press the SETTING BOBBIN key. 1 Press the NEXT key to...
... key. MY CUSTOM STITCHTM (CREATE YOUR OWN STITCH DESIGNS) EMBROIDERING MAINTENANCE ERROR MESSAGES SEWING CHART PATTERNS (PROGRAMMED IN MACHINE) 35 CONTENTS SETTING UP SEWING UTILITY STITCHES OPERATION GUIDE 1 1 OPERATION GUIDE This sewing machine is equipped with a convenient guide that displays information and instructions on various operations, such as bobbin winding, upper threading, and LCD adjustment, making this machine easy to display more options. 3. Example: To display the instructions for installing the bobbin 1. Press the SETTING BOBBIN key. 1 Press the NEXT key to...
Users Manual - English
Page 56
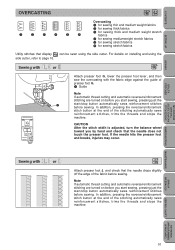
... guide of the fabric before sewing. Note If automatic thread cutting and automatic reverse/reinforcement stitching are turned on before you by hand and check that the needle does not touch the presser foot. In addition, pressing the reverse/reinforcement stitch button at the end of the stitching automatically sews reinforcement stitches, trims the threads and stops the machine. EMBROIDERING MAINTENANCE ERROR MESSAGES SEWING CHART PATTERNS (PROGRAMMED IN MACHINE) 53 For details on installing and using the side cutter...
... guide of the fabric before sewing. Note If automatic thread cutting and automatic reverse/reinforcement stitching are turned on before you by hand and check that the needle does not touch the presser foot. In addition, pressing the reverse/reinforcement stitch button at the end of the stitching automatically sews reinforcement stitches, trims the threads and stops the machine. EMBROIDERING MAINTENANCE ERROR MESSAGES SEWING CHART PATTERNS (PROGRAMMED IN MACHINE) 53 For details on installing and using the side cutter...

Users Manual - English
Page 128
... start /stop button or reverse/reinforcement stitch button is pressed while a pattern other than a buttonhole is selected and the buttonhole lever is lowered. This message appears when the embroidery unit is being initialized, but no pattern has been selected. This message appears when the start/stop button, reverse/reinforcement stitch button, thread cutter button or the foot controller is pressed while the presser foot lever is pressed, but the presser foot is lowered. 125 MAINTENANCE ERROR MESSAGES SEWING CHART PATTERNS (PROGRAMMED IN MACHINE...
... start /stop button or reverse/reinforcement stitch button is pressed while a pattern other than a buttonhole is selected and the buttonhole lever is lowered. This message appears when the embroidery unit is being initialized, but no pattern has been selected. This message appears when the start/stop button, reverse/reinforcement stitch button, thread cutter button or the foot controller is pressed while the presser foot lever is pressed, but the presser foot is lowered. 125 MAINTENANCE ERROR MESSAGES SEWING CHART PATTERNS (PROGRAMMED IN MACHINE...


