

Accessory Catalog
Page 12
... Adapter for securing edges of loops to make or attach piping. Ideal for ULT series, PC-6500, PC-8200 and PC-8500 sewing machines. SA150 ABCDEFJKMN www.brother.com Brother Embellishment Feet 21 Fringe Foot Gathering Foot SA142 All Brother home-use sewing machines SA120 All Brother home-use ...1. Decrease the upper thread tension and test various settings to make fringes). Creating tailor tacks: 1. Gathering Foot Used for details.) Brother Embellishment Feet Open Toe Foot 22 Pearls and Sequins Foot Metal type SA146 IP Open Toe Foot Provides better visibility in the needle...
... Adapter for securing edges of loops to make or attach piping. Ideal for ULT series, PC-6500, PC-8200 and PC-8500 sewing machines. SA150 ABCDEFJKMN www.brother.com Brother Embellishment Feet 21 Fringe Foot Gathering Foot SA142 All Brother home-use sewing machines SA120 All Brother home-use ...1. Decrease the upper thread tension and test various settings to make fringes). Creating tailor tacks: 1. Gathering Foot Used for details.) Brother Embellishment Feet Open Toe Foot 22 Pearls and Sequins Foot Metal type SA146 IP Open Toe Foot Provides better visibility in the needle...

Accessory Catalog
Page 33
Ten Spool Thread Stand This 10-Spool Thread Stand snaps securely in place on our website for your spool thread tails by placing them in use. Place your threads in the proper color sequence for details, www.brother.com. Some hoops can easily be used thread colors.... SA434 For ULT series: • Large: 260 x 160 mm (approx. 10-1/4 x 6-1/4 inches) SA428 • Medium Plus: 180 x 130 mm (approx. 7 x 5 inches) SA429 For PC-6500, 8200, 8500, 8500D series: • Extra-large: 300 x 130 mm (approx. 12 x 5 inches) • Small: 20 x 60 mm (approx. 1 x 2-1/2 inches) SA421 SA425 For...
Ten Spool Thread Stand This 10-Spool Thread Stand snaps securely in place on our website for your spool thread tails by placing them in use. Place your threads in the proper color sequence for details, www.brother.com. Some hoops can easily be used thread colors.... SA434 For ULT series: • Large: 260 x 160 mm (approx. 10-1/4 x 6-1/4 inches) SA428 • Medium Plus: 180 x 130 mm (approx. 7 x 5 inches) SA429 For PC-6500, 8200, 8500, 8500D series: • Extra-large: 300 x 130 mm (approx. 12 x 5 inches) • Small: 20 x 60 mm (approx. 1 x 2-1/2 inches) SA421 SA425 For...
Users Manual - English
Page 5
... the presser foot 24 Removing the presser foot holder (while cleaning, etc 24 FEED DOGS 25 NEEDLE 26 Checking the needle 26 Installing the needle securely 26 FABRIC/THREAD/NEEDLE COMBINATION CHART 27 CHAPTER 2 1. SEWING 28 TRIAL SEWING 28 Sewing using stitch 05 or 09 38 OVERCASTING (WHEN USING THE OPTIONAL...
... the presser foot 24 Removing the presser foot holder (while cleaning, etc 24 FEED DOGS 25 NEEDLE 26 Checking the needle 26 Installing the needle securely 26 FABRIC/THREAD/NEEDLE COMBINATION CHART 27 CHAPTER 2 1. SEWING 28 TRIAL SEWING 28 Sewing using stitch 05 or 09 38 OVERCASTING (WHEN USING THE OPTIONAL...

Users Manual - English
Page 16
... the spool pin. Note If using it will go. Place the spool of thread on the main power. 2. Connect the machine to hold the spool securely on the spool pin. 1 Spool cap 2 Spool 3 Spool pin * The spool cap should come from the spool of the spool. Using a different bobbin may result...
... the spool pin. Note If using it will go. Place the spool of thread on the main power. 2. Connect the machine to hold the spool securely on the spool pin. 1 Spool cap 2 Spool 3 Spool pin * The spool cap should come from the spool of the spool. Using a different bobbin may result...

Users Manual - English
Page 27
... holder is incorrectly attached. 1 Disc-shaped screwdriver 24 Raise the presser foot lever. 3. Then, lower the presser foot lever, install the presser foot holder and securely tighten the presser foot holder screw. Place the presser foot pin directly below the holder-end and lower the presser foot lever to attach the...
... holder is incorrectly attached. 1 Disc-shaped screwdriver 24 Raise the presser foot lever. 3. Then, lower the presser foot lever, install the presser foot holder and securely tighten the presser foot holder screw. Place the presser foot pin directly below the holder-end and lower the presser foot lever to attach the...

Users Manual - English
Page 29
...flat surface and check whether the space between the needle and the flat surface 2 Flat surface (needle plate, glass, ruler, etc.) Installing the needle securely 1. Press the "NEEDLE POSITION" button to the machine. 1 Space between the needle and the flat surface is parallel or not. Pull out the ...needle. NEEDLE Checking the needle 1 2 Place the needle on . 26 Fasten the screw securely with a screwdriver. 6 4. CAUTION Do not loosen or tighten the needle clamp screw with a strong force, otherwise it will go up against the needle...
...flat surface and check whether the space between the needle and the flat surface 2 Flat surface (needle plate, glass, ruler, etc.) Installing the needle securely 1. Press the "NEEDLE POSITION" button to the machine. 1 Space between the needle and the flat surface is parallel or not. Pull out the ...needle. NEEDLE Checking the needle 1 2 Place the needle on . 26 Fasten the screw securely with a screwdriver. 6 4. CAUTION Do not loosen or tighten the needle clamp screw with a strong force, otherwise it will go up against the needle...
Users Manual - English
Page 59
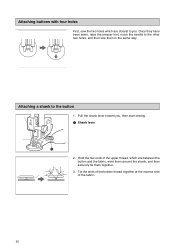
Tie the ends of the bobbin thread together at the reverse side of the upper thread, which are between the button and the fabric, wind them around the shank, and then securely tie them in the same way. Pull the shank lever toward you . Hold the two ends of the fabric. 56 Attaching a shank to the button 1. Once they have been sewn, raise the presser foot, move the needle to the other two holes, and then sew them together. 3. Attaching buttons with four holes First, sew the two holes which are closest to you , then start sewing. 6 1 Shank lever 1 2.
Tie the ends of the bobbin thread together at the reverse side of the upper thread, which are between the button and the fabric, wind them around the shank, and then securely tie them in the same way. Pull the shank lever toward you . Hold the two ends of the fabric. 56 Attaching a shank to the button 1. Once they have been sewn, raise the presser foot, move the needle to the other two holes, and then sew them together. 3. Attaching buttons with four holes First, sew the two holes which are closest to you , then start sewing. 6 1 Shank lever 1 2.

Users Manual - English
Page 63
...). stop, lift the presser foot, slide your fabric towards you reach the narrow end of the stitch. 2. Sew 3 stitches on the seam line. This will secure the thread ends, cut the thread. 4. Iron the dart to 0.4 mm. Cut the thread at the end. Touch the stitch length keys, reduce to one...
...). stop, lift the presser foot, slide your fabric towards you reach the narrow end of the stitch. 2. Sew 3 stitches on the seam line. This will secure the thread ends, cut the thread. 4. Iron the dart to 0.4 mm. Cut the thread at the end. Touch the stitch length keys, reduce to one...

Users Manual - English
Page 64
... a stitch length of straight stitches parallel to the seam line, then trim off the excess thread leaving 5 cm (2") . 1 Seam line 2 1.0 to 1.5 cm (25/64" to secure them . 61 Sew two rows of 4.0 mm (5/32") and a weak thread tension. 2.
... a stitch length of straight stitches parallel to the seam line, then trim off the excess thread leaving 5 cm (2") . 1 Seam line 2 1.0 to 1.5 cm (25/64" to secure them . 61 Sew two rows of 4.0 mm (5/32") and a weak thread tension. 2.

Users Manual - English
Page 78
4. Thread through right eye of needle. 1 The thread for right needle threading. 2 Push the spool pin securely into the hole on the end of the bobbin winder shaft on the top of the machine. Stitch length • Straight 2 mm min. • Others 0.5 ...
4. Thread through right eye of needle. 1 The thread for right needle threading. 2 Push the spool pin securely into the hole on the end of the bobbin winder shaft on the top of the machine. Stitch length • Straight 2 mm min. • Others 0.5 ...
