

Accessory Catalog
Page 13
...gathers. Draw a reference line to guide your first row of stitching and use that to get started. Brother Embellishment Feet 23 Bed Runner & Pillowcase Innov-is Project Book (See pages 16 and 17 for most consistent results.... Sew slowly for details.) Brother Embellishment Feet Pin Tuck Foot 24 Ruffler Foot Pin Tuck Foot This presser foot has 7 grooves and produces... can be evenly spaced by trying different combinations of tucks can be adjusted. 1. www.brother.com Install and manually thread a twin needle. 2.
...gathers. Draw a reference line to guide your first row of stitching and use that to get started. Brother Embellishment Feet 23 Bed Runner & Pillowcase Innov-is Project Book (See pages 16 and 17 for most consistent results.... Sew slowly for details.) Brother Embellishment Feet Pin Tuck Foot 24 Ruffler Foot Pin Tuck Foot This presser foot has 7 grooves and produces... can be evenly spaced by trying different combinations of tucks can be adjusted. 1. www.brother.com Install and manually thread a twin needle. 2.

Accessory Catalog
Page 34
...for our embroidery only machines, PE750D and PE700II. Polyester retains its color beauty and quality even in a 5-pack sleeve) at selected dealers. 30-Pack: CYTPK30 Brother Countr y Yarn Embroider y Threads (30 Color Thread Pack) Attention all embroiderers, Quilters and Heirloom stitchers! Out metallic thread maintains its color, heat resistance and ... wooden thread rack that no stabilizer remains after the embroidery is important that can stand on the top surface of fabrics. Consult your instruction manual for advice on the wall for greater utility and space saving.
...for our embroidery only machines, PE750D and PE700II. Polyester retains its color beauty and quality even in a 5-pack sleeve) at selected dealers. 30-Pack: CYTPK30 Brother Countr y Yarn Embroider y Threads (30 Color Thread Pack) Attention all embroiderers, Quilters and Heirloom stitchers! Out metallic thread maintains its color, heat resistance and ... wooden thread rack that no stabilizer remains after the embroidery is important that can stand on the top surface of fabrics. Consult your instruction manual for advice on the wall for greater utility and space saving.
Users Manual - English
Page 2
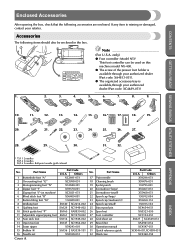
... can be enclosed in the box. Part Name 1 Buttonhole foot "A" 2 Overcasting foot "G" 3 Monogramming foot "N" 4 Zipper foot "I" 5 Zigzag foot "J" (on this machine model NX-400. ● The screw of the presser foot holder is available through your authorized dealer (Part code: XA4813-051). ● The organized accessory tray is missing... foot 12 Non stick foot 13 Open toe foot 14 Seam ripper 15 Bobbin (4) 16 Needle set 29 Knee lifter 30 Operation manual 31 Quick reference guide 32 Hard case Part Code U.S.A. Note (For U.S.A. If any item is available,through your retailer.
... can be enclosed in the box. Part Name 1 Buttonhole foot "A" 2 Overcasting foot "G" 3 Monogramming foot "N" 4 Zipper foot "I" 5 Zigzag foot "J" (on this machine model NX-400. ● The screw of the presser foot holder is available through your authorized dealer (Part code: XA4813-051). ● The organized accessory tray is missing... foot 12 Non stick foot 13 Open toe foot 14 Seam ripper 15 Bobbin (4) 16 Needle set 29 Knee lifter 30 Operation manual 31 Quick reference guide 32 Hard case Part Code U.S.A. Note (For U.S.A. If any item is available,through your retailer.
Users Manual - English
Page 8
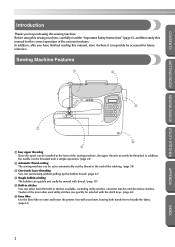
...utility stitches, character stitches and decorative stitches. CONTENTS GETTING READY SEWING BASICS UTILITY STITCHES Introduction Thank you have finished reading this manual, store it where it can quickly be accessed for future reference. Before using this sewing machine, carefully read the "Important ...Safety Instructions" (page 6), and then study this manual for the correct operation of the sewing machine, the upper thread can easily be threaded. Sewing Machine Features 1 4 5 2 6 3...
...utility stitches, character stitches and decorative stitches. CONTENTS GETTING READY SEWING BASICS UTILITY STITCHES Introduction Thank you have finished reading this manual, store it where it can quickly be accessed for future reference. Before using this sewing machine, carefully read the "Important ...Safety Instructions" (page 6), and then study this manual for the correct operation of the sewing machine, the upper thread can easily be threaded. Sewing Machine Features 1 4 5 2 6 3...
Users Manual - English
Page 12
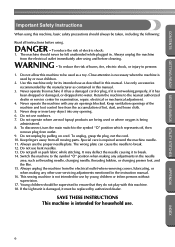
.... 17. If the Light unit is being used by authorized dealer. The machine should never be left unattended while plugged in the instruction manual. 16. Keep fingers away from the accumulation of electric shock: 1. Do not use outdoors. 7. Always use . 6 APPENDIX INDEX Do...been dropped or damaged, or dropped into any air openings blocked. Use only accessories recommended by pulling on cord. Never operate this manual. Return the machine to the symbol "{" position which represents off, then remove plug from the electrical outlet immediately after using and...
.... 17. If the Light unit is being used by authorized dealer. The machine should never be left unattended while plugged in the instruction manual. 16. Keep fingers away from the accumulation of electric shock: 1. Do not use outdoors. 7. Always use . 6 APPENDIX INDEX Do...been dropped or damaged, or dropped into any air openings blocked. Use only accessories recommended by pulling on cord. Never operate this manual. Return the machine to the symbol "{" position which represents off, then remove plug from the electrical outlet immediately after using and...
Users Manual - English
Page 14
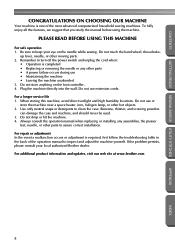
...to assure correct installation. For repair or adjustment In the event a malfunction occurs or adjustment is one of the operation manual to keep your local authorized Brother dealer. When storing this machine, avoid direct sunlight and high humidity locations. For additional product information and updates, visit ... in the back of the most advanced computerized household sewing machines. To fully enjoy all the features, we suggest that you study the manual before using the machine. up lever, needle, or other hot objects. 2. Be sure to inspect and adjust the machine yourself. Do...
...to assure correct installation. For repair or adjustment In the event a malfunction occurs or adjustment is one of the operation manual to keep your local authorized Brother dealer. When storing this machine, avoid direct sunlight and high humidity locations. For additional product information and updates, visit ... in the back of the most advanced computerized household sewing machines. To fully enjoy all the features, we suggest that you study the manual before using the machine. up lever, needle, or other hot objects. 2. Be sure to inspect and adjust the machine yourself. Do...

Users Manual - English
Page 19
... the sewing machine. 1 When you are finished with the help screen appears. X The LCD comes on. To 5 return to the corresponding page in this Operation Manual. 3 4 1 Replacing the presser foot 2 Threading the upper thread 3 Winding the bobbin 4 Installing the bobbin Press (OK key). 4 X The first screen describing the procedure for the...
... the sewing machine. 1 When you are finished with the help screen appears. X The LCD comes on. To 5 return to the corresponding page in this Operation Manual. 3 4 1 Replacing the presser foot 2 Threading the upper thread 3 Winding the bobbin 4 Installing the bobbin Press (OK key). 4 X The first screen describing the procedure for the...
Users Manual - English
Page 35
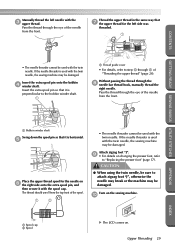
... the twin needle, the sewing machine may be damaged. Upper Threading 29 INDEX Pass the thread through the 8 needle bar thread hook, manually thread the right needle. GETTING READY SEWING BASICS UTILITY STITCHES APPENDIX 1 Bobbin winder shaft Swing down the spool pin so that it with ... Place the upper thread spool for the left needle with the 3 upper thread. If the needle threader is used with the twin needle. CONTENTS Manually thread the left side was threaded. 1 • The needle threader cannot be used with the twin needle, the sewing machine may be damaged....
... the twin needle, the sewing machine may be damaged. Upper Threading 29 INDEX Pass the thread through the 8 needle bar thread hook, manually thread the right needle. GETTING READY SEWING BASICS UTILITY STITCHES APPENDIX 1 Bobbin winder shaft Swing down the spool pin so that it with ... Place the upper thread spool for the left needle with the 3 upper thread. If the needle threader is used with the twin needle. CONTENTS Manually thread the left side was threaded. 1 • The needle threader cannot be used with the twin needle, the sewing machine may be damaged....
Users Manual - English
Page 59
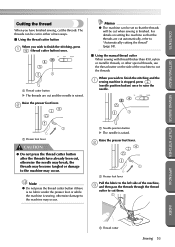
... stitching, press 1 (thread cutter button) once. 1 1 Thread cutter button X The threads are cut automatically, refer to "Automatically cutting the thread" (page 58). ■ Using the manual thread cutter When sewing with thread thicker than #30, nylon or metallic threads, or other special threads, use the thread cutter on the side of...
... stitching, press 1 (thread cutter button) once. 1 1 Thread cutter button X The threads are cut automatically, refer to "Automatically cutting the thread" (page 58). ■ Using the manual thread cutter When sewing with thread thicker than #30, nylon or metallic threads, or other special threads, use the thread cutter on the side of...
Users Manual - English
Page 76
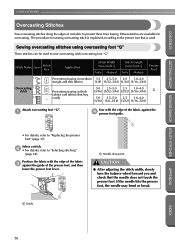
... fabric against the guide of cut fabric to "Selecting stitching" (page 68). Stitch Name Pattern Stitch Key Application Stitch Width [mm (inch.)] Auto Manual Stitch Length [mm (inch.)] Auto Manual Presser Foot 11 Preventing fraying in medium 3.5 2.5-5.0 2.0 1.0-4.0 weight and thin fabrics (1/8) (3/32-3/16) (1/16) (1/16-3/16) Overcasting 12 stitch 13 Preventing fraying...
... fabric against the guide of cut fabric to "Selecting stitching" (page 68). Stitch Name Pattern Stitch Key Application Stitch Width [mm (inch.)] Auto Manual Stitch Length [mm (inch.)] Auto Manual Presser Foot 11 Preventing fraying in medium 3.5 2.5-5.0 2.0 1.0-4.0 weight and thin fabrics (1/8) (3/32-3/16) (1/16) (1/16-3/16) Overcasting 12 stitch 13 Preventing fraying...
Users Manual - English
Page 77
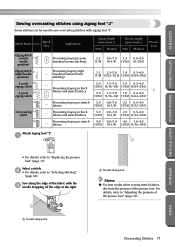
... pressure of the presser foot. Preventing fraying in thick fabrics and stretch fabrics - Preventing fraying in stretch fabrics Stitch Width [mm (inch.)] Auto Manual Stitch Length [mm (inch.)] Auto Manual Presser Foot 3.5 0.0-7.0 1.4 0.0-4.0 (1/8) (0-1/4) (1/16) (0-3/16) 3.5 2.5-5.0 1.4 0.3-4.0 (1/8) (3/32-3/16) (1/16) (1/64-3/16) 5.0 1.5-7.0 1.0 0.2-4.0 (3/16) (1/16-1/4) (1/16) (1/64-3/16) J 5.0 1.5-7.0 1.0 0.2-4.0 (3/16) (1/16-1/4) (1/16) (1/64-3/16) 5.0 0.0-7.0 2.5 0.5-4.0 (3/16) (0-1/4) (3/32) (1/32...
... pressure of the presser foot. Preventing fraying in thick fabrics and stretch fabrics - Preventing fraying in stretch fabrics Stitch Width [mm (inch.)] Auto Manual Stitch Length [mm (inch.)] Auto Manual Presser Foot 3.5 0.0-7.0 1.4 0.0-4.0 (1/8) (0-1/4) (1/16) (0-3/16) 3.5 2.5-5.0 1.4 0.3-4.0 (1/8) (3/32-3/16) (1/16) (1/64-3/16) 5.0 1.5-7.0 1.0 0.2-4.0 (3/16) (1/16-1/4) (1/16) (1/64-3/16) J 5.0 1.5-7.0 1.0 0.2-4.0 (3/16) (1/16-1/4) (1/16) (1/64-3/16) 5.0 0.0-7.0 2.5 0.5-4.0 (3/16) (0-1/4) (3/32) (1/32...
Users Manual - English
Page 78
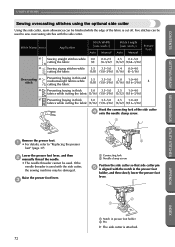
... optional side cutter Using the side cutter, seam allowances can be used . Stitch Name Pattern Application Stitch Width [mm (inch.)] Auto Manual Stitch Length [mm (inch.)] Auto Manual Presser Foot 63 Sewing straight stitches while 0.0 0.0-2.5 2.5 0.2-5.0 cutting the fabric (0) (0-3/32) (3/32) (1/64-3/16) 64 Sewing ...16) (3/32) (1/16-3/16) Hook the connecting fork of the fabric is cut off. Lower the presser foot lever, and then 2 manually thread the needle. • The needle threader cannot be damaged. If the needle threader is attached. 72 INDEX Raise the presser foot lever...
... optional side cutter Using the side cutter, seam allowances can be used . Stitch Name Pattern Application Stitch Width [mm (inch.)] Auto Manual Stitch Length [mm (inch.)] Auto Manual Presser Foot 63 Sewing straight stitches while 0.0 0.0-2.5 2.5 0.2-5.0 cutting the fabric (0) (0-3/32) (3/32) (1/64-3/16) 64 Sewing ...16) (3/32) (1/16-3/16) Hook the connecting fork of the fabric is cut off. Lower the presser foot lever, and then 2 manually thread the needle. • The needle threader cannot be damaged. If the needle threader is attached. 72 INDEX Raise the presser foot lever...
Users Manual - English
Page 80
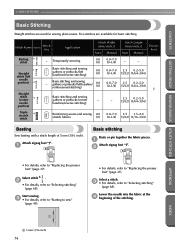
... stitch 6 . 2 • For details, refer to "Replacing the presser foot" (page 37). Stitch Name Pattern Stitch Key Application Stitch Width [mm (inch.)] Auto Manual Stitch Length [mm (inch.)] Auto Manual Presser Foot Basting 6 stitch - Temporarily securing 0.0 0.0-7.0 (0) (0-1/4) - - 1 Straight stitch (left needle position) 2 Straight stitch 3 (center needle position) Basic stitching and sewing gathers or...
... stitch 6 . 2 • For details, refer to "Replacing the presser foot" (page 37). Stitch Name Pattern Stitch Key Application Stitch Width [mm (inch.)] Auto Manual Stitch Length [mm (inch.)] Auto Manual Presser Foot Basting 6 stitch - Temporarily securing 0.0 0.0-7.0 (0) (0-1/4) - - 1 Straight stitch (left needle position) 2 Straight stitch 3 (center needle position) Basic stitching and sewing gathers or...
Users Manual - English
Page 82
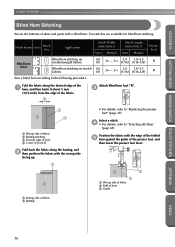
... then lower the presser foot lever. Position the fabric with a blind hem. Stitch Name Pattern Stitch Key Application Stitch Width [mm (inch.)] Auto Manual Stitch Length [mm (inch.)] Auto Manual Presser Foot 17 Blind hem stitch 18 Blind hem stitching on mediumweight fabrics 0.0 (0) 3← - 3→ 2.0 (1/16) 1.0-3.5 (1/16-1/8) R Blind hem stitching on stretch...
... then lower the presser foot lever. Position the fabric with a blind hem. Stitch Name Pattern Stitch Key Application Stitch Width [mm (inch.)] Auto Manual Stitch Length [mm (inch.)] Auto Manual Presser Foot 17 Blind hem stitch 18 Blind hem stitching on mediumweight fabrics 0.0 (0) 3← - 3→ 2.0 (1/16) 1.0-3.5 (1/16-1/8) R Blind hem stitching on stretch...
Users Manual - English
Page 84
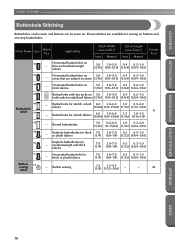
... sewing on - Bound buttonholes 5.0 0.0-6.0 2.0 0.2-4.0 (3/16) (0-15/64) (1/16) (1/64-3/16) 49 - Stitch Name Pattern Stitch Key Application Stitch Width [mm (inch.)] Auto Manual Stitch Length [mm (inch.)] Auto Manual Presser Foot 42 Horizontal buttonholes on buttons and one-step buttonholes. Eleven stitches are subject to strain (3/16) (1/8-3/16) (1/64) (1/64-1/16) 44...
... sewing on - Bound buttonholes 5.0 0.0-6.0 2.0 0.2-4.0 (3/16) (0-15/64) (1/16) (1/64-3/16) 49 - Stitch Name Pattern Stitch Key Application Stitch Width [mm (inch.)] Auto Manual Stitch Length [mm (inch.)] Auto Manual Presser Foot 42 Horizontal buttonholes on buttons and one-step buttonholes. Eleven stitches are subject to strain (3/16) (1/8-3/16) (1/64) (1/64-1/16) 44...
Users Manual - English
Page 91
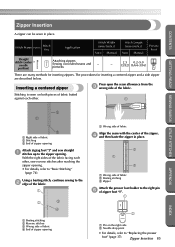
... foot "J" and sew straight 1 stitches up to "Basic Stitching" (page 74). Stitch Name Pattern Stitch Key Application Stitch Width [mm (inch.)] Auto Manual Stitch Length [mm (inch.)] Auto Manual Presser Foot Straight stitch (center 3 needle position) Attaching zippers Sewing concealed seams and - Zipper Insertion 85 INDEX The procedures for inserting zippers. With...
... foot "J" and sew straight 1 stitches up to "Basic Stitching" (page 74). Stitch Name Pattern Stitch Key Application Stitch Width [mm (inch.)] Auto Manual Stitch Length [mm (inch.)] Auto Manual Presser Foot Straight stitch (center 3 needle position) Attaching zippers Sewing concealed seams and - Zipper Insertion 85 INDEX The procedures for inserting zippers. With...
Users Manual - English
Page 95
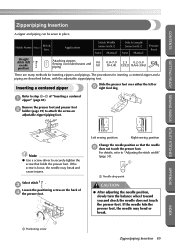
... sewing position Change the needle position so that holds the presser foot. Stitch Name Pattern Stitch Key Application Stitch Width [mm (inch.)] Auto Manual Stitch Length [mm (inch.)] Auto Manual Presser Foot Straight stitch (left or 5 right feed dog. CONTENTS GETTING READY SEWING BASICS UTILITY STITCHES Zipper/piping Insertion A zipper and piping...
... sewing position Change the needle position so that holds the presser foot. Stitch Name Pattern Stitch Key Application Stitch Width [mm (inch.)] Auto Manual Stitch Length [mm (inch.)] Auto Manual Presser Foot Straight stitch (left or 5 right feed dog. CONTENTS GETTING READY SEWING BASICS UTILITY STITCHES Zipper/piping Insertion A zipper and piping...
Users Manual - English
Page 97
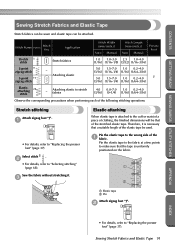
... operations. Pin the elastic tape to "Replacing the presser foot" (page 37). Stitch Name Pattern Stitch Key Application Stitch Width [mm (inch.)] Auto Manual Stitch Length [mm (inch.)] Auto Manual Presser Foot Stretch 5 stitch Stretch fabrics 1.0 1.0-3.0 2.5 1.0-4.0 (1/16) (1/16-1/8) (3/32) (1/16-3/16) 2-point 9 zigzag stitch 3-point 10 zigzag stitch - Attaching elastic to "Selecting...
... operations. Pin the elastic tape to "Replacing the presser foot" (page 37). Stitch Name Pattern Stitch Key Application Stitch Width [mm (inch.)] Auto Manual Stitch Length [mm (inch.)] Auto Manual Presser Foot Stretch 5 stitch Stretch fabrics 1.0 1.0-3.0 2.5 1.0-4.0 (1/16) (1/16-1/8) (3/32) (1/16-3/16) 2-point 9 zigzag stitch 3-point 10 zigzag stitch - Attaching elastic to "Selecting...
Users Manual - English
Page 99
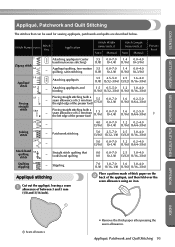
... from the left edge of the presser foot) 5.5 (7/32) 0.0-7.0 (0-1/4) 1.6 0.2-5.0 (1/16) (1/64-3/16) - Stitch Name Pattern Stitch Key Application Stitch Width [mm (inch.)] Auto Manual Stitch Length [mm (inch.)] Auto Manual Presser Foot 7 Zigzag stitch 60 Attaching appliqués (center baseline/reverse stitching) 3.5 0.0-7.0 1.4 0.0-4.0 (1/8) (0-1/4) (1/16) (0-3/16) - Piecing straight stitching (with a seam allowance of 6.5 mm...
... from the left edge of the presser foot) 5.5 (7/32) 0.0-7.0 (0-1/4) 1.6 0.2-5.0 (1/16) (1/64-3/16) - Stitch Name Pattern Stitch Key Application Stitch Width [mm (inch.)] Auto Manual Stitch Length [mm (inch.)] Auto Manual Presser Foot 7 Zigzag stitch 60 Attaching appliqués (center baseline/reverse stitching) 3.5 0.0-7.0 1.4 0.0-4.0 (1/8) (0-1/4) (1/16) (0-3/16) - Piecing straight stitching (with a seam allowance of 6.5 mm...
Users Manual - English
Page 106
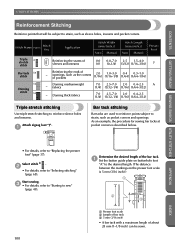
... (1-1/8 inch) can be subject to strain, such as pocket corners and openings. Stitch Name Pattern Stitch Key Application Stitch Width [mm (inch.)] Auto Manual Stitch Length [mm (inch.)] Auto Manual Presser Foot Triple 4 stretch stitch Reinforcing the seams of sleeves and inseams 0.0 0.0-7.0 2.5 1.5-4.0 (0) (0-1/4) (3/32) (1/16-3/16) J Bar tack 54 stitch - Darning mediumweight fabrics...
... (1-1/8 inch) can be subject to strain, such as pocket corners and openings. Stitch Name Pattern Stitch Key Application Stitch Width [mm (inch.)] Auto Manual Stitch Length [mm (inch.)] Auto Manual Presser Foot Triple 4 stretch stitch Reinforcing the seams of sleeves and inseams 0.0 0.0-7.0 2.5 1.5-4.0 (0) (0-1/4) (3/32) (1/16-3/16) J Bar tack 54 stitch - Darning mediumweight fabrics...


