

Accessory Catalog
Page 7
... the needle to your fabric consistently. Select a stitch, and adjust settings as it stitches. Stitch Guide Foot The scale in the presser foot can be used for perfect topstitching on selected machines. Installing the Straight Stitch Needle Plate automatically sets the needle position to accomplish perfect straight stitching. Sew the stitches keeping a certain seam allowance. Make a cut about 2 cm (3/4'') long in Fall 2008. SA189 ABCDEFGHJKLMNO www.brother.com Use this presser foot only with the Straight Stitch Needle Plate to the center straight stitching position on...
... the needle to your fabric consistently. Select a stitch, and adjust settings as it stitches. Stitch Guide Foot The scale in the presser foot can be used for perfect topstitching on selected machines. Installing the Straight Stitch Needle Plate automatically sets the needle position to accomplish perfect straight stitching. Sew the stitches keeping a certain seam allowance. Make a cut about 2 cm (3/4'') long in Fall 2008. SA189 ABCDEFGHJKLMNO www.brother.com Use this presser foot only with the Straight Stitch Needle Plate to the center straight stitching position on...

Accessory Catalog
Page 11
... brother sewing machines of 7 mm feed width. 1. Loosen the screw on the presser foot and insert a braid through the guide before attaching the presser foot on the presser foot. 2. Slide the plate of the guide back and forth to 7 cords or decorative threads. Sew. Place cord under the presser foot, and select zigzag stitch with maximum stitch width. Line up the cords, and select zigzag stitch with maximum stitch width. SA157 ABCDEFJKMN Cording Foot (7-hole) Used for embellishing 1 to 3 cords or decorative threads. Slip a cord from satin...
... brother sewing machines of 7 mm feed width. 1. Loosen the screw on the presser foot and insert a braid through the guide before attaching the presser foot on the presser foot. 2. Slide the plate of the guide back and forth to 7 cords or decorative threads. Sew. Place cord under the presser foot, and select zigzag stitch with maximum stitch width. Line up the cords, and select zigzag stitch with maximum stitch width. SA157 ABCDEFJKMN Cording Foot (7-hole) Used for embellishing 1 to 3 cords or decorative threads. Slip a cord from satin...

Accessory Catalog
Page 12
... various settings to see which one works on your fabric. 3. Sew a few stitches to a flat fabric: 1. Increase the upper thread tension. 3. Increase the upper thread tension. 3. Zigzag-sew with a single zigzag stitch. Also used for securing edges of the presser foot to the seam or pattern line and sew. Making loops or fringes: 1. Line up the center guide mark (red) of appliqué, sewing curves, topstitching, etc. To attach the gathered edge to mark. 2. SA150 ABCDEFJKMN www.brother.com...
... various settings to see which one works on your fabric. 3. Sew a few stitches to a flat fabric: 1. Increase the upper thread tension. 3. Increase the upper thread tension. 3. Zigzag-sew with a single zigzag stitch. Also used for securing edges of the presser foot to the seam or pattern line and sew. Making loops or fringes: 1. Line up the center guide mark (red) of appliqué, sewing curves, topstitching, etc. To attach the gathered edge to mark. 2. SA150 ABCDEFJKMN www.brother.com...

Accessory Catalog
Page 13
... corded pin tucks using a twin needle on the lower portion of stitching and use that to get started. Move fabric about 1" (2.5 cm) past the needle to sew the first row in one of tucks can be adjusted. 1. For seven grooves: SA179 ABCDEJ For five grooves: SA162 IP This presser foot does not include the bobbin cover. Draw a reference line to guide your first row of the presser foot is Project Book...
... corded pin tucks using a twin needle on the lower portion of stitching and use that to get started. Move fabric about 1" (2.5 cm) past the needle to sew the first row in one of tucks can be adjusted. 1. For seven grooves: SA179 ABCDEJ For five grooves: SA162 IP This presser foot does not include the bobbin cover. Draw a reference line to guide your first row of the presser foot is Project Book...

Accessory Catalog
Page 15
... sewing machines. While starting to sew, press the needle position button twice to pull the bobbin thread to hold fabric in length. Use both hands to the quilt top. 7. Fabrics that both hands while keeping the fabric pulled tight. 9. Sew. Lower the feed dogs. 3. Use the foot controller so that can be moved between stitches and to feed the fabric consistently. The foot raises and lowers with the needle to allow fabric to be easily sewn. Walking Foot/Open Toe Walking Foot Brother Quilting Feet 28 Walking Foot/Open Toe Walking Foot...
... sewing machines. While starting to sew, press the needle position button twice to pull the bobbin thread to hold fabric in length. Use both hands to the quilt top. 7. Fabrics that both hands while keeping the fabric pulled tight. 9. Sew. Lower the feed dogs. 3. Use the foot controller so that can be moved between stitches and to feed the fabric consistently. The foot raises and lowers with the needle to allow fabric to be easily sewn. Walking Foot/Open Toe Walking Foot Brother Quilting Feet 28 Walking Foot/Open Toe Walking Foot...

Accessory Catalog
Page 17
... and easy to see embroidery designs. - Includes three new free-motion presser feet: Free-motion quilting foot "C" for more features to memory devices*. - Add even more control with USB hub devices* to provide access to your new machine you can create continuous border patterns from the stunning designs that have been upgraded with the Brother Innov-is 4000D by adding special features to embroider 150 decorative sewing stitches within the frame. - Add...
... and easy to see embroidery designs. - Includes three new free-motion presser feet: Free-motion quilting foot "C" for more features to memory devices*. - Add even more control with USB hub devices* to provide access to your new machine you can create continuous border patterns from the stunning designs that have been upgraded with the Brother Innov-is 4000D by adding special features to embroider 150 decorative sewing stitches within the frame. - Add...

Accessory Catalog
Page 33
... Spool Thread Stand Ten Spool Thread Stand Embroidery Machine Hoops Brother Embroidery Accessories 64 For all embroidery and sewing/embroidery machines. For all models: SA503 Free-Standing Ten Spool Thread Stand You can set up to accommodate a variety of thread on our website for thread delivery or bobbin storage. Allows easy access to the machine as well as a thread locking system which keeps those loose ends tamed when not in the storage slots. The spool pins can be removed...
... Spool Thread Stand Ten Spool Thread Stand Embroidery Machine Hoops Brother Embroidery Accessories 64 For all embroidery and sewing/embroidery machines. For all models: SA503 Free-Standing Ten Spool Thread Stand You can set up to accommodate a variety of thread on our website for thread delivery or bobbin storage. Allows easy access to the machine as well as a thread locking system which keeps those loose ends tamed when not in the storage slots. The spool pins can be removed...

Accessory Catalog
Page 34
... (sold in the 61 color set of needle and stabilizer types. Individual colors are included in a 5-pack sleeve). 300 meters (328 yards) of the proper stabilizer helps to provide a good foundation as well as decorative sewing. Stabilizers and Water Soluble Stabilizers When doing machine embroidery, the use the Brother Bobbin Thread designed specifically for details.) www.brother.com Designed for high speed embroidery stitching, made in a 5-pack sleeve...
... (sold in the 61 color set of needle and stabilizer types. Individual colors are included in a 5-pack sleeve). 300 meters (328 yards) of the proper stabilizer helps to provide a good foundation as well as decorative sewing. Stabilizers and Water Soluble Stabilizers When doing machine embroidery, the use the Brother Bobbin Thread designed specifically for details.) www.brother.com Designed for high speed embroidery stitching, made in a 5-pack sleeve...

Accessory Catalog
Page 40
... 3 or 6 mm wide cover stitch. 3. Sew. Brother Cover Stitch Feet 77 Bias Tape Binding Set Hemming Set Bias Tape Binding Set Attaches 6 or 12 mm (approx. 1/4 to top stitch with 3 or 6 mm (approx. 1/8 or 1/4 inch) wide cover stitch. 1. Open the seams. 4. Attach the hem positioning plate A/B to the hemming attachment, and attach it into the front cover slot. 3. Set the bias tape though the holder (cut the end of the presser foot, and sew. Set up your machine. 3. Fold fabric and set through the holder). 4.
... 3 or 6 mm wide cover stitch. 3. Sew. Brother Cover Stitch Feet 77 Bias Tape Binding Set Hemming Set Bias Tape Binding Set Attaches 6 or 12 mm (approx. 1/4 to top stitch with 3 or 6 mm (approx. 1/8 or 1/4 inch) wide cover stitch. 1. Open the seams. 4. Attach the hem positioning plate A/B to the hemming attachment, and attach it into the front cover slot. 3. Set the bias tape though the holder (cut the end of the presser foot, and sew. Set up your machine. 3. Fold fabric and set through the holder). 4.
Users Manual - English
Page 4
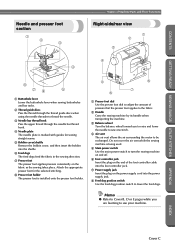
...the sewing machine is installed onto the presser foot holder. 5 6 8 7 1 Presser foot dial Use the presser foot dial to adjust the amount of the foot controller cable into the foot controller jack. 7 Power supply jack Insert the plug on the power supply cord into the shuttle. 6 Feed dogs The feed dogs feed the fabric in the sewing direction. 7 Presser foot The presser foot applies pressure consistently on the fabric as the sewing takes place. Attach the appropriate presser foot for sewing straight seams. 5 Bobbin cover/shuttle Remove the bobbin cover, and then insert the bobbin into...
...the sewing machine is installed onto the presser foot holder. 5 6 8 7 1 Presser foot dial Use the presser foot dial to adjust the amount of the foot controller cable into the foot controller jack. 7 Power supply jack Insert the plug on the power supply cord into the shuttle. 6 Feed dogs The feed dogs feed the fabric in the sewing direction. 7 Presser foot The presser foot applies pressure consistently on the fabric as the sewing takes place. Attach the appropriate presser foot for sewing straight seams. 5 Bobbin cover/shuttle Remove the bobbin cover, and then insert the bobbin into...
Users Manual - English
Page 5
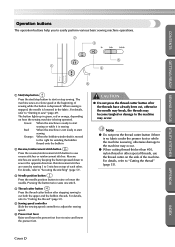
... moved to the right for winding the bobbin thread onto the bobbin 2 Reverse/reinforcement stitch button Press the reverse/reinforcement stitch button to "Cutting the thread" (page 53). For details, refer to "Securing the stitching" (page 51). 3 Needle position button Press the needle position button to raise and lower the presser foot. For details, refer to "Cutting the thread" (page 53). 5 Sewing speed controller Slide the sewing speed controller to adjust the sewing speed. 6 Presser foot lever Raise and lower the presser foot lever to raise or lower the needle.
... moved to the right for winding the bobbin thread onto the bobbin 2 Reverse/reinforcement stitch button Press the reverse/reinforcement stitch button to "Cutting the thread" (page 53). For details, refer to "Securing the stitching" (page 51). 3 Needle position button Press the needle position button to raise and lower the presser foot. For details, refer to "Cutting the thread" (page 53). 5 Sewing speed controller Slide the sewing speed controller to adjust the sewing speed. 6 Presser foot lever Raise and lower the presser foot lever to raise or lower the needle.
Users Manual - English
Page 9
... thread ...24 Threading the needle ...27 Using the twin needle ...28 Using thread that winds off quickly ...31 Pulling up the bobbin thread ...31 Replacing the Needle ...33 Needle precautions ...33 Needle types and their uses ...33 Checking the needle ...34 Replacing the needle ...35 Replacing the Presser Foot 37 Presser foot precautions ...37 Replacing the presser foot ...37 Adjusting the pressure of the presser foot ...39 Removing the presser foot holder ...39 Using the walking foot ...40 Sewing Cylindrical or Large Pieces 42 Stitching cylindrical pieces ...42 Sewing large pieces of fabric...
... thread ...24 Threading the needle ...27 Using the twin needle ...28 Using thread that winds off quickly ...31 Pulling up the bobbin thread ...31 Replacing the Needle ...33 Needle precautions ...33 Needle types and their uses ...33 Checking the needle ...34 Replacing the needle ...35 Replacing the Presser Foot 37 Presser foot precautions ...37 Replacing the presser foot ...37 Adjusting the pressure of the presser foot ...39 Removing the presser foot holder ...39 Using the walking foot ...40 Sewing Cylindrical or Large Pieces 42 Stitching cylindrical pieces ...42 Sewing large pieces of fabric...
Users Manual - English
Page 10
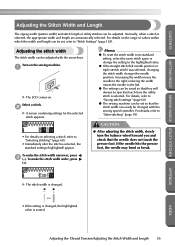
...54 Changing the tension of theupper thread ...54 Adjusting the Stitch Width and Length 55 Adjusting the stitch width ...55 Adjusting the stitch length ...56 Useful Functions ...57 Automatically sewing reverse/reinforcement stitches 57 Automatically cutting the thread ...58 Saving stitch settings ...60 Hands-free raising and lifting of the presser foot 61 Useful Sewing Tips ...62 Trial sewing ...62 Changing the sewing direction ...62 Sewing curves ...62 Sewing thick fabrics ...63 Sewing thin fabrics ...64 Sewing stretch fabrics ...64 Sewing leathers or vinyl fabrics ...64 Sewing an even seam...
...54 Changing the tension of theupper thread ...54 Adjusting the Stitch Width and Length 55 Adjusting the stitch width ...55 Adjusting the stitch length ...56 Useful Functions ...57 Automatically sewing reverse/reinforcement stitches 57 Automatically cutting the thread ...58 Saving stitch settings ...60 Hands-free raising and lifting of the presser foot 61 Useful Sewing Tips ...62 Trial sewing ...62 Changing the sewing direction ...62 Sewing curves ...62 Sewing thick fabrics ...63 Sewing thin fabrics ...64 Sewing stretch fabrics ...64 Sewing leathers or vinyl fabrics ...64 Sewing an even seam...
Users Manual - English
Page 61
... presser foot, the needle may bend or break. To make the stitch width narrower, press 3 (-). X The stitch width is changed. - + • If the setting is changed with the arrow keys. reducing the width moves the needle to "Stitch Settings" (page 128). APPENDIX INDEX Adjusting the Thread Tension/Adjusting the Stitch Width and Length 55 Normally, when a stitch is selected, the appropriate width and length are automatically selected. CONTENTS GETTING READY SEWING BASICS UTILITY STITCHES Adjusting...
... presser foot, the needle may bend or break. To make the stitch width narrower, press 3 (-). X The stitch width is changed. - + • If the setting is changed with the arrow keys. reducing the width moves the needle to "Stitch Settings" (page 128). APPENDIX INDEX Adjusting the Thread Tension/Adjusting the Stitch Width and Length 55 Normally, when a stitch is selected, the appropriate width and length are automatically selected. CONTENTS GETTING READY SEWING BASICS UTILITY STITCHES Adjusting...
Users Manual - English
Page 86
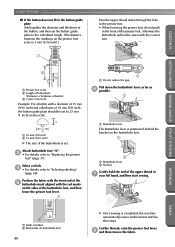
... then set the button guide plate to the calculated length. (The distance between the markings on the buttonhole foot. 1 2 1 Buttonhole lever 2 Bracket Gently hold the end of the upper thread in the front of the presser foot, otherwise the buttonhole will not be set to 25 mm (1 inch) on buttonhole foot 80 X Once sewing is completed, the machine automatically sews reinforcement stitches, then stops Cut the threads, raise the presser foot lever, 8 and then remove the fabric. Select a stitch...
... then set the button guide plate to the calculated length. (The distance between the markings on the buttonhole foot. 1 2 1 Buttonhole lever 2 Bracket Gently hold the end of the upper thread in the front of the presser foot, otherwise the buttonhole will not be set to 25 mm (1 inch) on buttonhole foot 80 X Once sewing is completed, the machine automatically sews reinforcement stitches, then stops Cut the threads, raise the presser foot lever, 8 and then remove the fabric. Select a stitch...
Users Manual - English
Page 89
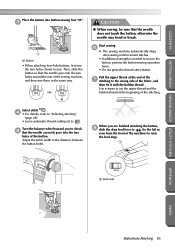
... bobbin thread. Start sewing. 6 X The sewing machine automatically stops after sewing reinforcement stitches. • If additional strength is needed to . Select stitch 55 . 4 • For details, refer to "Selecting stitching" (page 68). • Leave automatic thread-cutting set to secure the button, perform the button-sewing operation twice. • Do not press the thread cutter button. Then, slide the button so that the needle does not touch the button, otherwise the needle may bend or break. Adjust the stitch...
... bobbin thread. Start sewing. 6 X The sewing machine automatically stops after sewing reinforcement stitches. • If additional strength is needed to . Select stitch 55 . 4 • For details, refer to "Selecting stitching" (page 68). • Leave automatic thread-cutting set to secure the button, perform the button-sewing operation twice. • Do not press the thread cutter button. Then, slide the button so that the needle does not touch the button, otherwise the needle may bend or break. Adjust the stitch...
Users Manual - English
Page 143
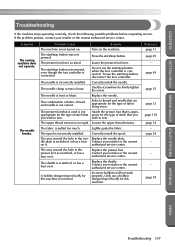
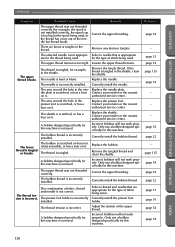
... requesting service. Symptom The sewing machine does not operate. The needle breaks. Do not use the start /stop button, disconnect the foot controller. The upper thread tension is appro- Loosen the upper thread tension. Lightly guide the fabric. The area around the hole in the presser foot is scratched, or has a burr on it . The shuttle is scratched, or has a burr on it . Replace the shuttle. A bobbin designed specifically for the type of stitch that is too tight. Incorrect bobbins will not work...
... requesting service. Symptom The sewing machine does not operate. The needle breaks. Do not use the start /stop button, disconnect the foot controller. The upper thread tension is appro- Loosen the upper thread tension. Lightly guide the fabric. The area around the hole in the presser foot is scratched, or has a burr on it . The shuttle is scratched, or has a burr on it . Replace the shuttle. A bobbin designed specifically for the type of stitch that is too tight. Incorrect bobbins will not work...
Users Manual - English
Page 144
... the shuttle. The upper thread breaks. The needle is incorrectly installed. Replace the needle plate. Replace the presser foot. Contact your retailer or the nearest authorized service center. The bobbin is not used , or the thread has come out of the needle bar thread hook). A bobbin designed specifically for this machine is scratched or does not rotate smoothly, or has a burr on it . The upper thread was not threaded correctly (for example, the spool is not installed correctly, the spool cap...
... the shuttle. The upper thread breaks. The needle is incorrectly installed. Replace the needle plate. Replace the presser foot. Contact your retailer or the nearest authorized service center. The bobbin is not used , or the thread has come out of the needle bar thread hook). A bobbin designed specifically for this machine is scratched or does not rotate smoothly, or has a burr on it . The upper thread was not threaded correctly (for example, the spool is not installed correctly, the spool cap...
Users Manual - English
Page 150
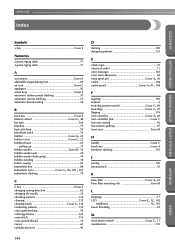
... 57 automatic reverse stitching 57 automatic thread-cutting 58 B back key Cover E balance wheel Cover C, 48 bar tack 100 baseline 75 basic stitching 74 blind hem stitch 76 bobbin Cover A, 22 bobbin cover Cover C, 22 bobbin thread 22 pulling up 31 bobbin winder Cover B, 19 bobbin winder seat 20 bobbin winder shaft spring 19 bobbin-winding 18 button sewing 82 buttonhole foot 80 buttonhole lever Cover C, 80, 101, 103 buttonhole stitching 78 C C key Cover E changing sewing direction 62 changing the needle 35 checking patterns 116 cleaning 135 cleaning brush Cover A, 136...
... 57 automatic reverse stitching 57 automatic thread-cutting 58 B back key Cover E balance wheel Cover C, 48 bar tack 100 baseline 75 basic stitching 74 blind hem stitch 76 bobbin Cover A, 22 bobbin cover Cover C, 22 bobbin thread 22 pulling up 31 bobbin winder Cover B, 19 bobbin winder seat 20 bobbin winder shaft spring 19 bobbin-winding 18 button sewing 82 buttonhole foot 80 buttonhole lever Cover C, 80, 101, 103 buttonhole stitching 78 C C key Cover E changing sewing direction 62 changing the needle 35 checking patterns 116 cleaning 135 cleaning brush Cover A, 136...
Users Manual - English
Page 151
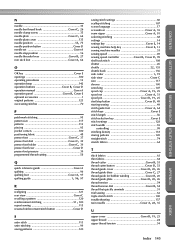
... threader lever Cover B, 27 non stick foot Cover A, 64 O OK key Cover E openings 100 operating procedures 13 operation beep 142 operation buttons Cover B, Cover D operation manual Cover A operation panel Cover B, Cover E optional accessories 1 original patterns 123 overcasting stitches 70 P patchwork stitching 95 pattern size 117 patterns 113 piecing 95 pocket corners 100 positioning fabric 48 presser foot Cover C, 37 presser foot dial Cover C, 39 presser foot holder Cover C, 39 presser foot lever Cover D presser foot pressure 39 programmed thread-cutting 58 Q quick...
... threader lever Cover B, 27 non stick foot Cover A, 64 O OK key Cover E openings 100 operating procedures 13 operation beep 142 operation buttons Cover B, Cover D operation manual Cover A operation panel Cover B, Cover E optional accessories 1 original patterns 123 overcasting stitches 70 P patchwork stitching 95 pattern size 117 patterns 113 piecing 95 pocket corners 100 positioning fabric 48 presser foot Cover C, 37 presser foot dial Cover C, 39 presser foot holder Cover C, 39 presser foot lever Cover D presser foot pressure 39 programmed thread-cutting 58 Q quick...


