Users Manual - English
Page 6
...Paper Feeding Kit, Fuser and Laser Units. You are not limited to print heads, toner, drums, ink cartridges, print cartridges, cordless handset battery, refill ribbons, therma PLUS paper and thermal paper. „ Except as otherwise provided herein, Brother warrants that expired in accordance with.... For products purchased in, but not limited to transporting this Product without authorization from Brother and/or alteration/removal of the serial number). Brother® One-Year Limited Warranty and Replacement Service (USA only) Who is covered: „ This limited warranty ("warranty") is...
...Paper Feeding Kit, Fuser and Laser Units. You are not limited to print heads, toner, drums, ink cartridges, print cartridges, cordless handset battery, refill ribbons, therma PLUS paper and thermal paper. „ Except as otherwise provided herein, Brother warrants that expired in accordance with.... For products purchased in, but not limited to transporting this Product without authorization from Brother and/or alteration/removal of the serial number). Brother® One-Year Limited Warranty and Replacement Service (USA only) Who is covered: „ This limited warranty ("warranty") is...
Users Manual - English
Page 8
For Laser units: Failure to remove the Toner Cartridge (and Toner Drum Unit, waste toner packs or oil bottles on applicable models) during shipping and will repair or replace (at Brother Authorized Service Centres throughout Canada. Please avoid shipping the unit without original protective ...(Canada only) Pursuant to the limited warranty of 1 year from the date of purchase for labour and parts, Brother International Corporation (Canada) Ltd. ("Brother"), or its Authorized Service Centres, Distributors, Dealers, Agents or employees, shall create another warranty or modify this warranty....
For Laser units: Failure to remove the Toner Cartridge (and Toner Drum Unit, waste toner packs or oil bottles on applicable models) during shipping and will repair or replace (at Brother Authorized Service Centres throughout Canada. Please avoid shipping the unit without original protective ...(Canada only) Pursuant to the limited warranty of 1 year from the date of purchase for labour and parts, Brother International Corporation (Canada) Ltd. ("Brother"), or its Authorized Service Centres, Distributors, Dealers, Agents or employees, shall create another warranty or modify this warranty....
Users Manual - English
Page 13
... Information 92 Standard telephone and FCC Notices 92 Industry Canada Compliance Statement (Canada only 95 Disconnect device 95 LAN connection 95 Laser safety 95 FDA regulations 96 Important safety instructions 97 Trademarks 98 B Options 99 Options ...99 Optional Paper Tray (LT-5300... the scanner glass 128 Cleaning the laser scanner window 128 Cleaning the corona wire 130 Cleaning the drum unit 131 Replacing the toner cartridge (TN-550/TN-580 132 Replacing the toner cartridge 132 Replacing the drum unit (DR-520 135 Replacing periodic maintenance parts 137 Packing and ...
... Information 92 Standard telephone and FCC Notices 92 Industry Canada Compliance Statement (Canada only 95 Disconnect device 95 LAN connection 95 Laser safety 95 FDA regulations 96 Important safety instructions 97 Trademarks 98 B Options 99 Options ...99 Optional Paper Tray (LT-5300... the scanner glass 128 Cleaning the laser scanner window 128 Cleaning the corona wire 130 Cleaning the drum unit 131 Replacing the toner cartridge (TN-550/TN-580 132 Replacing the toner cartridge 132 Replacing the drum unit (DR-520 135 Replacing periodic maintenance parts 137 Packing and ...
Users Manual - English
Page 118
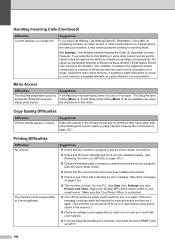
...your machine, it on again. On your model name)'. Brother's ECM feature should help overcome this problem. The Setup Receive access the Setup Receive and setting (Menu, 2, 1) and Setup Send setting (Menu, 2, 2) are installed properly. (See Replacing the drum unit (DR-520) on page 135.) „ Check... streaks appear in Fax mode. Suggestions If you try it prints garbage. Right-click 'Brother MFC-XXXX (where XXXX is turned on. „ Check that the toner cartridge and drum unit are available only when Setup Send menus. The machine prints unexpectedly or it again....
...your machine, it on again. On your model name)'. Brother's ECM feature should help overcome this problem. The Setup Receive access the Setup Receive and setting (Menu, 2, 1) and Setup Send setting (Menu, 2, 2) are installed properly. (See Replacing the drum unit (DR-520) on page 135.) „ Check... streaks appear in Fax mode. Suggestions If you try it prints garbage. Right-click 'Brother MFC-XXXX (where XXXX is turned on. „ Check that the toner cartridge and drum unit are available only when Setup Send menus. The machine prints unexpectedly or it again....
Users Manual - English
Page 124
... the scanner window and the primary corona wire of the drum unit. (See Cleaning the laser scanner window on page 128 and Cleaning the corona wire on page 130.) If the print quality has not improved, put in a new drum unit. (See Replacing the drum unit (DR-520) on page 135.) „ Put in a new... drum unit. (See Replacing the drum unit (DR-520) on page 12.) „ ...
... the scanner window and the primary corona wire of the drum unit. (See Cleaning the laser scanner window on page 128 and Cleaning the corona wire on page 130.) If the print quality has not improved, put in a new drum unit. (See Replacing the drum unit (DR-520) on page 135.) „ Put in a new... drum unit. (See Replacing the drum unit (DR-520) on page 12.) „ ...
Users Manual - English
Page 125
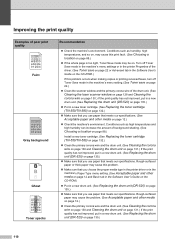
...the print quality still has not improved you need to install a new drum. (See Replacing the drum unit (DR-520) on page 135.) Black Spots at 3.7 in a new drum unit. (See Replacing the drum unit (DR-520) on page 135.) 111 Troubleshooting and routine maintenance ...Examples of poor print quality Hollow print Recommendation „ Make sure that you use paper that meets our specifications. (See Acceptable paper and other media on page 12.) „ If you use label sheets for laser...
...the print quality still has not improved you need to install a new drum. (See Replacing the drum unit (DR-520) on page 135.) Black Spots at 3.7 in a new drum unit. (See Replacing the drum unit (DR-520) on page 135.) 111 Troubleshooting and routine maintenance ...Examples of poor print quality Hollow print Recommendation „ Make sure that you use paper that meets our specifications. (See Acceptable paper and other media on page 12.) „ If you use label sheets for laser...

Users Manual - English
Page 126
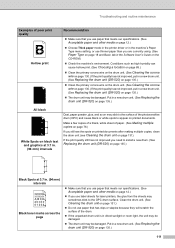
...paper and other media on page 12.) 112 Put in a new drum unit. (See Replacing the drum unit (DR-520) on the CD-ROM.) „ The problem may be damaged. Call Brother Customer Service at 1-877-BROTHER (1-877-276-8437) (in USA) or 1-877-BROTHER (in the Software User's Guide on page 135.) Black lines ...abcde 01234 White lines across the page „ Clean the primary corona wire in the drum unit. (See Cleaning the corona wire on page 130.) „ Clean the scanner window with a soft cloth. (See Cleaning the laser scanner window on page 12 and Basic tab in Canada). A rough surfaced paper or...
...paper and other media on page 12.) 112 Put in a new drum unit. (See Replacing the drum unit (DR-520) on the CD-ROM.) „ The problem may be damaged. Call Brother Customer Service at 1-877-BROTHER (1-877-276-8437) (in USA) or 1-877-BROTHER (in the Software User's Guide on page 135.) Black lines ...abcde 01234 White lines across the page „ Clean the primary corona wire in the drum unit. (See Cleaning the corona wire on page 130.) „ Clean the scanner window with a soft cloth. (See Cleaning the laser scanner window on page 12 and Basic tab in Canada). A rough surfaced paper or...

Users Manual - English
Page 131
...not rise at a specified temperature within specified time. Leave the machine for up the One-Touch or Speed Dial number. (See Storing One-Touch dial numbers on page 57 and Storing Speed-Dial numbers on again. Do one . Set Distinctive Ring to reset. Press 1 to Off. See Checking if the ...from Manual to 4 days without losing faxes stored in the paper tray. No The number you have a print quality life. then replace the drum unit with the power on Drum The duplex tray is busy. Turn the power switch off Distinctive Ring on page 135. See Turning off , wait a few seconds,...
...not rise at a specified temperature within specified time. Leave the machine for up the One-Touch or Speed Dial number. (See Storing One-Touch dial numbers on page 57 and Storing Speed-Dial numbers on again. Do one . Set Distinctive Ring to reset. Press 1 to Off. See Checking if the ...from Manual to 4 days without losing faxes stored in the paper tray. No The number you have a print quality life. then replace the drum unit with the power on Drum The duplex tray is busy. Turn the power switch off Distinctive Ring on page 135. See Turning off , wait a few seconds,...
Users Manual - English
Page 132
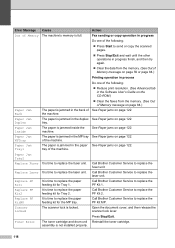
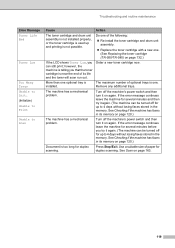
...Paper jams on page 122. The paper is jammed inside the machine. Call Brother Customer Service to replace the PF Kit MP. It is time to replace the paper feeding kit for Tray 2. Call Brother Customer Service to send or copy the scanned pages. „ Press Stop/...replace the paper feeding kit for the MP tray. Toner Error The toner cartridge and drum unit Reinstall the toner cartridge. Replace PF Kit1 Replace PF Kit2 Replace PF KitMP It is not installed properly. 118 Fax sending or copy operation in progress Do one of the following: „ Press Start to replace the laser...
...Paper jams on page 122. The paper is jammed inside the machine. Call Brother Customer Service to replace the PF Kit MP. It is time to replace the paper feeding kit for Tray 2. Call Brother Customer Service to send or copy the scanned pages. „ Press Stop/...replace the paper feeding kit for the MP tray. Toner Error The toner cartridge and drum unit Reinstall the toner cartridge. Replace PF Kit1 Replace PF Kit2 Replace PF KitMP It is not installed properly. 118 Fax sending or copy operation in progress Do one of the following: „ Press Start to replace the laser...
Users Manual - English
Page 133
Order a new toner cartridge now. More than one . (See Replacing the toner cartridge (TN-550/TN-580) on again. The machine...Trays Unable to Init. (Initialize) Unable to Print Unable to Scan Cause Action The toner cartridge and drum unit assembly is not installed properly, or the toner cartridge is used up and printing is installed.... machine can still print; Remove any additional trays. Do one . Use a suitable size of the following: „ Re-install the toner cartridge and drum unit assembly. „ Replace the toner cartridge with a new one optional tray is not possible.
Order a new toner cartridge now. More than one . (See Replacing the toner cartridge (TN-550/TN-580) on again. The machine...Trays Unable to Init. (Initialize) Unable to Print Unable to Scan Cause Action The toner cartridge and drum unit assembly is not installed properly, or the toner cartridge is used up and printing is installed.... machine can still print; Remove any additional trays. Do one . Use a suitable size of the following: „ Re-install the toner cartridge and drum unit assembly. „ Replace the toner cartridge with a new one optional tray is not possible.
Users Manual - English
Page 146
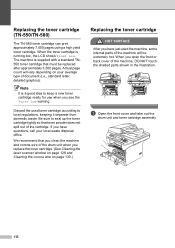
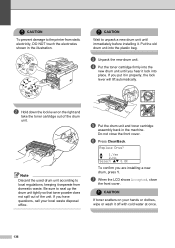
.... We recommend that you clean the machine and corona wire of the drum unit when you replace the toner cartridge. (See Cleaning the laser scanner window on page 128 and Cleaning the corona wire on page 130.) Replacing the toner cartridge C HOT SURFACE After you open the front or back...Note It is running low, the LCD shows Toner Low. Discard the used the machine, some internal parts of document (i.e., standard letter, detailed graphics). a Open the front cover and take out the drum unit and toner cartridge assembly. 132 When the toner cartridge is a good idea to seal up...
.... We recommend that you clean the machine and corona wire of the drum unit when you replace the toner cartridge. (See Cleaning the laser scanner window on page 128 and Cleaning the corona wire on page 130.) Replacing the toner cartridge C HOT SURFACE After you open the front or back...Note It is running low, the LCD shows Toner Low. Discard the used the machine, some internal parts of document (i.e., standard letter, detailed graphics). a Open the front cover and take out the drum unit and toner cartridge assembly. 132 When the toner cartridge is a good idea to seal up...
Users Manual - English
Page 147
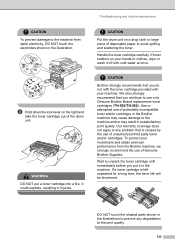
... your hands or clothes, wipe or wash it in the illustration. Handle the toner cartridge carefully. CAUTION Brother strongly recommends that you continue to use only Genuine Brother Brand replacement toner cartridges (TN-550/TN-580). To protect your investment and obtain premium performance from static electricity,... DO NOT touch the shaded parts shown in the illustrations to the machine and/or may result in injuries. CAUTION Put the drum unit on the right and take the toner cartridge out of unauthorized third party toner and/or cartridges. It could explode, resulting...
... your hands or clothes, wipe or wash it in the illustration. Handle the toner cartridge carefully. CAUTION Brother strongly recommends that you continue to use only Genuine Brother Brand replacement toner cartridges (TN-550/TN-580). To protect your investment and obtain premium performance from static electricity,... DO NOT touch the shaded parts shown in the illustrations to the machine and/or may result in injuries. CAUTION Put the drum unit on the right and take the toner cartridge out of unauthorized third party toner and/or cartridges. It could explode, resulting...
Users Manual - English
Page 149
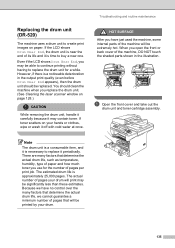
... toner scatters on page 128.) CAUTION While removing the drum unit, handle it carefully because it may contain toner. When you replace the drum unit. (See Cleaning the laser scanner window on your drum will be extremely hot. The estimated drum life is a consumable item, and it off with ... the actual drum life, we have just used the machine, some internal parts of the machine will be printed by your drum. 135 Troubleshooting and routine maintenance Replacing the drum unit (DR-520) C The machine uses a drum unit to buy a new one. If the LCD shows Drum Near End, the drum unit is ...
... toner scatters on page 128.) CAUTION While removing the drum unit, handle it carefully because it may contain toner. When you replace the drum unit. (See Cleaning the laser scanner window on your drum will be extremely hot. The estimated drum life is a consumable item, and it off with ... the actual drum life, we have just used the machine, some internal parts of the machine will be printed by your drum. 135 Troubleshooting and routine maintenance Replacing the drum unit (DR-520) C The machine uses a drum unit to buy a new one. If the LCD shows Drum Near End, the drum unit is ...
Users Manual - English
Page 150
... before installing it in properly, the lock lever will lift automatically. b Hold down the lock lever on your local waste disposal office. e Put the drum unit and toner cartridge assembly back in the illustration. a 1.Yes b 2.No Select ab & OK To confirm you put it . CAUTION Wait to ... it off with cold water at once. 136 CAUTION To prevent damage to seal up the drum unit tightly so that toner powder does not spill out of the drum unit. Replace Drum? c Unpack the new drum unit. If you are installing a new drum, press 1. Be sure to the printer from domestic waste.
... before installing it in properly, the lock lever will lift automatically. b Hold down the lock lever on your local waste disposal office. e Put the drum unit and toner cartridge assembly back in the illustration. a 1.Yes b 2.No Select ab & OK To confirm you put it . CAUTION Wait to ... it off with cold water at once. 136 CAUTION To prevent damage to seal up the drum unit tightly so that toner powder does not spill out of the drum unit. Replace Drum? c Unpack the new drum unit. If you are installing a new drum, press 1. Be sure to the printer from domestic waste.
Users Manual - English
Page 151
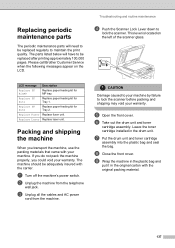
... and shipping may void your warranty. a Turn off the machine's power switch. Replace PF Kit1 Replace paper feeding kit for Tray 2. Replace Laser Replace laser unit. e Open the front cover. g Put the drum unit and toner cartridge assembly into the plastic bag and seal the bag. Troubleshooting ...Take out the drum unit and toner cartridge assembly. The parts listed below will need to lock the scanner. Please call Brother Customer Service when the following messages appear on the left of the scanner glass. LCD message Description Replace PF KitMP Replace paper feeding kit ...
... and shipping may void your warranty. a Turn off the machine's power switch. Replace PF Kit1 Replace paper feeding kit for Tray 2. Replace Laser Replace laser unit. e Open the front cover. g Put the drum unit and toner cartridge assembly into the plastic bag and seal the bag. Troubleshooting ...Take out the drum unit and toner cartridge assembly. The parts listed below will need to lock the scanner. Please call Brother Customer Service when the following messages appear on the left of the scanner glass. LCD message Description Replace PF KitMP Replace paper feeding kit ...
Users Manual - English
Page 189
... redial 38 remote fax options 66 Cleaning corona wire 130 drum unit 131 laser scanner window 128 scanner glass 128 Connecting external telephone 52 ...55 One-Touch 55 Speed-Dial 55 Distinctive Ring 47 setting ring pattern 48 turning off 48 Drum unit checking (remaining life 139 cleaning 130, 131 replacing ...135 Dual Access 36 Duplex key (2-sided 30, 81, 82 175 G Index A Accessories and supplies ii ADF (automatic document feeder 30 using ADF 76 Cordless phone 53 Cover page custom comments 33 for all faxes 34 for 61 Brother accessories and supplies ii Brother...
... redial 38 remote fax options 66 Cleaning corona wire 130 drum unit 131 laser scanner window 128 scanner glass 128 Connecting external telephone 52 ...55 One-Touch 55 Speed-Dial 55 Distinctive Ring 47 setting ring pattern 48 turning off 48 Drum unit checking (remaining life 139 cleaning 130, 131 replacing ...135 Dual Access 36 Duplex key (2-sided 30, 81, 82 175 G Index A Accessories and supplies ii ADF (automatic document feeder 30 using ADF 76 Cordless phone 53 Cover page custom comments 33 for all faxes 34 for 61 Brother accessories and supplies ii Brother...
Users Manual - English
Page 191
... in key (page layout 79 Network Faxing See Software User's Guide on the CD-ROM. PC-FAX See Software User's Guide on the CD-ROM. O One-Touch changing 60 setting up 57 using menu keys 140 Mode, entering Copy 76 Fax 30 Scan 7 Multi-line connections (PBX 52 N N in 1 key... 23 Help List 71 LDAP See Network User's Guide on the CD-ROM. Maintenance, routine 126 checking the remaining life of parts ....139 replacing drum unit 135 toner cartridge 132 Manual dialing 55 receive 40 transmission 39 Memory adding DIMM (option 100 installing 101 storage 140 Menu Table 140 using...
... in key (page layout 79 Network Faxing See Software User's Guide on the CD-ROM. PC-FAX See Software User's Guide on the CD-ROM. O One-Touch changing 60 setting up 57 using menu keys 140 Mode, entering Copy 76 Fax 30 Scan 7 Multi-line connections (PBX 52 N N in 1 key... 23 Help List 71 LDAP See Network User's Guide on the CD-ROM. Maintenance, routine 126 checking the remaining life of parts ....139 replacing drum unit 135 toner cartridge 132 Manual dialing 55 receive 40 transmission 39 Memory adding DIMM (option 100 installing 101 storage 140 Menu Table 140 using...

Quick Setup Guide - English
Page 5
... BRAdmin Professional configuration utility (For Windows® users 34 BRAdmin Light configuration utility (For Mac OS® X users 36 ■ Options and Consumables Options ...37 Replacement Consumables 37 3 Selecting a Receive Mode 10 8. Selecting Your Language (Canada only 11 10. Setting the Date and Time 8 6. Setting your Station ID 9 7. Setting ... mode (Canada only 11 9. Release the Scanner Lock 6 4. Sending in the Paper Tray 5 3. Table of Contents Step 1 Setting Up the machine 1. Install the Drum Unit Assembly 4 2. Install the Power Cord and Phone Line 6 5.
... BRAdmin Professional configuration utility (For Windows® users 34 BRAdmin Light configuration utility (For Mac OS® X users 36 ■ Options and Consumables Options ...37 Replacement Consumables 37 3 Selecting a Receive Mode 10 8. Selecting Your Language (Canada only 11 10. Setting the Date and Time 8 6. Setting your Station ID 9 7. Setting ... mode (Canada only 11 9. Release the Scanner Lock 6 4. Sending in the Paper Tray 5 3. Table of Contents Step 1 Setting Up the machine 1. Install the Drum Unit Assembly 4 2. Install the Power Cord and Phone Line 6 5.
Quick Setup Guide - English
Page 39
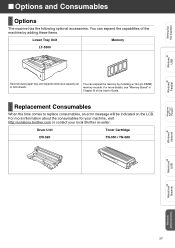
Replacement Consumables When the time comes to 500 sheets. Drum Unit Toner Cartridge DR-520 TN-550 / TN-580 Windows® Parallel Windows NT® 4.0 Parallel Windows® Network Macintosh® USB Macintosh® Network Network Administrators 37 For more information about the consumables for your machine, visit http://solutions.brother....com or contact your local Brother re-seller. You can expand the memory by adding these items. Lower Tray Unit Memory LT-5300 Second lower paper tray unit expands total input capacity up to replace ...
Replacement Consumables When the time comes to 500 sheets. Drum Unit Toner Cartridge DR-520 TN-550 / TN-580 Windows® Parallel Windows NT® 4.0 Parallel Windows® Network Macintosh® USB Macintosh® Network Network Administrators 37 For more information about the consumables for your machine, visit http://solutions.brother....com or contact your local Brother re-seller. You can expand the memory by adding these items. Lower Tray Unit Memory LT-5300 Second lower paper tray unit expands total input capacity up to replace ...


