Software Users Manual - English
Page 4
...Network Scanning (For models with built-in network support) Before using Network Scanning ...77 Network license ...77 Configuring Network Scanning ...78 Using the Scan key (For models that support duplex scanning 80 Scan to E-mail (PC)...80 Scan to E-mail (E-mail Server) (For MFC-8860DN and MFC-8870DW 81 Scan to Image ...82 Scan to OCR ...83 Scan to File...84 Scan to FTP...85 Scan...Address Book ...94 Setting up a cover page...95 Entering cover page information...95 Speed Dial setup ...96 Brother Address Book ...97 Setting up a member in the Address Book 97 Setting up a group for broadcasting...
...Network Scanning (For models with built-in network support) Before using Network Scanning ...77 Network license ...77 Configuring Network Scanning ...78 Using the Scan key (For models that support duplex scanning 80 Scan to E-mail (PC)...80 Scan to E-mail (E-mail Server) (For MFC-8860DN and MFC-8870DW 81 Scan to Image ...82 Scan to OCR ...83 Scan to File...84 Scan to FTP...85 Scan...Address Book ...94 Setting up a cover page...95 Entering cover page information...95 Speed Dial setup ...96 Brother Address Book ...97 Setting up a member in the Address Book 97 Setting up a group for broadcasting...
Software Users Manual - English
Page 6
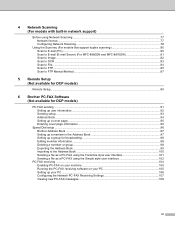
... Status Monitor ...162 10 Network Scanning (Not available for DCP-8060) Before using Network Scanning ...163 Configuring network scanning ...163 Using the Scan key...165 Scan to E-mail (PC)...165 Scan to E-mail (E-mail server) (For MFC-8860DN and MFC-8870DW 166 Scan to Image ...168 Scan to OCR ...169 Scan to File...170 Scan to FTP...171 Scan to FTP Manual Method...173...
... Status Monitor ...162 10 Network Scanning (Not available for DCP-8060) Before using Network Scanning ...163 Configuring network scanning ...163 Using the Scan key...165 Scan to E-mail (PC)...165 Scan to E-mail (E-mail server) (For MFC-8860DN and MFC-8870DW 166 Scan to Image ...168 Scan to OCR ...169 Scan to File...170 Scan to FTP...171 Scan to FTP Manual Method...173...
Software Users Manual - English
Page 7
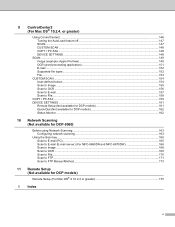
Section I Windows® I Printing 2 Scanning 34 ControlCenter2 57 Network Scanning (For models with built-in network support) 77 Remote Setup (Not available for DCP models) 89 Brother PC-FAX Software (Not available for DCP models) 91
Section I Windows® I Printing 2 Scanning 34 ControlCenter2 57 Network Scanning (For models with built-in network support) 77 Remote Setup (Not available for DCP models) 89 Brother PC-FAX Software (Not available for DCP models) 91
Software Users Manual - English
Page 83
...allow communication through port number 137 and 54925. Note • Max. Visit the Brother Solutions Center (http://solutions.brother.com) for a network user in Wndows NT®. 77 4 Network Scanning (For models with built-in network support) 4 To use on a network. For example, if 30 clients try to connect at a time, 5 of ... can be connected to 5 PCs for use the machine as a network scanner, the machine must be configured for up to one machine on the LCD. • If your PC is protected by a firewall, and is unable to scan, you want to 5 additional users. To buy NL-5 which is...
...allow communication through port number 137 and 54925. Note • Max. Visit the Brother Solutions Center (http://solutions.brother.com) for a network user in Wndows NT®. 77 4 Network Scanning (For models with built-in network support) 4 To use on a network. For example, if 30 clients try to connect at a time, 5 of ... can be connected to 5 PCs for use the machine as a network scanner, the machine must be configured for up to one machine on the LCD. • If your PC is protected by a firewall, and is unable to scan, you want to 5 additional users. To buy NL-5 which is...
Software Users Manual - English
Page 84
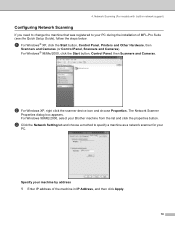
...and Other Hardware, then Scanners and Cameras (or Control Panel, Scanners and Cameras). 4. Specify your Brother machine from the list and click the properties button. The Network Scanner Properties dialog box appears. b For Windows XP, right click the scanner device icon and choose... steps below. Network Scanning (For models with built-in IP Address, and then click Apply. 78 c Click the Network Setting tab and choose a method to specify a machine as a network scanner for your PC during the installation of the machine in network support) Configuring Network Scanning 4 If you...
...and Other Hardware, then Scanners and Cameras (or Control Panel, Scanners and Cameras). 4. Specify your Brother machine from the list and click the properties button. The Network Scanner Properties dialog box appears. b For Windows XP, right click the scanner device icon and choose... steps below. Network Scanning (For models with built-in IP Address, and then click Apply. 78 c Click the Network Setting tab and choose a method to specify a machine as a network scanner for your PC during the installation of the machine in network support) Configuring Network Scanning 4 If you...

Software Users Manual - English
Page 85
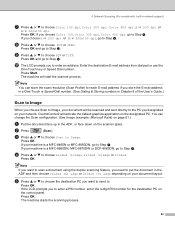
4. Network Scanning (For models with built-in network support) Specify your machine by a PIN number, the LCD prompts you to enter the PIN number before the document can enter any name that support duplex scanning) on page 80.) 79 To send data to avoid receiving unwanted documents, enter a 4-digit PIN number in Node ...default setting is your PC name in the Display Name field. e If you want to the machine. (See Using the Scan key (For models that you like. d Click the Scan To Button tab and enter your PC name. The machine's LCD displays the name you want to a PC protected by ...
4. Network Scanning (For models with built-in network support) Specify your machine by a PIN number, the LCD prompts you to enter the PIN number before the document can enter any name that support duplex scanning) on page 80.) 79 To send data to avoid receiving unwanted documents, enter a 4-digit PIN number in Node ...default setting is your PC name in the Display Name field. e If you want to the machine. (See Using the Scan key (For models that you like. d Click the Scan To Button tab and enter your PC name. The machine's LCD displays the name you want to a PC protected by ...

Software Users Manual - English
Page 86
... the PC as an attachment. c Press a or b to choose Scan to put the document in network support) Using the Scan key (For models that support duplex scanning) 4 If you want to E-mail. Choose your network. 4. Network Scanning (For models with built-in the ADF and do duplex scan, depending on your document layout you designated on your document...
... the PC as an attachment. c Press a or b to choose Scan to put the document in network support) Using the Scan key (For models that support duplex scanning) 4 If you want to E-mail. Choose your network. 4. Network Scanning (For models with built-in the ADF and do duplex scan, depending on your document layout you designated on your document...

Software Users Manual - English
Page 87
....) a Put the document face up only one E-mail server. Press OK. Press OK. Note If you want to choose your document layout. Press OK. b Press (Scan). e Press a or b to Step j. 81 e Press a or b to scan a document using the duplex scanning feature, you need to put the document in network support) d Press a or b to an E-mail...
....) a Put the document face up only one E-mail server. Press OK. Press OK. Note If you want to choose your document layout. Press OK. b Press (Scan). e Press a or b to Step j. 81 e Press a or b to scan a document using the duplex scanning feature, you need to put the document in network support) d Press a or b to an E-mail...
Software Users Manual - English
Page 88
...8860DN, MFC-8870DW or DCP-8065DN, go to scan a document using the duplex scanning feature, you designated on the scanner glass. The machine starts the scanning process. 82 ControlCenter2 will activate the default graphics application on your network. 4. Network Scanning (For models with built-in the ADF and ...then choose 2sided (L) edge or 2sided (S) edge depending on the designated PC. If you want to Step h. Enter the destination E-mail address from dial pad or use the One-Touch key or...
...8860DN, MFC-8870DW or DCP-8065DN, go to scan a document using the duplex scanning feature, you designated on the scanner glass. The machine starts the scanning process. 82 ControlCenter2 will activate the default graphics application on your network. 4. Network Scanning (For models with built-in the ADF and ...then choose 2sided (L) edge or 2sided (S) edge depending on the designated PC. If you want to Step h. Enter the destination E-mail address from dial pad or use the One-Touch key or...

Software Users Manual - English
Page 89
... ScanSoft® PaperPort® OCR and convert your machine is a MFC-8460N or MFC-8660DN, go to . Press OK. Network Scanning (For models with built-in network support) Scan to OCR 4 When you need to enter a PIN number, enter the 4-digit PIN number for viewing and editing from a ...word processing application on your network. You can change the Scan configuration. (See OCR (word processing application) on page 63.) a Put the document face up in the ADF and then choose 2sided...
... ScanSoft® PaperPort® OCR and convert your machine is a MFC-8460N or MFC-8660DN, go to . Press OK. Network Scanning (For models with built-in network support) Scan to OCR 4 When you need to enter a PIN number, enter the 4-digit PIN number for viewing and editing from a ...word processing application on your network. You can change the Scan configuration. (See OCR (word processing application) on page 63.) a Put the document face up in the ADF and then choose 2sided...

Software Users Manual - English
Page 90
... 2sided (L)edge, 2sided (S)edge or 1sided. 4. If your document layout. Press OK. Press OK. Network Scanning (For models with built-in network support) Scan to File 4 When you choose Scan to File, you want the scanned data in color, choose color in scan type on the Device Button tab of the ControlCenter2 configuration. The file will be...
... 2sided (L)edge, 2sided (S)edge or 1sided. 4. If your document layout. Press OK. Press OK. Network Scanning (For models with built-in network support) Scan to File 4 When you choose Scan to File, you want the scanned data in color, choose color in scan type on the Device Button tab of the ControlCenter2 configuration. The file will be...
Software Users Manual - English
Page 91
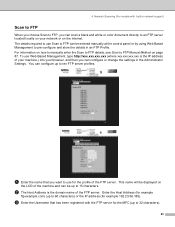
...-configure and store the details in an FTP Profile. You can be displayed on the LCD of your machine.) into your network or on your browser, and then you can scan a black and white or color document directly to 15 characters. b The Host Address is the IP address of the machine and....xxx.xxx.xxx (where xxx.xxx.xxx.xxx is the domain name of the FTP server. To use for the profile of the FTP server. 4. Network Scanning (For models with the FTP server for example 192.23.56.189). Enter the Host Address (for example ftp.example.com) (up to 60 characters...
...-configure and store the details in an FTP Profile. You can be displayed on the LCD of your machine.) into your network or on your browser, and then you can scan a black and white or color document directly to 15 characters. b The Host Address is the IP address of the machine and....xxx.xxx.xxx (where xxx.xxx.xxx.xxx is the domain name of the FTP server. To use for the profile of the FTP server. 4. Network Scanning (For models with the FTP server for example 192.23.56.189). Enter the Host Address (for example ftp.example.com) (up to 60 characters...
Software Users Manual - English
Page 92
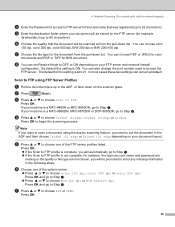
...or B/W 200x100 dpi. You can also change the port number used to Step e. b Press (Scan). If your FTP server and network firewall configuration. e Press a or b to choose PDF or JPEG. g Press a or b to choose one of the FTP server profiles listed. In most cases these two settings can set Passive Mode... color 600 dpi. Press OK and go to access the FTP server. Press OK. f Choose one of the options below: „ Press a or b to Step d. g Choose the file type for example /brother/abc/) (up to 32 characters). You can choose PDF or JPEG for color documents and PDF...
...or B/W 200x100 dpi. You can also change the port number used to Step e. b Press (Scan). If your FTP server and network firewall configuration. e Press a or b to choose PDF or JPEG. g Press a or b to choose one of the FTP server profiles listed. In most cases these two settings can set Passive Mode... color 600 dpi. Press OK and go to access the FTP server. Press OK. f Choose one of the options below: „ Press a or b to Step d. g Choose the file type for example /brother/abc/) (up to 32 characters). You can choose PDF or JPEG for color documents and PDF...

Software Users Manual - English
Page 93
...brother/abc/, up in network support) h Press a or b to enter the username. Scan to Step l. If your machine is no FTP Profile configured, skip Step e and go to 60 characters). Press OK. Note If there is a MFC-8860DN, MFC-8870DW or DCP-8065DN, go to Step e. k The LCD shows Connecting. Press OK. Network Scanning... (For models with built-in the ADF, or face down on your document layout. 4. i Use the dial pad to choose PDF or TIFF. Press OK. If your machine is successful the machine will start the scanning process. Press OK...
...brother/abc/, up in network support) h Press a or b to enter the username. Scan to Step l. If your machine is no FTP Profile configured, skip Step e and go to 60 characters). Press OK. Note If there is a MFC-8860DN, MFC-8870DW or DCP-8065DN, go to Step e. k The LCD shows Connecting. Press OK. Network Scanning... (For models with built-in the ADF, or face down on your document layout. 4. i Use the dial pad to choose PDF or TIFF. Press OK. If your machine is successful the machine will start the scanning process. Press OK...
Software Users Manual - English
Page 94
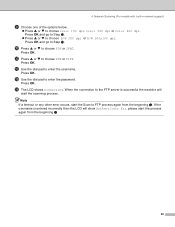
...PDF or JPEG. Press OK. l Use the dial pad to choose PDF or TIFF. Note If a timeout or any other error occurs, start the Scan to FTP process again from the beginning a. 88 When the connection to choose B/W 200 dpi or B/W 200x100 dpi. k Press a or b to ... Press OK. Press OK. If the username is successful the machine will show Authenticate Err, please start the scanning process. n The LCD shows Connecting. 4. Network Scanning (For models with built-in network support) i Choose one of the options below. „ Press a or b to Step k. Press OK and go to choose color...
...PDF or JPEG. Press OK. l Use the dial pad to choose PDF or TIFF. Note If a timeout or any other error occurs, start the Scan to FTP process again from the beginning a. 88 When the connection to choose B/W 200 dpi or B/W 200x100 dpi. k Press a or b to ... Press OK. Press OK. If the username is successful the machine will show Authenticate Err, please start the scanning process. n The LCD shows Connecting. 4. Network Scanning (For models with built-in network support) i Choose one of the options below. „ Press a or b to Step k. Press OK and go to choose color...

Software Users Manual - English
Page 115
Section II Apple® Macintosh® II Printing and Faxing 110 Scanning 133 ControlCenter2 (For Mac OS® 10.2.4. or greater) 146 Network Scanning (Not available for DCP-8060) 163 Remote Setup (Not available for DCP models) 175
Section II Apple® Macintosh® II Printing and Faxing 110 Scanning 133 ControlCenter2 (For Mac OS® 10.2.4. or greater) 146 Network Scanning (Not available for DCP-8060) 163 Remote Setup (Not available for DCP models) 175

Software Users Manual - English
Page 139
... the scanner 8 Run your Macintosh® TWAIN-compliant application. For more information, see Configuring network scanning on page 163 or Using ControlCenter2 on page 146 (Network scanning supported in Macintosh HD/Library/Printers/Brother/Utilities or from a Macintosh® 8 The Brother machine software includes a TWAIN Scanner driver for choosing the default driver depending on the application...
... the scanner 8 Run your Macintosh® TWAIN-compliant application. For more information, see Configuring network scanning on page 163 or Using ControlCenter2 on page 146 (Network scanning supported in Macintosh HD/Library/Printers/Brother/Utilities or from a Macintosh® 8 The Brother machine software includes a TWAIN Scanner driver for choosing the default driver depending on the application...

Software Users Manual - English
Page 169
... application located in Macintosh HD/Library/Printers/Brother/Utilities/DeviceSelector or from the control panel. (See the Network User's Guide on the LCD. Click Browse to one machine on a network, you already installed the MFL-Pro Suite following the network installation steps in the main screen of ControlCenter2. 10 Network Scanning (Not available for DCP-8060) 10...
... application located in Macintosh HD/Library/Printers/Brother/Utilities/DeviceSelector or from the control panel. (See the Network User's Guide on the LCD. Click Browse to one machine on a network, you already installed the MFL-Pro Suite following the network installation steps in the main screen of ControlCenter2. 10 Network Scanning (Not available for DCP-8060) 10...

Software Users Manual - English
Page 170
...to 15 characters. • You can be any name you want to use for DCP-8060) Note • Check Register your computer with the "Scan To" functions at the machine and enter a name you to enter the Pin number before the document can avoid receiving unwanted documents by a Pin ...prompts you want up to the computer. (See Using the Scan key on page 165.) 164 Enter your Macintosh® in the Pin number and Retype Pin number field. To send data to a computer protected by setting a 4-digit Pin number. 10. Network Scanning (Not available for your Pin number in Display Name.
...to 15 characters. • You can be any name you want to use for DCP-8060) Note • Check Register your computer with the "Scan To" functions at the machine and enter a name you to enter the Pin number before the document can avoid receiving unwanted documents by a Pin ...prompts you want up to the computer. (See Using the Scan key on page 165.) 164 Enter your Macintosh® in the Pin number and Retype Pin number field. To send data to a computer protected by setting a 4-digit Pin number. 10. Network Scanning (Not available for your Pin number in Display Name.

Software Users Manual - English
Page 171
... down on your machine is a MFC-8460N or MFC-8660DN, go to Step f. Press OK. If your network. b Press (Scan). 10. Network Scanning (Not available for legal size paper. If your document layout. c Press a or b to choose Scan to the recipient. Choose your document layout from following table: Front Portrait Back Landscape Front Back LCD...
... down on your machine is a MFC-8460N or MFC-8660DN, go to Step f. Press OK. If your network. b Press (Scan). 10. Network Scanning (Not available for legal size paper. If your document layout. c Press a or b to choose Scan to the recipient. Choose your document layout from following table: Front Portrait Back Landscape Front Back LCD...


