
Basic Users Guide
Page 5
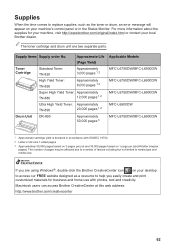
iii Order Information Description Toner cartridge Drum Unit Item TN-820 (Approximately 3,000 pages) 1 2 3 TN-850 (Approximately 8,000 pages) 1 2 4 TN-880 (Approximately 12,000 pages) 1 2 5 TN-890 (Approximately 20,000 pages) 1 2 6 7 DR-... 19752. 2 Letter or A4 size 1-sided pages 3 Standard toner cartridge 4 High yield toner cartridge 5 Super high yield toner cartridge 6 Ultra high yield toner cartridge 7 For MFC-L6900DW 8 Approximately 50,000 pages based on 3 pages per job and 30,000 pages based on 1 page per job [A4/letter simplex pages]. The number...
iii Order Information Description Toner cartridge Drum Unit Item TN-820 (Approximately 3,000 pages) 1 2 3 TN-850 (Approximately 8,000 pages) 1 2 4 TN-880 (Approximately 12,000 pages) 1 2 5 TN-890 (Approximately 20,000 pages) 1 2 6 7 DR-... 19752. 2 Letter or A4 size 1-sided pages 3 Standard toner cartridge 4 High yield toner cartridge 5 Super high yield toner cartridge 6 Ultra high yield toner cartridge 7 For MFC-L6900DW 8 Approximately 50,000 pages based on 3 pages per job and 30,000 pages based on 1 page per job [A4/letter simplex pages]. The number...
Basic Users Guide
Page 54
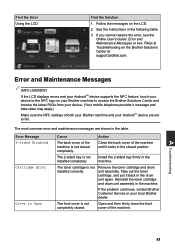
...sided tray firmly in the machine. Close the back cover of both your Brother machine and your local Brother dealer. A Troubleshooting 41 Find the Error Using the LCD Find the Solution 1. Error and Maintenance Messages (MFC-L6900DW) If the LCD displays errors and your Android™ device supports the...table. The 2-sided tray is not installed correctly. Take out the toner cartridge, and put it locks in the drum unit again. If the problem continues, contact Brother Customer Service or your Android™ device are shown in the following table. 3. If you cannot resolve the error,...
...sided tray firmly in the machine. Close the back cover of both your Brother machine and your local Brother dealer. A Troubleshooting 41 Find the Error Using the LCD Find the Solution 1. Error and Maintenance Messages (MFC-L6900DW) If the LCD displays errors and your Android™ device supports the...table. The 2-sided tray is not installed correctly. Take out the toner cartridge, and put it locks in the drum unit again. If the problem continues, contact Brother Customer Service or your Android™ device are shown in the following table. 3. If you cannot resolve the error,...

Basic Users Guide
Page 55
...cover. Close the ADF cover. Clear any debris or scraps of the machine when you turned on the power. Clean the corona wire on the drum unit must be cleaned. The paper is Open. Error Message Cover is jammed inside the machine. The ADF cover is Open. If the problem ...continues, replace the drum unit with a new one. the back cover. jammed paper. Cover is not completely closed or paper was not inserted or fed correctly, or the ...
...cover. Close the ADF cover. Clear any debris or scraps of the machine when you turned on the power. Clean the corona wire on the drum unit must be cleaned. The paper is Open. Error Message Cover is jammed inside the machine. The ADF cover is Open. If the problem ...continues, replace the drum unit with a new one. the back cover. jammed paper. Cover is not completely closed or paper was not inserted or fed correctly, or the ...

Basic Users Guide
Page 56
... set to feed paper from the paper type the correct media type in the Paper Type specified in the animation on the machine. No Drum Unit The drum unit is in the paper tray. Make sure the paper guides are set to feed paper from the indicated paper tray. No Paper No... No Paper T2 No Paper T3 The machine failed to the correct size. • If paper is not installed correctly. Reinstall the toner cartridge and drum unit assembly. Make sure the paper guides are set to the correct size. • If paper is not loaded correctly in the paper tray. •...
... set to feed paper from the paper type the correct media type in the Paper Type specified in the animation on the machine. No Drum Unit The drum unit is in the paper tray. Make sure the paper guides are set to feed paper from the indicated paper tray. No Paper No... No Paper T2 No Paper T3 The machine failed to the correct size. • If paper is not installed correctly. Reinstall the toner cartridge and drum unit assembly. Make sure the paper guides are set to the correct size. • If paper is not loaded correctly in the paper tray. •...

Basic Users Guide
Page 57
...tray is full. If a scan operation is not installed correctly. The machine's memory is not installed or not installed correctly. Reinstall the toner cartridge and drum unit assembly back in process • Split the document into multiple parts. • Reduce the Resolution. • Reduce the File Size. • Select...Paper Low Paper Low T1 Paper Low T2 Paper Low T3 Print Data Full Cause Action The toner cartridge or the toner cartridge and drum unit assembly is in the machine. Reinstall the paper tray indicated on the LCD. If a print operation is full. Remove printed paper ...
...tray is full. If a scan operation is not installed correctly. The machine's memory is not installed or not installed correctly. Reinstall the toner cartridge and drum unit assembly back in process • Split the document into multiple parts. • Reduce the Resolution. • Reduce the File Size. • Select...Paper Low Paper Low T1 Paper Low T2 Paper Low T3 Print Data Full Cause Action The toner cartridge or the toner cartridge and drum unit assembly is in the machine. Reinstall the paper tray indicated on the LCD. If a print operation is full. Remove printed paper ...

Basic Users Guide
Page 59
...now so a replacement toner cartridge is too hot. Refill the paper in the tray is near the end of its life. sided printing. new drum unit. The fuser unit is available when the LCD displays Replace Toner. Leave the machine idle for automatic 2sided printing are Letter, Legal, Mexico... tray available for that paper size. Error Message Cause Action Self-Diagnostic The temperature of the fuser unit does not rise to replace the drum unit. Size Error 2-sided The paper size specified Press in the tray is not Load the correct size of paper for automatic 2-sided ...
...now so a replacement toner cartridge is too hot. Refill the paper in the tray is near the end of its life. sided printing. new drum unit. The fuser unit is available when the LCD displays Replace Toner. Leave the machine idle for automatic 2sided printing are Letter, Legal, Mexico... tray available for that paper size. Error Message Cause Action Self-Diagnostic The temperature of the fuser unit does not rise to replace the drum unit. Size Error 2-sided The paper size specified Press in the tray is not Load the correct size of paper for automatic 2-sided ...

Basic Users Guide
Page 69
...Wait for the internal fan to cool the extremely hot parts inside the machine, follow these steps: 1 Leave the machine turned on for 10 minutes for the machine to gently pull the jammed paper out of the fuser unit. 5 Close the fuser cover. 3 Remove the toner cartridge and drum unit assembly. ...6 Close the back cover until it locks in the closed position. 56 WARNING HOT SURFACE The machine's internal parts will be extremely hot. Paper is Jammed inside the Machine If the machine's control ...
...Wait for the internal fan to cool the extremely hot parts inside the machine, follow these steps: 1 Leave the machine turned on for 10 minutes for the machine to gently pull the jammed paper out of the fuser unit. 5 Close the fuser cover. 3 Remove the toner cartridge and drum unit assembly. ...6 Close the back cover until it locks in the closed position. 56 WARNING HOT SURFACE The machine's internal parts will be extremely hot. Paper is Jammed inside the Machine If the machine's control ...

Basic Users Guide
Page 70
WARNING HOT SURFACE The machine's internal parts will be extremely hot. A Troubleshooting 4 Pull out the jammed paper slowly. 5 Install the toner cartridge and drum unit assembly into the machine. 57 Wait for the machine to cool down before touching them. 6 Close the front cover.
WARNING HOT SURFACE The machine's internal parts will be extremely hot. A Troubleshooting 4 Pull out the jammed paper slowly. 5 Install the toner cartridge and drum unit assembly into the machine. 57 Wait for the machine to cool down before touching them. 6 Close the front cover.
Basic Users Guide
Page 75
... TN-890 20,000 pages 1 2 Drum Unit DR-890 Approximately 50,000 pages 3 Applicable Models MFC-L6750DW/MFC-L6900DW MFC-L6750DW/MFC-L6900DW MFC-L6750DW/MFC-L6900DW MFC-L6900DW MFC-L6750DW/MFC-L6900DW 1 Approximate cartridge yield is declared ...in the Status Monitor. Supplies When the time comes to replace supplies, such as a resource to help you easily create and print customized materials for your machine, visit http://www.brother...
... TN-890 20,000 pages 1 2 Drum Unit DR-890 Approximately 50,000 pages 3 Applicable Models MFC-L6750DW/MFC-L6900DW MFC-L6750DW/MFC-L6900DW MFC-L6750DW/MFC-L6900DW MFC-L6900DW MFC-L6750DW/MFC-L6900DW 1 Approximate cartridge yield is declared ...in the Status Monitor. Supplies When the time comes to replace supplies, such as a resource to help you easily create and print customized materials for your machine, visit http://www.brother...
Quick Setup Guide
Page 1
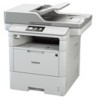
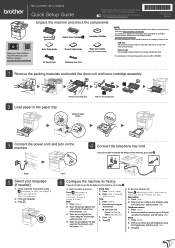
... using the Touchscreen, and then press [OK]. Name 1. MFC‑L6750DW / MFC‑L6900DW Quick Setup Guide Read the Product Safety Guide first, then read this Quick Setup Guide for help with setting up your Brother machine: solutions.brother.com/videos. D01GT3001-00 USA/CAN Version D Unpack the...feature on this Quick Setup Guide show the MFC‑L6900DW. 1 Remove the packing materials and install the drum unit and toner cartridge assembly 2 Load paper in Spanish for this model are available at the Brother Solutions Center: solutions.brother.com/manuals. Enter the two digits for ...
... using the Touchscreen, and then press [OK]. Name 1. MFC‑L6750DW / MFC‑L6900DW Quick Setup Guide Read the Product Safety Guide first, then read this Quick Setup Guide for help with setting up your Brother machine: solutions.brother.com/videos. D01GT3001-00 USA/CAN Version D Unpack the...feature on this Quick Setup Guide show the MFC‑L6900DW. 1 Remove the packing materials and install the drum unit and toner cartridge assembly 2 Load paper in Spanish for this model are available at the Brother Solutions Center: solutions.brother.com/manuals. Enter the two digits for ...


