Basic Users Guide
Page 5
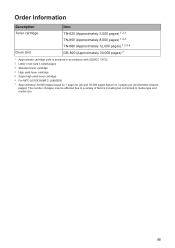
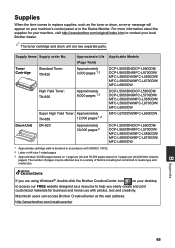
... of pages may be affected due to a variety of factors including but not limited to media type and media size. Order Information Description Toner cartridge Drum Unit Item TN-820 (Approximately 3,000 pages) 1 2 3 TN-850 (Approximately 8,000 pages) 1 2 4 TN-880 (Approximately 12,000 pages) 1 2 5 6 DR-820 (Approximately...19752. 2 Letter or A4 size 1-sided pages 3 Standard toner cartridge 4 High yield toner cartridge 5 Super high yield toner cartridge 6 For MFC-L6700DW/MFC-L6800DW 7 Approximately 30,000 pages based on 1 page per job and 50,000 pages based on 3 pages per job [A4/letter simplex pages...
... of pages may be affected due to a variety of factors including but not limited to media type and media size. Order Information Description Toner cartridge Drum Unit Item TN-820 (Approximately 3,000 pages) 1 2 3 TN-850 (Approximately 8,000 pages) 1 2 4 TN-880 (Approximately 12,000 pages) 1 2 5 6 DR-820 (Approximately...19752. 2 Letter or A4 size 1-sided pages 3 Standard toner cartridge 4 High yield toner cartridge 5 Super high yield toner cartridge 6 For MFC-L6700DW/MFC-L6800DW 7 Approximately 30,000 pages based on 1 page per job and 50,000 pages based on 3 pages per job [A4/letter simplex pages...
Basic Users Guide
Page 57
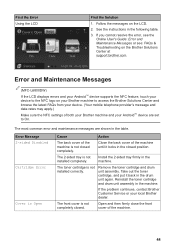
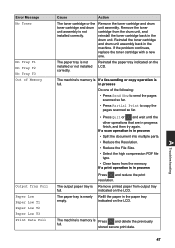
...browse the latest FAQs from your local Brother dealer. Close the back cover of both your Brother machine and your Android™ device are shown in the machine. Install the 2-sided tray firmly in the drum unit again. Error and Maintenance Messages (MFC-L6800DW) If the LCD displays errors ...and your Android™ device supports the NFC feature, touch your device to the NFC logo on your Brother machine to On. Take out the toner cartridge...
...browse the latest FAQs from your local Brother dealer. Close the back cover of both your Brother machine and your Android™ device are shown in the machine. Install the 2-sided tray firmly in the drum unit again. Error and Maintenance Messages (MFC-L6800DW) If the LCD displays errors ...and your Android™ device supports the NFC feature, touch your device to the NFC logo on your Brother machine to On. Take out the toner cartridge...

Basic Users Guide
Page 58
... cover to pull out all jammed paper. Close the ADF cover. The paper is jammed in Remove all the back of the machine. Document Jam Drum ! Make sure paper is not completely closed . Clear any debris or scraps of the machine when you turned on the power. If the problem ...continues, replace the drum unit with a new one. Cover is not completely closed or paper was too long. The document was not inserted or fed correctly, or the document...
... cover to pull out all jammed paper. Close the ADF cover. The paper is jammed in Remove all the back of the machine. Document Jam Drum ! Make sure paper is not completely closed . Clear any debris or scraps of the machine when you turned on the power. If the problem ...continues, replace the drum unit with a new one. Cover is not completely closed or paper was too long. The document was not inserted or fed correctly, or the document...
Basic Users Guide
Page 59
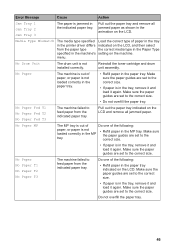
... the correct size. • If paper is in the tray, remove it and load it again. Do not overfill the paper tray. 46 No Drum Unit The drum unit is in the paper tray. Make sure the paper guides are set to feed paper from the indicated paper tray. No Paper Fed... guides are set to the correct size. • If paper is in the tray, remove it and load it again. Reinstall the toner cartridge and drum unit assembly. Do one of paper, or paper is not loaded correctly in the paper tray. • Refill paper in the tray, remove it and...
... the correct size. • If paper is in the tray, remove it and load it again. Do not overfill the paper tray. 46 No Drum Unit The drum unit is in the paper tray. Make sure the paper guides are set to feed paper from the indicated paper tray. No Paper Fed... guides are set to the correct size. • If paper is in the tray, remove it and load it again. Reinstall the toner cartridge and drum unit assembly. Do one of paper, or paper is not loaded correctly in the paper tray. • Refill paper in the tray, remove it and...
Basic Users Guide
Page 60
...not installed or not installed correctly. The machine's memory is nearly empty. Press and reduce the print resolution. Remove the toner cartridge from the drum unit, and reinstall the toner cartridge back in process • Split the document into multiple parts. • Reduce the Resolution. •... type. • Clear faxes from output tray indicated on the LCD. Refill the paper in the machine. Reinstall the toner cartridge and drum unit assembly back in the paper tray indicated on the LCD. If a print operation is full. The paper tray is not installed correctly...
...not installed or not installed correctly. The machine's memory is nearly empty. Press and reduce the print resolution. Remove the toner cartridge from the drum unit, and reinstall the toner cartridge back in process • Split the document into multiple parts. • Reduce the Resolution. •... type. • Clear faxes from output tray indicated on the LCD. Refill the paper in the machine. Reinstall the toner cartridge and drum unit assembly back in the paper tray indicated on the LCD. If a print operation is full. The paper tray is not installed correctly...

Basic Users Guide
Page 62
... turn it on . size setting is near the end of paper in the tray is too hot. Replace the drum unit with the drum was installed. The drum unit counter Reset the drum unit counter. A Troubleshooting 49 and set the size of paper during copying and the machine could not feed the ... tray. If the LCD displays this message, you can still print. was not reset when a new See the instructions included with a new one. new drum unit. The fuser unit is not the correct size. Leave the machine idle for automatic 2-sided printing. Choose a paper size supported by 2- sided printing....
... turn it on . size setting is near the end of paper in the tray is too hot. Replace the drum unit with the drum was installed. The drum unit counter Reset the drum unit counter. A Troubleshooting 49 and set the size of paper during copying and the machine could not feed the ... tray. If the LCD displays this message, you can still print. was not reset when a new See the instructions included with a new one. new drum unit. The fuser unit is not the correct size. Leave the machine idle for automatic 2-sided printing. Choose a paper size supported by 2- sided printing....

Basic Users Guide
Page 72
WARNING HOT SURFACE The machine's internal parts will be extremely hot. Paper is Jammed inside the Machine If the machine's control panel or the Status Monitor indicates that there is a jam .... 4 Use both hands to cool down before touching them. A Troubleshooting 6 Close the back cover until it locks in the closed position. 59 Wait for the internal fan to cool the extremely hot parts inside the machine, follow these steps: 1 Leave the machine turned on for 10 minutes for the machine to...
WARNING HOT SURFACE The machine's internal parts will be extremely hot. Paper is Jammed inside the Machine If the machine's control panel or the Status Monitor indicates that there is a jam .... 4 Use both hands to cool down before touching them. A Troubleshooting 6 Close the back cover until it locks in the closed position. 59 Wait for the internal fan to cool the extremely hot parts inside the machine, follow these steps: 1 Leave the machine turned on for 10 minutes for the machine to...

Basic Users Guide
Page 73
WARNING HOT SURFACE The machine's internal parts will be extremely hot. Wait for the machine to cool down before touching them. 6 Close the front cover. 4 Pull out the jammed paper slowly. 5 Install the toner cartridge and drum unit assembly into the machine. 60
WARNING HOT SURFACE The machine's internal parts will be extremely hot. Wait for the machine to cool down before touching them. 6 Close the front cover. 4 Pull out the jammed paper slowly. 5 Install the toner cartridge and drum unit assembly into the machine. 60
Basic Users Guide
Page 78
... limited to help you are two separate parts. Macintosh users can access Brother CreativeCenter at this web address: http://www.brother.com/creativecenter B Appendix 65 Toner Cartridge Standard Toner: TN-820 Approximate ...Drum Unit Super High Yield Toner: Approximately TN-880 12,000 pages 1 2 DR-820 Approximately 30,000 pages 3 Applicable Models DCP-L5500DN/DCP-L5600DN/ DCP-L5650DN/MFC-L5700DW/ MFC-L5800DW/MFC-L5850DW/ MFC-L5900DW/MFC-L6700DW/ MFC-L6800DW DCP-L5500DN/DCP-L5600DN/ DCP-L5650DN/MFC-L5700DW/ MFC-L5800DW/MFC-L5850DW/ MFC-L5900DW/MFC-L6700DW/ MFC-L6800DW MFC-L6700DW/MFC...
... limited to help you are two separate parts. Macintosh users can access Brother CreativeCenter at this web address: http://www.brother.com/creativecenter B Appendix 65 Toner Cartridge Standard Toner: TN-820 Approximate ...Drum Unit Super High Yield Toner: Approximately TN-880 12,000 pages 1 2 DR-820 Approximately 30,000 pages 3 Applicable Models DCP-L5500DN/DCP-L5600DN/ DCP-L5650DN/MFC-L5700DW/ MFC-L5800DW/MFC-L5850DW/ MFC-L5900DW/MFC-L6700DW/ MFC-L6800DW DCP-L5500DN/DCP-L5600DN/ DCP-L5650DN/MFC-L5700DW/ MFC-L5800DW/MFC-L5850DW/ MFC-L5900DW/MFC-L6700DW/ MFC-L6800DW MFC-L6700DW/MFC...
Quick Setup Guide
Page 1
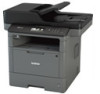
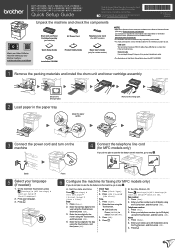
... go to use . Time 1. Enter your Brother machine: solutions.brother.com/videos. The latest manuals are available in all countries. Drum Unit and Toner Cartridge Assembly (pre‑installed) AC Power Cord Telephone Line Cord (For MFC models) Quick Setup Guide Product Safety Guide Basic..., and then press [OK]. DCP‑L5500DN / DCP‑L5600DN / DCP‑L5650DN / MFC‑L5700DW / MFC‑L5800DW / MFC‑L5850DW / MFC‑L5900DW / MFC‑L6700DW / MFC‑L6800DW Quick Setup Guide Read the Product Safety Guide first, then read this Quick Setup Guide ...
... go to use . Time 1. Enter your Brother machine: solutions.brother.com/videos. The latest manuals are available in all countries. Drum Unit and Toner Cartridge Assembly (pre‑installed) AC Power Cord Telephone Line Cord (For MFC models) Quick Setup Guide Product Safety Guide Basic..., and then press [OK]. DCP‑L5500DN / DCP‑L5600DN / DCP‑L5650DN / MFC‑L5700DW / MFC‑L5800DW / MFC‑L5850DW / MFC‑L5900DW / MFC‑L6700DW / MFC‑L6800DW Quick Setup Guide Read the Product Safety Guide first, then read this Quick Setup Guide ...


