Request Help Users Guide
Page 4
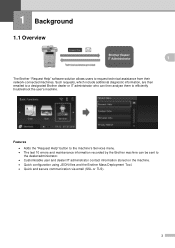
Features • Adds the "Request Help" button to the machine's Services menu. • The last 10 errors and maintenance information recorded by the Brother machine can then analyse them to the dealer/administrator. • Customisable user and dealer/IT administrator contact information stored on the machine. • Quick configuration using JSON files and the Brother Mass Deployment Tool. • Quick and secure communication via email (SSL or TLS). 3 Such requests, which include...
Features • Adds the "Request Help" button to the machine's Services menu. • The last 10 errors and maintenance information recorded by the Brother machine can then analyse them to the dealer/administrator. • Customisable user and dealer/IT administrator contact information stored on the machine. • Quick configuration using JSON files and the Brother Mass Deployment Tool. • Quick and secure communication via email (SSL or TLS). 3 Such requests, which include...
Request Help Users Guide
Page 6
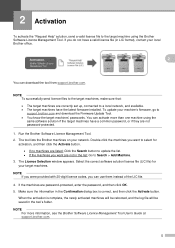
... button. Double-click the machines you want to select for your machine's firmware, go to Search > Add Machine. 3. 2 Activation To activate the "Request Help" solution, send a valid licence file to update the list. • If the machines you want are password-protected, enter the password, and then click OK. 5. If you can download the tool from support.brother.com. The tool lists the Brother machines on your local Brother office. 2 You can use...
... button. Double-click the machines you want to select for your machine's firmware, go to Search > Add Machine. 3. 2 Activation To activate the "Request Help" solution, send a valid licence file to update the list. • If the machines you want are password-protected, enter the password, and then click OK. 5. If you can download the tool from support.brother.com. The tool lists the Brother machines on your local Brother office. 2 You can use...
Request Help Users Guide
Page 7
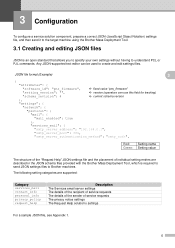
...": "pns_firmware", fixed value "pns_firmware" "setting_version": "", version (operators can be used to create and edit settings files. 3 Configuration To configure a service solution component, prepare a correct JSON (JavaScript Object Notation) settings file, and then send it to the target machine using the Brother Mass Deployment Tool. 3.1 Creating and editing JSON files JSON is required to send JSON settings files to Brother machines. Any JSON-supported text editor can use this field for...
...": "pns_firmware", fixed value "pns_firmware" "setting_version": "", version (operators can be used to create and edit settings files. 3 Configuration To configure a service solution component, prepare a correct JSON (JavaScript Object Notation) settings file, and then send it to the target machine using the Brother Mass Deployment Tool. 3.1 Creating and editing JSON files JSON is required to send JSON settings files to Brother machines. Any JSON-supported text editor can use this field for...

Basic Users Guide
Page 7
... PDF file / Brother Solutions Center 1 Web Connect Guide This Guide provides useful information about printing from your mobile device, and scanning from the Brother machine, as well as downloading images, printing data and uploading files directly to your Brother machine without installing a printer driver. PDF file / Brother Solutions Center 1 Google Cloud Print Guide This Guide provides details about using the machine on a network. Mobile Print/Scan Guide for trademarks and legal limitations. v See troubleshooting tips. PDF file / Brother Solutions Center 1 AirPrint Guide...
... PDF file / Brother Solutions Center 1 Web Connect Guide This Guide provides useful information about printing from your mobile device, and scanning from the Brother machine, as well as downloading images, printing data and uploading files directly to your Brother machine without installing a printer driver. PDF file / Brother Solutions Center 1 Google Cloud Print Guide This Guide provides details about using the machine on a network. Mobile Print/Scan Guide for trademarks and legal limitations. v See troubleshooting tips. PDF file / Brother Solutions Center 1 AirPrint Guide...
Basic Users Guide
Page 12
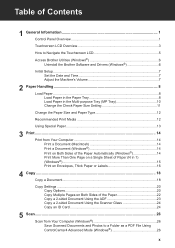
...the Brother Software and Drivers (Windows 6 Initial Setup...7 Set the Date and Time 7 Adjust the Machine's Volume 7 2 Paper Handling ...8 Load Paper ...8 Load Paper in the Paper Tray 8 Load Paper in the Multi‑purpose Tray (MP Tray 10 Change the Check Paper Size Setting 11 Change the Paper Size and Paper Type 12 Recommended Print Media 12 Using Special Paper 13 3 Print ...14 Print from Your Computer 14 Print a Document (Macintosh 14 Print a Document (Windows 14 Print on Both Sides of the Paper Automatically (Windows 14 Print More Than One Page on a Single Sheet of Paper (N in...
...the Brother Software and Drivers (Windows 6 Initial Setup...7 Set the Date and Time 7 Adjust the Machine's Volume 7 2 Paper Handling ...8 Load Paper ...8 Load Paper in the Paper Tray 8 Load Paper in the Multi‑purpose Tray (MP Tray 10 Change the Check Paper Size Setting 11 Change the Paper Size and Paper Type 12 Recommended Print Media 12 Using Special Paper 13 3 Print ...14 Print from Your Computer 14 Print a Document (Macintosh 14 Print a Document (Windows 14 Print on Both Sides of the Paper Automatically (Windows 14 Print More Than One Page on a Single Sheet of Paper (N in...
Basic Users Guide
Page 17
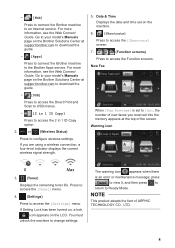
... to return to access the 2 in 1 ID Copy] Press to Ready Mode. Go to your model's Manuals page on the LCD. Date & Time Displays the date and time set to access the Function screens. NOTE This product adopts the font of new faxes you are using a wireless connection, a four-level indicator displays the current wireless signal strength. 5. New Fax When [Fax Preview] is an error or maintenance message; • [Web] Press to connect the Brother machine to an Internet...
... to return to access the 2 in 1 ID Copy] Press to Ready Mode. Go to your model's Manuals page on the LCD. Date & Time Displays the date and time set to access the Function screens. NOTE This product adopts the font of new faxes you are using a wireless connection, a four-level indicator displays the current wireless signal strength. 5. New Fax When [Fax Preview] is an error or maintenance message; • [Web] Press to connect the Brother machine to an Internet...
Basic Users Guide
Page 19
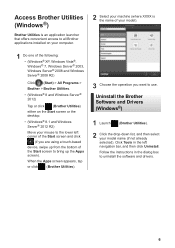
... click (Brother Utilities). 3 Choose the operation you are using a touch-based device, swipe up from the bottom of the Start screen to bring up the Apps screen). Access Brother Utilities (Windows®) Brother Utilities is an application launcher that offers convenient access to all Brother applications installed on your computer. 2 Select your machine (where XXXX is the name of your model). 1 Do...
... click (Brother Utilities). 3 Choose the operation you are using a touch-based device, swipe up from the bottom of the Start screen to bring up the Apps screen). Access Brother Utilities (Windows®) Brother Utilities is an application launcher that offers convenient access to all Brother applications installed on your computer. 2 Select your machine (where XXXX is the name of your model). 1 Do...
Basic Users Guide
Page 24
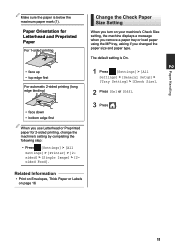
... for 2-sided printing, change the machine's setting by completing the following step: • Press [Settings] > [All Settings] > [Printer] > [2sided] > [Single Image] > [2sided Feed]. 1 Press [Settings] > [All Settings] > [General Setup] > [Tray Setting] > [Check Size]. 2 Press [On] or [Off]. 3 Press . Related Information • Print on Envelopes, Thick Paper or Labels on your machine's Check Size setting, the machine displays a message when you remove a paper tray or load paper using the MP tray, asking if you turn on page 16 11 2 Paper Handling Make sure the paper is On...
... for 2-sided printing, change the machine's setting by completing the following step: • Press [Settings] > [All Settings] > [Printer] > [2sided] > [Single Image] > [2sided Feed]. 1 Press [Settings] > [All Settings] > [General Setup] > [Tray Setting] > [Check Size]. 2 Press [On] or [Off]. 3 Press . Related Information • Print on Envelopes, Thick Paper or Labels on your machine's Check Size setting, the machine displays a message when you remove a paper tray or load paper using the MP tray, asking if you turn on page 16 11 2 Paper Handling Make sure the paper is On...

Basic Users Guide
Page 27
The printer driver window appears. 3 In the Orientation field, select the Portrait or Landscape option to set the orientation using the automatic 2‑sided printing option. 1 Select the print command in your application. 2 Select Brother XXX-XXXX (where XXXX is the name of your model), and then click the printing properties or preferences button. 3 Print Print from Your Computer Print a Document (Macintosh) For printing instructions, see the Online User's Guide: Print from Your...
The printer driver window appears. 3 In the Orientation field, select the Portrait or Landscape option to set the orientation using the automatic 2‑sided printing option. 1 Select the print command in your application. 2 Select Brother XXX-XXXX (where XXXX is the name of your model), and then click the printing properties or preferences button. 3 Print Print from Your Computer Print a Document (Macintosh) For printing instructions, see the Online User's Guide: Print from Your...

Basic Users Guide
Page 28
... Multiple Page drop-down list and select the 2 in 1, 4 in 1, 9 in 1, 16 in 1, or 25 in 1 option. 5 Click OK. 6 Complete your print operation. 3 Print 1 Select the print command in your application. 2 Select Brother XXX-XXXX (where XXXX is the name of your model), and then click the printing properties or preferences button. 5 Click the 2-sided Settings button. 6 Select an option from the 2-sided Type menu. 7 If you set...
... Multiple Page drop-down list and select the 2 in 1, 4 in 1, 9 in 1, 16 in 1, or 25 in 1 option. 5 Click OK. 6 Complete your print operation. 3 Print 1 Select the print command in your application. 2 Select Brother XXX-XXXX (where XXXX is the name of your model), and then click the printing properties or preferences button. 5 Click the 2-sided Settings button. 6 Select an option from the 2-sided Type menu. 7 If you set...
Basic Users Guide
Page 30
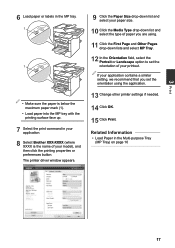
... printing properties or preferences button. The printer driver window appears. 9 Click the Paper Size drop-down list and select your paper size. 10 Click the Media Type drop-down lists and select MP Tray. 12 In the Orientation field, select the Portrait or Landscape option to set the orientation using the application. 13 Change other printer settings if needed. 14 Click OK. 15 Click Print. 3 Print 6 Load paper or labels in the MP tray. 1 1 • Make...
... printing properties or preferences button. The printer driver window appears. 9 Click the Paper Size drop-down list and select your paper size. 10 Click the Media Type drop-down lists and select MP Tray. 12 In the Orientation field, select the Portrait or Landscape option to set the orientation using the application. 13 Change other printer settings if needed. 14 Click OK. 15 Click Print. 3 Print 6 Load paper or labels in the MP tray. 1 1 • Make...
Basic Users Guide
Page 41
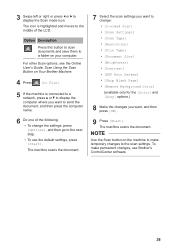
...; To change : • [2-sided Scan] • [Scan Settings] • [Scan Type] • [Resolution] • [File Type] • [Document Size] • [Brightness] • [Contrast] • [ADF Auto Deskew] • [Skip Blank Page] • [Remove Background Color] (available only for the [Color] and [Gray] options.) 8 Make the changes you want to the scan settings. The machine scans the document. The icon is highlighted and moves to a folder on Your Brother Machine. 4 Press [to File]. 5 If the machine is connected to a network, press...
...; To change : • [2-sided Scan] • [Scan Settings] • [Scan Type] • [Resolution] • [File Type] • [Document Size] • [Brightness] • [Contrast] • [ADF Auto Deskew] • [Skip Blank Page] • [Remove Background Color] (available only for the [Color] and [Gray] options.) 8 Make the changes you want to the scan settings. The machine scans the document. The icon is highlighted and moves to a folder on Your Brother Machine. 4 Press [to File]. 5 If the machine is connected to a network, press...

Basic Users Guide
Page 43
.../double-ring made by reducing the modem speed to minimize errors in the machine's menu) Manual Mode turns off Error Correction Mode (ECM). See Related Information: External and Extension Telephones. Use the Easy Receive feature to receive faxes when you to pick up the call as the machine. Manual Mode ([Manual] in fax transmission. Set Telephone Line Compatibility for VoIP). • VoIP is a recurring problem on your machine. If you are fax...
.../double-ring made by reducing the modem speed to minimize errors in the machine's menu) Manual Mode turns off Error Correction Mode (ECM). See Related Information: External and Extension Telephones. Use the Easy Receive feature to receive faxes when you to pick up the call as the machine. Manual Mode ([Manual] in fax transmission. Set Telephone Line Compatibility for VoIP). • VoIP is a recurring problem on your machine. If you are fax...
Basic Users Guide
Page 57
... installed correctly. Install the 2-sided tray firmly in the closed . Remove the toner cartridge and drum unit assembly. If the problem continues, contact Brother Customer Service or your Android™ device are shown in the machine. Open and then firmly close the front cover of both your Brother machine and your local Brother dealer. Reinstall the toner cartridge and drum unit assembly in the table. The most common error and maintenance messages are set to access the Brother...
... installed correctly. Install the 2-sided tray firmly in the closed . Remove the toner cartridge and drum unit assembly. If the problem continues, contact Brother Customer Service or your Android™ device are shown in the machine. Open and then firmly close the front cover of both your Brother machine and your local Brother dealer. Reinstall the toner cartridge and drum unit assembly in the table. The most common error and maintenance messages are set to access the Brother...

Basic Users Guide
Page 62
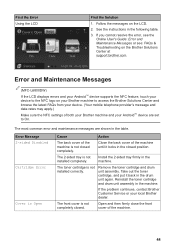
... installed. new drum unit. Size Error 2-sided The paper size specified Press in the paper tray. Size mismatch The paper in the tray is not the correct size. Refill the paper in the machine's paper (if required). A Troubleshooting 49 Press and hold to replace the drum unit. The paper in the tray is sided printing. The drum unit counter Reset the drum unit counter. Error Message Cause Action Self-Diagnostic The temperature of paper during copying and the machine could not feed the same size paper from the next priority tray. The fuser unit...
... installed. new drum unit. Size Error 2-sided The paper size specified Press in the paper tray. Size mismatch The paper in the tray is not the correct size. Refill the paper in the machine's paper (if required). A Troubleshooting 49 Press and hold to replace the drum unit. The paper in the tray is sided printing. The drum unit counter Reset the drum unit counter. Error Message Cause Action Self-Diagnostic The temperature of paper during copying and the machine could not feed the same size paper from the next priority tray. The fuser unit...
Basic Users Guide
Page 63
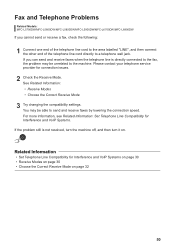
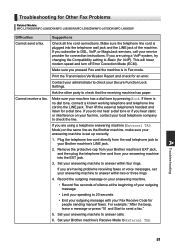
... the telephone line cord directly to a telephone wall jack. Fax and Telephone Problems Related Models: MFC-L5700DW/MFC-L5800DW/MFC-L5850DW/MFC-L5900DW/MFC-L6700DW/MFC-L6800DW If you can send and receive faxes when the telephone line is not resolved, turn the machine off, and then turn it on page 32 50 Related Information • Set Telephone Line Compatibility for Interference and VoIP Systems on page 30 • Receive Modes on page 30 •...
... the telephone line cord directly to a telephone wall jack. Fax and Telephone Problems Related Models: MFC-L5700DW/MFC-L5800DW/MFC-L5850DW/MFC-L5900DW/MFC-L6700DW/MFC-L6800DW If you can send and receive faxes when the telephone line is not resolved, turn the machine off, and then turn it on page 32 50 Related Information • Set Telephone Line Compatibility for Interference and VoIP Systems on page 30 • Receive Modes on page 30 •...
Basic Users Guide
Page 64
... people sending manual faxes. Make sure you subscribe to DSL, VoIP, or MagicJack services, call your answering machine to answer within four rings. Make sure your answering machine to check the line. If you are having problems receiving faxes or voice messages, set up correctly. 1. Set your machine has a dial tone by pressing Hook. Ask the other party to send a fax." 5. Plug the telephone line cord directly from your Brother machine's LINE jack. 2. Remove...
... people sending manual faxes. Make sure you subscribe to DSL, VoIP, or MagicJack services, call your answering machine to answer within four rings. Make sure your answering machine to check the line. If you are having problems receiving faxes or voice messages, set up correctly. 1. Set your machine has a dial tone by pressing Hook. Ask the other party to send a fax." 5. Plug the telephone line cord directly from your Brother machine's LINE jack. 2. Remove...
Basic Users Guide
Page 78
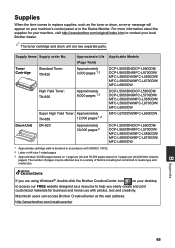
... FREE website designed as the toner or drum, an error message will appear on your local Brother dealer. If you easily create and print customized materials for your machine, visit http://www.brother.com/original/index.html or contact your machine's control panel or in accordance with photos, text and creativity. Macintosh users can access Brother CreativeCenter at this web address: http://www.brother.com/creativecenter B Appendix 65 Toner Cartridge Standard Toner...
... FREE website designed as the toner or drum, an error message will appear on your local Brother dealer. If you easily create and print customized materials for your machine, visit http://www.brother.com/original/index.html or contact your machine's control panel or in accordance with photos, text and creativity. Macintosh users can access Brother CreativeCenter at this web address: http://www.brother.com/creativecenter B Appendix 65 Toner Cartridge Standard Toner...
Quick Setup Guide
Page 1
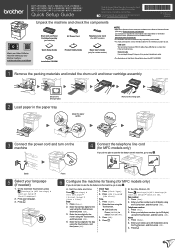
..., and then press [OK]. 3. Network cable Use a straight-through Category 5 (or greater) twisted-pair cable. • The illustrations in this Quick Setup Guide show the MFC‑L6800DW. 1 Remove the packing materials and install the drum unit and toner cartridge assembly Discard the silica gel pack. 2 Load paper in all models are available at the Brother Solutions Center: solutions.brother.com/manuals. Clock Type 1. USB cable We recommend using a USB 2.0 cable (Type A/B) that is no more than...
..., and then press [OK]. 3. Network cable Use a straight-through Category 5 (or greater) twisted-pair cable. • The illustrations in this Quick Setup Guide show the MFC‑L6800DW. 1 Remove the packing materials and install the drum unit and toner cartridge assembly Discard the silica gel pack. 2 Load paper in all models are available at the Brother Solutions Center: solutions.brother.com/manuals. Clock Type 1. USB cable We recommend using a USB 2.0 cable (Type A/B) that is no more than...
Quick Setup Guide
Page 2
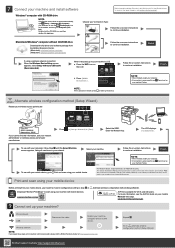
... these steps and connection is available for the latest firmware, visit solutions.brother.com/up1. solutions.brother.com/ips Alternate wireless configuration method (Setup Wizard). Press the WiFi icon on your model's Manuals web page. Print and scan using your machine. Go to add features and fix identified problems. To check for OS X and iOS users. Brother regularly updates firmware to Alternate wireless configuration method (Setup Wizard). Enter the Network key. below . Finish If using your machine, computer and/or...
... these steps and connection is available for the latest firmware, visit solutions.brother.com/up1. solutions.brother.com/ips Alternate wireless configuration method (Setup Wizard). Press the WiFi icon on your model's Manuals web page. Print and scan using your machine. Go to add features and fix identified problems. To check for OS X and iOS users. Brother regularly updates firmware to Alternate wireless configuration method (Setup Wizard). Enter the Network key. below . Finish If using your machine, computer and/or...


