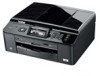
Network Users Manual - English
Page 71
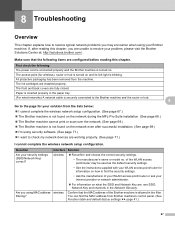
... settings uu page 41.) 67 Paper is inserted properly in the paper tray. (For wired networks) A network cable is securely connected to the Brother machine and the router or hub. 8 Go to the page for your solution from the lists below: 8 I cannot complete the ... items are configured before reading this chapter, you are , see SSID, Network Key and channels in the filter. The ink cartridges are fully closed. Question Are your Brother machine. Are you may be used as the default security settings. • See the instructions supplied with your WLAN access...
... settings uu page 41.) 67 Paper is inserted properly in the paper tray. (For wired networks) A network cable is securely connected to the Brother machine and the router or hub. 8 Go to the page for your solution from the lists below: 8 I cannot complete the ... items are configured before reading this chapter, you are , see SSID, Network Key and channels in the filter. The ink cartridges are fully closed. Question Are your Brother machine. Are you may be used as the default security settings. • See the instructions supplied with your WLAN access...
Product Safety Guide - English
Page 3
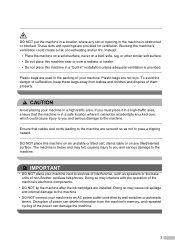
... AC power outlet controlled by wall switches or automatic timers. Doing so may cause ink spillage and internal damage to the machine. • DO NOT connect your machine next to sources of non-Brother cordless telephones. DO NOT place this machine on an unstable or tilted cart, stand...adequate ventilation is heavy and may interfere with the operation of the machine's electronic components. • DO NOT tip the machine after the ink cartridges are secured so as speakers or the base units of interference, such as not to the machine. Blocking the machine's ventilation could cause...
... AC power outlet controlled by wall switches or automatic timers. Doing so may cause ink spillage and internal damage to the machine. • DO NOT connect your machine next to sources of non-Brother cordless telephones. DO NOT place this machine on an unstable or tilted cart, stand...adequate ventilation is heavy and may interfere with the operation of the machine's electronic components. • DO NOT tip the machine after the ink cartridges are secured so as speakers or the base units of interference, such as not to the machine. Blocking the machine's ventilation could cause...
Software Users Manual - English
Page 12
... paper, it pauses the computer printing operation, and then continues printing when copying or fax receiving has finished. If the LCD shows Ink low, one or more of the ink cartridges are near the end of their life. You can print from the memory 1 If the LCD shows Data Remaining, you can clear...
... paper, it pauses the computer printing operation, and then continues printing when copying or fax receiving has finished. If the LCD shows Ink low, one or more of the ink cartridges are near the end of their life. You can print from the memory 1 If the LCD shows Data Remaining, you can clear...
Software Users Manual - English
Page 136
If the LCD shows Ink low, one or more of the ink cartridges are from your computer while sending or receiving a fax in memory, or while scanning a document into the computer. Screens on your computer may vary depending ...
If the LCD shows Ink low, one or more of the ink cartridges are from your computer while sending or receiving a fax in memory, or while scanning a document into the computer. Screens on your computer may vary depending ...

Quick Setup Guide - English
Page 1
... Most of them correctly. Note • Save all packing materials and the box in death or serious injuries. Starter Ink Cartridges Black Yellow Cyan Magenta Quick Setup Guide CD-ROM Basic User's Guide Product Safety Guide Product Registration Sheet (USA only) Disc Tray...or greater) twisted-pair cable for choosing Brother, your support is important to use (for the correct setup and installation. USA/CAN Version 0 1 Please read this Quick Setup Guide show the MFC-J825DW. The components included in and day-out. Your Brother product is no more than 6 feet ...
... Most of them correctly. Note • Save all packing materials and the box in death or serious injuries. Starter Ink Cartridges Black Yellow Cyan Magenta Quick Setup Guide CD-ROM Basic User's Guide Product Safety Guide Product Registration Sheet (USA only) Disc Tray...or greater) twisted-pair cable for choosing Brother, your support is important to use (for the correct setup and installation. USA/CAN Version 0 1 Please read this Quick Setup Guide show the MFC-J825DW. The components included in and day-out. Your Brother product is no more than 6 feet ...
Quick Setup Guide - English
Page 2
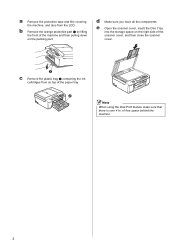
... Tray into the storage space on the right side of the scanner cover, and then close the scanner cover. 1 c Remove the plastic bag b containing the ink cartridges from the LCD. b Remove the orange protective part a by lifting the front of the machine and then pulling down on top of free space behind...
... Tray into the storage space on the right side of the scanner cover, and then close the scanner cover. 1 c Remove the plastic bag b containing the ink cartridges from the LCD. b Remove the orange protective part a by lifting the front of the machine and then pulling down on top of free space behind...
Quick Setup Guide - English
Page 6
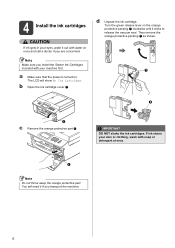
... your skin or clothing, wash with your eyes, wash it out with water at once and call a doctor if you install the Starter Ink Cartridges included with soap or detergent at once. 1 Note Do not throw away the orange protective part. Turn the green release lever on . ...a Make sure that the power is turned on the orange protective packing a clockwise until it if you transport the machine. 6 b Open the ink cartridge cover a. Note Make sure you are concerned. Then remove the orange protective packing a as shown. 1 1 1 c Remove the orange protective part a. You will...
... your skin or clothing, wash with your eyes, wash it out with water at once and call a doctor if you install the Starter Ink Cartridges included with soap or detergent at once. 1 Note Do not throw away the orange protective part. Turn the green release lever on . ...a Make sure that the power is turned on the orange protective packing a clockwise until it if you transport the machine. 6 b Open the ink cartridge cover a. Note Make sure you are concerned. Then remove the orange protective packing a as shown. 1 1 1 c Remove the orange protective part a. You will...
Quick Setup Guide - English
Page 7
... may seep out of the cartridge. • If you do so, ink may reduce the ink quantity and the machine will prepare the ink tube system for printing. Use or attempted use only Genuine Brother Brand replacement ink cartridges. IMPORTANT • DO NOT take approximately four minutes. Use unopened ink cartridges by installing an ink cartridge in the wrong position, clean...
... may seep out of the cartridge. • If you do so, ink may reduce the ink quantity and the machine will prepare the ink tube system for printing. Use or attempted use only Genuine Brother Brand replacement ink cartridges. IMPORTANT • DO NOT take approximately four minutes. Use unopened ink cartridges by installing an ink cartridge in the wrong position, clean...

Quick Setup Guide - English
Page 44
..." software developed by the following vendors: ©1983-1998 PACIFIC SOFTWORKS, INC. ©2008 Devicescape Software, Inc. For more information about the ink cartridges for your machine, visit http://www.brother.com/original/ or contact your desktop to access our FREE web site with "beautiful" and "long lasting" print results. All rights reserved.
..." software developed by the following vendors: ©1983-1998 PACIFIC SOFTWORKS, INC. ©2008 Devicescape Software, Inc. For more information about the ink cartridges for your machine, visit http://www.brother.com/original/ or contact your desktop to access our FREE web site with "beautiful" and "long lasting" print results. All rights reserved.
Advanced Users Manual - English
Page 71
... important to allow the machine to release the ink cartridges and then take out the ink cartridges. (uuBasic User's Guide: Replacing the ink cartridges) c Install the orange protective part and A then close the ink cartridge cover. 65 Listen carefully to the machine before unplugging it to the print head. a Open the ink cartridge cover. If you do not pack the...
... important to allow the machine to release the ink cartridges and then take out the ink cartridges. (uuBasic User's Guide: Replacing the ink cartridges) c Install the orange protective part and A then close the ink cartridge cover. 65 Listen carefully to the machine before unplugging it to the print head. a Open the ink cartridge cover. If you do not pack the...
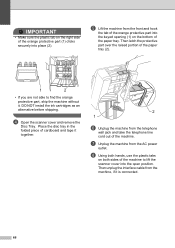
Advanced Users Manual - English
Page 72
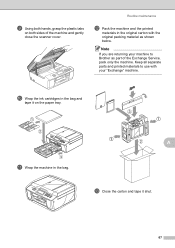
... front and hook the tab of the orange protective part into the keyed opening (1) on the bottom of the paper tray. DO NOT install the ink cartridges as an alternative before shipping. Place the disc tray in the folded piece of cardboard and tape it . h Using both hands, use the plastic tabs...
... front and hook the tab of the orange protective part into the keyed opening (1) on the bottom of the paper tray. DO NOT install the ink cartridges as an alternative before shipping. Place the disc tray in the folded piece of cardboard and tape it . h Using both hands, use the plastic tabs...
Advanced Users Manual - English
Page 73
j Wrap the ink cartridges in the bag and tape it shut. 67 Keep all separate parts and printed materials to Brother as shown below. A m Close the carton and tape it on both sides of the Exchange Service, pack only the machine. i Using both hands, grasp the ...
j Wrap the ink cartridges in the bag and tape it shut. 67 Keep all separate parts and printed materials to Brother as shown below. A m Close the carton and tape it on both sides of the Exchange Service, pack only the machine. i Using both hands, grasp the ...

Advanced Users Manual - English
Page 79
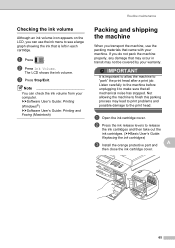
... (Dual Access 9 manual 9 overseas 12 Real Time Transmission 11 Resolution 8 return to factory setting 8 set new default 8 G Groups for Broadcasting 32 I ID Copy 39 Ink cartridges checking ink volume 65 J Jacks Convert to Speed Dial 29 Delete 29 Send a fax 29 73 Scanning See Software User's Guide. O Outgoing Call Add to RJ11 jack...
... (Dual Access 9 manual 9 overseas 12 Real Time Transmission 11 Resolution 8 return to factory setting 8 set new default 8 G Groups for Broadcasting 32 I ID Copy 39 Ink cartridges checking ink volume 65 J Jacks Convert to Speed Dial 29 Delete 29 Send a fax 29 73 Scanning See Software User's Guide. O Outgoing Call Add to RJ11 jack...

Users Manual - English
Page 4
...: In Canada: 1-877-552-MALL (1-877-552-6255) 1-800-947-1445 (fax) http://www.brothermall.com/ 1-877-BROTHER http://www.brother.ca/ Description Ink Cartridge Standard Ink Cartridge Standard Ink Cartridge Standard (blue) Ink Cartridge Standard (red) Ink Cartridge High Yield Ink Cartridge High Yield Ink Cartridge High Yield (blue) Ink Cartridge High Yield (red) Premium Plus Glossy Photo Paper (Letter size / 20 sheets) (4" 6" size / 20 sheets...
...: In Canada: 1-877-552-MALL (1-877-552-6255) 1-800-947-1445 (fax) http://www.brothermall.com/ 1-877-BROTHER http://www.brother.ca/ Description Ink Cartridge Standard Ink Cartridge Standard Ink Cartridge Standard (blue) Ink Cartridge Standard (red) Ink Cartridge High Yield Ink Cartridge High Yield Ink Cartridge High Yield (blue) Ink Cartridge High Yield (red) Premium Plus Glossy Photo Paper (Letter size / 20 sheets) (4" 6" size / 20 sheets...
Users Manual - English
Page 11
... 12 How to print on a Disc (CD/DVD/BD) 59 Overview...59 How to load a Disc (CD/DVD/BD 59 A Routine maintenance 61 Replacing the ink cartridges 61 Cleaning and checking the machine 64 Cleaning the scanner 64 Cleaning the print head 65 Checking the print quality 65 Checking the print alignment...
... 12 How to print on a Disc (CD/DVD/BD) 59 Overview...59 How to load a Disc (CD/DVD/BD 59 A Routine maintenance 61 Replacing the ink cartridges 61 Cleaning and checking the machine 64 Cleaning the scanner 64 Cleaning the print head 65 Checking the print quality 65 Checking the print alignment...
Users Manual - English
Page 21
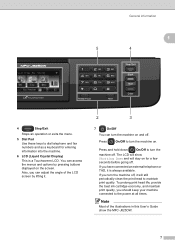
...buttons displayed on and off. Also, you have connected an external telephone or TAD, it is a Touchscreen LCD. The LCD will show the MFC-J825DW. 7 Press On/Off to turn the machine on the screen. If you can adjust the angle of the illustrations in this User's Guide show.... 2 3 7 On/Off You can access the menus and options by lifting it will stay on . To prolong print head life, provide the best ink cartridge economy, and maintain print quality, you turn the machine on for entering information into the machine. 6 LCD (Liquid Crystal Display) This is always available. ...
...buttons displayed on and off. Also, you have connected an external telephone or TAD, it is a Touchscreen LCD. The LCD will show the MFC-J825DW. 7 Press On/Off to turn the machine on the screen. If you can adjust the angle of the illustrations in this User's Guide show.... 2 3 7 On/Off You can access the menus and options by lifting it will stay on . To prolong print head life, provide the best ink cartridge economy, and maintain print quality, you turn the machine on for entering information into the machine. 6 LCD (Liquid Crystal Display) This is always available. ...
Users Manual - English
Page 75
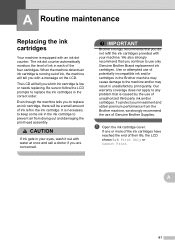
... in unsatisfactory print quality. Even though the machine tells you to replace an ink cartridge, there will tell you which ink cartridge is caused by the use only Genuine Brother Brand replacement ink cartridges. Use or attempted use of unauthorized third-party ink and/or cartridges. a Open the ink cartridge cover. Be sure to follow the LCD prompts to replace the...
... in unsatisfactory print quality. Even though the machine tells you to replace an ink cartridge, there will tell you which ink cartridge is caused by the use only Genuine Brother Brand replacement ink cartridges. Use or attempted use of unauthorized third-party ink and/or cartridges. a Open the ink cartridge cover. Be sure to follow the LCD prompts to replace the...
Users Manual - English
Page 76
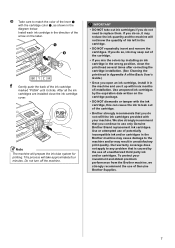
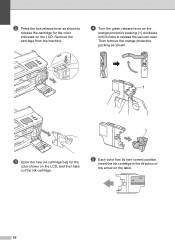
e Each color has its own correct position. b Press the lock release lever as shown. 1 1 c Open the new ink cartridge bag for the color indicated on the LCD. Remove the cartridge from the machine. Insert the ink cartridge in the direction of the arrow on the LCD, and then take out the ink cartridge. d Turn the green release lever on the orange protective packing (1) clockwise until it clicks to release the cartridge for the color shown on the label. 62 Then remove the orange protective packing as shown to release the vacuum seal.
e Each color has its own correct position. b Press the lock release lever as shown. 1 1 c Open the new ink cartridge bag for the color indicated on the LCD. Remove the cartridge from the machine. Insert the ink cartridge in the direction of the arrow on the LCD, and then take out the ink cartridge. d Turn the green release lever on the orange protective packing (1) clockwise until it clicks to release the cartridge for the color shown on the label. 62 Then remove the orange protective packing as shown to release the vacuum seal.
Users Manual - English
Page 77
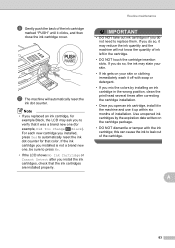
... with soap or detergent. • If you open an ink cartridge, install it in the machine and use it off with the ink cartridge; For each new cartridge you do not need to automatically reset the ink dot counter for example, Did You Change Black). Routine maintenance...the ink cartridges are installed properly. A 63 If the ink cartridge you do so, it clicks, and then close the ink cartridge cover. g The machine will not know the quantity of ink left in the cartridge. • DO NOT touch the cartridge insertion slots. f Gently push the back of the ink cartridge marked...
... with soap or detergent. • If you open an ink cartridge, install it in the machine and use it off with the ink cartridge; For each new cartridge you do not need to automatically reset the ink dot counter for example, Did You Change Black). Routine maintenance...the ink cartridges are installed properly. A 63 If the ink cartridge you do so, it clicks, and then close the ink cartridge cover. g The machine will not know the quantity of ink left in the cartridge. • DO NOT touch the cartridge insertion slots. f Gently push the back of the ink cartridge marked...
Users Manual - English
Page 79
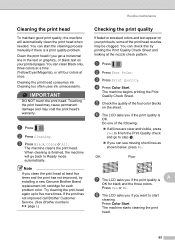
... Do one of the following: If all four colors at the nozzle check pattern. If the print has not improved call Brother Customer Service. (See Brother numbers uu page i.) Checking the print quality A If faded or streaked colors and text appear on your printouts, some of the four...g The LCD asks you clean the print head at least five times and the print has not improved, try installing a new Genuine Brother Brand replacement ink cartridge for black and the three colors. Note If you if the print quality is finished, the machine will automatically clean the print head ...
... Do one of the following: If all four colors at the nozzle check pattern. If the print has not improved call Brother Customer Service. (See Brother numbers uu page i.) Checking the print quality A If faded or streaked colors and text appear on your printouts, some of the four...g The LCD asks you clean the print head at least five times and the print has not improved, try installing a new Genuine Brother Brand replacement ink cartridge for black and the three colors. Note If you if the print quality is finished, the machine will automatically clean the print head ...


