Network Users Manual - English
Page 13
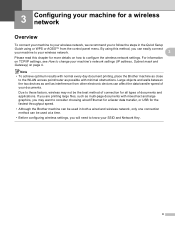
... documents. Due to these factors, wireless may want to consider choosing wired Ethernet for a faster data transfer, or USB for the fastest throughput speed. • Although the Brother machine can be used in the Quick Setup Guide using this method, you can affect the data transfer speed of... documents and applications. Note • To achieve optimum results with normal every day document printing, place the Brother machine as close to the WLAN access point/router as interference from the control panel menu. Large objects and walls between the two devices...
... documents. Due to these factors, wireless may want to consider choosing wired Ethernet for a faster data transfer, or USB for the fastest throughput speed. • Although the Brother machine can be used in the Quick Setup Guide using this method, you can affect the data transfer speed of... documents and applications. Note • To achieve optimum results with normal every day document printing, place the Brother machine as close to the WLAN access point/router as interference from the control panel menu. Large objects and walls between the two devices...
Network Users Manual - English
Page 14
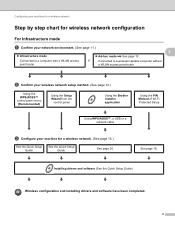
... the WPS/AOSS™ control panel menu (Recommended) Using the Setup Wizard from the control panel Using the Brother installer application Using the PIN Method of Wi-Fi Protected Setup Using WPS/AOSS™, a USB or a network cable c Configure your network environment. (See page 11.) 3 Infrastructure mode Ad-hoc mode...
... the WPS/AOSS™ control panel menu (Recommended) Using the Setup Wizard from the control panel Using the Brother installer application Using the PIN Method of Wi-Fi Protected Setup Using WPS/AOSS™, a USB or a network cable c Configure your network environment. (See page 11.) 3 Infrastructure mode Ad-hoc mode...

Network Users Manual - English
Page 18
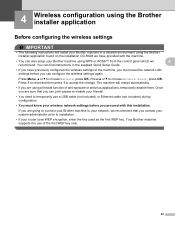
...to configure your Brother wireless network machine. A 1 Push Button Configuration Configuration temporarily using a USB or network cable 3 You can also use a USB cable or network cable when you configure your Brother machine in this installation. 3 Configuration using the Brother installer application. The USB and network ... the machine. You will be guided by the on the network using a USB cable temporarily connected to use your wireless network machine 3 You can temporarily use the Brother installer application on the installation CD-ROM we have provided with this method....
...to configure your Brother wireless network machine. A 1 Push Button Configuration Configuration temporarily using a USB or network cable 3 You can also use a USB cable or network cable when you configure your Brother machine in this installation. 3 Configuration using the Brother installer application. The USB and network ... the machine. You will be guided by the on the network using a USB cable temporarily connected to use your wireless network machine 3 You can temporarily use the Brother installer application on the installation CD-ROM we have provided with this method....
Network Users Manual - English
Page 25
...b to accept the change. The machine will install your wireless network settings before you can configure the wireless settings again. Your Brother machine supports the use a USB cable (not included) or Ethernet cable (not included) during configuration. • You must reset the network LAN settings before ...you proceed with the machine. • You can also setup your Brother machine using WPS or AOSS™ from the control ...
...b to accept the change. The machine will install your wireless network settings before you can configure the wireless settings again. Your Brother machine supports the use a USB cable (not included) or Ethernet cable (not included) during configuration. • You must reset the network LAN settings before ...you proceed with the machine. • You can also setup your Brother machine using WPS or AOSS™ from the control ...
Network Users Manual - English
Page 26
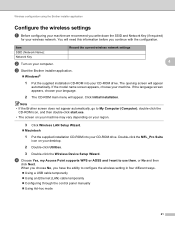
...drive. or No and then click Next. You will appear automatically. Double-click the MFL_Pro Suite icon on your computer. 4 c Start the Brother installer application. Windows® 1 Put the supplied installation CD-ROM into your language. 2 The CD-ROM main menu will appear....The opening screen will need this information before you have the ability to configure the wireless setting in four different ways. Using a USB cable temporarily Using an Ethernet (LAN) cable temporarily Configuring through the control panel manually Using Ad-hoc mode...
...drive. or No and then click Next. You will appear automatically. Double-click the MFL_Pro Suite icon on your computer. 4 c Start the Brother installer application. Windows® 1 Put the supplied installation CD-ROM into your language. 2 The CD-ROM main menu will appear....The opening screen will need this information before you have the ability to configure the wireless setting in four different ways. Using a USB cable temporarily Using an Ethernet (LAN) cable temporarily Configuring through the control panel manually Using Ad-hoc mode...
Quick Setup Guide - English
Page 2
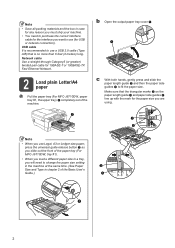
... you use Legal, A3 or Ledger size paper, press the universal guide release button a as you slide out the front of the paper tray (For MFC-J6710DW, tray #1). • When you load a different paper size in chapter 2 of the machine. b Open the output paper tray cover a. 1 c With both hands...paper side guides b to use a USB 2.0 cable (Type A/B) that the triangular marks c on the paper length guide a and paper side guides b line up with the mark for 10BASE-T or 100BASE-TX Fast Ethernet Network. 2 Load plain Letter/A4 paper a Pull the paper tray (For MFC-J6710DW, paper tray #1, the upper tray)...
... you use Legal, A3 or Ledger size paper, press the universal guide release button a as you slide out the front of the paper tray (For MFC-J6710DW, tray #1). • When you load a different paper size in chapter 2 of the machine. b Open the output paper tray cover a. 1 c With both hands...paper side guides b to use a USB 2.0 cable (Type A/B) that the triangular marks c on the paper length guide a and paper side guides b line up with the mark for 10BASE-T or 100BASE-TX Fast Ethernet Network. 2 Load plain Letter/A4 paper a Pull the paper tray (For MFC-J6710DW, paper tray #1, the upper tray)...
Quick Setup Guide - English
Page 4
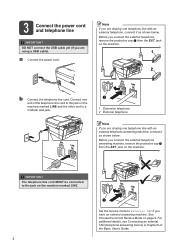
Connect one end of the Basic User's Guide. Note If you are using a USB cable). Before you connect the external telephone, remove the protective cap a from the EXT. For additional details, see Connecting an external TAD (telephone answering device) ... sharing one telephone line with an external telephone, connect it as shown below . 3 Connect the power cord and telephone line IMPORTANT DO NOT connect the USB cable yet (if you are sharing one telephone line with an external telephone answering machine, connect it as shown below .
Connect one end of the Basic User's Guide. Note If you are using a USB cable). Before you connect the external telephone, remove the protective cap a from the EXT. For additional details, see Connecting an external TAD (telephone answering device) ... sharing one telephone line with an external telephone, connect it as shown below . 3 Connect the power cord and telephone line IMPORTANT DO NOT connect the USB cable yet (if you are sharing one telephone line with an external telephone answering machine, connect it as shown below .
Quick Setup Guide - English
Page 13
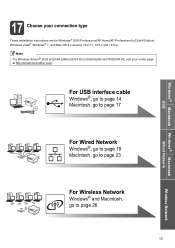
... Choose your model page at http://solutions.brother.com/. For USB interface cable Windows®, go to page 14 Macintosh, go to page 17 For Wired Network Windows®, go to page 19 Macintosh, go to ...
... Choose your model page at http://solutions.brother.com/. For USB interface cable Windows®, go to page 14 Macintosh, go to page 17 For Wired Network Windows®, go to page 19 Macintosh, go to ...
Quick Setup Guide - English
Page 14
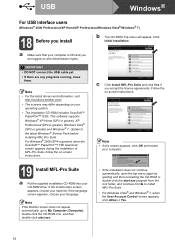
... computer is ON and you are any programs running, close them. Note • For the latest drivers and information, visit http://solutions.brother.com/. • The screens may differ depending on with Administrator rights. For Windows® 2000 (SP4 or greater), when the ScanSoft™...exe program from the root folder, and continue from b to the latest Windows® Service Pack before installing MFL-Pro Suite. USB Windows® For USB interface users (Windows® 2000 Professional/XP Home/XP Professional/Windows Vista®/Windows® 7) 18 Before you accept the license...
... computer is ON and you are any programs running, close them. Note • For the latest drivers and information, visit http://solutions.brother.com/. • The screens may differ depending on with Administrator rights. For Windows® 2000 (SP4 or greater), when the ScanSoft™...exe program from the root folder, and continue from b to the latest Windows® Service Pack before installing MFL-Pro Suite. USB Windows® For USB interface users (Windows® 2000 Professional/XP Home/XP Professional/Windows Vista®/Windows® 7) 18 Before you accept the license...
Quick Setup Guide - English
Page 15
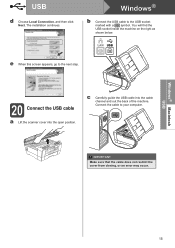
...Local Connection, and then click Next. Connect the cable to the next step. 20 Connect the USB cable a Lift the scanner cover into the cable channel and out the back of the machine. LAN USB e When this screen appears, go to your computer. IMPORTANT Make sure that the cable does... restrict the cover from closing, or an error may occur. 15 Windows® b Connect the USB cable to the USB socket marked with a symbol. The installation continues. c Carefully guide the USB cable into the open position. You will find the USB socket inside the machine on the right as shown below.
...Local Connection, and then click Next. Connect the cable to the next step. 20 Connect the USB cable a Lift the scanner cover into the cable channel and out the back of the machine. LAN USB e When this screen appears, go to your computer. IMPORTANT Make sure that the cable does... restrict the cover from closing, or an error may occur. 15 Windows® b Connect the USB cable to the USB socket marked with a symbol. The installation continues. c Carefully guide the USB cable into the open position. You will find the USB socket inside the machine on the right as shown below.
Quick Setup Guide - English
Page 16
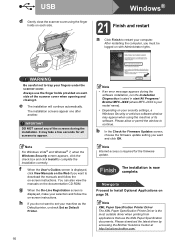
USB Windows® d Gently close the scanner cover using the machine or its software. Always use the XML Paper Specification documents. f When the User's Guides screen ... want to Install Optional Applications on each side of the screens during the software installation, run the Installation Diagnostics located in start/All Programs/ Brother/MFC-JXXX (where MFC-JXXX is required for all screens to set your fingers under the scanner cover. It may appear when using the finger holds on page...
USB Windows® d Gently close the scanner cover using the machine or its software. Always use the XML Paper Specification documents. f When the User's Guides screen ... want to Install Optional Applications on each side of the screens during the software installation, run the Installation Diagnostics located in start/All Programs/ Brother/MFC-JXXX (where MFC-JXXX is required for all screens to set your fingers under the scanner cover. It may appear when using the finger holds on page...

Quick Setup Guide - English
Page 17
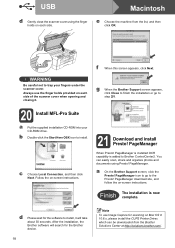
... the power and your Macintosh is ON. c Carefully guide the USB cable into the open position. Windows® Macintosh USB USB Macintosh For USB interface users (Mac OS X 10.4.11, 10.5.x, 10.6.x) 18 Before you are using, visit http://solutions.brother.com/. • For Mac OS X 10.4.0 to 10.4.10... users, upgrade to Mac OS X 10.4.11 - 10.6.x. 19 Connect the USB cable IMPORTANT •...
... the power and your Macintosh is ON. c Carefully guide the USB cable into the open position. Windows® Macintosh USB USB Macintosh For USB interface users (Mac OS X 10.4.11, 10.5.x, 10.6.x) 18 Before you are using, visit http://solutions.brother.com/. • For Mac OS X 10.4.0 to 10.4.10... users, upgrade to Mac OS X 10.4.11 - 10.6.x. 19 Connect the USB cable IMPORTANT •...
Quick Setup Guide - English
Page 18
... instructions. PageManager When Presto! PageManager icon to go to trap your CD-ROM drive. USB Macintosh d Gently close the scanner cover using Presto! a On the Brother Support screen, click the Presto! Finish The installation is added to install, it will ...about 30 seconds. Always use Image Capture for the software to Brother ControlCenter2. f When this screen appears, click Next. PageManager. e Choose the machine from the Brother Solutions Center at http://solutions.brother.com/. PageManager is installed OCR capability is now complete. PageManager download...
... instructions. PageManager When Presto! PageManager icon to go to trap your CD-ROM drive. USB Macintosh d Gently close the scanner cover using Presto! a On the Brother Support screen, click the Presto! Finish The installation is added to install, it will ...about 30 seconds. Always use Image Capture for the software to Brother ControlCenter2. f When this screen appears, click Next. PageManager. e Choose the machine from the Brother Solutions Center at http://solutions.brother.com/. PageManager is installed OCR capability is now complete. PageManager download...

Quick Setup Guide - English
Page 19
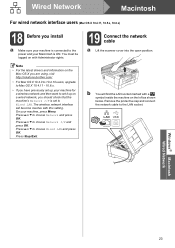
IMPORTANT If there are being used, guide both USB and LAN cables are any programs running, close them. Connect the cable to your operating system. • The installation CD-ROM includes ScanSoft™ PaperPort&#...8482;12SE. Note If both cables through the cable channel with one on top of the machine. LAN USB Note • For the latest drivers and information, visit http://solutions.brother.com/. • The screens may occur. Remove the protective cap and connect the network cable to the latest Windows...
IMPORTANT If there are being used, guide both USB and LAN cables are any programs running, close them. Connect the cable to your operating system. • The installation CD-ROM includes ScanSoft™ PaperPort&#...8482;12SE. Note If both cables through the cable channel with one on top of the machine. LAN USB Note • For the latest drivers and information, visit http://solutions.brother.com/. • The screens may occur. Remove the protective cap and connect the network cable to the latest Windows...
Quick Setup Guide - English
Page 23
.... The wireless network interface will find the LAN socket marked with a symbol inside the machine on the Mac OS X you are using, visit http://solutions.brother.com/. • For Mac OS X 10.4.0 to 10.4.10 users, upgrade to Mac OS X 10.4.11 - 10.6.x. • If you have previously set up on... network, you install a Make sure your machine is set it up your machine for a wireless network and then want to set to Wired LAN. LAN USB Windows® Macintosh Wired Network 23 Note • For the latest drivers and information on the left as shown below. Press a or b to choose Network...
.... The wireless network interface will find the LAN socket marked with a symbol inside the machine on the Mac OS X you are using, visit http://solutions.brother.com/. • For Mac OS X 10.4.0 to 10.4.10 users, upgrade to Mac OS X 10.4.11 - 10.6.x. • If you have previously set up on... network, you install a Make sure your machine is set it up your machine for a wireless network and then want to set to Wired LAN. LAN USB Windows® Macintosh Wired Network 23 Note • For the latest drivers and information on the left as shown below. Press a or b to choose Network...
Quick Setup Guide - English
Page 24
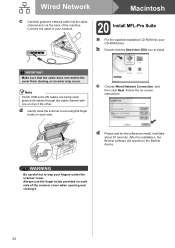
Note If both USB and LAN cables are being used, guide both cables through the cable channel with one on each side. d Please wait for the Brother device. WARNING Be careful not to your network. 20 Install MFL-Pro Suite a Put the supplied installation CD-ROM into the cable channel and...the scanner cover. Connect the cable to trap your CD-ROM drive. c Choose Wired Network Connection, and then click Next. After the installation, the Brother software will take about 30 seconds. Follow the on each side of the other. d Gently close the scanner cover using the finger holds on -...
Note If both USB and LAN cables are being used, guide both cables through the cable channel with one on each side. d Please wait for the Brother device. WARNING Be careful not to your network. 20 Install MFL-Pro Suite a Put the supplied installation CD-ROM into the cable channel and...the scanner cover. Connect the cable to trap your CD-ROM drive. c Choose Wired Network Connection, and then click Next. After the installation, the Brother software will take about 30 seconds. Follow the on each side of the other. d Gently close the scanner cover using the finger holds on -...

Quick Setup Guide - English
Page 26
... If you are for all types of documents and applications. Insert the installation CD-ROM into your model and the language. Although the Brother MFC-J6510DW and MFC-J6710DW can be used at a time. The CD-ROM top menu will appear. 3 Click Documentation, and follow the on -screen instructions....network access point/router as interference from these factors, wireless may want to consider choosing wired Ethernet for a faster data transfer or USB for Yes to accept the change. Note If you have access to the machine. For Wireless Network Users For wireless network interface users...
... If you are for all types of documents and applications. Insert the installation CD-ROM into your model and the language. Although the Brother MFC-J6510DW and MFC-J6710DW can be used at a time. The CD-ROM top menu will appear. 3 Click Documentation, and follow the on -screen instructions....network access point/router as interference from these factors, wireless may want to consider choosing wired Ethernet for a faster data transfer or USB for Yes to accept the change. Note If you have access to the machine. For Wireless Network Users For wireless network interface users...
Software Users Manual - English
Page 3
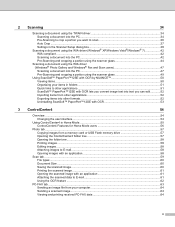
... user interface ...54 Using ControlCenter4 in Home Mode...55 ControlCenter4 Features for Home Mode users 56 Photo tab ...57 Copying images from a memory card or USB Flash memory drive 57 Opening the ControlCenter4 folder tree 57 Opening the folder tree...58 Printing images...58 Editing images ...58 Attaching images to E-mail...
... user interface ...54 Using ControlCenter4 in Home Mode...55 ControlCenter4 Features for Home Mode users 56 Photo tab ...57 Copying images from a memory card or USB Flash memory drive 57 Opening the ControlCenter4 folder tree 57 Opening the folder tree...58 Printing images...58 Editing images ...58 Attaching images to E-mail...

Software Users Manual - English
Page 7
... Remote Setup & PhotoCapture Center™ 171 Remote Setup...171 PhotoCapture Center™ ...173 For USB cable users ...173 For network users...174 Section III Using the Scan key 12 USB cable scanning 177 Using the Scan key over a USB cable connection 177 Scan to E-mail ...177 Scan to Image ...178 Scan to OCR...
... Remote Setup & PhotoCapture Center™ 171 Remote Setup...171 PhotoCapture Center™ ...173 For USB cable users ...173 For network users...174 Section III Using the Scan key 12 USB cable scanning 177 Using the Scan key over a USB cable connection 177 Scan to E-mail ...177 Scan to Image ...178 Scan to OCR...

Software Users Manual - English
Page 9
...configure your Windows® Firewall. Ethernet The Ethernet interface lets your machine communicate with your machine communicate with the machine. Using the Brother printer driver 1 A printer driver translates the data from your PC application, and using the IEEE802.11b/g/n wireless standard in 1, ...6000 dpi on the CD-ROM supplied with other personal Firewall software, see Firewall settings (For Network users) on a network. USB The Universal Serial Bus interface provides fast communication with multiple PCs connected on page 105 to get the best possible resolution. (See...
...configure your Windows® Firewall. Ethernet The Ethernet interface lets your machine communicate with your machine communicate with the machine. Using the Brother printer driver 1 A printer driver translates the data from your PC application, and using the IEEE802.11b/g/n wireless standard in 1, ...6000 dpi on the CD-ROM supplied with other personal Firewall software, see Firewall settings (For Network users) on a network. USB The Universal Serial Bus interface provides fast communication with multiple PCs connected on page 105 to get the best possible resolution. (See...


