
Brother Meter Read Tool Users Guide
Page 5
... installer file icon, and read settings. 5 1.2 System Requirements The Brother Meter Read Tool supports the following operating systems and software environments: OS .NET Framework Windows® 7, Windows® 8, Windows® 8.1, Windows® 10, Windows Server® 2008, Windows Server® 2008 R2, Windows Server® 2012, Windows Server® 2012 R2, Windows Server® 2016 (both 32bit and 64bit) 4.5.2 or later...
... installer file icon, and read settings. 5 1.2 System Requirements The Brother Meter Read Tool supports the following operating systems and software environments: OS .NET Framework Windows® 7, Windows® 8, Windows® 8.1, Windows® 10, Windows Server® 2008, Windows Server® 2008 R2, Windows Server® 2012, Windows Server® 2012 R2, Windows Server® 2016 (both 32bit and 64bit) 4.5.2 or later...

Basic Users Guide
Page 14
... 1 Control Panel Overview 1 LCD Overview ...5 Access Brother Utilities (Windows 6 Uninstall the Brother Software and Drivers (Windows 6 2 Paper Handling ...7 Load Paper ...7 Load paper in the paper tray 7 Change the Check Paper Size Setting 9 Change the Paper Size and Paper Type 9 Recommended Print Media 10 Handle and Use Print Media 10 3 Print ...11 Print from Your Computer 11...
... 1 Control Panel Overview 1 LCD Overview ...5 Access Brother Utilities (Windows 6 Uninstall the Brother Software and Drivers (Windows 6 2 Paper Handling ...7 Load Paper ...7 Load paper in the paper tray 7 Change the Check Paper Size Setting 9 Change the Paper Size and Paper Type 9 Recommended Print Media 10 Handle and Use Print Media 10 3 Print ...11 Print from Your Computer 11...

Basic Users Guide
Page 28
... using this option. 10 Click OK again, and then complete your model), and then click the printing properties or preferences button. Print More Than One Page on a Single Sheet of Paper (N in 1) (Windows®) 1 Select the print command in your application. 2 Select Brother MFC-XXXX (where XXXX... is used as an example. 1 Make sure you want to specify the offset for binding in inches or millimeters. 8 Click OK to return to the printer driver window. 9 Change other printer settings if needed . Print...
... using this option. 10 Click OK again, and then complete your model), and then click the printing properties or preferences button. Print More Than One Page on a Single Sheet of Paper (N in 1) (Windows®) 1 Select the print command in your application. 2 Select Brother MFC-XXXX (where XXXX... is used as an example. 1 Make sure you want to specify the offset for binding in inches or millimeters. 8 Click OK to return to the printer driver window. 9 Change other printer settings if needed . Print...
Online Users Guide HTML
Page 78
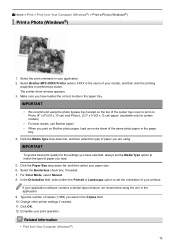
...copies (1-999) you are using. Type the number of paper you want in the Copies field. 10. Related Information • Print from Your Computer (Windows®) > Print a Photo (Windows®) Print a Photo (Windows®) 1. Select the print command in the application. 9. IMPORTANT • We recommend using the... To get the best print quality for certain models) • For best results, use Brother paper. • When you have loaded the correct media in the paper tray. 4. Select Brother MFC-XXXX Printer (where XXXX is the name of paper you have selected, always set the ...
...copies (1-999) you are using. Type the number of paper you want in the Copies field. 10. Related Information • Print from Your Computer (Windows®) > Print a Photo (Windows®) Print a Photo (Windows®) 1. Select the print command in the application. 9. IMPORTANT • We recommend using the... To get the best print quality for certain models) • For best results, use Brother paper. • When you have loaded the correct media in the paper tray. 4. Select Brother MFC-XXXX Printer (where XXXX is the name of paper you have selected, always set the ...
Online Users Guide HTML
Page 80
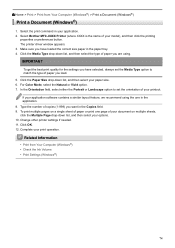
Select Brother MFC-XXXX Printer (where XXXX is the name of your application. 2. The printer driver window appears. 3. IMPORTANT To get the best print quality for the settings you have loaded the correct size paper in your model), and then .... 6. To print multiple pages on a single sheet of paper or print one in the Copies field. 9. Related Information • Print from Your Computer (Windows®) > Print a Document (Windows®) Print a Document (Windows®) 1. Home > Print > Print from Your Computer (Windows®) • Check the Ink Volume • Print Settings...
Select Brother MFC-XXXX Printer (where XXXX is the name of your application. 2. The printer driver window appears. 3. IMPORTANT To get the best print quality for the settings you have loaded the correct size paper in your model), and then .... 6. To print multiple pages on a single sheet of paper or print one in the Copies field. 9. Related Information • Print from Your Computer (Windows®) > Print a Document (Windows®) Print a Document (Windows®) 1. Home > Print > Print from Your Computer (Windows®) • Check the Ink Volume • Print Settings...
Online Users Guide HTML
Page 85
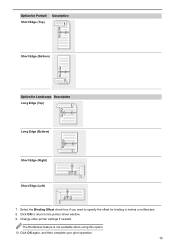
The Borderless feature is not available when using this option. 10. Option for Portrait Short Edge (Top) Description Short Edge (Bottom) Option for binding in inches or millimeters. 8. Click OK again, and then complete your print operation. 79 Select the Binding Offset check box if you want to the printer driver window. 9. Change other printer settings if needed. Click OK to return to specify the offset for Landscape Description Long Edge (Top) Long Edge (Bottom) Short Edge (Right) Short Edge (Left) 7.
The Borderless feature is not available when using this option. 10. Option for Portrait Short Edge (Top) Description Short Edge (Bottom) Option for binding in inches or millimeters. 8. Click OK again, and then complete your print operation. 79 Select the Binding Offset check box if you want to the printer driver window. 9. Change other printer settings if needed. Click OK to return to specify the offset for Landscape Description Long Edge (Top) Long Edge (Bottom) Short Edge (Right) Short Edge (Left) 7.

Online Users Guide HTML
Page 88
... Every page will be helpful when folding a printed booklet that has a large number of the Paper Automatically (Automatic 2-sided Printing) (Windows®) 82 Complete your printout in the middle to specify the offset for Landscape Description Top Binding Bottom Binding 7. You can be printed... in each smaller booklet set (from 1-15). Fold your print operation. Click OK to return to the printer driver window. 10. Click OK. 12. Select one of the options from Your Computer (Windows®) • Print Settings (Windows®) • Print on Both Sides of pages. 8.
... Every page will be helpful when folding a printed booklet that has a large number of the Paper Automatically (Automatic 2-sided Printing) (Windows®) 82 Complete your printout in the middle to specify the offset for Landscape Description Top Binding Bottom Binding 7. You can be printed... in each smaller booklet set (from 1-15). Fold your print operation. Click OK to return to the printer driver window. 10. Click OK. 12. Select one of the options from Your Computer (Windows®) • Print Settings (Windows®) • Print on Both Sides of pages. 8.

Online Users Guide HTML
Page 90
...;) Some types of your model), and then click the printing properties or preferences button. Click OK. 10. Home > Print > Print from Your Computer (Windows®) • Paper Handling and Printing Problems 84 Select the print command in your print operation. Click OK to return to print at a slower... if you have problems with smudged 2-sided printouts or paper jams. 1. Click the 2-sided / Booklet drop-down list, and then select 2-sided. 4. Select Brother MFC-XXXX Printer (where XXXX is the name of print media may need more drying time when using a normal amount of the screen. 7.
...;) Some types of your model), and then click the printing properties or preferences button. Click OK. 10. Home > Print > Print from Your Computer (Windows®) • Paper Handling and Printing Problems 84 Select the print command in your print operation. Click OK to return to print at a slower... if you have problems with smudged 2-sided printouts or paper jams. 1. Click the 2-sided / Booklet drop-down list, and then select 2-sided. 4. Select Brother MFC-XXXX Printer (where XXXX is the name of print media may need more drying time when using a normal amount of the screen. 7.

Online Users Guide HTML
Page 155
Click OK. In the File Name field, type a prefix for your scanned documents. 12. The scanned document is saved to save the document as a PDF. Click the folder icon to browse and select the folder where you want to the destination folder as a password-protected PDF, select Secure PDF (*.pdf) from the File Type dropdown list, click , and then type the password. 10. To save your file name, if needed. 11. Related Information • Scan Using ControlCenter4 Home Mode (Windows®) 149
Click OK. In the File Name field, type a prefix for your scanned documents. 12. The scanned document is saved to save the document as a PDF. Click the folder icon to browse and select the folder where you want to the destination folder as a password-protected PDF, select Secure PDF (*.pdf) from the File Type dropdown list, click , and then type the password. 10. To save your file name, if needed. 11. Related Information • Scan Using ControlCenter4 Home Mode (Windows®) 149

Online Users Guide HTML
Page 156
...available only for certain models) • XML Paper Specification (*.xps) (the XML Paper Specification is available for Windows Vista®, Windows® 7 and Windows® 8, or when using applications that support XML Paper Specification files) • Microsoft Office Word (*.docx) ... 10 (*.wpd) • Microsoft Excel 2003, XP (*.xls) Target Application Select the destination application from Your Computer (Windows®) > Scan Using ControlCenter4 Home Mode (Windows®) > Scan Settings for ControlCenter4 Home Mode (Windows®) Scan Settings for ControlCenter4 Home Mode (Windows&#...
...available only for certain models) • XML Paper Specification (*.xps) (the XML Paper Specification is available for Windows Vista®, Windows® 7 and Windows® 8, or when using applications that support XML Paper Specification files) • Microsoft Office Word (*.docx) ... 10 (*.wpd) • Microsoft Excel 2003, XP (*.xls) Target Application Select the destination application from Your Computer (Windows®) > Scan Using ControlCenter4 Home Mode (Windows®) > Scan Settings for ControlCenter4 Home Mode (Windows®) Scan Settings for ControlCenter4 Home Mode (Windows&#...

Online Users Guide HTML
Page 164
..., such as file format, file name, scan location, resolution, or color, if needed. 8. Click Scan. Click Finish. Related Information • Scan Using ControlCenter4 Advanced Mode (Windows®) 158 Read the instructions on the screen, and then press OK. 7. After the machine has scanned one side of the identification card. 9. Click the... File button. The machine starts scanning one side, turn over the identification card, and then click Continue to scan the other side. 10. 4. The instruction dialog box appears. 6.
..., such as file format, file name, scan location, resolution, or color, if needed. 8. Click Scan. Click Finish. Related Information • Scan Using ControlCenter4 Advanced Mode (Windows®) 158 Read the instructions on the screen, and then press OK. 7. After the machine has scanned one side of the identification card. 9. Click the... File button. The machine starts scanning one side, turn over the identification card, and then click Continue to scan the other side. 10. 4. The instruction dialog box appears. 6.

Online Users Guide HTML
Page 171
... HTML 3.2 (*.htm) • HTML 4.0 (*.htm) • Searchable PDF (*.pdf) • WordPad (*.rtf) • RTF Word 2000 (*.rtf) • WordPerfect 9, 10 (*.wpd) • Microsoft Excel 2003, XP (*.xls) For E-mail and File • Microsoft Office Word (*.docx) (available only for certain models) • Microsoft Office ... option if you want to specify the scanned image's destination every time you want to preview your scanned document. Show Save As Window Select this option to match the language of the scanned document's text (available only for the Image, OCR and E-mail features,...
... HTML 3.2 (*.htm) • HTML 4.0 (*.htm) • Searchable PDF (*.pdf) • WordPad (*.rtf) • RTF Word 2000 (*.rtf) • WordPerfect 9, 10 (*.wpd) • Microsoft Excel 2003, XP (*.xls) For E-mail and File • Microsoft Office Word (*.docx) (available only for certain models) • Microsoft Office ... option if you want to specify the scanned image's destination every time you want to preview your scanned document. Show Save As Window Select this option to match the language of the scanned document's text (available only for the Image, OCR and E-mail features,...

Online Users Guide HTML
Page 174
The machine starts scanning. Related Information • Scan from Your Computer (Windows®) • TWAIN Driver Settings (Windows®) 168 Click PreScan if you want to scan. 10. Adjust the settings in the Scanner Setup dialog box, if needed. 9. 8. Click the Document Size drop-down list, and then select your document size. • After you select a document size, adjust the scanning area by holding down the left mouse button and dragging your mouse pointer over the portion you want to preview your image and crop unwanted portions before scanning. 11. Click Start.
The machine starts scanning. Related Information • Scan from Your Computer (Windows®) • TWAIN Driver Settings (Windows®) 168 Click PreScan if you want to scan. 10. Adjust the settings in the Scanner Setup dialog box, if needed. 9. 8. Click the Document Size drop-down list, and then select your document size. • After you select a document size, adjust the scanning area by holding down the left mouse button and dragging your mouse pointer over the portion you want to preview your image and crop unwanted portions before scanning. 11. Click Start.

Online Users Guide HTML
Page 379
... the top of the output tray cover to print on Photo (4" x 6")/(10 x 15 cm) and Photo L (3.5" x 5")/(9 x 13 cm) paper. (available only for certain models) • For best results, use Brother paper. • When you print on your desktop to select images you want... to print. 5. Home > PhotoCapture Center > Print Photos from ControlCenter4 (Windows®) Print Photos from your computer. Select images you want to print. ...
... the top of the output tray cover to print on Photo (4" x 6")/(10 x 15 cm) and Photo L (3.5" x 5")/(9 x 13 cm) paper. (available only for certain models) • For best results, use Brother paper. • When you print on your desktop to select images you want... to print. 5. Home > PhotoCapture Center > Print Photos from ControlCenter4 (Windows®) Print Photos from your computer. Select images you want to print. ...

Online Users Guide HTML
Page 380
...the settings for the Paper Size, Media Type, and Layout options. 10. To print the image's timestamp in the lower-right corner of copies you want to print (1-99) by clicking . 7. The print settings window appears. 9. Click the Properties button to view the image on screen ... printer settings, click the Print Options... Click the Start Printing button. Related Information • PhotoCapture Center • Edit Photos Using ControlCenter4 (Windows®) 374 button. (For Advanced Mode only) 12. Specify the number of the image, select the Print Date check box. 11. Deselect...
...the settings for the Paper Size, Media Type, and Layout options. 10. To print the image's timestamp in the lower-right corner of copies you want to print (1-99) by clicking . 7. The print settings window appears. 9. Click the Properties button to view the image on screen ... printer settings, click the Print Options... Click the Start Printing button. Related Information • PhotoCapture Center • Edit Photos Using ControlCenter4 (Windows®) 374 button. (For Advanced Mode only) 12. Specify the number of the image, select the Print Date check box. 11. Deselect...

Online Users Guide HTML
Page 385
... Brother Solutions Center at http://support.brother.com to download the latest versions of all Brother applications and utilities for PC or for certain models) Status Monitor Driver Deployment Wizard Vertical Pairing (Windows® 7 and Windows® 8 only) Windows® XP Windows Vista® Windows® 7 Windows®...; 8 Yes Yes Yes Yes Yes Yes Yes Yes Yes Yes Yes Windows Server® 2003/2008/2012/2012 R2 OS X v10.8.5 OS X v10.9.x OS X v10.10.x Yes Yes ...
... Brother Solutions Center at http://support.brother.com to download the latest versions of all Brother applications and utilities for PC or for certain models) Status Monitor Driver Deployment Wizard Vertical Pairing (Windows® 7 and Windows® 8 only) Windows® XP Windows Vista® Windows® 7 Windows®...; 8 Yes Yes Yes Yes Yes Yes Yes Yes Yes Yes Yes Windows Server® 2003/2008/2012/2012 R2 OS X v10.8.5 OS X v10.9.x OS X v10.10.x Yes Yes ...

Online Users Guide HTML
Page 393
... is on the machine's LCD, and then click Next. 10. Do one of the following: • (Windows Vista®) Click (Start) > Network > Add a wireless device. • (Windows® 7) Click (Start) > Devices and Printers > Add a device. • (Windows® 8) Move your mouse to your desktop. MFC-J680DW/MFC-J880DW/MFC-J885DW 1. Press [Settings] > [All Settings] > [Network] > [WLAN] > [...387 To cancel, press Stop/Exit. 4. For more information, see the instructions supplied with your wireless LAN access point/router. • If you use the Brother Installation CD-ROM. 8.
... is on the machine's LCD, and then click Next. 10. Do one of the following: • (Windows Vista®) Click (Start) > Network > Add a wireless device. • (Windows® 7) Click (Start) > Devices and Printers > Add a device. • (Windows® 8) Move your mouse to your desktop. MFC-J680DW/MFC-J880DW/MFC-J885DW 1. Press [Settings] > [All Settings] > [Network] > [WLAN] > [...387 To cancel, press Stop/Exit. 4. For more information, see the instructions supplied with your wireless LAN access point/router. • If you use the Brother Installation CD-ROM. 8.

Online Users Guide HTML
Page 394
... click Next. 10. Click Close. Related Information • Additional Methods of the following: • (Windows Vista®) Click (Start) > Network > Add a wireless device. • (Windows® 7) Click (Start) > Devices and Printers > Add a device. • (Windows® 8) Move your mouse to your wireless LAN access point/router. • If you use the Brother Installation CD-ROM...
... click Next. 10. Click Close. Related Information • Additional Methods of the following: • (Windows Vista®) Click (Start) > Network > Add a wireless device. • (Windows® 7) Click (Start) > Devices and Printers > Add a device. • (Windows® 8) Move your mouse to your wireless LAN access point/router. • If you use the Brother Installation CD-ROM...

Online Users Guide HTML
Page 395
... or b to enter text, see the Appendix. 6. MFC-J680DW/MFC-J880DW/MFC-J885DW 1. Press OK. 3. To cancel, press Stop/Exit. 4. For more information about how to select the [] option, and then press OK. 5. For Windows®: You have completed the wireless network setup. To ... Downloads page on the Brother Solutions Center at http://support.brother.com to the wireless device you selected the [WEP] option for Ad-Hoc mode. >> MFC-J460DW/MFC-J480DW/MFC-J485DW >> MFC-J680DW/MFC-J880DW/MFC-J885DW MFC-J460DW/MFC-J480DW/MFC-J485DW 1. To cancel, press 2. 10. Select [Setup Wizard...
... or b to enter text, see the Appendix. 6. MFC-J680DW/MFC-J880DW/MFC-J885DW 1. Press OK. 3. To cancel, press Stop/Exit. 4. For more information about how to select the [] option, and then press OK. 5. For Windows®: You have completed the wireless network setup. To ... Downloads page on the Brother Solutions Center at http://support.brother.com to the wireless device you selected the [WEP] option for Ad-Hoc mode. >> MFC-J460DW/MFC-J480DW/MFC-J485DW >> MFC-J680DW/MFC-J880DW/MFC-J885DW MFC-J460DW/MFC-J480DW/MFC-J485DW 1. To cancel, press 2. 10. Select [Setup Wizard...

Web Connect Guide
Page 18
...), and then click the drop-down list and select your mouse to the lower left navigation bar, and then click Brother Web Connect. Windows® 10 Macintosh Click (Start) > All apps > Brother > Brother Utilities. Click Do More in the left corner of the Start screen and click (if you are using a computer that has the...
...), and then click the drop-down list and select your mouse to the lower left navigation bar, and then click Brother Web Connect. Windows® 10 Macintosh Click (Start) > All apps > Brother > Brother Utilities. Click Do More in the left corner of the Start screen and click (if you are using a computer that has the...


