Network Users Manual - English
Page 1
... about network and advanced network features of wired and wireless network settings, security settings and Internet fax settings (For MFC models) using your Brother machine, see the Network Glossary. Version 0 ENG To download the latest manual, please visit the Brother Solutions Center at (http://solutions.brother.com/). To find supported protocol information and detailed troubleshooting tips. You...
... about network and advanced network features of wired and wireless network settings, security settings and Internet fax settings (For MFC models) using your Brother machine, see the Network Glossary. Version 0 ENG To download the latest manual, please visit the Brother Solutions Center at (http://solutions.brother.com/). To find supported protocol information and detailed troubleshooting tips. You...
Network Users Manual - English
Page 4
... 24 Network settings ...24 TCP/IP ...24 Setup Wizard (wireless network only 26 WPS (Wi-Fi Protected Setup)/AOSS™ (wireless network only 26 WPS w/PIN Code (wireless network only 27 WLAN Status (wireless network only 27 Ethernet (wired network only)...27 MAC Address ...27 E-mail / IFAX (For MFC models) (...Available when IFAX is downloaded 27 Network I/F ...30 Restoring the network settings to factory default 31 iii
... 24 Network settings ...24 TCP/IP ...24 Setup Wizard (wireless network only 26 WPS (Wi-Fi Protected Setup)/AOSS™ (wireless network only 26 WPS w/PIN Code (wireless network only 27 WLAN Status (wireless network only 27 Ethernet (wired network only)...27 MAC Address ...27 E-mail / IFAX (For MFC models) (...Available when IFAX is downloaded 27 Network I/F ...30 Restoring the network settings to factory default 31 iii
Network Users Manual - English
Page 5
... Web Based Management (web browser 39 Secure Function Lock 2.0 ...41 How to configure the Secure Function Lock 2.0 settings using Web Based Management (web browser)...41 Synchronize with SNTP server ...44 Changing the Scan to FTP configuration using a web browser ...46 Changing the Scan to Network configuration using a web browser 47 Changing the LDAP configuration using a web browser (For MFC-J2510/J4510DW) (Available as a download 48 6 LDAP operation (For MFC-J2510/J4510DW) 49 Overview...49 Changing the LDAP configuration using a Browser 49 LDAP operation using the control panel 49 7...
... Web Based Management (web browser 39 Secure Function Lock 2.0 ...41 How to configure the Secure Function Lock 2.0 settings using Web Based Management (web browser)...41 Synchronize with SNTP server ...44 Changing the Scan to FTP configuration using a web browser ...46 Changing the Scan to Network configuration using a web browser 47 Changing the LDAP configuration using a web browser (For MFC-J2510/J4510DW) (Available as a download 48 6 LDAP operation (For MFC-J2510/J4510DW) 49 Overview...49 Changing the LDAP configuration using a Browser 49 LDAP operation using the control panel 49 7...

Network Users Manual - English
Page 6
......81 Authentication and Encryption...81 Authentication and Encryption methods for a personal wireless network 81 13 Additional network settings from Windows® 83 Types of additional network settings...83 Installing drivers used for printing and scanning via Web Services (Windows Vista® and Windows®... Section III Appendixes A Appendix A 88 Supported protocols and security features 88 B Appendix B 89 Using services ...89 Other ways to set the IP address (for advanced users and administrators 90 Using DHCP to configure the IP address 90 Using RARP to configure the IP ...
......81 Authentication and Encryption...81 Authentication and Encryption methods for a personal wireless network 81 13 Additional network settings from Windows® 83 Types of additional network settings...83 Installing drivers used for printing and scanning via Web Services (Windows Vista® and Windows®... Section III Appendixes A Appendix A 88 Supported protocols and security features 88 B Appendix B 89 Using services ...89 Other ways to set the IP address (for advanced users and administrators 90 Using DHCP to configure the IP address 90 Using RARP to configure the IP ...
Network Users Manual - English
Page 7
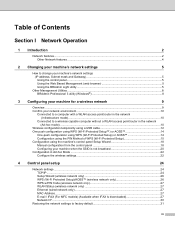
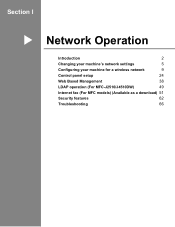
Section I Network Operation I Introduction 2 Changing your machine's network settings 5 Configuring your machine for a wireless network 9 Control panel setup 24 Web Based Management 38 LDAP operation (For MFC-J2510/J4510DW) 49 Internet fax (For MFC models) (Available as a download) 51 Security features 62 Troubleshooting 66
Section I Network Operation I Introduction 2 Changing your machine's network settings 5 Configuring your machine for a wireless network 9 Control panel setup 24 Web Based Management 38 LDAP operation (For MFC-J2510/J4510DW) 49 Internet fax (For MFC models) (Available as a download) 51 Security features 62 Troubleshooting 66
Network Users Manual - English
Page 10
...panel. Before using this function, you have to configure the necessary machine settings by accessing services on the internet directly from your server. (See LDAP operation (For MFC-J2510/J4510DW) on page 49.) Internet fax (For MFC models) (Available as a download) on page 51.) In order to ...by restricting the use this function, please go to the downloads page for your model on the Brother Solutions Center (http://solutions.brother.com/). 4 Introduction Other Network features 1 1 LDAP (For MFC-J2510/J4510DW) 1 The LDAP protocol allows you to search for information such as fax numbers and ...
...panel. Before using this function, you have to configure the necessary machine settings by accessing services on the internet directly from your server. (See LDAP operation (For MFC-J2510/J4510DW) on page 49.) Internet fax (For MFC models) (Available as a download) on page 51.) In order to ...by restricting the use this function, please go to the downloads page for your model on the Brother Solutions Center (http://solutions.brother.com/). 4 Introduction Other Network features 1 1 LDAP (For MFC-J2510/J4510DW) 1 The LDAP protocol allows you to search for information such as fax numbers and ...

Network Users Manual - English
Page 11
... browser) on page 39.) Using the BRAdmin Light utility 2 The BRAdmin Light utility is designed for Brother products in a TCP/IP environment, view the status and configure basic network settings, such as a download from the Brother Solutions Center (http://solutions.brother.com/). 5 b Turn on your machine. The opening screen will appear. NOTE If the...
... browser) on page 39.) Using the BRAdmin Light utility 2 The BRAdmin Light utility is designed for Brother products in a TCP/IP environment, view the status and configure basic network settings, such as a download from the Brother Solutions Center (http://solutions.brother.com/). 5 b Turn on your machine. The opening screen will appear. NOTE If the...
Network Users Manual - English
Page 12
...174; Macintosh NOTE • If the print server is set to start the BRAdmin Light utility. b BRAdmin Light will search for Windows® users. • If you are sure that is 2 available as a download from http://solutions.brother.com/. • If you don't use the latest ... is only available for new devices automatically. Once you can download the latest BRAdmin Light utility version from http://solutions.brother.com/. c Double-click the unconfigured device. The default Node Name of anti-spyware or antivirus applications, temporarily disable them. Changing ...
...174; Macintosh NOTE • If the print server is set to start the BRAdmin Light utility. b BRAdmin Light will search for Windows® users. • If you are sure that is 2 available as a download from http://solutions.brother.com/. • If you don't use the latest ... is only available for new devices automatically. Once you can download the latest BRAdmin Light utility version from http://solutions.brother.com/. c Double-click the unconfigured device. The default Node Name of anti-spyware or antivirus applications, temporarily disable them. Changing ...
Network Users Manual - English
Page 13
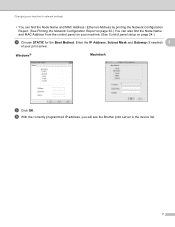
f With the correctly programmed IP address, you will see the Brother print server in the device list. 7 Windows® Macintosh e Click OK. Changing your machine's network settings • You can find the Node Name and MAC Address / Ethernet Address by printing the Network Configuration Report. (See Printing the Network Configuration Report on ...
f With the correctly programmed IP address, you will see the Brother print server in the device list. 7 Windows® Macintosh e Click OK. Changing your machine's network settings • You can find the Node Name and MAC Address / Ethernet Address by printing the Network Configuration Report. (See Printing the Network Configuration Report on ...
Network Users Manual - English
Page 14
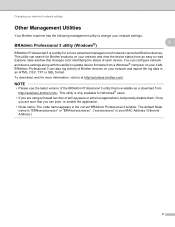
... Professional 3 utility that is only available for a more information, visit us at http://solutions.brother.com/. Changing your machine's network settings Other Management Utilities 2 Your Brother machine has the following management utility to read Explorer style window that changes color identifying the status... of each device. Once you can configure network and device settings along with the ability to update device firmware from http://solutions.brother.com/. This utility is available as a download from a Windows® computer on your ...
... Professional 3 utility that is only available for a more information, visit us at http://solutions.brother.com/. Changing your machine's network settings Other Management Utilities 2 Your Brother machine has the following management utility to read Explorer style window that changes color identifying the status... of each device. Once you can configure network and device settings along with the ability to update device firmware from http://solutions.brother.com/. This utility is available as a download from a Windows® computer on your ...

Network Users Manual - English
Page 15
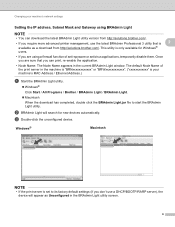
...your machine's network settings (IP address, Subnet mask and Gateway) on the Manuals download page for setup. If you may want to these factors, wireless may not be the best method of connection for the fastest throughput speed. • Although the Brother machine can be ...consider choosing wired Ethernet for a faster data transfer, or USB for all types of your model on the Brother Solutions Center (http://solutions.brother.com/). • Before configuring wireless settings, you will appear when the network interface is using a WLAN. • To achieve optimum results with mixed...
...your machine's network settings (IP address, Subnet mask and Gateway) on the Manuals download page for setup. If you may want to these factors, wireless may not be the best method of connection for the fastest throughput speed. • Although the Brother machine can be ...consider choosing wired Ethernet for a faster data transfer, or USB for all types of your model on the Brother Solutions Center (http://solutions.brother.com/). • Before configuring wireless settings, you will appear when the network interface is using a WLAN. • To achieve optimum results with mixed...

Network Users Manual - English
Page 17
Configuring your machine for a wireless network 1 2 3 1 Wireless network machine (your machine in Ad-hoc mode, see Configuration in Ad-hoc mode. To set up your machine) 2 Wireless capable computer We do not guarantee the wireless network connection with Windows Server® products in Ad-hoc Mode on page 22. 11
Configuring your machine for a wireless network 1 2 3 1 Wireless network machine (your machine in Ad-hoc mode, see Configuration in Ad-hoc mode. To set up your machine) 2 Wireless capable computer We do not guarantee the wireless network connection with Windows Server® products in Ad-hoc Mode on page 22. 11

Network Users Manual - English
Page 18
... on the network using a USB cable (A) 1. 3 3 A 1 You can configure the wireless settings of your language. 2 The CD-ROM main menu will appear automatically. NOTE • If the Brother screen does not appear automatically, go to Computer (My Computer), double-click the CD-ROM icon, ... that you use a USB cable during configuration (cable not included). • If you are required when configuring the machine's wireless settings. b Start the Brother installer application. Windows® 1 Put the supplied CD-ROM into your computer. IMPORTANT • You need to know ...
... on the network using a USB cable (A) 1. 3 3 A 1 You can configure the wireless settings of your language. 2 The CD-ROM main menu will appear automatically. NOTE • If the Brother screen does not appear automatically, go to Computer (My Computer), double-click the CD-ROM icon, ... that you use a USB cable during configuration (cable not included). • If you are required when configuring the machine's wireless settings. b Start the Brother installer application. Windows® 1 Put the supplied CD-ROM into your computer. IMPORTANT • You need to know ...

Network Users Manual - English
Page 19
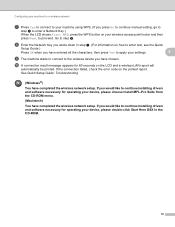
Double-click the BROTHER icon on your device, please double-click Start Here OSX in the CD... Follow the on -screen instructions for operating your CD-ROM drive. Follow the on -screen instructions to configure the wireless settings, and to use for installation. If you would like to not broadcast the SSID you have a USB cable? Configuring your... choose Install MFL-Pro Suite from the CD-ROM menu. (Macintosh) You have completed the wireless network setup. is set to continue installing drivers and software necessary for entering the Name (SSID). (Windows®) You have a USB cable ...
Double-click the BROTHER icon on your device, please double-click Start Here OSX in the CD... Follow the on -screen instructions for operating your CD-ROM drive. Follow the on -screen instructions to configure the wireless settings, and to use for installation. If you would like to not broadcast the SSID you have a USB cable? Configuring your... choose Install MFL-Pro Suite from the CD-ROM menu. (Macintosh) You have completed the wireless network setup. is set to continue installing drivers and software necessary for entering the Name (SSID). (Windows®) You have a USB cable ...
Network Users Manual - English
Page 20
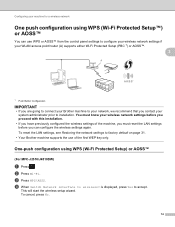
...-Fi Protected Setup) or AOSS™ 3 (For MFC-J2510/J4510DW) 3 a Press . One-push configuration using WPS (Wi-Fi Protected Setup™) or AOSS™ 3 You can use of the machine, you must know your wireless network settings before you contact your network, we recommend that you ...14 b Press Wi-Fi. To reset the LAN settings, see Restoring the network settings to factory default on page 31. • Your Brother machine supports the use WPS or AOSS™ from the control panel settings to configure your wireless network settings if your WLAN access point/router (A) supports either ...
...-Fi Protected Setup) or AOSS™ 3 (For MFC-J2510/J4510DW) 3 a Press . One-push configuration using WPS (Wi-Fi Protected Setup™) or AOSS™ 3 You can use of the machine, you must know your wireless network settings before you contact your network, we recommend that you ...14 b Press Wi-Fi. To reset the LAN settings, see Restoring the network settings to factory default on page 31. • Your Brother machine supports the use WPS or AOSS™ from the control panel settings to configure your wireless network settings if your WLAN access point/router (A) supports either ...
Network Users Manual - English
Page 21
... to access the WPS mode. Connection when the WLAN access point/router (A) doubles as a Registrar. If you can setup the wireless network and security settings. By inputting a PIN which mode (WPS or AOSS™) your wireless access point/router uses and try to connect to your machine) to the Registrar...
... to access the WPS mode. Connection when the WLAN access point/router (A) doubles as a Registrar. If you can setup the wireless network and security settings. By inputting a PIN which mode (WPS or AOSS™) your wireless access point/router uses and try to connect to your machine) to the Registrar...
Network Users Manual - English
Page 22
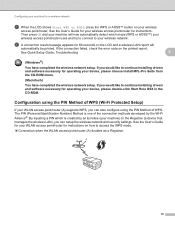
... c Press WPS w/PIN Code. See the instruction manual that support WPS (Wi-Fi Protected Setup) have a symbol as shown below. (For MFC-J2510/J4510DW) 3 a Press . NOTE The setting page may be different, depending on the network, type "http://access point's IP address/" into your browser. (Where "access point's IP address"... Registrar and follow the on-screen instructions. 1 The Registrar is used as the Registrar 1.) Go to the WPS (Wi-Fi Protected Setup) setting page and input the PIN which the LCD shows in e to 5 minutes. is displayed, press Yes to wireless? To cancel, press No.
... c Press WPS w/PIN Code. See the instruction manual that support WPS (Wi-Fi Protected Setup) have a symbol as shown below. (For MFC-J2510/J4510DW) 3 a Press . NOTE The setting page may be different, depending on the network, type "http://access point's IP address/" into your browser. (Where "access point's IP address"... Registrar and follow the on-screen instructions. 1 The Registrar is used as the Registrar 1.) Go to the WPS (Wi-Fi Protected Setup) setting page and input the PIN which the LCD shows in e to 5 minutes. is displayed, press Yes to wireless? To cancel, press No.
Network Users Manual - English
Page 24
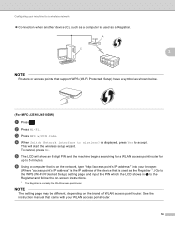
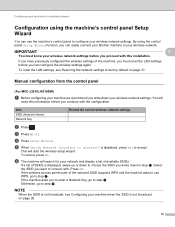
... asks you write down in step a. Manual configuration from the control panel 3 (For MFC-J2510/J4510DW) 3 a Before configuring your wireless network. c Press Wi-Fi. IMPORTANT 3 You must reset the LAN settings before you continue with . If the wireless access point/router of SSIDs is displayed, swipe...can use WPS, go to connect with the configuration. By using the machine's control panel Setup Wizard 3 You can easily connect your Brother machine to configure your machine when the SSID is displayed, press Yes to factory default on page 20. 18 d Press Setup Wizard....
... asks you write down in step a. Manual configuration from the control panel 3 (For MFC-J2510/J4510DW) 3 a Before configuring your wireless network. c Press Wi-Fi. IMPORTANT 3 You must reset the LAN settings before you continue with . If the wireless access point/router of SSIDs is displayed, swipe...can use WPS, go to connect with the configuration. By using the machine's control panel Setup Wizard 3 You can easily connect your Brother machine to configure your machine when the SSID is displayed, press Yes to factory default on page 20. 18 d Press Setup Wizard....
Network Users Manual - English
Page 25
... on how to enter text, see the Quick Setup Guide.) Press OK when you have entered all the characters, then press Yes to apply your settings. 3 i The machine starts to connect to the wireless device you would like to continue installing drivers and software necessary for a wireless network g Press... Yes to connect to your machine using WPS. (If you press No to continue manual setting, go to step h to enter a Network Key.) When the LCD shows Start WPS; press the WPS button on the printed report. Go to proceed...
... on how to enter text, see the Quick Setup Guide.) Press OK when you have entered all the characters, then press Yes to apply your settings. 3 i The machine starts to connect to the wireless device you would like to continue installing drivers and software necessary for a wireless network g Press... Yes to connect to your machine using WPS. (If you press No to continue manual setting, go to step h to enter a Network Key.) When the LCD shows Start WPS; press the WPS button on the printed report. Go to proceed...
Network Users Manual - English
Page 26
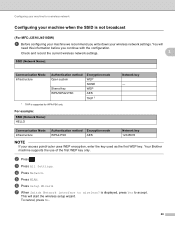
...the current wireless network settings. 3 SSID (Network Name): Communication Mode Infrastructure Authentication method Open system Shared key WPA/WPA2-PSK 1 TKIP is supported for a wireless network Configuring your machine when the SSID is displayed, press Yes to wireless? Your Brother machine supports the use...12345678 NOTE If your access point/router uses WEP encryption, enter the key used as the first WEP key. is not broadcast 3 (For MFC-J2510/J4510DW) 3 a Before configuring your machine we recommend you continue with the configuration. d Press Network. To cancel, press No. ...
...the current wireless network settings. 3 SSID (Network Name): Communication Mode Infrastructure Authentication method Open system Shared key WPA/WPA2-PSK 1 TKIP is supported for a wireless network Configuring your machine when the SSID is displayed, press Yes to wireless? Your Brother machine supports the use...12345678 NOTE If your access point/router uses WEP encryption, enter the key used as the first WEP key. is not broadcast 3 (For MFC-J2510/J4510DW) 3 a Before configuring your machine we recommend you continue with the configuration. d Press Network. To cancel, press No. ...


