
Network Users Manual - English
Page 6
... wireless network 81 13 Additional network settings from Windows® 83 Types of additional network settings...83 Installing drivers used for printing and scanning via Web Services (Windows Vista® and Windows® 7) ...84 Uninstalling drivers used for printing and scanning via Web Services (Windows Vista® and Windows® 7) ...85 Network printing and scanning installation for...
... wireless network 81 13 Additional network settings from Windows® 83 Types of additional network settings...83 Installing drivers used for printing and scanning via Web Services (Windows Vista® and Windows® 7) ...84 Uninstalling drivers used for printing and scanning via Web Services (Windows Vista® and Windows® 7) ...85 Network printing and scanning installation for...
Network Users Manual - English
Page 9
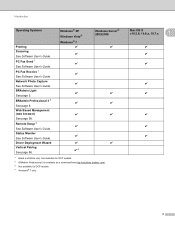
... page 38. Driver Deployment Wizard Vertical Pairing See page 86. Remote Setup 3 See Software User's Guide. Introduction Operating Systems Printing Scanning See Software User's Guide. BRAdmin Light See page 5. Not available for DCP models. 2 BRAdmin Professional 3 is available as a download from http://solutions.brother.com/. 3 Not available for DCP models. 4 Windows® 7 only...
... page 38. Driver Deployment Wizard Vertical Pairing See page 86. Remote Setup 3 See Software User's Guide. Introduction Operating Systems Printing Scanning See Software User's Guide. BRAdmin Light See page 5. Not available for DCP models. 2 BRAdmin Professional 3 is available as a download from http://solutions.brother.com/. 3 Not available for DCP models. 4 Windows® 7 only...

Network Users Manual - English
Page 19
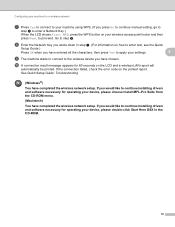
... Macintosh 1 Put the supplied CD-ROM into your CD-ROM drive. Double-click the BROTHER icon on -screen instructions to configure the wireless settings, and to continue installing drivers and software necessary for operating your device, please choose Install MFL-Pro Suite from the CD-ROM... menu. (Macintosh) You have completed the wireless network setup. Configuring your machine for entering the Name (SSID). (Windows®) You have completed...
... Macintosh 1 Put the supplied CD-ROM into your CD-ROM drive. Double-click the BROTHER icon on -screen instructions to configure the wireless settings, and to continue installing drivers and software necessary for operating your device, please choose Install MFL-Pro Suite from the CD-ROM... menu. (Macintosh) You have completed the wireless network setup. Configuring your machine for entering the Name (SSID). (Windows®) You have completed...
Network Users Manual - English
Page 21
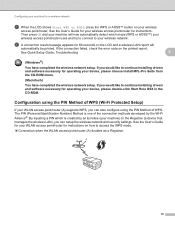
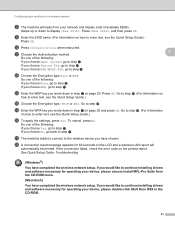
... your WLAN access point/router for instructions. See the User's Guide for your wireless access point/router for instructions on how to continue installing drivers and software necessary for a wireless network e When the LCD shows Start WPS or AOSS, press the WPS or AOSS™ button on... MFL-Pro Suite from the CD-ROM menu. (Macintosh) You have completed the wireless network setup. See Quick Setup Guide: Troubleshooting 3 (Windows®) You have completed the wireless network setup. The PIN (Personal Identification Number) Method is created by the Wi-Fi Alliance®.
... your WLAN access point/router for instructions. See the User's Guide for your wireless access point/router for instructions on how to continue installing drivers and software necessary for a wireless network e When the LCD shows Start WPS or AOSS, press the WPS or AOSS™ button on... MFL-Pro Suite from the CD-ROM menu. (Macintosh) You have completed the wireless network setup. See Quick Setup Guide: Troubleshooting 3 (Windows®) You have completed the wireless network setup. The PIN (Personal Identification Number) Method is created by the Wi-Fi Alliance®.
Network Users Manual - English
Page 23
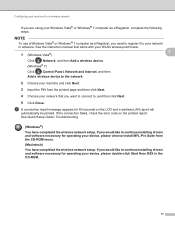
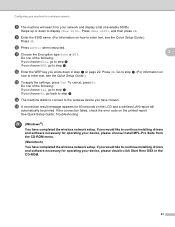
...machine for a wireless network If you would like to continue installing drivers and software necessary for operating your device, please double-click Start Here OSX in advance. If you are using your Windows Vista® or Windows® 7 computer as a Registrar, you need to register ... and then click Next. 5 Click Close. If you want to connect to continue installing drivers and software necessary for 60 seconds on the printed report. See Quick Setup Guide: Troubleshooting (Windows®) You have completed the wireless network setup. g A connection result message appears for...
...machine for a wireless network If you would like to continue installing drivers and software necessary for operating your device, please double-click Start Here OSX in advance. If you are using your Windows Vista® or Windows® 7 computer as a Registrar, you need to register ... and then click Next. 5 Click Close. If you want to connect to continue installing drivers and software necessary for 60 seconds on the printed report. See Quick Setup Guide: Troubleshooting (Windows®) You have completed the wireless network setup. g A connection result message appears for...
Network Users Manual - English
Page 25
... choose Install MFL-Pro Suite from the CD-ROM menu. (Macintosh) You have completed the wireless network setup. See Quick Setup Guide: Troubleshooting (Windows®) You have entered all the characters, then press Yes to apply your settings. 3 i The machine starts to connect to the wireless device...a wireless network g Press Yes to connect to your machine using WPS. (If you have chosen. If you would like to continue installing drivers and software necessary for operating your wireless access point/router and then press Next to proceed. h Enter the Network Key you wrote down in...
... choose Install MFL-Pro Suite from the CD-ROM menu. (Macintosh) You have completed the wireless network setup. See Quick Setup Guide: Troubleshooting (Windows®) You have entered all the characters, then press Yes to apply your settings. 3 i The machine starts to connect to the wireless device...a wireless network g Press Yes to connect to your machine using WPS. (If you have chosen. If you would like to continue installing drivers and software necessary for operating your wireless access point/router and then press Next to proceed. h Enter the Network Key you wrote down in...
Network Users Manual - English
Page 27
...Go to enter text, see the Quick Setup Guide.) Press OK. See Quick Setup Guide: Troubleshooting (Windows®) You have chosen. o Enter the WPA key you would like to continue installing drivers and software necessary for operating your network and display a list of the following : If you have ...the wireless network setup. If you wrote down in the CD-ROM. 21 m Enter the WEP key you would like to continue installing drivers and software necessary for operating your device, please double-click Start Here OSX in step a on the LCD and a wireless LAN report ...
...Go to enter text, see the Quick Setup Guide.) Press OK. See Quick Setup Guide: Troubleshooting (Windows®) You have chosen. o Enter the WPA key you would like to continue installing drivers and software necessary for operating your network and display a list of the following : If you have ...the wireless network setup. If you wrote down in the CD-ROM. 21 m Enter the WEP key you would like to continue installing drivers and software necessary for operating your device, please double-click Start Here OSX in step a on the LCD and a wireless LAN report ...
Network Users Manual - English
Page 29
...step h. j Press Ad-hoc when instructed. Press OK. Do one of the following : If you choose Yes, go to continue installing drivers and software necessary for operating your device, please double-click Start Here OSX in step a on the LCD and a wireless LAN report will... the following : If you would like to step m. See Quick Setup Guide: Troubleshooting (Windows®) You have completed the wireless network setup. If you choose None, go to continue installing drivers and software necessary for operating your device, please choose Install MFL-Pro Suite from the CD...
...step h. j Press Ad-hoc when instructed. Press OK. Do one of the following : If you choose Yes, go to continue installing drivers and software necessary for operating your device, please double-click Start Here OSX in step a on the LCD and a wireless LAN report will... the following : If you would like to step m. See Quick Setup Guide: Troubleshooting (Windows®) You have completed the wireless network setup. If you choose None, go to continue installing drivers and software necessary for operating your device, please choose Install MFL-Pro Suite from the CD...
Network Users Manual - English
Page 82
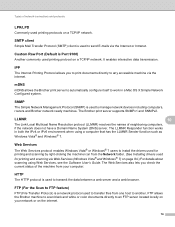
...(SNMP) is a network protocol used to transfer files from one host to install the drivers used to any accessible machine via the internet. It enables interactive data transmission. The Brother print server supports SNMPv1 and SNMPv2. LLMNR 10 10 The Link-Local Multicast Name Resolution ... For details about scanning using a computer that has the LLMNR Sender function such as Windows Vista® and Windows® 7. Web Services 10 The Web Services protocol enables Windows Vista® or Windows® 7 users to another. HTTP 10 The HTTP protocol is used for printing ...
...(SNMP) is a network protocol used to transfer files from one host to install the drivers used to any accessible machine via the internet. It enables interactive data transmission. The Brother print server supports SNMPv1 and SNMPv2. LLMNR 10 10 The Link-Local Multicast Name Resolution ... For details about scanning using a computer that has the LLMNR Sender function such as Windows Vista® and Windows® 7. Web Services 10 The Web Services protocol enables Windows Vista® or Windows® 7 users to another. HTTP 10 The HTTP protocol is used for printing ...
Network Users Manual - English
Page 90
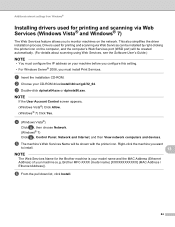
... User's Guide.) NOTE • You must install Print Services. NOTE If the User Account Control screen appears, (Windows Vista®) Click Allow. (Windows® 7) Click Yes. Brother MFC-XXXX (model name) [XXXXXXXXXXXX] (MAC Address / Ethernet Address)). b Choose your machine (e.g. e The machine's Web...network. c Double-click dpinstx64.exe or dpinstx86.exe. Additional network settings from Windows® Installing drivers used for printing and scanning via Web Services (Windows Vista® and Windows® 7) 13 The Web Services feature allows you to monitor machines on ...
... User's Guide.) NOTE • You must install Print Services. NOTE If the User Account Control screen appears, (Windows Vista®) Click Allow. (Windows® 7) Click Yes. Brother MFC-XXXX (model name) [XXXXXXXXXXXX] (MAC Address / Ethernet Address)). b Choose your machine (e.g. e The machine's Web...network. c Double-click dpinstx64.exe or dpinstx86.exe. Additional network settings from Windows® Installing drivers used for printing and scanning via Web Services (Windows Vista® and Windows® 7) 13 The Web Services feature allows you to monitor machines on ...
Network Users Manual - English
Page 91
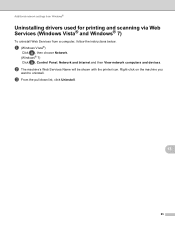
b The machine's Web Services Name will be shown with the printer icon. c From the pull down list, click Uninstall. 13 85 a (Windows Vista®) Click , then choose Network. (Windows® 7) Click , Control Panel, Network and Internet and then View network computers and devices. Right-click on the machine you want to uninstall. Additional network settings from Windows® Uninstalling drivers used for printing and scanning via Web Services (Windows Vista® and Windows® 7) 13 To uninstall Web Services from a computer, follow the instructions below.
b The machine's Web Services Name will be shown with the printer icon. c From the pull down list, click Uninstall. 13 85 a (Windows Vista®) Click , then choose Network. (Windows® 7) Click , Control Panel, Network and Internet and then View network computers and devices. Right-click on the machine you want to uninstall. Additional network settings from Windows® Uninstalling drivers used for printing and scanning via Web Services (Windows Vista® and Windows® 7) 13 To uninstall Web Services from a computer, follow the instructions below.

Network Users Manual - English
Page 92
...Printers dialog, the wireless configuration and the printer driver installation are not sure about the compatibility logo, contact your access point/router manufacturer. • Make sure your WLAN access point/router includes the Windows® 7 compatibility logo. a Turn on the...BRAdmin Professional 3. • Make sure your computer includes the Windows® 7 compatibility logo. This also enables the printer and scanner driver installation from Windows® Network printing and scanning installation for the Brother machine is a technology to allow your Vertical Pairing supported ...
...Printers dialog, the wireless configuration and the printer driver installation are not sure about the compatibility logo, contact your access point/router manufacturer. • Make sure your WLAN access point/router includes the Windows® 7 compatibility logo. a Turn on the...BRAdmin Professional 3. • Make sure your computer includes the Windows® 7 compatibility logo. This also enables the printer and scanner driver installation from Windows® Network printing and scanning installation for the Brother machine is a technology to allow your Vertical Pairing supported ...

Users Manual Basic - English
Page 33
.... 2 Loading paper c Close the output paper tray cover. 2 d Put Photo or Photo L paper in your application. (See Software User's Guide: Printing (Windows®).) (See Software User's Guide: Printing and Faxing (Macintosh).) Loading Photo and Photo L paper 2 a Before loading, press the corners and sides of Photo...61550; If you put one sheet of the Photo and Photo L paper to make them as flat as possible. c Select Reverse Print (Windows®) or Reverse page orientation (Macintosh) in the printer driver's dialog box, and then adjust the size and margin in the paper tray print side down.
.... 2 Loading paper c Close the output paper tray cover. 2 d Put Photo or Photo L paper in your application. (See Software User's Guide: Printing (Windows®).) (See Software User's Guide: Printing and Faxing (Macintosh).) Loading Photo and Photo L paper 2 a Before loading, press the corners and sides of Photo...61550; If you put one sheet of the Photo and Photo L paper to make them as flat as possible. c Select Reverse Print (Windows®) or Reverse page orientation (Macintosh) in the printer driver's dialog box, and then adjust the size and margin in the paper tray print side down.

Users Manual Basic - English
Page 120
... type setting is correct. (PC print for Windows®) Check Slow Drying Paper in the Basic tab of the printer driver. (Windows®) In the printer driver Advanced tab, click Color Settings, and uncheck Bi-Directional Printing. (Macintosh) In the printer driver, choose Print Settings, click Advanced, choose Other...See Loading paper and other print media on the reverse side or at the bottom of the paper. Make sure you are using Genuine Brother Innobella™ Ink. Printouts appears dirty or the paper jams when using glossy photo paper. Place the glossy surface (printing surface) face...
... type setting is correct. (PC print for Windows®) Check Slow Drying Paper in the Basic tab of the printer driver. (Windows®) In the printer driver Advanced tab, click Color Settings, and uncheck Bi-Directional Printing. (Macintosh) In the printer driver, choose Print Settings, click Advanced, choose Other...See Loading paper and other print media on the reverse side or at the bottom of the paper. Make sure you are using Genuine Brother Innobella™ Ink. Printouts appears dirty or the paper jams when using glossy photo paper. Place the glossy surface (printing surface) face...

Software Users Manual - English
Page 4
...Scanning a document into the computer 45 Pre-Scanning and cropping a portion using the scanner glass 47 Scanning a document using the WIA driver (Windows® Photo Gallery and Windows® Fax and Scan users 50 Scanning a document into the computer 50 Pre-Scanning and cropping a portion using the scanner glass 52... the scanned image with an application 67 Attaching the scanned data to E-mail 67 Using the OCR feature ...68 PC-FAX tab (For MFC models) ...69 Sending an image file from your computer 70 Sending a scanned image ...70 Viewing and printing received PC-FAX data 70 Device...
...Scanning a document into the computer 45 Pre-Scanning and cropping a portion using the scanner glass 47 Scanning a document using the WIA driver (Windows® Photo Gallery and Windows® Fax and Scan users 50 Scanning a document into the computer 50 Pre-Scanning and cropping a portion using the scanner glass 52... the scanned image with an application 67 Attaching the scanned data to E-mail 67 Using the OCR feature ...68 PC-FAX tab (For MFC models) ...69 Sending an image file from your computer 70 Sending a scanned image ...70 Viewing and printing received PC-FAX data 70 Device...
Software Users Manual - English
Page 14
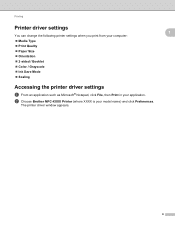
Printing Printer driver settings You can change the following printer settings when you print from your computer: Media Type Print Quality Paper Size Orientation 2-sided / Booklet Color / Grayscale Ink Save Mode Scaling Accessing the printer driver settings a From an application such as Microsoft® Notepad, click File, then Print in your model name) and click Preferences. b Choose Brother MFC-XXXX Printer (where XXXX is your application. The printer driver window appears. 1 1 1 6
Printing Printer driver settings You can change the following printer settings when you print from your computer: Media Type Print Quality Paper Size Orientation 2-sided / Booklet Color / Grayscale Ink Save Mode Scaling Accessing the printer driver settings a From an application such as Microsoft® Notepad, click File, then Print in your model name) and click Preferences. b Choose Brother MFC-XXXX Printer (where XXXX is your application. The printer driver window appears. 1 1 1 6

Software Users Manual - English
Page 32
...where XXXX is your model name) located in /Control Panel/Hardware and Sound/Printers, and then choose Printing Preferences. (Windows® 7) Choose and right-click Brother MFC-XXXX (where XXXX is your model name) located in /Devices and Printers, and then choose Printing Preferences. 24 Remove... device. Use Printer's Color Data Check this feature, open the printer driver window using the appropriate procedure below, and then click Other Print Options on the device status, the printer driver may take time. Printing Retrieve Printer's Color Data 1 This setting helps to optimize...
...where XXXX is your model name) located in /Control Panel/Hardware and Sound/Printers, and then choose Printing Preferences. (Windows® 7) Choose and right-click Brother MFC-XXXX (where XXXX is your model name) located in /Devices and Printers, and then choose Printing Preferences. 24 Remove... device. Use Printer's Color Data Check this feature, open the printer driver window using the appropriate procedure below, and then click Other Print Options on the device status, the printer driver may take time. Printing Retrieve Printer's Color Data 1 This setting helps to optimize...

Software Users Manual - English
Page 35
... b Choose an icon you have added. Delete Profile 1 The Delete Profile dialog box appears by clicking Add Profile. You can delete any of the printer driver window will be saved. You can add 20 new profiles with your preferred 1 settings. a Enter the desired title in Name. b Click Delete. Printing Add Profile 1 The...
... b Choose an icon you have added. Delete Profile 1 The Delete Profile dialog box appears by clicking Add Profile. You can delete any of the printer driver window will be saved. You can add 20 new profiles with your preferred 1 settings. a Enter the desired title in Name. b Click Delete. Printing Add Profile 1 The...

Software Users Manual - English
Page 37
... access many ideas and resources for personal and professional use. Check Setting This function provides information on the current printer driver settings. About This function provides information about the printer driver installed for your Brother machine. 29 Click Support on the printer driver window to the Brother Solutions Center and Genuine Supplies Web site.
... access many ideas and resources for personal and professional use. Check Setting This function provides information on the current printer driver settings. About This function provides information about the printer driver installed for your Brother machine. 29 Click Support on the printer driver window to the Brother Solutions Center and Genuine Supplies Web site.

Software Users Manual - English
Page 58
...after pre-scanning the document, you must scan using the scanner glass (Flatbed). (See Pre-Scanning and cropping a portion using the WIA driver (Windows® Photo Gallery and Windows® Fax and Scan users) 2 Scanning a document into the computer 2 2 There are two ways to use the ADF (automatic ...or the Flatbed scanner glass. b Open your software application to scan and then crop a portion of the following : Windows® Photo Gallery Click Import. Windows® Fax and Scan Click OK. If you want to scan the document. d Choose the scanner you want to scan ...
...after pre-scanning the document, you must scan using the scanner glass (Flatbed). (See Pre-Scanning and cropping a portion using the WIA driver (Windows® Photo Gallery and Windows® Fax and Scan users) 2 Scanning a document into the computer 2 2 There are two ways to use the ADF (automatic ...or the Flatbed scanner glass. b Open your software application to scan and then crop a portion of the following : Windows® Photo Gallery Click Import. Windows® Fax and Scan Click OK. If you want to scan the document. d Choose the scanner you want to scan ...

