Users Manual - English
Page 106
For additional specifications visit http://www.brother.com/ for details. Printer Type Print Head Memory Capacity LCD (Liquid Crystal Display) Power Source Power Consumption 2 Inkjet Black: Piezo with 210 nozzles &#... Copy Mode: Approx. 19 W 3 Ready Mode: Approx. 5.5 W Sleep Mode: Approx. 2 W Off: Approx. 0.2 W 1 Measured diagonally. 2 Measured when the machine is connected to the USB interface. 3 When using ADF, resolution: standard / document: ISO/IEC 24712 printed pattern. 92 D Specifications D General D Note This chapter provides a summary of the machines' specifications.
For additional specifications visit http://www.brother.com/ for details. Printer Type Print Head Memory Capacity LCD (Liquid Crystal Display) Power Source Power Consumption 2 Inkjet Black: Piezo with 210 nozzles &#... Copy Mode: Approx. 19 W 3 Ready Mode: Approx. 5.5 W Sleep Mode: Approx. 2 W Off: Approx. 0.2 W 1 Measured diagonally. 2 Measured when the machine is connected to the USB interface. 3 When using ADF, resolution: standard / document: ISO/IEC 24712 printed pattern. 92 D Specifications D General D Note This chapter provides a summary of the machines' specifications.
Users Manual - English
Page 113
The machine can also be connected to a computer that is no longer than 6 feet (2 m). D 99 Specifications Interfaces D USB 1 2 Wireless LAN Use a USB 2.0 interface cable that has a USB 1.1 interface. 2 Third party USB ports are not supported. IEEE 802.11b/g/n (Infrastructure/Ad-hoc Mode) 1 Your machine has a USB 2.0 Hi-Speed interface.
The machine can also be connected to a computer that is no longer than 6 feet (2 m). D 99 Specifications Interfaces D USB 1 2 Wireless LAN Use a USB 2.0 interface cable that has a USB 1.1 interface. 2 Third party USB ports are not supported. IEEE 802.11b/g/n (Infrastructure/Ad-hoc Mode) 1 Your machine has a USB 2.0 Hi-Speed interface.
Users Manual - English
Page 114
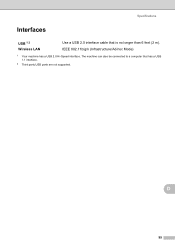
...Processor Minimum Speed Minimum RAM Recommended RAM Hard Disk Space to 19200 19200 dpi. (in USA) www.brother.com/ 2 Third party USB ports are not supported. (in Canada) www.brother.ca/ 3 4 PC Fax supports black and white only. (PC Fax Send is only supported.) PaperPort™... (SP3 or greater), XP Professional x64 Edition (SP2 or greater), Windows Vista® (SP2 or greater) and Windows® 7. 100 Brother Scanner For the latest driver updates, visit us at Utility enables to enhance up to install For For Drivers Applications Windows® Operating System Windows...
...Processor Minimum Speed Minimum RAM Recommended RAM Hard Disk Space to 19200 19200 dpi. (in USA) www.brother.com/ 2 Third party USB ports are not supported. (in Canada) www.brother.ca/ 3 4 PC Fax supports black and white only. (PC Fax Send is only supported.) PaperPort™... (SP3 or greater), XP Professional x64 Edition (SP2 or greater), Windows Vista® (SP2 or greater) and Windows® 7. 100 Brother Scanner For the latest driver updates, visit us at Utility enables to enhance up to install For For Drivers Applications Windows® Operating System Windows...
Quick Setup Guide - English
Page 1
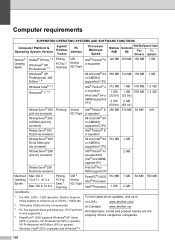
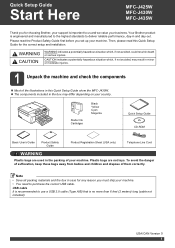
...(cable not included). USB cable It is recommended to deliver reliable performance, day-in case for any reason you must ship your machine. • You need to us and we value your business. Quick Setup Guide Start Here MFC-J425W MFC-J430W MFC-J435W Thank you for choosing Brother, your support is ...important to purchase the correct USB cable. Note • Save all packing materials and the box in and day-out. Starter ...
...(cable not included). USB cable It is recommended to deliver reliable performance, day-in case for any reason you must ship your machine. • You need to us and we value your business. Quick Setup Guide Start Here MFC-J425W MFC-J430W MFC-J435W Thank you for choosing Brother, your support is ...important to purchase the correct USB cable. Note • Save all packing materials and the box in and day-out. Starter ...
Quick Setup Guide - English
Page 4
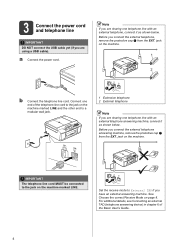
...on the machine marked LINE and the other end to a modular wall jack. 1 1 Extension telephone 2 External telephone Note If you are using a USB cable). jack on the machine marked LINE. 1 Set the receive mode to the jack on the machine. IMPORTANT The telephone line cord MUST be ...external telephone answering machine, remove the protective cap a from the EXT. 3 Connect the power cord and telephone line IMPORTANT DO NOT connect the USB cable yet (if you connect the external telephone, remove the protective cap a from the EXT. See Choose the correct Receive Mode on page...
...on the machine marked LINE and the other end to a modular wall jack. 1 1 Extension telephone 2 External telephone Note If you are using a USB cable). jack on the machine marked LINE. 1 Set the receive mode to the jack on the machine. IMPORTANT The telephone line cord MUST be ...external telephone answering machine, remove the protective cap a from the EXT. 3 Connect the power cord and telephone line IMPORTANT DO NOT connect the USB cable yet (if you connect the external telephone, remove the protective cap a from the EXT. See Choose the correct Receive Mode on page...
Quick Setup Guide - English
Page 13
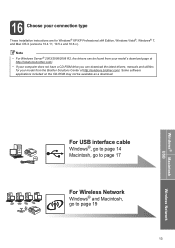
... CD-ROM may not be found from the Brother Solutions Center at http://solutions.brother.com/. For USB interface cable Windows®, go to page 14 Macintosh, go to page 17 For Wireless Network Windows® and Macintosh, go to page 19 13 Windows® Macintosh USB Wireless Network Note • For Windows Server... 10.4.11, 10.5.x and 10.6.x). 16 Choose your connection type These installation instructions are for your model from your model's download page at http://solutions.brother.com/. • If your computer does not have a CD-ROM drive you can be available as a download.
... CD-ROM may not be found from the Brother Solutions Center at http://solutions.brother.com/. For USB interface cable Windows®, go to page 14 Macintosh, go to page 17 For Wireless Network Windows® and Macintosh, go to page 19 13 Windows® Macintosh USB Wireless Network Note • For Windows Server... 10.4.11, 10.5.x and 10.6.x). 16 Choose your connection type These installation instructions are for your model from your model's download page at http://solutions.brother.com/. • If your computer does not have a CD-ROM drive you can be available as a download.
Quick Setup Guide - English
Page 14
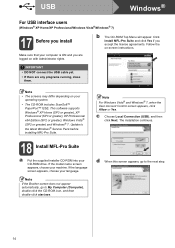
... a Put the supplied installer CD-ROM into your operating system. • The CD-ROM includes ScanSoft™ PaperPort™12SE. Note If the Brother screen does not appear automatically, go to My Computer (Computer), double-click the CD-ROM icon, and then double-click start.exe. d When ...click Allow or Yes. Follow the on with Administrator rights. Note • The screens may differ depending on your CD-ROM drive. USB Windows® For USB interface users (Windows® XP Home/XP Professional/Windows Vista®/Windows® 7) 17 Before you install Make sure that your computer ...
... a Put the supplied installer CD-ROM into your operating system. • The CD-ROM includes ScanSoft™ PaperPort™12SE. Note If the Brother screen does not appear automatically, go to My Computer (Computer), double-click the CD-ROM icon, and then double-click start.exe. d When ...click Allow or Yes. Follow the on with Administrator rights. Note • The screens may differ depending on your CD-ROM drive. USB Windows® For USB interface users (Windows® XP Home/XP Professional/Windows Vista®/Windows® 7) 17 Before you install Make sure that your computer ...
Quick Setup Guide - English
Page 15
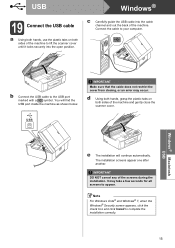
...machine to lift the scanner cover until it locks securely into the cable channel and out the back of the machine. USB Windows® Macintosh USB e The installation will find the USB port inside the machine as shown below. Note For Windows Vista® and Windows® 7, when the Windows®...; Security screen appears, click the check box and click Install to the USB port marked with a symbol. d Using both hands, grasp the plastic tabs on both sides of the screens during the installation. IMPORTANT Make sure that...
...machine to lift the scanner cover until it locks securely into the cable channel and out the back of the machine. USB Windows® Macintosh USB e The installation will find the USB port inside the machine as shown below. Note For Windows Vista® and Windows® 7, when the Windows®...; Security screen appears, click the check box and click Install to the USB port marked with a symbol. d Using both hands, grasp the plastic tabs on both sides of the screens during the installation. IMPORTANT Make sure that...
Quick Setup Guide - English
Page 16
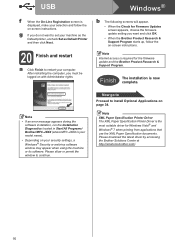
Note • If an error message appears during the software installation, run the Installation Diagnostics located in Start/All Programs/ Brother/MFC-JXXX (where MFC-JXXX is now complete. g If you must be logged on with Administrator rights. Finish The installation is your model name... Center at http://solutions.brother.com/. 16 Note Internet access is required for Windows Vista® and Windows® 7 when printing from applications that use the XML Paper Specification documents. Now go to Proceed to continue. USB Windows® f When the On-Line Registration screen ...
Note • If an error message appears during the software installation, run the Installation Diagnostics located in Start/All Programs/ Brother/MFC-JXXX (where MFC-JXXX is now complete. g If you must be logged on with Administrator rights. Finish The installation is your model name... Center at http://solutions.brother.com/. 16 Note Internet access is required for Windows Vista® and Windows® 7 when printing from applications that use the XML Paper Specification documents. Now go to Proceed to continue. USB Windows® f When the On-Line Registration screen ...
Quick Setup Guide - English
Page 17
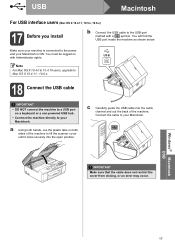
... users (Mac OS X 10.4.11, 10.5.x, 10.6.x) 17 Before you install b Connect the USB cable to your Macintosh. Windows® Macintosh USB 17 You must be logged on a keyboard or a non-powered USB hub. • Connect the machine directly to lift the scanner cover until it locks securely into ...Make sure that the cable does not restrict the cover from closing, or an error may occur. c Carefully guide the USB cable into the open position. Connect the cable to the USB port marked with Administrator rights. Make sure your Macintosh is connected to Mac OS X 10.4.11 - 10.6.x. a ...
... users (Mac OS X 10.4.11, 10.5.x, 10.6.x) 17 Before you install b Connect the USB cable to your Macintosh. Windows® Macintosh USB 17 You must be logged on a keyboard or a non-powered USB hub. • Connect the machine directly to lift the scanner cover until it locks securely into ...Make sure that the cable does not restrict the cover from closing, or an error may occur. c Carefully guide the USB cable into the open position. Connect the cable to the USB port marked with Administrator rights. Make sure your Macintosh is connected to Mac OS X 10.4.11 - 10.6.x. a ...
Quick Setup Guide - English
Page 18
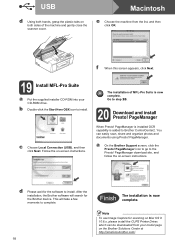
...your CD-ROM drive. c Choose Local Connection (USB), and then click Next. PageManager is installed OCR capability is added to install. a On the Brother Support screen, click the Presto! b Double-click the Start Here OSX icon to Brother ControlCenter2. PageManager When Presto! PageManager download site, ...the Presto! You can be downloaded from the list, and then click OK. After the installation, the Brother software will take a few moments to install. PageManager. USB Macintosh d Using both hands, grasp the plastic tabs on both sides of MFL-Pro Suite is now complete...
...your CD-ROM drive. c Choose Local Connection (USB), and then click Next. PageManager is installed OCR capability is added to install. a On the Brother Support screen, click the Presto! b Double-click the Start Here OSX icon to Brother ControlCenter2. PageManager When Presto! PageManager download site, ...the Presto! You can be downloaded from the list, and then click OK. After the installation, the Brother software will take a few moments to install. PageManager. USB Macintosh d Using both hands, grasp the plastic tabs on both sides of MFL-Pro Suite is now complete...
Quick Setup Guide - English
Page 19
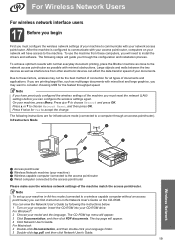
To achieve optimum results with normal everyday document printing, place the Brother machine as close to the network access point/router as possible with your access point/router, computers on your network will have previously configured the ... data transfer speed of your documents. The following instructions are printing large files, such as interference from these factors, wireless may want to consider choosing USB for Yes to choose Network Reset, and then press OK. On your model and the language. Press a or b to accept the change. For Windows®...
To achieve optimum results with normal everyday document printing, place the Brother machine as close to the network access point/router as possible with your access point/router, computers on your network will have previously configured the ... data transfer speed of your documents. The following instructions are printing large files, such as interference from these factors, wireless may want to consider choosing USB for Yes to choose Network Reset, and then press OK. On your model and the language. Press a or b to accept the change. For Windows®...

Quick Setup Guide - English
Page 20
... without the wireless security information. Please write down your wireless network settings in the area below. • Please do not contact Brother Customer Service for this method. • If you are using Windows® XP, or currently using the CD-ROM installer and...* The Network Key may also be the manufacturer's name or the model name. 3) If you use a USB cable during configuration (cable not included). Note If you prefer for installing your Brother machine in locating your network security settings. Choose the method you do not know this information? 1) You should ...
... without the wireless security information. Please write down your wireless network settings in the area below. • Please do not contact Brother Customer Service for this method. • If you are using Windows® XP, or currently using the CD-ROM installer and...* The Network Key may also be the manufacturer's name or the model name. 3) If you use a USB cable during configuration (cable not included). Note If you prefer for installing your Brother machine in locating your network security settings. Choose the method you do not know this information? 1) You should ...
Quick Setup Guide - English
Page 22
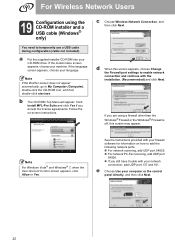
... Vista® and Windows® 7, when the User Account Control screen appears, click Allow or Yes. If you are using the CD-ROM installer and a USB cable (Windows® only) You need to My Computer (Computer), double-click the CD-ROM icon, and then double-click start.exe. Note If the...
... Vista® and Windows® 7, when the User Account Control screen appears, click Allow or Yes. If you are using the CD-ROM installer and a USB cable (Windows® only) You need to My Computer (Computer), double-click the CD-ROM icon, and then double-click start.exe. Note If the...
Quick Setup Guide - English
Page 23
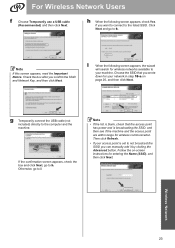
... after you want to connect to your machine. Note If this screen appears, read the Important Notice. Click Next and go to h. g Temporarily connect the USB cable (not included) directly to k. Note • If the list is blank, check that you can manually add it by clicking the Advanced button. Then... the following screen appears, check Yes if you confirm the SSID and Network Key, and then click Next. For Wireless Network Users f Choose Temporarily use a USB cable (Recommended) and then click Next. Wireless Network 23
... after you want to connect to your machine. Note If this screen appears, read the Important Notice. Click Next and go to h. g Temporarily connect the USB cable (not included) directly to k. Note • If the list is blank, check that you can manually add it by clicking the Advanced button. Then... the following screen appears, check Yes if you confirm the SSID and Network Key, and then click Next. For Wireless Network Users f Choose Temporarily use a USB cable (Recommended) and then click Next. Wireless Network 23
Quick Setup Guide - English
Page 24
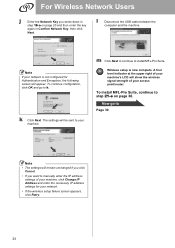
... of your machine, click Change IP Address and enter the necessary IP address settings for Authentication and Encryption, the following screen will appear. l Disconnect the USB cable between the computer and the machine. To continue configuration, click OK and go to Page 30 Note • The settings will be sent to...
... of your machine, click Change IP Address and enter the necessary IP address settings for Authentication and Encryption, the following screen will appear. l Disconnect the USB cable between the computer and the machine. To continue configuration, click OK and go to Page 30 Note • The settings will be sent to...

Network Glossary - English
Page 6
Types of network connections and protocols 1 1 Client computer 2 Also known as "Server" or "Print server" 3 TCP/IP, USB or parallel (where available) 4 Network machine (your machine) In a larger network, we recommend a Network Shared printing environment. The "server" or the "print server" must use the TCP/IP print protocol. The Brother machine needs to have an appropriate IP address configuration unless the machine is connected via the USB or the parallel interface at the server. 2
Types of network connections and protocols 1 1 Client computer 2 Also known as "Server" or "Print server" 3 TCP/IP, USB or parallel (where available) 4 Network machine (your machine) In a larger network, we recommend a Network Shared printing environment. The "server" or the "print server" must use the TCP/IP print protocol. The Brother machine needs to have an appropriate IP address configuration unless the machine is connected via the USB or the parallel interface at the server. 2
Network Users Manual - English
Page 3
.../router in the network (Ad-hoc mode)...10 Wireless configuration temporarily using a USB cable 11 For Windows® users (Recommended 11 For Macintosh users ...12 Wireless configuration temporarily using an Ethernet cable (For MFC-J825DW/J835DW and DCP-J925DW) ...14 One push configuration using Wi-Fi Protected...Wizard ...36 WPS/AOSS™ ...36 WPS w/PIN Code ...36 WLAN Status ...37 Ethernet (For MFC-J825DW/J835DW and DCP-J925DW 37 MAC Address ...37 Network I/F (For MFC-J825DW/J835DW and DCP-J925DW 37 Restoring the network settings to factory default 38 Printing the Network Configuration ...
.../router in the network (Ad-hoc mode)...10 Wireless configuration temporarily using a USB cable 11 For Windows® users (Recommended 11 For Macintosh users ...12 Wireless configuration temporarily using an Ethernet cable (For MFC-J825DW/J835DW and DCP-J925DW) ...14 One push configuration using Wi-Fi Protected...Wizard ...36 WPS/AOSS™ ...36 WPS w/PIN Code ...36 WLAN Status ...37 Ethernet (For MFC-J825DW/J835DW and DCP-J925DW 37 MAC Address ...37 Network I/F (For MFC-J825DW/J835DW and DCP-J925DW 37 Restoring the network settings to factory default 38 Printing the Network Configuration ...
Network Users Manual - English
Page 12
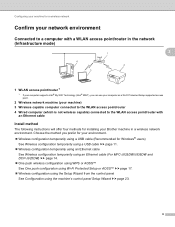
...read this method, you need to know your documents. Note • To achieve optimum results with normal every day document printing, place the Brother machine as close to the WLAN access point/router as multi-page documents with minimal obstructions. If you are printing large files, such as ...of your SSID and Network Key. 1 A wired network interface is a recommended way for more details on the MFC-J825DW/J835DW and DCP-J925DW. 8 By using the CD-ROM installer and a USB cable is available on how to configure the wireless network settings. Due to these factors, wireless may not be...
...read this method, you need to know your documents. Note • To achieve optimum results with normal every day document printing, place the Brother machine as close to the WLAN access point/router as multi-page documents with minimal obstructions. If you are printing large files, such as ...of your SSID and Network Key. 1 A wired network interface is a recommended way for more details on the MFC-J825DW/J835DW and DCP-J925DW. 8 By using the CD-ROM installer and a USB cable is available on how to configure the wireless network settings. Due to these factors, wireless may not be...
Network Users Manual - English
Page 13
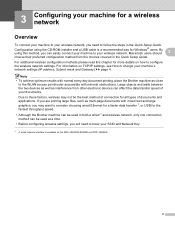
...cable Install method 3 The following instructions will offer four methods for installing your environment. Wireless configuration temporarily using a USB cable (Recommended for your Brother machine in a wireless network environment. Configuring your machine for a wireless network Confirm your network environment 3 Connected to a ...11. Wireless configuration temporarily using an Ethernet cable See Wireless configuration temporarily using an Ethernet cable (For MFC-J825DW/J835DW and DCP-J925DW) uu page 14. One push wireless configuration using WPS or AOSS&#...
...cable Install method 3 The following instructions will offer four methods for installing your environment. Wireless configuration temporarily using a USB cable (Recommended for your Brother machine in a wireless network environment. Configuring your machine for a wireless network Confirm your network environment 3 Connected to a ...11. Wireless configuration temporarily using an Ethernet cable See Wireless configuration temporarily using an Ethernet cable (For MFC-J825DW/J835DW and DCP-J925DW) uu page 14. One push wireless configuration using WPS or AOSS&#...


