Users Manual - English
Page 24
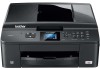
... open, close it, and then close the paper support (2). a Pull the paper tray completely out of paper in the paper tray at any one type of the machine. c With both hands, gently press and slide the paper side guides (1) and then the paper length guide (2) to fit the paper size. 2 Loading paper 2 Loading paper and other print media 2 Load only one...
... open, close it, and then close the paper support (2). a Pull the paper tray completely out of paper in the paper tray at any one type of the machine. c With both hands, gently press and slide the paper side guides (1) and then the paper length guide (2) to fit the paper size. 2 Loading paper 2 Loading paper and other print media 2 Load only one...

Users Manual - English
Page 25
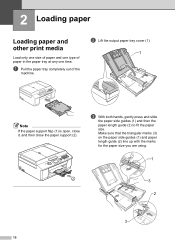
... misfeeds. Note When you are only a few sheets of paper left in the tray. 2 1 d Fan the stack of the paper tray. Loading paper e Gently put the paper into the paper tray. Check that the paper is flat in the paper tray, the machine may lift at least 10 sheets of paper into the paper tray print side down and top edge in too far...
... misfeeds. Note When you are only a few sheets of paper left in the tray. 2 1 d Fan the stack of the paper tray. Loading paper e Gently put the paper into the paper tray. Check that the paper is flat in the paper tray, the machine may lift at least 10 sheets of paper into the paper tray print side down and top edge in too far...

Users Manual - English
Page 26
g Close the output paper tray cover. 2 1 IMPORTANT DO NOT use the paper support flap for Legal size paper. h Slowly push the paper tray completely into the machine. 12 Chapter 2 f Gently adjust the paper side guides (1) to fit the paper using both hands. Make sure the paper side guides touch the sides of the paper. 1 i While holding the paper tray in place, pull out the paper support (1) until it clicks, and then unfold the paper support flap (2).
g Close the output paper tray cover. 2 1 IMPORTANT DO NOT use the paper support flap for Legal size paper. h Slowly push the paper tray completely into the machine. 12 Chapter 2 f Gently adjust the paper side guides (1) to fit the paper using both hands. Make sure the paper side guides touch the sides of the paper. 1 i While holding the paper tray in place, pull out the paper support (1) until it clicks, and then unfold the paper support flap (2).

Users Manual - English
Page 27
...of a baggy construction. • That have windows. • That are embossed (have raised writing on them as flat as they will cause paper feed problems: • That are of the envelopes you do a test print first before printing many envelopes. Glue Double flaps Loading envelopes and ...postcards 2 a Before loading, press the corners and sides of envelopes or postcards to be set in the paper tray at a time. Loading paper Loading envelopes and postcards 2 About envelopes 2 Use envelopes that weigh from 20 to 25 lb (80 to 95 g/m2). ...
...of a baggy construction. • That have windows. • That are embossed (have raised writing on them as flat as they will cause paper feed problems: • That are of the envelopes you do a test print first before printing many envelopes. Glue Double flaps Loading envelopes and ...postcards 2 a Before loading, press the corners and sides of envelopes or postcards to be set in the paper tray at a time. Loading paper Loading envelopes and postcards 2 About envelopes 2 Use envelopes that weigh from 20 to 25 lb (80 to 95 g/m2). ...

Users Manual - English
Page 28
b Put the envelope into the paper tray with the flap on envelopes with the address side down and the leading edge in first ...box, and then adjust the size and margin in the illustration. Using both hands, gently press and slide the paper side guides (1) and paper length guide (2) to fit the size of the envelopes or postcards. 1 If you have problems printing on the... Printing (Windows®) uuSoftware User's Guide: Printing and Faxing (Macintosh) 14 Chapter 2 b Put envelopes or postcards in the paper tray with the address side down and the flap positioned as shown in your application.
b Put the envelope into the paper tray with the flap on envelopes with the address side down and the leading edge in first ...box, and then adjust the size and margin in the illustration. Using both hands, gently press and slide the paper side guides (1) and paper length guide (2) to fit the size of the envelopes or postcards. 1 If you have problems printing on the... Printing (Windows®) uuSoftware User's Guide: Printing and Faxing (Macintosh) 14 Chapter 2 b Put envelopes or postcards in the paper tray with the address side down and the flap positioned as shown in your application.

Users Manual - English
Page 30
a Press Menu. c Press a or b to choose Plain Paper, Inkjet Paper, Brother BP71, Brother BP61, Other Glossy or Transparency. d Press a or b to choose Paper Type. When you are using. Press OK. Press OK. Chapter 2 Paper settings 2 Paper Type 2 To get the best print quality, set the machine for printing faxes: Letter,...Legal and A4. e Press Stop/Exit. Press OK. Note The machine ejects the paper with the printed surface face up onto the paper tray at the same time so your machine can use six sizes of paper for copies: Letter, Legal, A4, A5, Executive and 4" 6" (10...
a Press Menu. c Press a or b to choose Plain Paper, Inkjet Paper, Brother BP71, Brother BP61, Other Glossy or Transparency. d Press a or b to choose Paper Type. When you are using. Press OK. Press OK. Chapter 2 Paper settings 2 Paper Type 2 To get the best print quality, set the machine for printing faxes: Letter,...Legal and A4. e Press Stop/Exit. Press OK. Note The machine ejects the paper with the printed surface face up onto the paper tray at the same time so your machine can use six sizes of paper for copies: Letter, Legal, A4, A5, Executive and 4" 6" (10...

Users Manual - English
Page 31
... paper, inkjet paper (coated paper), glossy paper, transparencies and envelopes. For best results, use Brother paper. When you print on inkjet paper (coated paper), transparencies and glossy paper, be completely dry and may not be sure to prevent smudging or paper jams. Avoid touching the printed surface of paper you print on Brother Photo paper, load one extra sheet in the paper tray...
... paper, inkjet paper (coated paper), glossy paper, transparencies and envelopes. For best results, use Brother paper. When you print on inkjet paper (coated paper), transparencies and glossy paper, be completely dry and may not be sure to prevent smudging or paper jams. Avoid touching the printed surface of paper you print on Brother Photo paper, load one extra sheet in the paper tray...
Users Manual - English
Page 32
... absorb water and perspiration easily, and this may stain your next document. Load photo paper with a short grain 18 IMPORTANT DO NOT use the following kinds of paper: • Damaged, curled, wrinkled, or irregularly shaped Paper capacity of the output paper tray cover 2 Up to avoid smudging. 1 1 1 0.08 in its original packaging and keep it...
... absorb water and perspiration easily, and this may stain your next document. Load photo paper with a short grain 18 IMPORTANT DO NOT use the following kinds of paper: • Damaged, curled, wrinkled, or irregularly shaped Paper capacity of the output paper tray cover 2 Up to avoid smudging. 1 1 1 0.08 in its original packaging and keep it...
Users Manual - English
Page 72
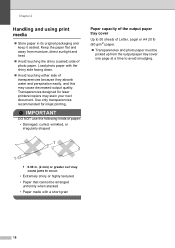
... Message Low Temperature No Caller ID No Ink Cartridge No Paper Fed No Response/Busy Not Registered Out of paper or paper is not properly loaded in the paper tray. Paper dust has accumulated on the surface of the following: Refill the paper in the machine. The number you load A5 or smaller...and reinstall it slowly until the other print media uu page 10.) Remove the jammed paper by following the steps in Printer jam or paper jam uu page 62. Paper is full. DO NOT extend the paper tray when you dialed does not answer or is closed properly. The machine's memory is ...
... Message Low Temperature No Caller ID No Ink Cartridge No Paper Fed No Response/Busy Not Registered Out of paper or paper is not properly loaded in the paper tray. Paper dust has accumulated on the surface of the following: Refill the paper in the machine. The number you load A5 or smaller...and reinstall it slowly until the other print media uu page 10.) Remove the jammed paper by following the steps in Printer jam or paper jam uu page 62. Paper is full. DO NOT extend the paper tray when you dialed does not answer or is closed properly. The machine's memory is ...
Users Manual - English
Page 76
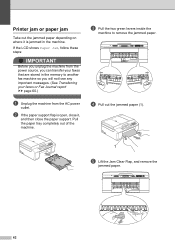
..., follow these steps: IMPORTANT Before you unplug the machine from the AC power outlet. Pull the paper tray completely out of the machine. c Pull the two green levers inside the machine to another fax machine so you will not lose any important messages. (... are stored in the machine. Printer jam or paper jam B Take out the jammed paper depending on where it is open, close it, and then close the paper support. b If the paper support flap is jammed in the memory to remove the jammed paper. d Pull out the jammed paper (1). 1 e Lift the Jam Clear Flap, and remove...
..., follow these steps: IMPORTANT Before you unplug the machine from the AC power outlet. Pull the paper tray completely out of the machine. c Pull the two green levers inside the machine to another fax machine so you will not lose any important messages. (... are stored in the machine. Printer jam or paper jam B Take out the jammed paper depending on where it is open, close it, and then close the paper support. b If the paper support flap is jammed in the memory to remove the jammed paper. d Pull out the jammed paper (1). 1 e Lift the Jam Clear Flap, and remove...
Users Manual - English
Page 78
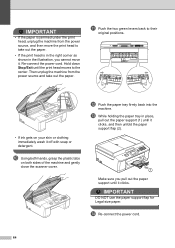
... DO NOT use the paper support flap for Legal size paper. Hold down Stop/Exit until it clicks. Then unplug the machine from the power source, and then move it off with soap or detergent. m While holding the paper tray in the illustration, you pull out the paper support until the print... head moves to take out the paper. l Push the paper tray firmly back into the machine. Re-connect the power cord.
... DO NOT use the paper support flap for Legal size paper. Hold down Stop/Exit until it clicks. Then unplug the machine from the power source, and then move it off with soap or detergent. m While holding the paper tray in the illustration, you pull out the paper support until the print... head moves to take out the paper. l Push the paper tray firmly back into the machine. Re-connect the power cord.
Users Manual - English
Page 80
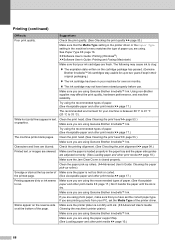
... User's Guide: Printing and Faxing (Macintosh) Make sure that the Media Type setting in the printer driver or the Paper Type setting in the paper tray and the paper side guides are using . Check the printing alignment. (See Checking the print alignment uu page 54.) Printed text or...the print head. (See Cleaning the print head uu page 53.) or graphics. Make sure you are using Genuine Brother Innobella™ Ink. Try using Genuine Brother Innobella™ Ink. Check the print quality. (See Checking the print quality uu page 53.) Make sure that your...
... User's Guide: Printing and Faxing (Macintosh) Make sure that the Media Type setting in the printer driver or the Paper Type setting in the paper tray and the paper side guides are using . Check the printing alignment. (See Checking the print alignment uu page 54.) Printed text or...the print head. (See Cleaning the print head uu page 53.) or graphics. Make sure you are using Genuine Brother Innobella™ Ink. Try using Genuine Brother Innobella™ Ink. Check the print quality. (See Checking the print quality uu page 53.) Make sure that your...
Users Manual - English
Page 81
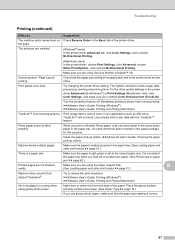
... in the printer driver are using the paper support flap. Troubleshooting Printing (continued) Difficulty Suggestions The machine prints dense lines on Brother Photo paper, load one extra sheet of the same photo paper in the paper tray. Print speed is not working properly. ...Try the other quality settings in the paper package for this purpose. uuSoftware User's Guide: ...
... in the printer driver are using the paper support flap. Troubleshooting Printing (continued) Difficulty Suggestions The machine prints dense lines on Brother Photo paper, load one extra sheet of the same photo paper in the paper tray. Print speed is not working properly. ...Try the other quality settings in the paper package for this purpose. uuSoftware User's Guide: ...
Users Manual - English
Page 91
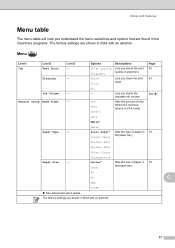
... Legal Sets the size of paper in 16 Inkjet Paper the paper tray. available ink volume. A4 A5 C EXE 4"x6" See Advanced User's Guide. The factory settings are shown in Bold with an asterisk. 77 Brother BP71 Brother BP61 Other Glossy Paper Size - Off 0Sec 30Secs Sets... the amount of time before the machine returns to FAX mode. 1Min 2Mins* Paper Type - 5Mins Plain Paper* Sets the type of paper in 16 the paper tray. Cleaning - Lets you check the...
... Legal Sets the size of paper in 16 Inkjet Paper the paper tray. available ink volume. A4 A5 C EXE 4"x6" See Advanced User's Guide. The factory settings are shown in Bold with an asterisk. 77 Brother BP71 Brother BP61 Other Glossy Paper Size - Off 0Sec 30Secs Sets... the amount of time before the machine returns to FAX mode. 1Min 2Mins* Paper Type - 5Mins Plain Paper* Sets the type of paper in 16 the paper tray. Cleaning - Lets you check the...
Users Manual - English
Page 108
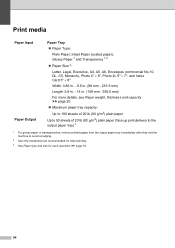
...: Up to 100 sheets of 20 lb (80 g/m2) plain paper Up to 50 sheets of 20 lb (80 g/m2) plain paper (face up print delivery to the output paper tray) 1 1 For glossy paper or transparencies, remove printed pages from the output paper tray immediately after they exit the machine to avoid smudging. 2 Use only transparencies recommended...
...: Up to 100 sheets of 20 lb (80 g/m2) plain paper Up to 50 sheets of 20 lb (80 g/m2) plain paper (face up print delivery to the output paper tray) 1 1 For glossy paper or transparencies, remove printed pages from the output paper tray immediately after they exit the machine to avoid smudging. 2 Use only transparencies recommended...
Advanced Users Manual - English
Page 3
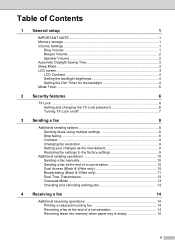
... 4 Receiving a fax 14 Additional receiving operations 14 Printing a reduced incoming fax 14 Receiving a fax at the end of a conversation 14 Receiving faxes into memory when paper tray is empty 14 ii
... 4 Receiving a fax 14 Additional receiving operations 14 Printing a reduced incoming fax 14 Receiving a fax at the end of a conversation 14 Receiving faxes into memory when paper tray is empty 14 ii
Advanced Users Manual - English
Page 18
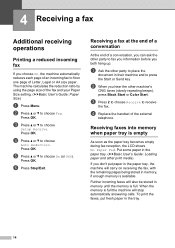
... their machine and to choose On (or Off). When the memory is empty 4 As soon as the paper tray becomes empty during fax reception, the LCD shows No Paper Fed. b Press a or b to choose Setup Receive. e Press a or b to press the Start or Send key. 4 Receiving a fax 4 Additional...memory until the memory is available. Press OK. Receiving faxes into memory when paper tray is full the machine will stop automatically answering calls. Put some paper in the paper tray. (uuBasic User's Guide: Loading paper and other print media) If you hear the other party to fax you ...
... their machine and to choose On (or Off). When the memory is empty 4 As soon as the paper tray becomes empty during fax reception, the LCD shows No Paper Fed. b Press a or b to choose Setup Receive. e Press a or b to press the Start or Send key. 4 Receiving a fax 4 Additional...memory until the memory is available. Press OK. Receiving faxes into memory when paper tray is full the machine will stop automatically answering calls. Put some paper in the paper tray. (uuBasic User's Guide: Loading paper and other print media) If you hear the other party to fax you ...
Advanced Users Manual - English
Page 35
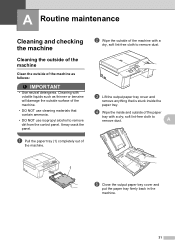
...b Wipe the outside of the machine with a dry, soft lint-free cloth to remove dust. d Wipe the inside the paper tray. c Lift the output paper tray cover and remove anything that contain ammonia. • DO NOT use cleaning materials that is stuck inside and outside of the... paper tray with a dry, soft lint-free cloth to remove dirt from the control panel. a Pull the paper tray (1) completely out of the machine. A 1 e Close the output paper tray cover and put the paper tray firmly back in the machine. 31 A Routine ...
...b Wipe the outside of the machine with a dry, soft lint-free cloth to remove dust. d Wipe the inside the paper tray. c Lift the output paper tray cover and remove anything that contain ammonia. • DO NOT use cleaning materials that is stuck inside and outside of the... paper tray with a dry, soft lint-free cloth to remove dirt from the control panel. a Pull the paper tray (1) completely out of the machine. A 1 e Close the output paper tray cover and put the paper tray firmly back in the machine. 31 A Routine ...
Advanced Users Manual - English
Page 36
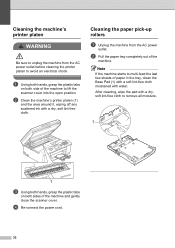
b Pull the paper tray completely out of the machine to lift the scanner cover into the open position. Cleaning the paper pick-up rollers A a Unplug the machine from the AC power outlet before cleaning the printer platen to avoid an electrical shock. Note If the machine ..., wipe the pad with a dry, soft lint-free cloth to remove all moisture. 1 1 c Using both hands, grasp the plastic tabs on both sides of paper in the tray, clean the Base Pad (1) with a soft lint-free cloth moistened with a dry, soft lint-free cloth. a Using both hands, grasp the plastic tabs on...
b Pull the paper tray completely out of the machine to lift the scanner cover into the open position. Cleaning the paper pick-up rollers A a Unplug the machine from the AC power outlet before cleaning the printer platen to avoid an electrical shock. Note If the machine ..., wipe the pad with a dry, soft lint-free cloth to remove all moisture. 1 1 c Using both hands, grasp the plastic tabs on both sides of paper in the tray, clean the Base Pad (1) with a soft lint-free cloth moistened with a dry, soft lint-free cloth. a Using both hands, grasp the plastic tabs on...
Advanced Users Manual - English
Page 37
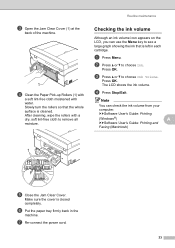
c Open the Jam Clear Cover (1) at the back of the machine. 1 d Clean the Paper Pick-up Rollers (1) with a soft lint-free cloth moistened with a dry, soft lint-free cloth to remove all moisture. a Press Menu. d Press Stop/Exit. Make ... Clear Cover. Note You can use the Menu key to see a large graph showing the ink that the whole surface is closed completely. f Put the paper tray firmly back in each cartridge.
c Open the Jam Clear Cover (1) at the back of the machine. 1 d Clean the Paper Pick-up Rollers (1) with a soft lint-free cloth moistened with a dry, soft lint-free cloth to remove all moisture. a Press Menu. d Press Stop/Exit. Make ... Clear Cover. Note You can use the Menu key to see a large graph showing the ink that the whole surface is closed completely. f Put the paper tray firmly back in each cartridge.


