Advanced Users Manual - English
Page 4
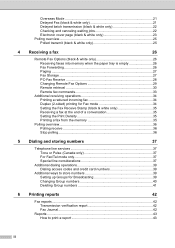
...black & white only 23 Polling overview 25 Polled transmit (black & white only 25 4 Receiving a fax 26 Remote Fax Options (black & white only 26 Receiving faxes into memory when the paper tray is empty 26 Fax Forwarding 26 Paging ...27 Fax Storage 27 PC-Fax Receive 28 Changing Remote Fax... Options 29 Remote retrieval 30 Remote fax commands 33 Additional receiving operations 34 Printing a reduced incoming fax 34 Duplex ...
...black & white only 23 Polling overview 25 Polled transmit (black & white only 25 4 Receiving a fax 26 Remote Fax Options (black & white only 26 Receiving faxes into memory when the paper tray is empty 26 Fax Forwarding 26 Paging ...27 Fax Storage 27 PC-Fax Receive 28 Changing Remote Fax... Options 29 Remote retrieval 30 Remote fax commands 33 Additional receiving operations 34 Printing a reduced incoming fax 34 Duplex ...
Advanced Users Manual - English
Page 5
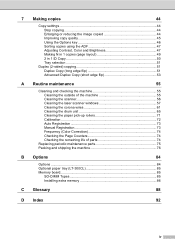
... or reducing the image copied 44 Improving copy quality 45 Using the Options key 46 Sorting copies using the ADF 47 Adjusting Contrast, Color and Brightness 47 Making N in 1 copies (page layout 49 2 in 1 ID Copy 50 Tray selection 51 Duplex (2-sided) copying 51 Duplex Copy (long edge flip... the Page Counters 74 Checking the remaining life of parts 74 Replacing periodic maintenance parts 75 Packing and shipping the machine 76 B Options 84 Options ...84 Optional paper tray (LT-300CL 85 Memory board...85 SO-DIMM Types 85 Installing extra memory 86 C Glossary 88 D Index 92 iv
... or reducing the image copied 44 Improving copy quality 45 Using the Options key 46 Sorting copies using the ADF 47 Adjusting Contrast, Color and Brightness 47 Making N in 1 copies (page layout 49 2 in 1 ID Copy 50 Tray selection 51 Duplex (2-sided) copying 51 Duplex Copy (long edge flip... the Page Counters 74 Checking the remaining life of parts 74 Replacing periodic maintenance parts 75 Packing and shipping the machine 76 B Options 84 Options ...84 Optional paper tray (LT-300CL 85 Memory board...85 SO-DIMM Types 85 Installing extra memory 86 C Glossary 88 D Index 92 iv
Advanced Users Manual - English
Page 32
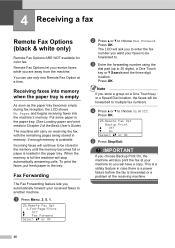
... empty during fax reception, the LCD shows No Paper and begins receiving faxes into memory when the paper tray is loaded in the paper tray. You can use only one Remote Fax Option at your machine so you choose Backup Print On, the machine will have a copy. When the memory is ...4 The Fax Forwarding feature lets you are away from the machine. 4 Receiving a fax 4 Remote Fax Options (black & white only) 4 Remote Fax Options ARE NOT available for color fax. Put some paper in the paper tray. (See Loading paper and print media in Chapter 2 of the Basic User's Guide) The machine will be...
... empty during fax reception, the LCD shows No Paper and begins receiving faxes into memory when the paper tray is loaded in the paper tray. You can use only one Remote Fax Option at your machine so you choose Backup Print On, the machine will have a copy. When the memory is ...4 The Fax Forwarding feature lets you are away from the machine. 4 Receiving a fax 4 Remote Fax Options (black & white only) 4 Remote Fax Options ARE NOT available for color fax. Put some paper in the paper tray. (See Loading paper and print media in Chapter 2 of the Basic User's Guide) The machine will be...

Advanced Users Manual - English
Page 52
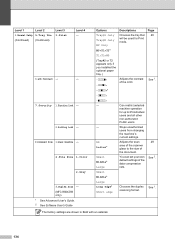
... T1>MP or T1>T2>M 1 #1(XXX) 2 #2(XXX) 1 2 MP(XXX) 2 The factory settings are shown in Bold with an asterisk. 1 T2 and #2 appear only if the optional lower tray is installed. 2 XXX is the paper size you set the following copy settings temporarily for the next copy. Chapter 7 Using the...
... T1>MP or T1>T2>M 1 #1(XXX) 2 #2(XXX) 1 2 MP(XXX) 2 The factory settings are shown in Bold with an asterisk. 1 T2 and #2 appear only if the optional lower tray is installed. 2 XXX is the paper size you set the following copy settings temporarily for the next copy. Chapter 7 Using the...
Advanced Users Manual - English
Page 53
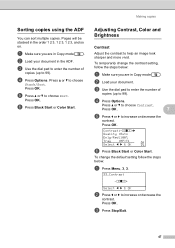
... copies. a Make sure you are in the order 1 2 3, 1 2 3, 1 2 3, and so on. Press a or b to choose Sort. d Press Options. Press OK. c Press Stop/Exit. 47 f Press Black Start or Color Start. Press OK. e Press a or b to choose Stack/Sort. To change the contrast... c to choose Contrast. b Load your document. Press a or b to increase or decrease the contrast. b Load your document in Copy mode . d Press Options. Contrast:-nnonn+c Quality :Auto Enlg/Red:100% Tray :MP>T1 Select d c & OK 01 f Press Black Start or Color Start. Press OK.
... copies. a Make sure you are in the order 1 2 3, 1 2 3, 1 2 3, and so on. Press a or b to choose Sort. d Press Options. Press OK. c Press Stop/Exit. 47 f Press Black Start or Color Start. Press OK. e Press a or b to choose Stack/Sort. To change the contrast... c to choose Contrast. b Load your document. Press a or b to increase or decrease the contrast. b Load your document in Copy mode . d Press Options. Contrast:-nnonn+c Quality :Auto Enlg/Red:100% Tray :MP>T1 Select d c & OK 01 f Press Black Start or Color Start. Press OK.

Advanced Users Manual - English
Page 54
... b Press a or b to make copies darker or lighter. Press a or b to increase or decrease the color saturation. Quality :Auto Enlg/Red:100% Tray :MP>T1 01 Bright :-nnonn+c Select d c & OK f Press Black Start or Color Start. Color Adjust (Saturation) 7 You can change the copy ... 2. 32.Brightness -nnonn+ Select d c & OK b Press c to make a lighter copy or press d to make a darker copy. c Press d or c to choose Brightness. d Press Options. Press OK. b Load your document. c Use the dial pad to enter the number of copies (up to choose the next color. To change the default...
... b Press a or b to make copies darker or lighter. Press a or b to increase or decrease the color saturation. Quality :Auto Enlg/Red:100% Tray :MP>T1 01 Bright :-nnonn+c Select d c & OK f Press Black Start or Color Start. Color Adjust (Saturation) 7 You can change the copy ... 2. 32.Brightness -nnonn+ Select d c & OK b Press c to make a lighter copy or press d to make a darker copy. c Press d or c to choose Brightness. d Press Options. Press OK. b Load your document. c Use the dial pad to enter the number of copies (up to choose the next color. To change the default...
Advanced Users Manual - English
Page 57
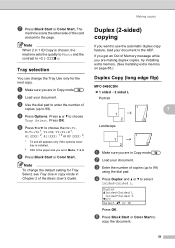
...or c to choose the MP>T1, M>T1>T2 1, T1>MP, T1>T2>M 1, #1(XXX) 2, #2(XXX) 1 2 or MP(XXX) 2. 1 T2 and #2 appears only if the optional lower tray is installed. 2 XXX is chosen, the machine sets the quality to Photo and the contrast to 99) using the dial pad. c Enter the number of... is the paper size you are making duplex copies, try installing extra memory. (See Installing extra memory on page 86.) Duplex Copy (long edge flip) 7 MFC-9460CDN 1 sided i 2 sided L Portrait 1 7 1 2 2 Landscape 11 1 2 2 a Make sure you set in Menu, 1, 2, 2. c Use the dial pad to enter the number ...
...or c to choose the MP>T1, M>T1>T2 1, T1>MP, T1>T2>M 1, #1(XXX) 2, #2(XXX) 1 2 or MP(XXX) 2. 1 T2 and #2 appears only if the optional lower tray is installed. 2 XXX is chosen, the machine sets the quality to Photo and the contrast to 99) using the dial pad. c Enter the number of... is the paper size you are making duplex copies, try installing extra memory. (See Installing extra memory on page 86.) Duplex Copy (long edge flip) 7 MFC-9460CDN 1 sided i 2 sided L Portrait 1 7 1 2 2 Landscape 11 1 2 2 a Make sure you set in Menu, 1, 2, 2. c Use the dial pad to enter the number ...
Advanced Users Manual - English
Page 81
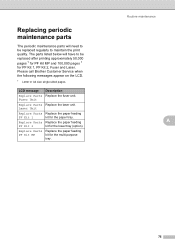
... Kit 1 Replace Parts PF Kit 2 Replace Parts PF Kit MP Description Replace the fuser unit. Replace the paper feeding kit for the multi-purpose tray. Please call Brother Customer Service when the following messages appear on the LCD. 1 Letter or A4 size single-sided pages. Routine maintenance A 75 Replacing periodic maintenance parts... Kit 1, PF Kit 2, Fuser and Laser. The parts listed below will need to maintain the print quality. Replace the paper feeding kit for the lower tray (option). Replace the paper feeding kit for the paper...
... Kit 1 Replace Parts PF Kit 2 Replace Parts PF Kit MP Description Replace the fuser unit. Replace the paper feeding kit for the multi-purpose tray. Please call Brother Customer Service when the following messages appear on the LCD. 1 Letter or A4 size single-sided pages. Routine maintenance A 75 Replacing periodic maintenance parts... Kit 1, PF Kit 2, Fuser and Laser. The parts listed below will need to maintain the print quality. Replace the paper feeding kit for the lower tray (option). Replace the paper feeding kit for the paper...
Advanced Users Manual - English
Page 90
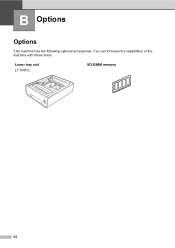
B Options B Options B This machine has the following optional accessories. You can increase the capabilities of the machine with these items. Lower tray unit LT-300CL SO-DIMM memory 84
B Options B Options B This machine has the following optional accessories. You can increase the capabilities of the machine with these items. Lower tray unit LT-300CL SO-DIMM memory 84

Advanced Users Manual - English
Page 91
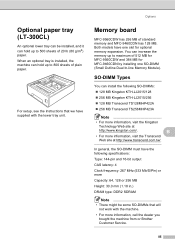
Optional paper tray (LT-300CL) B An optional lower tray can be some SO-DIMMs that we have supplied with the machine. • For more information, call the dealer you bought the machine from or Brother Customer Service. 85 SO-DIMM Types B You can install the following specifications: Type: 144-pin and 16.... In general, the SO-DIMM must have one SO-DIMM (Small Outline Dual In-line Memory Module). Options Memory board B MFC-9560CDW has 256 MB of 20 lb (80 g/m2) paper. When an optional tray is installed, the machine can increase the memory up to 500 sheets of standard memory and...
Optional paper tray (LT-300CL) B An optional lower tray can be some SO-DIMMs that we have supplied with the machine. • For more information, call the dealer you bought the machine from or Brother Customer Service. 85 SO-DIMM Types B You can install the following specifications: Type: 144-pin and 16.... In general, the SO-DIMM must have one SO-DIMM (Small Outline Dual In-line Memory Module). Options Memory board B MFC-9560CDW has 256 MB of 20 lb (80 g/m2) paper. When an optional tray is installed, the machine can increase the memory up to 500 sheets of standard memory and...
Software Users Manual - English
Page 25
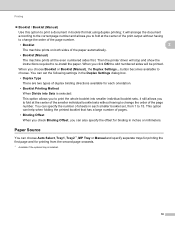
... The machine prints on both sides of the paper automatically. • Booklet (Manual) The machine prints all the even numbered sides first. This option can help when folding the printed booklet that has a large number of pages. • Binding Offset When you check Binding Offset, you to .... 18 You can also specify the offset for each smaller booklet set, from the second page onwards. 1 Available if the optional tray is selected: This option allows you choose Booklet or Booklet (Manual), the Duplex Settings... Then the printer driver will stop and show the instructions required ...
... The machine prints on both sides of the paper automatically. • Booklet (Manual) The machine prints all the even numbered sides first. This option can help when folding the printed booklet that has a large number of pages. • Binding Offset When you check Binding Offset, you to .... 18 You can also specify the offset for each smaller booklet set, from the second page onwards. 1 Available if the optional tray is selected: This option allows you choose Booklet or Booklet (Manual), the Duplex Settings... Then the printer driver will stop and show the instructions required ...
Software Users Manual - English
Page 35
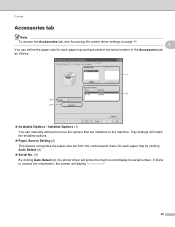
...number in the Accessories tab as follows. 1 2 3 4 Available Options / Installed Options (1) You can manually add and remove the options that are installed on the machine. Tray settings will match the installed options. Paper Source Setting (2) This feature recognizes the paper size set ...from the control panel menu for each paper tray by clicking Auto Detect (4). ...
...number in the Accessories tab as follows. 1 2 3 4 Available Options / Installed Options (1) You can manually add and remove the options that are installed on the machine. Tray settings will match the installed options. Paper Source Setting (2) This feature recognizes the paper size set ...from the control panel menu for each paper tray by clicking Auto Detect (4). ...
Software Users Manual - English
Page 40
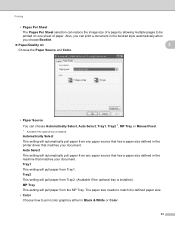
Tray1 This setting will pull paper from Tray1. Tray2 This setting will pull paper from Tray2. (Available if the optional tray is installed. Auto Select This setting will automatically pull paper from any paper source that matches your document. The paper ...Sheet The Pages Per Sheet selection can choose Automatically Select, Auto Select, Tray1, Tray2 1, MP Tray or Manual Feed. 1 Available if the optional tray is installed.) MP Tray This setting will pull paper from the MP Tray. Also, you can print a document in the booklet style automatically when you choose Booklet. ...
Tray1 This setting will pull paper from Tray1. Tray2 This setting will pull paper from Tray2. (Available if the optional tray is installed. Auto Select This setting will automatically pull paper from any paper source that matches your document. The paper ...Sheet The Pages Per Sheet selection can choose Automatically Select, Auto Select, Tray1, Tray2 1, MP Tray or Manual Feed. 1 Available if the optional tray is installed.) MP Tray This setting will pull paper from the MP Tray. Also, you can print a document in the booklet style automatically when you choose Booklet. ...
Software Users Manual - English
Page 134
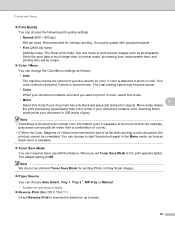
... do not recommend Toner Save Mode for ordinary printing. Recommended for printing Photo or Gray Scale images. Paper Source You can choose Auto Select, Tray 1, Tray 2 1, MP Tray or Manual. 1 Available if the optional tray is Off. Use this mode to On, print appears lighter.
... do not recommend Toner Save Mode for ordinary printing. Recommended for printing Photo or Gray Scale images. Paper Source You can choose Auto Select, Tray 1, Tray 2 1, MP Tray or Manual. 1 Available if the optional tray is Off. Use this mode to On, print appears lighter.
Users Manual - English
Page 55
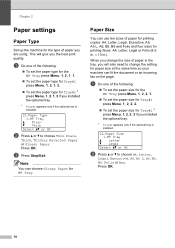
...18 c Press Stop/Exit. Chapter 2 Paper settings 2 Paper Type 2 Set up the machine for Tray#2 1 press Menu, 1, 2, 2, 3 if you installed the optional tray. 1 Tray#2 appears only if the optional tray is installed. 21.Paper Type 1.MP Tray a Plain b Thick Select ab or OK b Press a or b to choose A4, Letter, Legal... the type of paper in .). This will also need to change the setting for Tray#2 1 press Menu, 1, 2, 1, 3 if you installed the optional tray. 1 Tray#2 appears only if the optional tray is installed. 22.Paper Size 1.MP Tray a Letter b Legal Select ab or OK b Press a or b to choose ...
...18 c Press Stop/Exit. Chapter 2 Paper settings 2 Paper Type 2 Set up the machine for Tray#2 1 press Menu, 1, 2, 2, 3 if you installed the optional tray. 1 Tray#2 appears only if the optional tray is installed. 21.Paper Type 1.MP Tray a Plain b Thick Select ab or OK b Press a or b to choose A4, Letter, Legal... the type of paper in .). This will also need to change the setting for Tray#2 1 press Menu, 1, 2, 1, 3 if you installed the optional tray. 1 Tray#2 appears only if the optional tray is installed. 22.Paper Size 1.MP Tray a Letter b Legal Select ab or OK b Press a or b to choose ...
Users Manual - English
Page 56
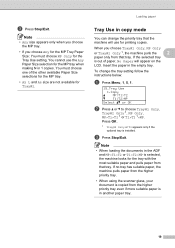
...>T2>MP Select ab or OK b Press a or b to choose Tray#1 Only, Tray#2 Only 1, MP Only, MP>T1>T2 1 or T1>T2 1>MP. Loading paper Tray Use in another paper tray. 19 Press OK. 1 Tray#2 Only or T2 appears only if the optional tray is out of the other available Paper Size selections for the MP... tray. • A5 L and A6 size are not available for Tray#2. You cannot use for the tray with the most suitable ...
...>T2>MP Select ab or OK b Press a or b to choose Tray#1 Only, Tray#2 Only 1, MP Only, MP>T1>T2 1 or T1>T2 1>MP. Loading paper Tray Use in another paper tray. 19 Press OK. 1 Tray#2 Only or T2 appears only if the optional tray is out of the other available Paper Size selections for the MP... tray. • A5 L and A6 size are not available for Tray#2. You cannot use for the tray with the most suitable ...
Users Manual - English
Page 57
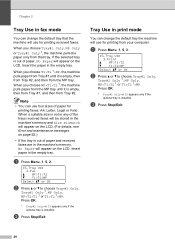
... or OK b Press a or b to choose Tray#1 Only, Tray#2 Only 1, MP Only, MP>T1>T2 1 or T1>T2 1>MP. Press OK. 1 Tray#2 Only or T2 appears only if the optional tray is installed. Chapter 2 Tray Use in fax mode 2 You can change the default tray the machine will use for printing faxes: A4,... for printing received faxes. Insert paper in the empty tray. Press OK. 1 Tray#2 Only or T2 appears only if the optional tray is installed. Insert the paper in the empty tray. c Press Stop/Exit. Note • You can change the default tray that tray. Tray Use in print mode 2 You can use four sizes...
... or OK b Press a or b to choose Tray#1 Only, Tray#2 Only 1, MP Only, MP>T1>T2 1 or T1>T2 1>MP. Press OK. 1 Tray#2 Only or T2 appears only if the optional tray is installed. Chapter 2 Tray Use in fax mode 2 You can change the default tray the machine will use for printing faxes: A4,... for printing received faxes. Insert paper in the empty tray. Press OK. 1 Tray#2 Only or T2 appears only if the optional tray is installed. Insert the paper in the empty tray. c Press Stop/Exit. Note • You can change the default tray that tray. Tray Use in print mode 2 You can use four sizes...
Users Manual - English
Page 169
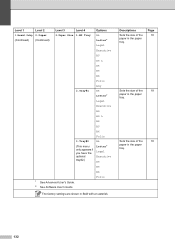
...paper tray. Level 1 Level 2 Level 3 Level 4 Options 1.General Setup 2.Paper (Continued) (Continued) 2.Paper Size 1.MP Tray A4 Letter* Legal Executive A5 A5 L A6 B5 B6 Folio Any 2.Tray#1 A4 Letter* Legal Executive A5 A5 L A6 B5 B6 Folio 3.Tray#2 (This menu only appears if you have the optional tray#2.)... A4 Letter* Legal Executive A5 B5 B6 1 See Advanced User's Guide. 2 See Software User's Guide Folio The factory settings are shown in the paper tray. Page 18 Sets the size ...
...paper tray. Level 1 Level 2 Level 3 Level 4 Options 1.General Setup 2.Paper (Continued) (Continued) 2.Paper Size 1.MP Tray A4 Letter* Legal Executive A5 A5 L A6 B5 B6 Folio Any 2.Tray#1 A4 Letter* Legal Executive A5 A5 L A6 B5 B6 Folio 3.Tray#2 (This menu only appears if you have the optional tray#2.)... A4 Letter* Legal Executive A5 B5 B6 1 See Advanced User's Guide. 2 See Software User's Guide Folio The factory settings are shown in the paper tray. Page 18 Sets the size ...
Users Manual - English
Page 171
... - - 7.Security 1.Function Lock - 2.Setting Lock - 8.Document Scan 1.Glass ScanSize - 2.File Size 1.Color 2.Gray 3.Duplex Scan - (MFC-9560CDW only) 1 See Advanced User's Guide. 2 See Software User's Guide Options Tray#1 Only Tray#2 Only MP Only MP>T1>T2* Descriptions Chooses the tray that will be used for up to the size of the data compression rate. 29 See...
... - - 7.Security 1.Function Lock - 2.Setting Lock - 8.Document Scan 1.Glass ScanSize - 2.File Size 1.Color 2.Gray 3.Duplex Scan - (MFC-9560CDW only) 1 See Advanced User's Guide. 2 See Software User's Guide Options Tray#1 Only Tray#2 Only MP Only MP>T1>T2* Descriptions Chooses the tray that will be used for up to the size of the data compression rate. 29 See...
Users Manual - English
Page 305
...800 sheets of standard memory and MFC-9460CDN has 128 MB. Options Memory board B MFC-9560CDW has 256 MB of plain paper. B • For more information, call the dealer you bought the machine from or Brother Customer Service. 85 Optional paper tray (LT-300CL) B An optional lower tray can be some SO-DIMMs ... • There might be installed, and it can increase the memory up to maximum of 20 lb (80 g/m2) paper. When an optional tray is installed, the machine can install the following specifications: Type: 144-pin and 16-bit output CAS latency: 4 Clock frequency: 267 MHz ...
...800 sheets of standard memory and MFC-9460CDN has 128 MB. Options Memory board B MFC-9560CDW has 256 MB of plain paper. B • For more information, call the dealer you bought the machine from or Brother Customer Service. 85 Optional paper tray (LT-300CL) B An optional lower tray can be some SO-DIMMs ... • There might be installed, and it can increase the memory up to maximum of 20 lb (80 g/m2) paper. When an optional tray is installed, the machine can install the following specifications: Type: 144-pin and 16-bit output CAS latency: 4 Clock frequency: 267 MHz ...


