Advanced Users Manual - English
Page 61
... the power cord from the AC power outlet. A Be careful not to clean the machine. See To use cleaning materials that you replace the toner cartridge or the drum unit, make sure that contain ammonia, alcohol, any type of spray, or any type of flammable substance to clean the outside or...
... the power cord from the AC power outlet. A Be careful not to clean the machine. See To use cleaning materials that you replace the toner cartridge or the drum unit, make sure that contain ammonia, alcohol, any type of spray, or any type of flammable substance to clean the outside or...
Advanced Users Manual - English
Page 65
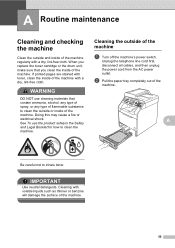
... it . DO NOT hold the side of the drum unit. 1 59 IMPORTANT • We recommend that you place the drum unit and/or the toner cartridge on a clean, flat surface with a dry, lint-free cloth. 1 A f Make sure the green lock lever (1) is in the release position as shown in the illustration...
... it . DO NOT hold the side of the drum unit. 1 59 IMPORTANT • We recommend that you place the drum unit and/or the toner cartridge on a clean, flat surface with a dry, lint-free cloth. 1 A f Make sure the green lock lever (1) is in the release position as shown in the illustration...
Advanced Users Manual - English
Page 68
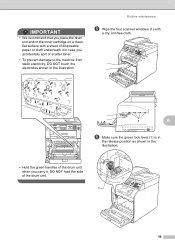
Then pull it out of the corona wire cover (1), and then open the cover. 1 62 Repeat this for all the toner cartridges. d Push to unlock it. c Hold the handle of the toner cartridge and slightly push it toward the machine to release the latches of the drum unit.
Then pull it out of the corona wire cover (1), and then open the cover. 1 62 Repeat this for all the toner cartridges. d Push to unlock it. c Hold the handle of the toner cartridge and slightly push it toward the machine to release the latches of the drum unit.
Advanced Users Manual - English
Page 70
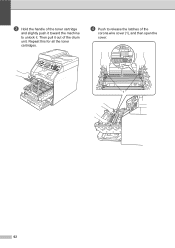
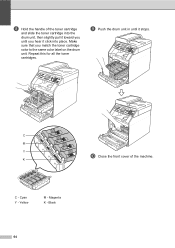
K C - Cyan Y - h Hold the handle of the machine. Make sure that you hear it stops. i Push the drum unit in until it click into the drum unit, then slightly pull it toward you until you match the toner cartridge color to the same color label on the drum unit. Yellow M - Magenta K - Black 64 Repeat this for all the toner cartridges. C M Y j Close the front cover of the toner cartridge and slide the toner cartridge into place.
K C - Cyan Y - h Hold the handle of the machine. Make sure that you hear it stops. i Push the drum unit in until it click into the drum unit, then slightly pull it toward you until you match the toner cartridge color to the same color label on the drum unit. Yellow M - Magenta K - Black 64 Repeat this for all the toner cartridges. C M Y j Close the front cover of the toner cartridge and slide the toner cartridge into place.
Advanced Users Manual - English
Page 73
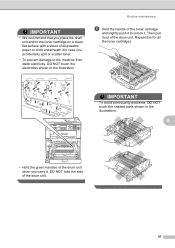
...handles of the drum unit when you carry it out of the drum unit. Repeat this for all the toner cartridges. Then pull it . IMPORTANT To avoid print quality problems, DO NOT touch the shaded parts shown in the.... IMPORTANT • We recommend that you place the drum unit and/or the toner cartridge on a clean, flat surface with a sheet of disposable paper or cloth underneath it . DO NOT hold ...the side of the toner cartridge and slightly push it to unlock it in case you accidentally spill or scatter toner. •...
...handles of the drum unit when you carry it out of the drum unit. Repeat this for all the toner cartridges. Then pull it . IMPORTANT To avoid print quality problems, DO NOT touch the shaded parts shown in the.... IMPORTANT • We recommend that you place the drum unit and/or the toner cartridge on a clean, flat surface with a sheet of disposable paper or cloth underneath it . DO NOT hold ...the side of the toner cartridge and slightly push it to unlock it in case you accidentally spill or scatter toner. •...

Advanced Users Manual - English
Page 75
C A k When you have found the mark on the drum that you match the toner cartridge color to the same color label on the surface comes off. l Turn the drum unit over by hand while looking at the surface of the ... clean the surface of the suspected area. Black 69 Yellow M - Repeat this for all the toner cartridges. C - Make sure that matches the drum dot check M sheet, wipe the surface of the toner cartridge and slide the toner cartridge into the drum unit, then slightly pull it click into place. Magenta K - j Turn the drum...
C A k When you have found the mark on the drum that you match the toner cartridge color to the same color label on the surface comes off. l Turn the drum unit over by hand while looking at the surface of the ... clean the surface of the suspected area. Black 69 Yellow M - Repeat this for all the toner cartridges. C - Make sure that matches the drum dot check M sheet, wipe the surface of the toner cartridge and slide the toner cartridge into the drum unit, then slightly pull it click into place. Magenta K - j Turn the drum...
Advanced Users Manual - English
Page 82
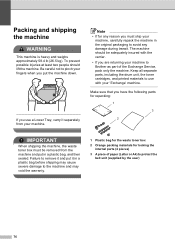
... during transit. If you have the following parts for locking the internal parts (4 pieces) 3 A piece of paper (Letter or A4) to Brother as part of the Exchange Service, pack only the machine. Keep all separate parts, including the drum unit, the toner cartridges, and printed materials to use a Lower Tray, carry it in...
... during transit. If you have the following parts for locking the internal parts (4 pieces) 3 A piece of paper (Letter or A4) to Brother as part of the Exchange Service, pack only the machine. Keep all separate parts, including the drum unit, the toner cartridges, and printed materials to use a Lower Tray, carry it in...
Advanced Users Manual - English
Page 84
... on a clean, flat surface with cold water at the left of the drum unit when you accidentally spill or scatter toner. • Handle the toner cartridge and the waste toner box carefully.
... on a clean, flat surface with cold water at the left of the drum unit when you accidentally spill or scatter toner. • Handle the toner cartridge and the waste toner box carefully.
Advanced Users Manual - English
Page 86
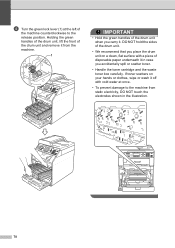
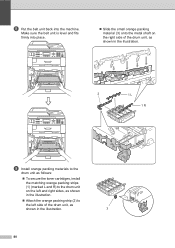
... side of the drum unit, as shown in the illustration. 2 1 L 1 R i Install orange packing materials to the drum unit as follows: To secure the toner cartridges, install the matching orange packing strips (1) (marked L and R) to the drum unit on the left and right sides, as shown in the illustration. Attach...
... side of the drum unit, as shown in the illustration. 2 1 L 1 R i Install orange packing materials to the drum unit as follows: To secure the toner cartridges, install the matching orange packing strips (1) (marked L and R) to the drum unit on the left and right sides, as shown in the illustration. Attach...
Advanced Users Manual - English
Page 89
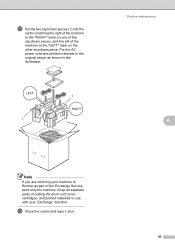
... the machine to the "LEFT" mark on the other styrofoam piece. Keep all separate parts, including the drum unit, toner cartridges, and printed materials to use with your machine to Brother as shown in the original carton as part of the machine to the "RIGHT" mark on one of the styrofoam pieces...
... the machine to the "LEFT" mark on the other styrofoam piece. Keep all separate parts, including the drum unit, toner cartridges, and printed materials to use with your machine to Brother as shown in the original carton as part of the machine to the "RIGHT" mark on one of the styrofoam pieces...
Users Manual - English
Page 26
... (English for USA and Canada) LX4374002 (French for Canada) (MFC-9460CDN) LX4371001 (English for USA and Canada) (MFC-9560CDW) LX4384001 (English for USA and Canada) (MFC-9460CDN) LX4371002 (French for Canada) (MFC-9560CDW) LX4384002 (French for Canada) 1 Letter or A4 size single-sided pages. 2 Approx. iii cartridge yield is declared in accordance with ISO/IEC 19798. 3 Standard...
... (English for USA and Canada) LX4374002 (French for Canada) (MFC-9460CDN) LX4371001 (English for USA and Canada) (MFC-9560CDW) LX4384001 (English for USA and Canada) (MFC-9460CDN) LX4371002 (French for Canada) (MFC-9560CDW) LX4384002 (French for Canada) 1 Letter or A4 size single-sided pages. 2 Approx. iii cartridge yield is declared in accordance with ISO/IEC 19798. 3 Standard...
Users Manual - English
Page 28
...device or software used with a copy of your purchase you are not limited to Toner Cartridges, Drum Unit, Belt Unit, and Waste Toner Box. Except as otherwise provided herein, Brother warrants that the Machine and the accompanying Consumable and Accessory Items will be free from ...but are not the Original Purchaser and the product that you purchased is not covered by improper installation, improper or abnormal use of non Brother®-brand parts and Consumable and Accessory Items); 4 Consumable and Accessory Items that expired in accordance with a rated life; 5 Problems ...
...device or software used with a copy of your purchase you are not limited to Toner Cartridges, Drum Unit, Belt Unit, and Waste Toner Box. Except as otherwise provided herein, Brother warrants that the Machine and the accompanying Consumable and Accessory Items will be free from ...but are not the Original Purchaser and the product that you purchased is not covered by improper installation, improper or abnormal use of non Brother®-brand parts and Consumable and Accessory Items); 4 Consumable and Accessory Items that expired in accordance with a rated life; 5 Problems ...
Users Manual - English
Page 30
... year labour and parts from the date of purchase, Brother International Corporation (Canada) Ltd. ("Brother"), or its Authorized Service Centres, Distributors, Dealers, Agents or employees, shall create another warranty or modify this Laser Printer/MFC/Fax machine free of such damages. When shipping or transporting... toner packs or oil bottles on -site. This limited Warranty does not include cleaning, consumables (including, without limitation, toner cartridges and drum units, OPC belts, fixing units, print heads, paper feed rollers, transfer rolls, cleaning rollers, waste toner packs...
... year labour and parts from the date of purchase, Brother International Corporation (Canada) Ltd. ("Brother"), or its Authorized Service Centres, Distributors, Dealers, Agents or employees, shall create another warranty or modify this Laser Printer/MFC/Fax machine free of such damages. When shipping or transporting... toner packs or oil bottles on -site. This limited Warranty does not include cleaning, consumables (including, without limitation, toner cartridges and drum units, OPC belts, fixing units, print heads, paper feed rollers, transfer rolls, cleaning rollers, waste toner packs...
Users Manual - English
Page 34
... 56 Scanning a document 56 Scanning using the scan key 56 Scanning using a scanner driver 57 A Routine maintenance 58 Replacing the consumable items 58 Replacing a Toner cartridge 62 Cleaning the corona wires 68 Replacing the drum unit 72 Replacing the belt unit 79 Replacing the waste toner box 85 B Troubleshooting 92 Error...
... 56 Scanning a document 56 Scanning using the scan key 56 Scanning using a scanner driver 57 A Routine maintenance 58 Replacing the consumable items 58 Replacing a Toner cartridge 62 Cleaning the corona wires 68 Replacing the drum unit 72 Replacing the belt unit 79 Replacing the waste toner box 85 B Troubleshooting 92 Error...
Users Manual - English
Page 95
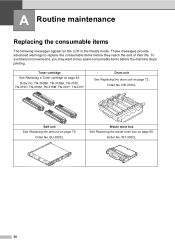
... stops printing. WT-300CL 58 BU-300CL Waste toner box See Replacing the waste toner box on the LCD in the Ready mode. Toner cartridge See Replacing a Toner cartridge on page 79. Order No. DR-310CL Belt unit See Replacing the belt unit on page 62. TN-310BK, TN-315BK, TN-310C...
... stops printing. WT-300CL 58 BU-300CL Waste toner box See Replacing the waste toner box on the LCD in the Ready mode. Toner cartridge See Replacing a Toner cartridge on page 79. Order No. DR-310CL Belt unit See Replacing the belt unit on page 62. TN-310BK, TN-315BK, TN-310C...
Users Manual - English
Page 96
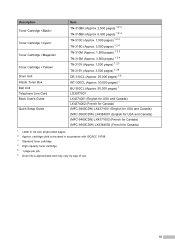
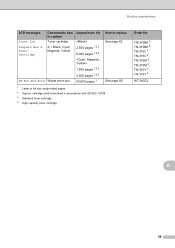
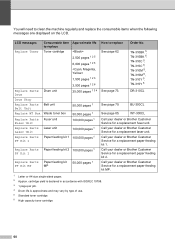
...-310BK 3, TN-315BK 4, TN-310C 3, TN-315C 4, TN-310M 3, TN-315M 4, TN-310Y 3, TN-315Y 4 WT-300CL A 59 Consumable item to replace Toner cartridge X = Black, Cyan, Magenta, Yellow WT Box End Soon Waste toner box Approximate life 2,500 pages 1 2 3 6,000 pages 1 2 4 1,500 pages 1 2 ...1 2 4 50,000 pages 1 How to replace See page 62. See page 85. 1 Letter or A4 size single-sided pages. 2 Approx. cartridge yield is declared in accordance with ISO/IEC 19798. 3 Standard toner cartridge 4 High capacity toner cartridge Order No. Routine maintenance LCD messages Toner Low Prepare New X Toner...
...-310BK 3, TN-315BK 4, TN-310C 3, TN-315C 4, TN-310M 3, TN-315M 4, TN-310Y 3, TN-315Y 4 WT-300CL A 59 Consumable item to replace Toner cartridge X = Black, Cyan, Magenta, Yellow WT Box End Soon Waste toner box Approximate life 2,500 pages 1 2 3 6,000 pages 1 2 4 1,500 pages 1 2 ...1 2 4 50,000 pages 1 How to replace See page 62. See page 85. 1 Letter or A4 size single-sided pages. 2 Approx. cartridge yield is declared in accordance with ISO/IEC 19798. 3 Standard toner cartridge 4 High capacity toner cartridge Order No. Routine maintenance LCD messages Toner Low Prepare New X Toner...
Users Manual - English
Page 97
.... WT-300CL Call your dealer or Brother Customer Service for a replacement laser unit. Call your dealer or Brother Customer Service for a replacement paper feeding kit 1. Call your dealer or Brother Customer Service for a replacement fuser unit. cartridge yield is declared in accordance with ISO...TN-315Y 6 DR-310CL See page 79. Call your dealer or Brother Customer Service for a replacement paper feeding kit MP. 1 Letter or A4 size single-sided pages. 2 Approx. LCD messages Replace Toner Consumable item to replace Toner cartridge Approximate life 2,500 pages 1 2 5 6,000 pages 1 2 ...
.... WT-300CL Call your dealer or Brother Customer Service for a replacement laser unit. Call your dealer or Brother Customer Service for a replacement paper feeding kit 1. Call your dealer or Brother Customer Service for a replacement fuser unit. cartridge yield is declared in accordance with ISO...TN-315Y 6 DR-310CL See page 79. Call your dealer or Brother Customer Service for a replacement paper feeding kit MP. 1 Letter or A4 size single-sided pages. 2 Approx. LCD messages Replace Toner Consumable item to replace Toner cartridge Approximate life 2,500 pages 1 2 5 6,000 pages 1 2 ...
Users Manual - English
Page 98
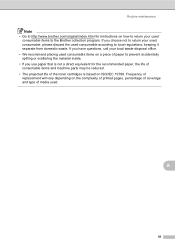
...of media used consumable items to local regulations, keeping it separate from domestic waste. Routine maintenance Note • Go to http://www.brother.com/original/index.html for the recommended paper, the life of consumable items and machine parts may be reduced. • The ...projected life of the toner cartridges is not a direct equivalent for instructions on how to return your used consumable, please discard the used consumable according to the Brother collection program. If you have questions, call your local waste disposal office....
...of media used consumable items to local regulations, keeping it separate from domestic waste. Routine maintenance Note • Go to http://www.brother.com/original/index.html for the recommended paper, the life of consumable items and machine parts may be reduced. • The ...projected life of the toner cartridges is not a direct equivalent for instructions on how to return your used consumable, please discard the used consumable according to the Brother collection program. If you have questions, call your local waste disposal office....
Users Manual - English
Page 99
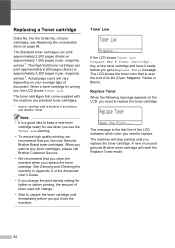
... Toner mode. 62 If the LCD shows Toner Low Prepare New X Toner Cartridge., buy toner cartridges, please call Brother Customer Service. • We recommend that come supplied with ISO/IEC 19798. of toner cartridges, see the Toner Low warning. • To ensure high quality printing,...the machine are standard toner cartridges. 1 Approx. A new or unused genuine Brother toner cartridge will change the print density setting for use only Genuine Brother Brand toner cartridges. For the Order No. Note • It is near the end of document. cartridge yield is running low, ...
... Toner mode. 62 If the LCD shows Toner Low Prepare New X Toner Cartridge., buy toner cartridges, please call Brother Customer Service. • We recommend that come supplied with ISO/IEC 19798. of toner cartridges, see the Toner Low warning. • To ensure high quality printing,...the machine are standard toner cartridges. 1 Approx. A new or unused genuine Brother toner cartridge will change the print density setting for use only Genuine Brother Brand toner cartridges. For the Order No. Note • It is near the end of document. cartridge yield is running low, ...
Users Manual - English
Page 100
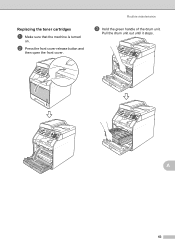
Replacing the toner cartridges A a Make sure that the machine is turned on. Pull the drum unit out until it stops. A 63 Routine maintenance c Hold the green handle of the drum unit. b Press the front cover release button and then open the front cover.
Replacing the toner cartridges A a Make sure that the machine is turned on. Pull the drum unit out until it stops. A 63 Routine maintenance c Hold the green handle of the drum unit. b Press the front cover release button and then open the front cover.


