
Advanced Users Manual - English
Page 85
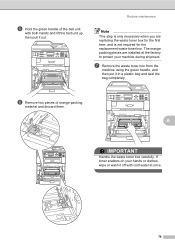
...pull it out. A IMPORTANT Handle the waste toner box carefully. If toner scatters on your machine during shipment. f Remove two pieces of the belt unit with cold water at the factory to protect your hands or clothes, wipe or wash it in a plastic bag and seal the bag completely. e... Hold the green handle of orange packing material and discard them. The orange packing pieces are replacing the waste toner box for the first time, and is not required for the replacement waste toner box. Routine maintenance Note This step is only necessary when you are installed at once. ...
...pull it out. A IMPORTANT Handle the waste toner box carefully. If toner scatters on your machine during shipment. f Remove two pieces of the belt unit with cold water at the factory to protect your hands or clothes, wipe or wash it in a plastic bag and seal the bag completely. e... Hold the green handle of orange packing material and discard them. The orange packing pieces are replacing the waste toner box for the first time, and is not required for the replacement waste toner box. Routine maintenance Note This step is only necessary when you are installed at once. ...
Users Manual - English
Page 30
...the Laser Printer/MFC/Fax machine to Province. BROTHER LASER PRINTER / MULTIFUNCTION CENTER® / FAX ON-SITE LIMITED WARRANTY (Canada Only) For a limited on-site warranty of 1 year labour and parts from the date of purchase, Brother International Corporation (Canada) Ltd. ("Brother"), or its ... This warranty applies only to the Laser Printer/MFC/Fax machine and will void the warranty. This limited Warranty does not include cleaning, consumables (including, without limitation, toner cartridges and drum units, OPC belts, fixing units, print heads, paper feed rollers, transfer rolls,...
...the Laser Printer/MFC/Fax machine to Province. BROTHER LASER PRINTER / MULTIFUNCTION CENTER® / FAX ON-SITE LIMITED WARRANTY (Canada Only) For a limited on-site warranty of 1 year labour and parts from the date of purchase, Brother International Corporation (Canada) Ltd. ("Brother"), or its ... This warranty applies only to the Laser Printer/MFC/Fax machine and will void the warranty. This limited Warranty does not include cleaning, consumables (including, without limitation, toner cartridges and drum units, OPC belts, fixing units, print heads, paper feed rollers, transfer rolls,...
Users Manual - English
Page 34
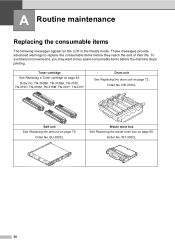
... a document 56 Scanning using the scan key 56 Scanning using a scanner driver 57 A Routine maintenance 58 Replacing the consumable items 58 Replacing a Toner cartridge 62 Cleaning the corona wires 68 Replacing the drum unit 72 Replacing the belt unit 79 Replacing the waste toner box 85 B Troubleshooting 92 Error and maintenance messages 92 Transferring your faxes or Fax...
... a document 56 Scanning using the scan key 56 Scanning using a scanner driver 57 A Routine maintenance 58 Replacing the consumable items 58 Replacing a Toner cartridge 62 Cleaning the corona wires 68 Replacing the drum unit 72 Replacing the belt unit 79 Replacing the waste toner box 85 B Troubleshooting 92 Error and maintenance messages 92 Transferring your faxes or Fax...
Users Manual - English
Page 95
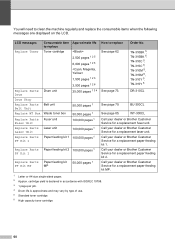
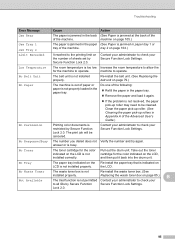
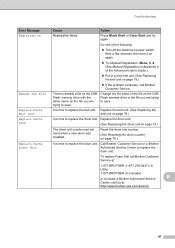
..., you may want to replace the consumable items before the machine stops printing. These messages provide advanced warnings to buy spare consumable items before they reach the end of their life. Order No. Order No. DR-310CL Belt unit See Replacing the belt unit on page 85. BU-300CL... Waste toner box See Replacing the waste toner box on page 79. Order No. A Routine maintenance A Replacing the consumable items A The following messages appear on page 72. Order...
..., you may want to replace the consumable items before the machine stops printing. These messages provide advanced warnings to buy spare consumable items before they reach the end of their life. Order No. Order No. DR-310CL Belt unit See Replacing the belt unit on page 85. BU-300CL... Waste toner box See Replacing the waste toner box on page 79. Order No. A Routine maintenance A Replacing the consumable items A The following messages appear on page 72. Order...
Users Manual - English
Page 97
...Replace Parts Drum unit Drum 3,500 pages 1 2 6 25,000 pages 1 3 4 Drum Stop Replace Parts Belt Unit Replace WT Box Belt unit Waste toner box 50,000 pages 1 50,000 pages 1 Replace Parts Fuser Unit Replace Parts Laser Unit Replace Parts PF Kit 1 Fuser unit 100,000 pages 1 Laser unit ...replace See page 62. Call your dealer or Brother Customer Service for a replacement laser unit. BU-300CL See page 85. See page 73. Order No. WT-300CL Call your dealer or Brother Customer Service for a replacement paper feeding kit 1. Call your dealer or Brother Customer Service for a replacement...
...Replace Parts Drum unit Drum 3,500 pages 1 2 6 25,000 pages 1 3 4 Drum Stop Replace Parts Belt Unit Replace WT Box Belt unit Waste toner box 50,000 pages 1 50,000 pages 1 Replace Parts Fuser Unit Replace Parts Laser Unit Replace Parts PF Kit 1 Fuser unit 100,000 pages 1 Laser unit ...replace See page 62. Call your dealer or Brother Customer Service for a replacement laser unit. BU-300CL See page 85. See page 73. Order No. WT-300CL Call your dealer or Brother Customer Service for a replacement paper feeding kit 1. Call your dealer or Brother Customer Service for a replacement...
Users Manual - English
Page 116
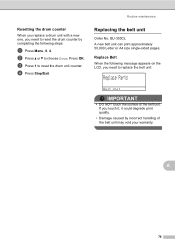
... maintenance Resetting the drum counter A When you replace a drum unit with a new one, you need to replace the belt unit: Replace Parts Belt Unit IMPORTANT • DO NOT touch the surface of the belt unit may void your warranty. b Press a or b to reset the drum unit counter. c Press 1 to choose Drum. A 79 Replace Belt A When the following steps: a Press Menu, 8, 4. Replacing the belt unit A Order No.
... maintenance Resetting the drum counter A When you replace a drum unit with a new one, you need to replace the belt unit: Replace Parts Belt Unit IMPORTANT • DO NOT touch the surface of the belt unit may void your warranty. b Press a or b to reset the drum unit counter. c Press 1 to choose Drum. A 79 Replace Belt A When the following steps: a Press Menu, 8, 4. Replacing the belt unit A Order No.
Users Manual - English
Page 121
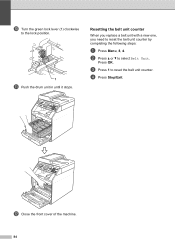
Resetting the belt unit counter A When you replace a belt unit with a new one, you need to select Belt Unit. Press OK. d Press Stop/Exit. l Close the front cover of the machine. 84 b Press a or b to reset the belt unit counter by completing the following steps: a Press Menu, 8, 4. c Press 1 to the lock position. 1 k Push the drum unit in until it stops. j Turn the green lock lever (1) clockwise to reset the belt unit counter.
Resetting the belt unit counter A When you replace a belt unit with a new one, you need to select Belt Unit. Press OK. d Press Stop/Exit. l Close the front cover of the machine. 84 b Press a or b to reset the belt unit counter by completing the following steps: a Press Menu, 8, 4. c Press 1 to the lock position. 1 k Push the drum unit in until it stops. j Turn the green lock lever (1) clockwise to reset the belt unit counter.

Users Manual - English
Page 129
...and try it on again. Put in a new drum unit. (See Replacing the drum unit on page 73.) Put in a new belt unit. (See Replacing the belt unit on page 79.) Put in a waste toner box. (See Replacing the waste toner box on the LCD, then re-install the toner ...cartridge in the drum unit. You can correct most common error and maintenance messages are shown below. If the problem continues, call Brother ...
...and try it on again. Put in a new drum unit. (See Replacing the drum unit on page 73.) Put in a new belt unit. (See Replacing the belt unit on page 79.) Put in a waste toner box. (See Replacing the waste toner box on the LCD, then re-install the toner ...cartridge in the drum unit. You can correct most common error and maintenance messages are shown below. If the problem continues, call Brother ...
Users Manual - English
Page 132
... to operate. answer or is not permitted Contact your administrator to check your to all IDs by Secure Function Secure Function Lock Settings. Replacing the waste toner box on page 104.) Limit Exceeded It reached to check your Secure Function Lock Settings. tray 2 on page 85.)...No Permission Printing color documents is too low Increase the room temperature to allow the for the machine to operate. Re-install the belt unit. (See Replacing the belt unit on the number of sheets set by Secure Function Lock 2.0. The print job will be cleaned. No Waste Toner Not Available ...
... to operate. answer or is not permitted Contact your administrator to check your to all IDs by Secure Function Secure Function Lock Settings. Replacing the waste toner box on page 104.) Limit Exceeded It reached to check your Secure Function Lock Settings. tray 2 on page 85.)...No Permission Printing color documents is too low Increase the room temperature to allow the for the machine to operate. Re-install the belt unit. (See Replacing the belt unit on the number of sheets set by Secure Function Lock 2.0. The print job will be cleaned. No Waste Toner Not Available ...
Users Manual - English
Page 134
.... Rename the File There is already a file on page 79.) Replace Parts Fuser Unit It is time to replace the fuser unit. Replace Parts Belt Unit It is time to replace the drum unit. Call Brother Customer Service or a Brother Authorized Service Center to replace the belt unit. Replace the drum unit. (See Replacing the drum unit on the USB Flash memory drive or the file you are...
.... Rename the File There is already a file on page 79.) Replace Parts Fuser Unit It is time to replace the fuser unit. Replace Parts Belt Unit It is time to replace the drum unit. Call Brother Customer Service or a Brother Authorized Service Center to replace the belt unit. Replace the drum unit. (See Replacing the drum unit on the USB Flash memory drive or the file you are...
Users Manual - English
Page 161
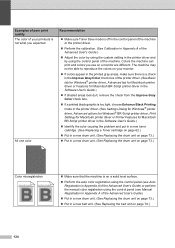
... is not what you see Manual Registration in Appendix A of the Advanced User's Guide). Put in a new drum unit. (See Replacing the drum unit on page 73.) Put in a new belt unit. (See Replacing the belt unit on page 73.) Color misregistration ABCDEFGHIJKLMNOPQRSTUVWXYZ. 0123456789. ABCDEFGHIJKLMNOPQRSTUVWXYZ. 0123456789. ABCDEFGHIJKLMNOPQRSTUVWXYZ. 0123456789. ABCDEFGHIJKLMNOPQRSTUVWXYZ. 0123456789. ABCDEFGHIJKLMNOPQRSTUVWXYZ. 0123456789. abcdefghijklmnopqrstuvwxyz. ABCDEFGHIJKLMNOPQRSTUVWXYZ. 0123456789. abcdefghijklmnopqrstuvwxyz...
... is not what you see Manual Registration in Appendix A of the Advanced User's Guide). Put in a new drum unit. (See Replacing the drum unit on page 73.) Put in a new belt unit. (See Replacing the belt unit on page 73.) Color misregistration ABCDEFGHIJKLMNOPQRSTUVWXYZ. 0123456789. ABCDEFGHIJKLMNOPQRSTUVWXYZ. 0123456789. ABCDEFGHIJKLMNOPQRSTUVWXYZ. 0123456789. ABCDEFGHIJKLMNOPQRSTUVWXYZ. 0123456789. ABCDEFGHIJKLMNOPQRSTUVWXYZ. 0123456789. abcdefghijklmnopqrstuvwxyz. ABCDEFGHIJKLMNOPQRSTUVWXYZ. 0123456789. abcdefghijklmnopqrstuvwxyz...
Users Manual - English
Page 209
Automatic fax receive 34 easy receive 36 fax redial 46 B Belt unit replacing 79 Brother accessories and supplies ii Brother numbers i Customer Service i FAQs (frequently asked questions) ..........i product support i service centers i warranties iv, v, vii C Cleaning corona wires 68 Connecting external TAD (answering machine) .......40... specification 167 Distinctive ring 38 choosing ring pattern 39 setting ring pattern 39 turning off 40 Document how to load 26, 27 Drum unit cleaning 68 replacing 72 E Envelopes 14, 21, 22, 24 Equalization 120 Error messages on LCD 92 Comm.
Automatic fax receive 34 easy receive 36 fax redial 46 B Belt unit replacing 79 Brother accessories and supplies ii Brother numbers i Customer Service i FAQs (frequently asked questions) ..........i product support i service centers i warranties iv, v, vii C Cleaning corona wires 68 Connecting external TAD (answering machine) .......40... specification 167 Distinctive ring 38 choosing ring pattern 39 setting ring pattern 39 turning off 40 Document how to load 26, 27 Drum unit cleaning 68 replacing 72 E Envelopes 14, 21, 22, 24 Equalization 120 Error messages on LCD 92 Comm.

Users Manual - English
Page 210
... 6, 130 E M Machine information how to reset the machine 129 reset functions 128 serial number 128 status LED 9 Macintosh See Software User's Guide. Maintenance, routine replacing belt unit 79 drum unit 72 toner cartridge 62 waste toner box 85 Manual dialing 45 receive 32, 34 Menu Table 131 Mode, entering copy 51 fax 28 scan...
... 6, 130 E M Machine information how to reset the machine 129 reset functions 128 serial number 128 status LED 9 Macintosh See Software User's Guide. Maintenance, routine replacing belt unit 79 drum unit 72 toner cartridge 62 waste toner box 85 Manual dialing 45 receive 32, 34 Menu Table 131 Mode, entering copy 51 fax 28 scan...
Users Manual - English
Page 211
... 47 setting up 47 using 45 search 46 speed dial changing 48 custom scan profile 48 setting up 48 using 45 Status LED 9 174 Replacing belt unit 79 drum unit 72 toner cartridge 62 waste toner box 85 Reports Transmission Verification 30 Resolution copy 163 fax (standard, fine, superfine, photo 162 print 165 scan...
... 47 setting up 47 using 45 search 46 speed dial changing 48 custom scan profile 48 setting up 48 using 45 Status LED 9 174 Replacing belt unit 79 drum unit 72 toner cartridge 62 waste toner box 85 Reports Transmission Verification 30 Resolution copy 163 fax (standard, fine, superfine, photo 162 print 165 scan...
Users Manual - English
Page 299
... e Hold the green handle of orange packing material and discard them. Routine maintenance Note This step is not required for the replacement waste toner box. f Remove two pieces of the belt unit with cold water at the factory to protect your hands or clothes, wipe or wash it off with both hands and... lift the belt unit up, then pull it in a plastic bag and seal the bag completely. A IMPORTANT Handle the waste toner box carefully. g Remove the waste toner box from ...
... e Hold the green handle of orange packing material and discard them. Routine maintenance Note This step is not required for the replacement waste toner box. f Remove two pieces of the belt unit with cold water at the factory to protect your hands or clothes, wipe or wash it off with both hands and... lift the belt unit up, then pull it in a plastic bag and seal the bag completely. A IMPORTANT Handle the waste toner box carefully. g Remove the waste toner box from ...
Quick Setup Guide - English
Page 37
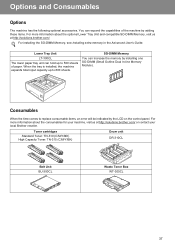
... to replace consumable items, an error will be indicated by installing one SO-DIMM (Small Outline Dual In-line Memory Module). Lower Tray Unit LT-300CL The lower paper tray unit can...Unit and compatible SO-DIMM Memory, visit us at http://solutions.brother.com/. For more information about the consumables for your machine, visit us at http://solutions.brother.com/ or contact your local Brother...310 (C/M/Y/BK) High Capacity Toner: TN-315 (C/M/Y/BK) Drum unit DR-310CL Belt Unit BU-300CL Waste Toner Box WT-300CL 37 Options and Consumables Options The machine has the...
... to replace consumable items, an error will be indicated by installing one SO-DIMM (Small Outline Dual In-line Memory Module). Lower Tray Unit LT-300CL The lower paper tray unit can...Unit and compatible SO-DIMM Memory, visit us at http://solutions.brother.com/. For more information about the consumables for your machine, visit us at http://solutions.brother.com/ or contact your local Brother...310 (C/M/Y/BK) High Capacity Toner: TN-315 (C/M/Y/BK) Drum unit DR-310CL Belt Unit BU-300CL Waste Toner Box WT-300CL 37 Options and Consumables Options The machine has the...


