
Advanced Users Manual - English
Page 5
... 55 Cleaning the outside of the machine 55 Cleaning the scanner 56 Cleaning the laser scanner windows 57 Cleaning the corona wires 61 Cleaning the drum unit 65 Cleaning the paper pick-up rollers 71 Calibration ...72 Auto Registration 73 Manual Registration 73 Frequency (Color Correction 74 Checking the Page Counters 74...
... 55 Cleaning the outside of the machine 55 Cleaning the scanner 56 Cleaning the laser scanner windows 57 Cleaning the corona wires 61 Cleaning the drum unit 65 Cleaning the paper pick-up rollers 71 Calibration ...72 Auto Registration 73 Manual Registration 73 Frequency (Color Correction 74 Checking the Page Counters 74...
Advanced Users Manual - English
Page 61
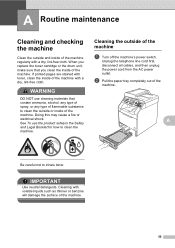
b Pull the paper tray completely out of the machine. 55 A Be careful not to clean the machine. When you replace the toner cartridge or the drum unit, make sure that contain ammonia, alcohol, any type of spray, or any type of flammable substance to clean the outside of the machine A a Turn off ...
b Pull the paper tray completely out of the machine. 55 A Be careful not to clean the machine. When you replace the toner cartridge or the drum unit, make sure that contain ammonia, alcohol, any type of spray, or any type of flammable substance to clean the outside of the machine A a Turn off ...

Advanced Users Manual - English
Page 64
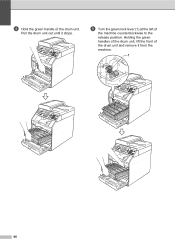
Pull the drum unit out until it from the machine. 1 58 Holding the green handles of the drum unit, lift the front of the drum unit. c Hold the green handle of the drum unit and remove it stops. d Turn the green lock lever (1) at the left of the machine counterclockwise to the release position.
Pull the drum unit out until it from the machine. 1 58 Holding the green handles of the drum unit, lift the front of the drum unit. c Hold the green handle of the drum unit and remove it stops. d Turn the green lock lever (1) at the left of the machine counterclockwise to the release position.
Advanced Users Manual - English
Page 65
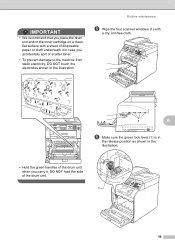
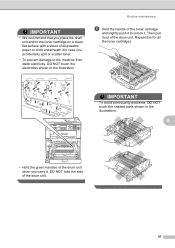
DO NOT hold the side of disposable paper or cloth underneath it . IMPORTANT • We recommend that you place the drum unit and/or the toner cartridge on a clean, flat surface with a dry, lint-free cloth. 1 A f Make sure the green lock lever (1) is in the release position ...as shown in the illustration. • Hold the green handles of the drum unit when you accidentally spill or scatter toner. • To prevent damage to the machine from static electricity, DO NOT touch the electrodes shown in case...
DO NOT hold the side of disposable paper or cloth underneath it . IMPORTANT • We recommend that you place the drum unit and/or the toner cartridge on a clean, flat surface with a dry, lint-free cloth. 1 A f Make sure the green lock lever (1) is in the release position ...as shown in the illustration. • Hold the green handles of the drum unit when you accidentally spill or scatter toner. • To prevent damage to the machine from static electricity, DO NOT touch the electrodes shown in case...
Advanced Users Manual - English
Page 66
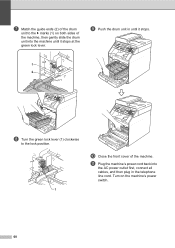
Turn on both sides of the machine. g Match the guide ends (2) of the drum unit to the lock position. 1 j Close the front cover of the machine, then gently slide the drum unit into the AC power outlet first, connect all cables, and then plug in the telephone line cord. k Plug the machine's power cord back into the machine until it stops. 1 2 h Turn the green lock lever (1) clockwise to the c marks (1) on the machine's power switch. 60 i Push the drum unit in until it stops at the green lock lever.
Turn on both sides of the machine. g Match the guide ends (2) of the drum unit to the lock position. 1 j Close the front cover of the machine, then gently slide the drum unit into the AC power outlet first, connect all cables, and then plug in the telephone line cord. k Plug the machine's power cord back into the machine until it stops. 1 2 h Turn the green lock lever (1) clockwise to the c marks (1) on the machine's power switch. 60 i Push the drum unit in until it stops at the green lock lever.
Advanced Users Manual - English
Page 67
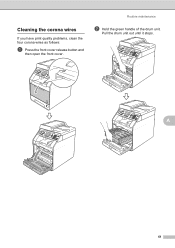
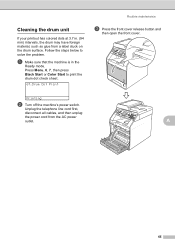
A 61 Cleaning the corona wires A If you have print quality problems, clean the four corona wires as follows: a Press the front cover release button and then open the front cover. Routine maintenance b Hold the green handle of the drum unit. Pull the drum unit out until it stops.
A 61 Cleaning the corona wires A If you have print quality problems, clean the four corona wires as follows: a Press the front cover release button and then open the front cover. Routine maintenance b Hold the green handle of the drum unit. Pull the drum unit out until it stops.
Advanced Users Manual - English
Page 68
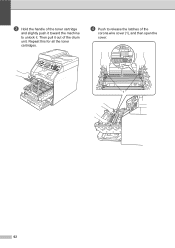
d Push to unlock it. Repeat this for all the toner cartridges. Then pull it out of the corona wire cover (1), and then open the cover. 1 62 c Hold the handle of the toner cartridge and slightly push it toward the machine to release the latches of the drum unit.
d Push to unlock it. Repeat this for all the toner cartridges. Then pull it out of the corona wire cover (1), and then open the cover. 1 62 c Hold the handle of the toner cartridge and slightly push it toward the machine to release the latches of the drum unit.
Advanced Users Manual - English
Page 69
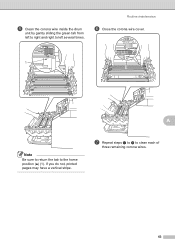
Routine maintenance f Close the corona wire cover. 1 A Note Be sure to return the tab to clean each of three remaining corona wires. 63 If you do not, printed pages may have a vertical stripe. g Repeat steps d to f to the home position (a) (1). e Clean the corona wire inside the drum unit by gently sliding the green tab from left to right and right to left several times.
Routine maintenance f Close the corona wire cover. 1 A Note Be sure to return the tab to clean each of three remaining corona wires. 63 If you do not, printed pages may have a vertical stripe. g Repeat steps d to f to the home position (a) (1). e Clean the corona wire inside the drum unit by gently sliding the green tab from left to right and right to left several times.
Advanced Users Manual - English
Page 70
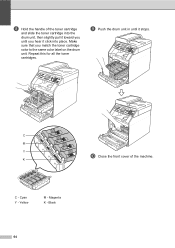
C M Y j Close the front cover of the toner cartridge and slide the toner cartridge into place. K C - Cyan Y - Yellow M - Magenta K - h Hold the handle of the machine. i Push the drum unit in until it click into the drum unit, then slightly pull it toward you until you match the toner cartridge color to the same color label on the drum unit. Black 64 Make sure that you hear it stops. Repeat this for all the toner cartridges.
C M Y j Close the front cover of the toner cartridge and slide the toner cartridge into place. K C - Cyan Y - Yellow M - Magenta K - h Hold the handle of the machine. i Push the drum unit in until it click into the drum unit, then slightly pull it toward you until you match the toner cartridge color to the same color label on the drum unit. Black 64 Make sure that you hear it stops. Repeat this for all the toner cartridges.
Advanced Users Manual - English
Page 71
... Start to solve the problem. a Make sure that the machine is in . (94 mm) intervals, the drum may have foreign material, such as glue from the AC power outlet. Cleaning the drum unit A If your printout has colored dots at 3.7 in the Ready mode. Follow the steps below to print the... drum dot check sheet. 67.Drum Dot Print Routine maintenance c Press the front cover release button and then open...
... Start to solve the problem. a Make sure that the machine is in . (94 mm) intervals, the drum may have foreign material, such as glue from the AC power outlet. Cleaning the drum unit A If your printout has colored dots at 3.7 in the Ready mode. Follow the steps below to print the... drum dot check sheet. 67.Drum Dot Print Routine maintenance c Press the front cover release button and then open...
Advanced Users Manual - English
Page 72
e Turn the green lock lever (1) at the left of the drum unit. Pull the drum unit out until it from the machine. 1 66 Holding the green handles of the drum unit, lift the front of the drum unit and remove it stops. d Hold the green handle of the machine counterclockwise to the release position.
e Turn the green lock lever (1) at the left of the drum unit. Pull the drum unit out until it from the machine. 1 66 Holding the green handles of the drum unit, lift the front of the drum unit and remove it stops. d Hold the green handle of the machine counterclockwise to the release position.
Advanced Users Manual - English
Page 73
...8226; To prevent damage to unlock it. IMPORTANT • We recommend that you place the drum unit and/or the toner cartridge on a clean, flat surface with a sheet of the drum unit. Routine maintenance f Hold the handle of the drum unit. 67 IMPORTANT To avoid print quality problems, DO NOT touch the shaded parts shown in... side of the toner cartridge and slightly push it . Repeat this for all the toner cartridges. A • Hold the green handles of the drum unit when you carry it to the machine from static electricity, DO NOT touch the electrodes shown in the illustrations.
...8226; To prevent damage to unlock it. IMPORTANT • We recommend that you place the drum unit and/or the toner cartridge on a clean, flat surface with a sheet of the drum unit. Routine maintenance f Hold the handle of the drum unit. 67 IMPORTANT To avoid print quality problems, DO NOT touch the shaded parts shown in... side of the toner cartridge and slightly push it . Repeat this for all the toner cartridges. A • Hold the green handles of the drum unit when you carry it to the machine from static electricity, DO NOT touch the electrodes shown in the illustrations.
Advanced Users Manual - English
Page 74
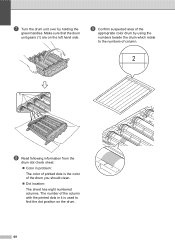
i Confirm suspected area of the appropriate color drum by holding the green handles. g Turn the drum unit over by using the numbers beside the drum which relate to find the dot position on the left hand side. Make sure that the drum unit gears (1) are on the drum. 68 The number of the column with the printed dots in it is used to the numbers of column. 1 h Read following information from the drum dot check sheet. Color in problem: The color of printed dots is the color of the drum you should clean. Dot location: The sheet has eight numbered columns.
i Confirm suspected area of the appropriate color drum by holding the green handles. g Turn the drum unit over by using the numbers beside the drum which relate to find the dot position on the left hand side. Make sure that the drum unit gears (1) are on the drum. 68 The number of the column with the printed dots in it is used to the numbers of column. 1 h Read following information from the drum dot check sheet. Color in problem: The color of printed dots is the color of the drum you should clean. Dot location: The sheet has eight numbered columns.

Advanced Users Manual - English
Page 75
... off. C A k When you hear it click into the drum unit, then slightly pull it toward you match the toner cartridge color to the same color label on the drum that you by holding the green handles. l Turn the drum unit over by hand while looking at the surface of the photosensitive... drum with a cotton swab until you have found the mark on the drum unit. C - Yellow M - K IMPORTANT DO NOT ...
... off. C A k When you hear it click into the drum unit, then slightly pull it toward you match the toner cartridge color to the same color label on the drum that you by holding the green handles. l Turn the drum unit over by hand while looking at the surface of the photosensitive... drum with a cotton swab until you have found the mark on the drum unit. C - Yellow M - K IMPORTANT DO NOT ...
Advanced Users Manual - English
Page 76
o Match the guide ends (2) of the drum unit to the lock position. 1 1 q Push the drum unit in the illustration. n Make sure the green lock lever (1) is in the release position as shown in until it stops at the green lock lever. 1 2 r Close the front cover of the machine, then gently slide the drum unit into the machine until it stops. p Turn the green lock lever (1) clockwise to the c marks (1) on both sides of the machine. 70
o Match the guide ends (2) of the drum unit to the lock position. 1 1 q Push the drum unit in the illustration. n Make sure the green lock lever (1) is in the release position as shown in until it stops at the green lock lever. 1 2 r Close the front cover of the machine, then gently slide the drum unit into the machine until it stops. p Turn the green lock lever (1) clockwise to the c marks (1) on both sides of the machine. 70
Advanced Users Manual - English
Page 82
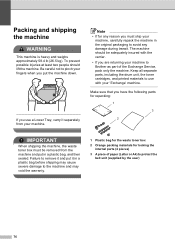
... Brother as part of paper (Letter or A4) to protect the belt unit (supplied by the user) 76 Make sure that you have the following parts for repacking: 1 3 2 IMPORTANT When shipping the machine, the waste toner box must ship your 'Exchange' machine. Note • If for locking the internal... sealed. Failure to avoid any reason you are returning your machine. The machine should lift the machine. Keep all separate parts, including the drum unit, the toner cartridges, and printed materials to the machine and may void the warranty. 1 Plastic bag for the waste toner box 2 Orange...
... Brother as part of paper (Letter or A4) to protect the belt unit (supplied by the user) 76 Make sure that you have the following parts for repacking: 1 3 2 IMPORTANT When shipping the machine, the waste toner box must ship your 'Exchange' machine. Note • If for locking the internal... sealed. Failure to avoid any reason you are returning your machine. The machine should lift the machine. Keep all separate parts, including the drum unit, the toner cartridges, and printed materials to the machine and may void the warranty. 1 Plastic bag for the waste toner box 2 Orange...
Advanced Users Manual - English
Page 83
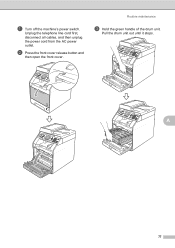
A 77 Routine maintenance c Hold the green handle of the drum unit. Unplug the telephone line cord first, disconnect all cables, and then unplug the power cord from the AC power outlet. b Press the front cover release button and then open the front cover. Pull the drum unit out until it stops. a Turn off the machine's power switch.
A 77 Routine maintenance c Hold the green handle of the drum unit. Unplug the telephone line cord first, disconnect all cables, and then unplug the power cord from the AC power outlet. b Press the front cover release button and then open the front cover. Pull the drum unit out until it stops. a Turn off the machine's power switch.
Advanced Users Manual - English
Page 84
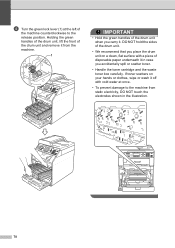
...machine from the machine. 1 IMPORTANT • Hold the green handles of the drum unit when you carry it in case you place the drum unit on your hands or clothes, wipe or wash it off with a piece of the drum unit and remove it from static electricity, DO NOT touch the electrodes shown in the... illustration. 78 Holding the green handles of the drum unit, lift the front of disposable paper...
...machine from the machine. 1 IMPORTANT • Hold the green handles of the drum unit when you carry it in case you place the drum unit on your hands or clothes, wipe or wash it off with a piece of the drum unit and remove it from static electricity, DO NOT touch the electrodes shown in the... illustration. 78 Holding the green handles of the drum unit, lift the front of disposable paper...
Advanced Users Manual - English
Page 86
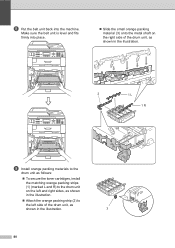
...metal shaft on the right side of the drum unit, as shown in the illustration. 2 1 L 1 R i Install orange packing materials to the drum unit as follows: To secure the toner cartridges, install the matching orange packing strips (1) (marked L and R) to the drum unit on the left and right sides, as shown... in the illustration. Attach the orange packing strip (2) to the left side of the drum unit, as shown in the illustration. 3 80 Make sure the belt unit is level and fits firmly into the ...
...metal shaft on the right side of the drum unit, as shown in the illustration. 2 1 L 1 R i Install orange packing materials to the drum unit as follows: To secure the toner cartridges, install the matching orange packing strips (1) (marked L and R) to the drum unit on the left and right sides, as shown... in the illustration. Attach the orange packing strip (2) to the left side of the drum unit, as shown in the illustration. 3 80 Make sure the belt unit is level and fits firmly into the ...

Advanced Users Manual - English
Page 87
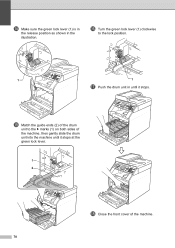
A m Turn the green lock lever (1) clockwise to the belt unit. Routine maintenance l Match the guide ends (2) of the drum unit to the c marks (1) on both sides of paper (Letter or A4) on the belt unit to prevent damage to the lock position. 1 1 81 j Put a piece of the machine, then gently slide the drum unit into the machine until it stops at the green lock lever. 1 2 k Make sure the green lock lever (1) is in the release position as shown in the illustration.
A m Turn the green lock lever (1) clockwise to the belt unit. Routine maintenance l Match the guide ends (2) of the drum unit to the c marks (1) on both sides of paper (Letter or A4) on the belt unit to prevent damage to the lock position. 1 1 81 j Put a piece of the machine, then gently slide the drum unit into the machine until it stops at the green lock lever. 1 2 k Make sure the green lock lever (1) is in the release position as shown in the illustration.


