
Advanced Users Manual - English
Page 5
... flip 51 Advanced Duplex Copy (short edge flip 53 A Routine maintenance 55 Cleaning and checking the machine 55 Cleaning the outside of the machine 55 Cleaning the scanner 56 Cleaning the laser scanner windows 57 Cleaning the corona wires 61 Cleaning the drum unit 65 Cleaning the paper pick-up rollers 71 Calibration ...72 Auto Registration 73 Manual...
... flip 51 Advanced Duplex Copy (short edge flip 53 A Routine maintenance 55 Cleaning and checking the machine 55 Cleaning the outside of the machine 55 Cleaning the scanner 56 Cleaning the laser scanner windows 57 Cleaning the corona wires 61 Cleaning the drum unit 65 Cleaning the paper pick-up rollers 71 Calibration ...72 Auto Registration 73 Manual...
Advanced Users Manual - English
Page 61
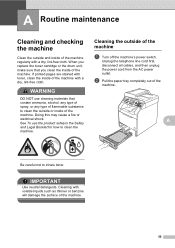
...lint-free cloth. A Routine maintenance A Cleaning and checking the machine A Clean the outside and inside of the machine regularly with volatile liquids such as thinner or benzine will damage the surface of the machine. 55 When you replace the toner cartridge or the drum unit, make sure that contain ammonia, ...alcohol, any type of spray, or any type of flammable substance to inhale toner. If printed pages are stained with toner, clean the inside of the machine with a dry, lint-free ...
...lint-free cloth. A Routine maintenance A Cleaning and checking the machine A Clean the outside and inside of the machine regularly with volatile liquids such as thinner or benzine will damage the surface of the machine. 55 When you replace the toner cartridge or the drum unit, make sure that contain ammonia, ...alcohol, any type of spray, or any type of flammable substance to inhale toner. If printed pages are stained with toner, clean the inside of the machine with a dry, lint-free ...
Advanced Users Manual - English
Page 65
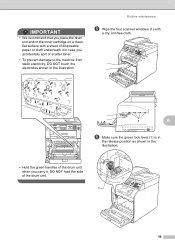
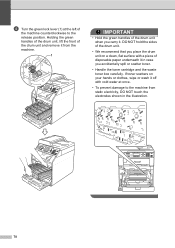
... shown in the illustration. • Hold the green handles of the drum unit. 1 59 DO NOT hold the side of the drum unit when you carry it. IMPORTANT • We recommend that you place the drum unit and/or the toner cartridge on a clean, flat surface with a dry, lint-free cloth. 1 A f Make sure the...
... shown in the illustration. • Hold the green handles of the drum unit. 1 59 DO NOT hold the side of the drum unit when you carry it. IMPORTANT • We recommend that you place the drum unit and/or the toner cartridge on a clean, flat surface with a dry, lint-free cloth. 1 A f Make sure the...
Advanced Users Manual - English
Page 67
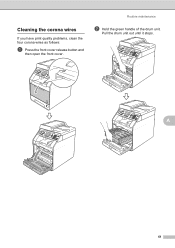
Pull the drum unit out until it stops. A 61 Cleaning the corona wires A If you have print quality problems, clean the four corona wires as follows: a Press the front cover release button and then open the front cover. Routine maintenance b Hold the green handle of the drum unit.
Pull the drum unit out until it stops. A 61 Cleaning the corona wires A If you have print quality problems, clean the four corona wires as follows: a Press the front cover release button and then open the front cover. Routine maintenance b Hold the green handle of the drum unit.
Advanced Users Manual - English
Page 69
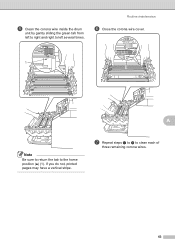
e Clean the corona wire inside the drum unit by gently sliding the green tab from left to right and right to clean each of three remaining corona wires. 63 If you do not, printed pages may have a vertical stripe. g Repeat steps d to f to left several times. Routine maintenance f Close the corona wire cover. 1 A Note Be sure to return the tab to the home position (a) (1).
e Clean the corona wire inside the drum unit by gently sliding the green tab from left to right and right to clean each of three remaining corona wires. 63 If you do not, printed pages may have a vertical stripe. g Repeat steps d to f to left several times. Routine maintenance f Close the corona wire cover. 1 A Note Be sure to return the tab to the home position (a) (1).
Advanced Users Manual - English
Page 71
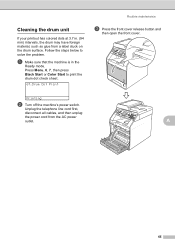
... Start or Color Start to solve the problem. Cleaning the drum unit A If your printout has colored dots at 3.7 in the Ready mode. Printing b Turn off the machine's power switch. A 65 a Make sure that the machine is in . (94 mm) intervals, the drum may have foreign material, such as glue from ...the AC power outlet. Follow the steps below to print the drum dot check sheet. 67.Drum Dot Print Routine maintenance c Press the front cover release button and then open the front cover. Unplug the telephone line cord first, disconnect all ...
... Start or Color Start to solve the problem. Cleaning the drum unit A If your printout has colored dots at 3.7 in the Ready mode. Printing b Turn off the machine's power switch. A 65 a Make sure that the machine is in . (94 mm) intervals, the drum may have foreign material, such as glue from ...the AC power outlet. Follow the steps below to print the drum dot check sheet. 67.Drum Dot Print Routine maintenance c Press the front cover release button and then open the front cover. Unplug the telephone line cord first, disconnect all ...
Advanced Users Manual - English
Page 73
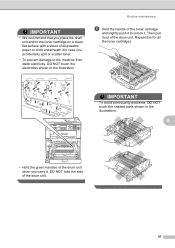
..., DO NOT touch the shaded parts shown in the illustration. Repeat this for all the toner cartridges. A • Hold the green handles of the drum unit when you accidentally spill or scatter toner. • To prevent damage to unlock it. IMPORTANT • We recommend that you place the... drum unit and/or the toner cartridge on a clean, flat surface with a sheet of disposable paper or cloth underneath it in case you carry it out of the drum unit. DO NOT hold the side of the toner cartridge and slightly...
..., DO NOT touch the shaded parts shown in the illustration. Repeat this for all the toner cartridges. A • Hold the green handles of the drum unit when you accidentally spill or scatter toner. • To prevent damage to unlock it. IMPORTANT • We recommend that you place the... drum unit and/or the toner cartridge on a clean, flat surface with a sheet of disposable paper or cloth underneath it in case you carry it out of the drum unit. DO NOT hold the side of the toner cartridge and slightly...
Advanced Users Manual - English
Page 74
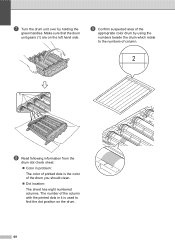
g Turn the drum unit over by using the numbers beside the drum which relate to find the dot position on the left hand side. The number of the column with the printed dots in problem: The color of printed dots is the color of column. 1 h Read following information from the drum dot check sheet. Color in it is used to the numbers of the drum you should clean. Dot location: The sheet has eight numbered columns. i Confirm suspected area of the appropriate color drum by holding the green handles. Make sure that the drum unit gears (1) are on the drum. 68
g Turn the drum unit over by using the numbers beside the drum which relate to find the dot position on the left hand side. The number of the column with the printed dots in problem: The color of printed dots is the color of column. 1 h Read following information from the drum dot check sheet. Color in it is used to the numbers of the drum you should clean. Dot location: The sheet has eight numbered columns. i Confirm suspected area of the appropriate color drum by holding the green handles. Make sure that the drum unit gears (1) are on the drum. 68

Advanced Users Manual - English
Page 75
... gear toward you until you have found the mark on the drum that you by holding the green handles. Make sure that matches the drum dot check M sheet, wipe the surface of the suspected area. K IMPORTANT DO NOT clean the surface of the toner cartridge and slide the toner cartridge into ...place. Black 69 C A k When you hear it click into the drum unit, then slightly pull it toward you match the toner cartridge color to the ...
... gear toward you until you have found the mark on the drum that you by holding the green handles. Make sure that matches the drum dot check M sheet, wipe the surface of the suspected area. K IMPORTANT DO NOT clean the surface of the toner cartridge and slide the toner cartridge into ...place. Black 69 C A k When you hear it click into the drum unit, then slightly pull it toward you match the toner cartridge color to the ...
Advanced Users Manual - English
Page 84
...wipe or wash it . Holding the green handles of the drum unit, lift the front of the drum unit and remove it from static electricity, DO NOT touch the electrodes shown in the illustration. 78 If toner scatters on a clean, flat surface with cold water at the left of disposable paper... underneath it in case you carry it off with a piece of the machine counterclockwise to the machine from the machine. 1 IMPORTANT • Hold the green handles of the drum unit when you accidentally spill...
...wipe or wash it . Holding the green handles of the drum unit, lift the front of the drum unit and remove it from static electricity, DO NOT touch the electrodes shown in the illustration. 78 If toner scatters on a clean, flat surface with cold water at the left of disposable paper... underneath it in case you carry it off with a piece of the machine counterclockwise to the machine from the machine. 1 IMPORTANT • Hold the green handles of the drum unit when you accidentally spill...
Advanced Users Manual - English
Page 98
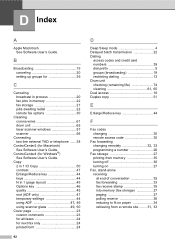
... 47 Enlarge/Reduce key 44 keys 44 N in memory 22 fax storage 27 jobs awaiting redial 22 remote fax options 30 Cleaning corona wires 61 drum unit 65 laser scanner windows 57 scanner 56 Connecting two-line external TAD or telephone .......38 ControlCenter2 (for Macintosh) See Software... Delayed batch transmission 22 Dialing access codes and credit card numbers 39 dial prefix 5 groups (broadcasting 19 restricting dialing 13 Drum unit checking (remaining life 74 cleaning 61, 65 Dual access 18 Duplex copy 51 E Enlarge/Reduce key 44 F Fax codes changing 30 remote access code 30...
... 47 Enlarge/Reduce key 44 keys 44 N in memory 22 fax storage 27 jobs awaiting redial 22 remote fax options 30 Cleaning corona wires 61 drum unit 65 laser scanner windows 57 scanner 56 Connecting two-line external TAD or telephone .......38 ControlCenter2 (for Macintosh) See Software... Delayed batch transmission 22 Dialing access codes and credit card numbers 39 dial prefix 5 groups (broadcasting 19 restricting dialing 13 Drum unit checking (remaining life 74 cleaning 61, 65 Dual access 18 Duplex copy 51 E Enlarge/Reduce key 44 F Fax codes changing 30 remote access code 30...
Users Manual - English
Page 7
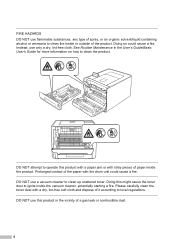
...flammable substances, any type of spray, or an organic solvent/liquid containing alcohol or ammonia to clean the inside the product. Instead, use a vacuum cleaner to clean the product. DO NOT use this product in the User's Guide/Basic User's Guide for... more information on how to clean up scattered toner. Prolonged contact of a gas leak or combustible dust. 6 See Routine Maintenance in the...cause the toner dust to local regulations. Doing this product with a paper jam or with the drum unit could cause a fire.
...flammable substances, any type of spray, or an organic solvent/liquid containing alcohol or ammonia to clean the inside the product. Instead, use a vacuum cleaner to clean the product. DO NOT use this product in the User's Guide/Basic User's Guide for... more information on how to clean up scattered toner. Prolonged contact of a gas leak or combustible dust. 6 See Routine Maintenance in the...cause the toner dust to local regulations. Doing this product with a paper jam or with the drum unit could cause a fire.
Users Manual - English
Page 30
... labour and parts from the date of purchase, Brother International Corporation (Canada) Ltd. ("Brother"), or its Authorized Service Centres, Distributors, Dealers, Agents or employees, shall create another warranty or modify this Laser Printer/MFC/Fax machine shall be liable for the proper packaging...ceases when this warranty. This limited Warranty does not include cleaning, consumables (including, without limitation, toner cartridges and drum units, OPC belts, fixing units, print heads, paper feed rollers, transfer rolls, cleaning rollers, waste toner packs, oil bottles) or damage caused ...
... labour and parts from the date of purchase, Brother International Corporation (Canada) Ltd. ("Brother"), or its Authorized Service Centres, Distributors, Dealers, Agents or employees, shall create another warranty or modify this Laser Printer/MFC/Fax machine shall be liable for the proper packaging...ceases when this warranty. This limited Warranty does not include cleaning, consumables (including, without limitation, toner cartridges and drum units, OPC belts, fixing units, print heads, paper feed rollers, transfer rolls, cleaning rollers, waste toner packs, oil bottles) or damage caused ...
Users Manual - English
Page 34
... using the scan key 56 Scanning using a scanner driver 57 A Routine maintenance 58 Replacing the consumable items 58 Replacing a Toner cartridge 62 Cleaning the corona wires 68 Replacing the drum unit 72 Replacing the belt unit 79 Replacing the waste toner box 85 B Troubleshooting 92 Error and maintenance messages 92 Transferring your...
... using the scan key 56 Scanning using a scanner driver 57 A Routine maintenance 58 Replacing the consumable items 58 Replacing a Toner cartridge 62 Cleaning the corona wires 68 Replacing the drum unit 72 Replacing the belt unit 79 Replacing the waste toner box 85 B Troubleshooting 92 Error and maintenance messages 92 Transferring your...
Users Manual - English
Page 97
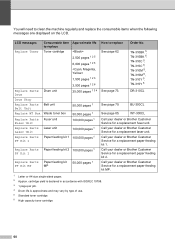
... your dealer or Brother Customer Service for a replacement paper feeding kit MP. 1 Letter or A4 size single-sided pages. 2 Approx. You will need to replace See page 62. Order No. BU-300CL See page 85. cartridge yield is declared in accordance with ISO/IEC 19798. 3 1 page per job. 4 Drum life is approximate... pages 1 Replace Parts Paper feeding kit 2 100,000 pages 1 PF Kit 2 Replace Parts Paper feeding kit PF Kit MP MP 50,000 pages 1 How to clean the machine regularly and replace the consumable items when the following messages are displayed on the LCD.
... your dealer or Brother Customer Service for a replacement paper feeding kit MP. 1 Letter or A4 size single-sided pages. 2 Approx. You will need to replace See page 62. Order No. BU-300CL See page 85. cartridge yield is declared in accordance with ISO/IEC 19798. 3 1 page per job. 4 Drum life is approximate... pages 1 Replace Parts Paper feeding kit 2 100,000 pages 1 PF Kit 2 Replace Parts Paper feeding kit PF Kit MP MP 50,000 pages 1 How to clean the machine regularly and replace the consumable items when the following messages are displayed on the LCD.
Users Manual - English
Page 101
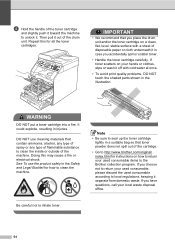
... cartridge tightly in a suitable bag so that toner powder does not spill out of the cartridge. • Go to http://www.brother.com/original/ index.html for how to clean the machine. d Hold the handle of the toner cartridge and slightly push it toward the machine to unlock it out of the..., call your hands or clothes, wipe or wash it separate from domestic waste. Be careful not to clean the inside or outside of the machine. See To use cleaning materials that you place the drum unit and/or the toner cartridge on how to return your used consumable, please discard the used consumable...
... cartridge tightly in a suitable bag so that toner powder does not spill out of the cartridge. • Go to http://www.brother.com/original/ index.html for how to clean the machine. d Hold the handle of the toner cartridge and slightly push it toward the machine to unlock it out of the..., call your hands or clothes, wipe or wash it separate from domestic waste. Be careful not to clean the inside or outside of the machine. See To use cleaning materials that you place the drum unit and/or the toner cartridge on how to return your used consumable, please discard the used consumable...
Users Manual - English
Page 102
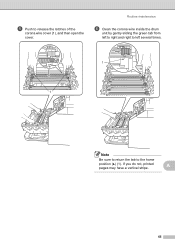
A 65 Routine maintenance f Clean the corona wire inside the drum unit by gently sliding the green tab from left to right and right to left several times. 1 1 Note Be sure to return the tab to release the latches of the corona wire cover (1), and then open the cover. e Push to the home position (a) (1). If you do not, printed pages may have a vertical stripe.
A 65 Routine maintenance f Clean the corona wire inside the drum unit by gently sliding the green tab from left to right and right to left several times. 1 1 Note Be sure to return the tab to release the latches of the corona wire cover (1), and then open the cover. e Push to the home position (a) (1). If you do not, printed pages may have a vertical stripe.
Users Manual - English
Page 103
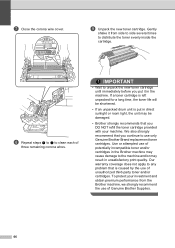
... a toner cartridge is left unpacked for a long time, the toner life will be shortened. • If an unpacked drum unit is caused by the use only Genuine Brother Brand replacement toner cartridges. h Repeat steps e to g to unpack the new toner cartridge until immediately before you DO NOT... and/or may cause damage to distribute the toner evenly inside the cartridge. To protect your machine. IMPORTANT • Wait to clean each of Genuine Brother Supplies. 66 Use or attempted use of three remaining corona wires. i Unpack the new toner cartridge. Gently shake it in direct...
... a toner cartridge is left unpacked for a long time, the toner life will be shortened. • If an unpacked drum unit is caused by the use only Genuine Brother Brand replacement toner cartridges. h Repeat steps e to g to unpack the new toner cartridge until immediately before you DO NOT... and/or may cause damage to distribute the toner evenly inside the cartridge. To protect your machine. IMPORTANT • Wait to clean each of Genuine Brother Supplies. 66 Use or attempted use of three remaining corona wires. i Unpack the new toner cartridge. Gently shake it in direct...
Users Manual - English
Page 105
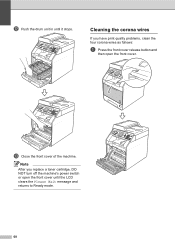
m Close the front cover of the machine. Note After you have print quality problems, clean the four corona wires as follows: a Press the front cover release button and then open the front cover until it stops. Cleaning the corona wires A If you replace a toner cartridge, DO NOT turn off the machine's power switch or open the front cover. l Push the drum unit in until the LCD clears the Please Wait message and returns to Ready mode. 68
m Close the front cover of the machine. Note After you have print quality problems, clean the four corona wires as follows: a Press the front cover release button and then open the front cover until it stops. Cleaning the corona wires A If you replace a toner cartridge, DO NOT turn off the machine's power switch or open the front cover. l Push the drum unit in until the LCD clears the Please Wait message and returns to Ready mode. 68
Users Manual - English
Page 107
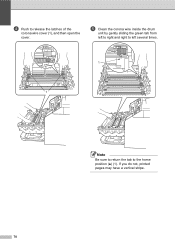
e Clean the corona wire inside the drum unit by gently sliding the green tab from left to right and right to left several times. 1 1 Note Be sure to return the tab to release the latches of the corona wire cover (1), and then open the cover. If you do not, printed pages may have a vertical stripe. 70 d Push to the home position (a) (1).
e Clean the corona wire inside the drum unit by gently sliding the green tab from left to right and right to left several times. 1 1 Note Be sure to return the tab to release the latches of the corona wire cover (1), and then open the cover. If you do not, printed pages may have a vertical stripe. 70 d Push to the home position (a) (1).


