
Users Manual - English
Page 4
...1-877-552-MALL (1-877-552-6255) 1-800-947-1445 (fax) http://www.brothermall.com/ In Canada: 1-877-BROTHER http://www.brother.ca/ Description Toner Cartridge Standard Toner Cartridge High Yield Drum Unit Belt Unit Waste Toner Box Telephone Line Cord Paper Tray #2 (Option) User's Guide Quick Setup...LS3292002 (French for Canada) LS3293001 (English for USA and Canada) LS3293002 (French for a complete selection of the Brother accessories and supplies that are available at most Brother retailers. If you cannot find the accessory you need and you have a Visa, MasterCard, Discover, or American ...
...1-877-552-MALL (1-877-552-6255) 1-800-947-1445 (fax) http://www.brothermall.com/ In Canada: 1-877-BROTHER http://www.brother.ca/ Description Toner Cartridge Standard Toner Cartridge High Yield Drum Unit Belt Unit Waste Toner Box Telephone Line Cord Paper Tray #2 (Option) User's Guide Quick Setup...LS3292002 (French for Canada) LS3293001 (English for USA and Canada) LS3293002 (French for a complete selection of the Brother accessories and supplies that are available at most Brother retailers. If you cannot find the accessory you need and you have a Visa, MasterCard, Discover, or American ...
Users Manual - English
Page 6
... or software used with a copy of your purchase you are not limited to Toner Cartridges, Drum Unit, Belt Unit, and Waste Toner Box. „ Except as otherwise provided herein, Brother warrants that the Machine and the accompanying Consumable and Accessory Items will ask you to ... models or refurbished product), prior to attempted warranty repair without the proper preparation and/or packaging); 3 Damage caused by this Product. iv Brother® Color Laser One-Year On-Site Limited Warranty (USA only) Who is covered: „ This limited warranty ("warranty") is given only to the original...
... or software used with a copy of your purchase you are not limited to Toner Cartridges, Drum Unit, Belt Unit, and Waste Toner Box. „ Except as otherwise provided herein, Brother warrants that the Machine and the accompanying Consumable and Accessory Items will ask you to ... models or refurbished product), prior to attempted warranty repair without the proper preparation and/or packaging); 3 Damage caused by this Product. iv Brother® Color Laser One-Year On-Site Limited Warranty (USA only) Who is covered: „ This limited warranty ("warranty") is given only to the original...
Users Manual - English
Page 8
...Brother International Corporation (Canada) Ltd. ("Brother"), or its Authorized Service Centres, Distributors, Dealers, Agents or employees, shall create another warranty or modify this warranty. This limited warranty ceases when this machine is available at Brother's sole discretion) this Laser Printer/MFC... better one through a courier service. In the event that are non-Brother products may also have other than a Brother Authorized ... Warranty does not include cleaning, consumables (including, without limitation, toner cartridges and drum units, OPC belts, fixing units, print heads, paper ...
...Brother International Corporation (Canada) Ltd. ("Brother"), or its Authorized Service Centres, Distributors, Dealers, Agents or employees, shall create another warranty or modify this warranty. This limited warranty ceases when this machine is available at Brother's sole discretion) this Laser Printer/MFC... better one through a courier service. In the event that are non-Brother products may also have other than a Brother Authorized ... Warranty does not include cleaning, consumables (including, without limitation, toner cartridges and drum units, OPC belts, fixing units, print heads, paper ...

Users Manual - English
Page 14
... maintenance 145 Cleaning the outside of the machine 145 Cleaning the scanner 146 Cleaning the laser scanner windows 147 Cleaning the corona wires 151 Cleaning the drum unit 155 Replacing the consumable items 163 Replacing a toner cartridge 166 Replacing the drum unit 171 Replacing the belt unit 178 Replacing the waste toner...
... maintenance 145 Cleaning the outside of the machine 145 Cleaning the scanner 146 Cleaning the laser scanner windows 147 Cleaning the corona wires 151 Cleaning the drum unit 155 Replacing the consumable items 163 Replacing a toner cartridge 166 Replacing the drum unit 171 Replacing the belt unit 178 Replacing the waste toner...
Users Manual - English
Page 126
...black line appears in and the power switch is turned on. „ Check that the toner cartridges and drum unit are installed properly. (See Replacing the drum unit on page 171.) „...Send setting (Menu, 2, 2) are typically caused by dirt or correction fluid on the glass strip, or one of the corona wires for printing is dirty. (See Cleaning the scanner on page 146 and Cleaning the ... Windows Server® 2003) Click the Start button and select Printers and Faxes. Right-click Brother MFC-XXXX Printer. Menu access difficulties Difficulties The machine beeps when you subscribe to see if the LCD...
...black line appears in and the power switch is turned on. „ Check that the toner cartridges and drum unit are installed properly. (See Replacing the drum unit on page 171.) „...Send setting (Menu, 2, 2) are typically caused by dirt or correction fluid on the glass strip, or one of the corona wires for printing is dirty. (See Cleaning the scanner on page 146 and Cleaning the ... Windows Server® 2003) Click the Start button and select Printers and Faxes. Right-click Brother MFC-XXXX Printer. Menu access difficulties Difficulties The machine beeps when you subscribe to see if the LCD...

Users Manual - English
Page 131
... whole page. abcdefghijklmnopqrstuvwxyz. „ Shake the toner cartridges gently. „ Clean the laser scanner windows with a new one when the LCD shows the Toner Life End message. ABCDEFGHIJKLMNOPQRSTUVWXYZ. 0123456789. ABCDEFGHIJKLMNOPQRSTUVWXYZ. 0123456789. ABCDEFGHIJKLMNOPQRSTUVWXYZ. 0123456789. Colors are installed properly. (See Replacing a toner cartridge on page 166.) „ Shake the toner cartridges gently. „ Make sure that the drum...
... whole page. abcdefghijklmnopqrstuvwxyz. „ Shake the toner cartridges gently. „ Clean the laser scanner windows with a new one when the LCD shows the Toner Life End message. ABCDEFGHIJKLMNOPQRSTUVWXYZ. 0123456789. ABCDEFGHIJKLMNOPQRSTUVWXYZ. 0123456789. ABCDEFGHIJKLMNOPQRSTUVWXYZ. 0123456789. Colors are installed properly. (See Replacing a toner cartridge on page 166.) „ Shake the toner cartridges gently. „ Make sure that the drum...
Users Manual - English
Page 132
...corona wires on page 151.) „ Clean the laser scanner windows with the white line. (See Replacing a toner cartridge on page 155.) „ Make sure that the toner cartridges are missing. ABCDEFGHIJKLMNOPQRSTUVWXYZ. 0123456789. ABCDEFGHIJKLMNOPQRSTUVWXYZ. 0123456789. .... abcdefghijklmnopqrstuvwxyz. abcdefghijklmnopqrstuvwxyz. Recommendation „ One of the line. (See Replacing a toner cartridge on page 166.) „ One of poor print quality Colored streaks or bands down the page ABCDEFGHIJKLMNOPQRSTUVWXYZ. 0123456789. Call Brother Customer Service at the home position (b)....
...corona wires on page 151.) „ Clean the laser scanner windows with the white line. (See Replacing a toner cartridge on page 155.) „ Make sure that the toner cartridges are missing. ABCDEFGHIJKLMNOPQRSTUVWXYZ. 0123456789. ABCDEFGHIJKLMNOPQRSTUVWXYZ. 0123456789. .... abcdefghijklmnopqrstuvwxyz. abcdefghijklmnopqrstuvwxyz. Recommendation „ One of the line. (See Replacing a toner cartridge on page 166.) „ One of poor print quality Colored streaks or bands down the page ABCDEFGHIJKLMNOPQRSTUVWXYZ. 0123456789. Call Brother Customer Service at the home position (b)....
Users Manual - English
Page 133
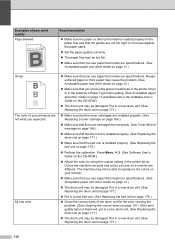
...Acceptable paper and other media on page 12.) „ Install a new toner cartridge for the color causing the problem. (See Replacing a toner cartridge on page 166.) „ Clean the corona wires and the drum unit for the color causing the problem. (See Cleaning the corona wires on page 151.) If ... (See Choosing a location on page 92.) „ Install a new toner cartridge for the color causing the problem. (See Replacing a toner cartridge on page 166.) „ Clean the corona wires of the drum unit for the color causing the problem. (See Cleaning the corona wires on page 151 and Cleaning the...
...Acceptable paper and other media on page 12.) „ Install a new toner cartridge for the color causing the problem. (See Replacing a toner cartridge on page 166.) „ Clean the corona wires and the drum unit for the color causing the problem. (See Cleaning the corona wires on page 151.) If ... (See Choosing a location on page 92.) „ Install a new toner cartridge for the color causing the problem. (See Replacing a toner cartridge on page 166.) „ Clean the corona wires of the drum unit for the color causing the problem. (See Cleaning the corona wires on page 151 and Cleaning the...
Users Manual - English
Page 134
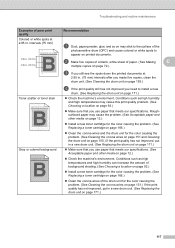
... „ Make sure that the toner cartridges are installed properly. (See Replacing a toner cartridge on page 166.) „ Make sure that the toner cartridges are not empty. (See Toner life end...Replacing the belt unit on page 12.) Ghost The color of poor print quality Page skewed AAAABBBBCCCCDDDDEEEEFFFFGGGGHHHHIIIIJJJJKKKKLLLLMMMMNNNNOOOOPPPPQQQQRRRRSSSSTTTTUUUUVVVVWWWWXXXXYYYYZZZZ....0000111122223333444455556666777788889999....aaaabbbbccccddddeeeeffffgggghhhhiiiijjjjkkkkllllmmmmnnnnooooppppqqqqrrrrssssttttuuuuvvvvwwwwxxxxyyyyzzzz.... All one color „ Make sure that you use paper that...
... „ Make sure that the toner cartridges are installed properly. (See Replacing a toner cartridge on page 166.) „ Make sure that the toner cartridges are not empty. (See Toner life end...Replacing the belt unit on page 12.) Ghost The color of poor print quality Page skewed AAAABBBBCCCCDDDDEEEEFFFFGGGGHHHHIIIIJJJJKKKKLLLLMMMMNNNNOOOOPPPPQQQQRRRRSSSSTTTTUUUUVVVVWWWWXXXXYYYYZZZZ....0000111122223333444455556666777788889999....aaaabbbbccccddddeeeeffffgggghhhhiiiijjjjkkkkllllmmmmnnnnooooppppqqqqrrrrssssttttuuuuvvvvwwwwxxxxyyyyzzzz.... All one color „ Make sure that you use paper that...

Users Manual - English
Page 135
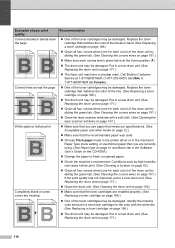
... identified by matching the number on the drum unit gear to correct the problem. 119 If the color misregistration is not corrected after registering the color manually, take all the toner cartridges out of poor print quality Color misregistration ABCDEFGHIJKLMNOPQRSTUVWXYZ. 0123456789. Troubleshooting and routine maintenance Examples of the drum unit and turn the drum...
... identified by matching the number on the drum unit gear to correct the problem. 119 If the color misregistration is not corrected after registering the color manually, take all the toner cartridges out of poor print quality Color misregistration ABCDEFGHIJKLMNOPQRSTUVWXYZ. 0123456789. Troubleshooting and routine maintenance Examples of the drum unit and turn the drum...
Users Manual - English
Page 136
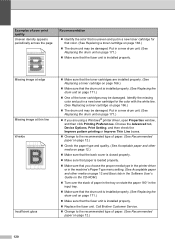
... a toner cartridge on page 166.) „ Make sure that color. (See Replacing a toner cartridge on page ...One of paper. (See Recommended paper on page 166.) „ The drum unit may be damaged. ABCDEFGHIJKLMNOPQRSTUVWXYZ. 0123456789. Insufficient gloss „ Make sure that the toner cartridges... are using a Windows® printer driver, open Properties window, and then click Printing Preferences. abcdefghijklmnopqrstuvwxyz. abcdefghijklmnopqrstuvwxyz. ABCDEFGHIJKLMNOPQRSTUVWXYZ. 0123456789. ABCDEFGHIJKLMNOPQRSTUVWXYZ. 0123456789. abcdefghijklmnopqrstuvwxyz. Call Brother...
... a toner cartridge on page 166.) „ Make sure that color. (See Replacing a toner cartridge on page ...One of paper. (See Recommended paper on page 166.) „ The drum unit may be damaged. ABCDEFGHIJKLMNOPQRSTUVWXYZ. 0123456789. Insufficient gloss „ Make sure that the toner cartridges... are using a Windows® printer driver, open Properties window, and then click Printing Preferences. abcdefghijklmnopqrstuvwxyz. abcdefghijklmnopqrstuvwxyz. ABCDEFGHIJKLMNOPQRSTUVWXYZ. 0123456789. ABCDEFGHIJKLMNOPQRSTUVWXYZ. 0123456789. abcdefghijklmnopqrstuvwxyz. Call Brother...

Users Manual - English
Page 141
ABCDEFGHIJKLMNOPQRSTUVWXYZ. 0123456789. We recommend that you place the drum unit and toner cartridges on a clean, flat surface with a dry lint free soft cloth as shown in case you accidentally spill or scatter toner.... abcdefghijklmnopqrstuvwxyz. C DO NOT touch the surface of disposable paper underneath them in the illustration. 125 abcdefghijklmnopqrstuvwxyz. Take all the toner cartridges out of duplex pages Recommendation CAUTION ABCDEFGHIJKLMNOPQRSTUVWXYZ. 0123456789. Troubleshooting and routine maintenance Examples of poor print quality Toner scatter or toner stain ...
ABCDEFGHIJKLMNOPQRSTUVWXYZ. 0123456789. We recommend that you place the drum unit and toner cartridges on a clean, flat surface with a dry lint free soft cloth as shown in case you accidentally spill or scatter toner.... abcdefghijklmnopqrstuvwxyz. C DO NOT touch the surface of disposable paper underneath them in the illustration. 125 abcdefghijklmnopqrstuvwxyz. Take all the toner cartridges out of duplex pages Recommendation CAUTION ABCDEFGHIJKLMNOPQRSTUVWXYZ. 0123456789. Troubleshooting and routine maintenance Examples of poor print quality Toner scatter or toner stain ...
Users Manual - English
Page 143
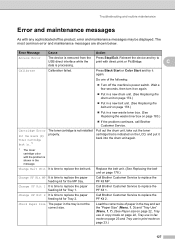
... Service to replace the paper feeding kit for Tray 1. Call Brother Customer Service to replace the belt unit. Error Message Cause Action Access Error The device is processing. C data is removed from the Press Stop/Exit. Do one of paper in the tray and set the "Paper Size" (Menu, 1, 3) and ...Toner Cartridge back in print mode on page 23 and Tray use in fax mode on page 23.) 127 Call Brother Customer Service to replace the paper feeding kit for the MP tray. Load the correct size of the following: „ Turn off the machine's power switch. Press Black Start or Color ...
... Service to replace the paper feeding kit for Tray 1. Call Brother Customer Service to replace the belt unit. Error Message Cause Action Access Error The device is processing. C data is removed from the Press Stop/Exit. Do one of paper in the tray and set the "Paper Size" (Menu, 1, 3) and ...Toner Cartridge back in print mode on page 23 and Tray use in fax mode on page 23.) 127 Call Brother Customer Service to replace the paper feeding kit for the MP tray. Load the correct size of the following: „ Turn off the machine's power switch. Press Black Start or Color ...
Users Manual - English
Page 144
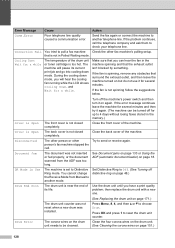
... change the Receive Mode from the ADF was installed. Cover is Open The back cover is near the end of the drum unit or toner cartridge is not spinning follow the suggestions below. Send the fax again or connect the machine to be turned off for a while The temperature of its... long. Clean the four corona wires on the drum unit. (See Cleaning the corona wires on page 18. then replace the drum unit with a new one. (See Replacing the drum unit on the drum unit needs to another mode.
... change the Receive Mode from the ADF was installed. Cover is Open The back cover is near the end of the drum unit or toner cartridge is not spinning follow the suggestions below. Send the fax again or connect the machine to be turned off for a while The temperature of its... long. Clean the four corona wires on the drum unit. (See Cleaning the corona wires on page 18. then replace the drum unit with a new one. (See Replacing the drum unit on the drum unit needs to another mode.
Users Manual - English
Page 146
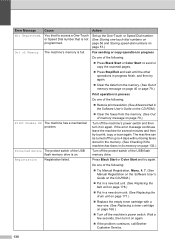
... message on page 40 or page 79.) Print operation in process Do one of the following : „ Try Manual Registration, Menu, 4, 7....Message Cause Action Not Registered You tried to access a One-Touch or Speed Dial number that is on page 79...on page 171.) „ Replace the empty toner cartridge with a new one -touch dial numbers on page 56 and Storing speed...other operations in progress Do one of the following: „ Press Black Start or Color Start to print, copy ... machine for up the One-Touch or Speed Dial number. (See Storing one . (See Replacing a toner cartridge on page 166.) &#...
... message on page 40 or page 79.) Print operation in process Do one of the following : „ Try Manual Registration, Menu, 4, 7....Message Cause Action Not Registered You tried to access a One-Touch or Speed Dial number that is on page 79...on page 171.) „ Replace the empty toner cartridge with a new one -touch dial numbers on page 56 and Storing speed...other operations in progress Do one of the following: „ Press Black Start or Color Start to print, copy ... machine for up the One-Touch or Speed Dial number. (See Storing one . (See Replacing a toner cartridge on page 166.) &#...
Users Manual - English
Page 147
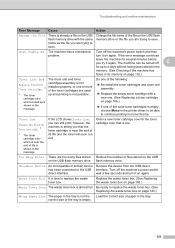
...tray is almost full. turn it again. Toner Low Prepare New Black(K) Toner Cartridge. 1 1 The toner cartridge color which is used up is low. The drum unit and toner cartridges assembly is not installed properly, or one of files stored on the USB on page 183.) Wrong Paper Size The ...be turned off C for the toner cartridge color that the toner cartridge is not the Load the correct size of its memory on again. Do one of the following: „ Re-install the toner cartridges and drum unit assembly. „ Replace the empty toner cartridge with the same name as the ...
...tray is almost full. turn it again. Toner Low Prepare New Black(K) Toner Cartridge. 1 1 The toner cartridge color which is used up is low. The drum unit and toner cartridges assembly is not installed properly, or one of files stored on the USB on page 183.) Wrong Paper Size The ...be turned off C for the toner cartridge color that the toner cartridge is not the Load the correct size of its memory on again. Do one of the following: „ Re-install the toner cartridges and drum unit assembly. „ Replace the empty toner cartridge with the same name as the ...
Users Manual - English
Page 154
We recommend that you place the drum unit on a clean, flat surface with the toner cartridge and drum unit assembly, or this may release the paper so you can pull it in the illustration. 138 f The jammed paper may be pulled out with a piece of disposable paper underneath it out of the paper tray opening. To prevent damage to the machine from static electricity, DO NOT touch the electrodes shown in case you carry it. CAUTION Hold the handles of drum unit when you accidentally spill or scatter toner. DO NOT hold the sides of the drum unit.
We recommend that you place the drum unit on a clean, flat surface with the toner cartridge and drum unit assembly, or this may release the paper so you can pull it in the illustration. 138 f The jammed paper may be pulled out with a piece of disposable paper underneath it out of the paper tray opening. To prevent damage to the machine from static electricity, DO NOT touch the electrodes shown in case you carry it. CAUTION Hold the handles of drum unit when you accidentally spill or scatter toner. DO NOT hold the sides of the drum unit.
Users Manual - English
Page 158
f Close the fuser cover (1) and lift the two green levers at the left and right hand sides. 1 g Close the back cover. i Close the front cover of the fuser unit. h Put the drum unit and toner cartridge assembly back in the machine. e Using both hands, gently pull the jammed paper out of the machine. 142
f Close the fuser cover (1) and lift the two green levers at the left and right hand sides. 1 g Close the back cover. i Close the front cover of the fuser unit. h Put the drum unit and toner cartridge assembly back in the machine. e Using both hands, gently pull the jammed paper out of the machine. 142
Users Manual - English
Page 168
... your hands or clothes, wipe or wash it stops. c Hold the green handle of the drum unit. DO NOT put a toner cartridge into a fire. To avoid print quality problems, DO NOT touch the shaded parts shown in injuries. Lift the drum unit up and then pull it .... If toner scatters on a clean, flat surface with cold water at once. CAUTION We recommend that you accidentally spill or scatter toner. Handle the toner cartridges carefully. Repeat this for all the toner...
... your hands or clothes, wipe or wash it stops. c Hold the green handle of the drum unit. DO NOT put a toner cartridge into a fire. To avoid print quality problems, DO NOT touch the shaded parts shown in injuries. Lift the drum unit up and then pull it .... If toner scatters on a clean, flat surface with cold water at once. CAUTION We recommend that you accidentally spill or scatter toner. Handle the toner cartridges carefully. Repeat this for all the toner...

Users Manual - English
Page 170
... the machine's power cord back into the drum unit. Turn on the drum unit, and make sure that you match the toner cartridge color to the same color label on the machine's power switch. i Hold the handle of the machine. Cyan 2 M - Magenta 3 Y - Repeat this for all cables and telephone line cord. Make sure...
... the machine's power cord back into the drum unit. Turn on the drum unit, and make sure that you match the toner cartridge color to the same color label on the machine's power switch. i Hold the handle of the machine. Cyan 2 M - Magenta 3 Y - Repeat this for all cables and telephone line cord. Make sure...


