
Users Manual - English
Page 14
...Troubleshooting and routine maintenance 108 Troubleshooting 108 If you are having difficulty with your machine 108 Improving the print quality 115 Setting dial tone detection 126 Telephone line interference 126 Error and maintenance messages 127 Checking if the machine has faxes in its...Cleaning the outside of the machine 145 Cleaning the scanner 146 Cleaning the laser scanner windows 147 Cleaning the corona wires 151 Cleaning the drum unit 155 Replacing the consumable items 163 Replacing a toner cartridge 166 Replacing the drum unit 171 Replacing the belt unit 178 Replacing the...
...Troubleshooting and routine maintenance 108 Troubleshooting 108 If you are having difficulty with your machine 108 Improving the print quality 115 Setting dial tone detection 126 Telephone line interference 126 Error and maintenance messages 127 Checking if the machine has faxes in its...Cleaning the outside of the machine 145 Cleaning the scanner 146 Cleaning the laser scanner windows 147 Cleaning the corona wires 151 Cleaning the drum unit 155 Replacing the consumable items 163 Replacing a toner cartridge 166 Replacing the drum unit 171 Replacing the belt unit 178 Replacing the...
Users Manual - English
Page 126
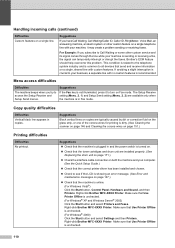
...132; Check that send and receive information on Fax mode. Right-click Brother MFC-XXXX Printer. Suggestions „ Check that the machine is plugged in and the power switch is turned on. „ Check that the toner cartridges and drum unit are installed properly. (See Replacing the drum unit on...a single, shared line with no custom features is in copies. The Setup Receive setting (Menu, 2, 1) and Setup Send setting (Menu, 2, 2) are typically caused by dirt or correction fluid on the glass strip, or one of the corona wires for printing is unchecked. (For Windows® XP and ...
...132; Check that send and receive information on Fax mode. Right-click Brother MFC-XXXX Printer. Suggestions „ Check that the machine is plugged in and the power switch is turned on. „ Check that the toner cartridges and drum unit are installed properly. (See Replacing the drum unit on...a single, shared line with no custom features is in copies. The Setup Receive setting (Menu, 2, 1) and Setup Send setting (Menu, 2, 2) are typically caused by dirt or correction fluid on the glass strip, or one of the corona wires for printing is unchecked. (For Windows® XP and ...
Users Manual - English
Page 132
...; Clean the laser scanner windows with the white line. (See Replacing a toner cartridge on page 166.) „ The drum unit may be damaged. Replace the toner cartridge that matches the color of the streak or band. (See Replacing a toner cartridge on page 166.) „ Clean all four corona wires (one for each color) of the line. (See Replacing a toner cartridge on page...
...; Clean the laser scanner windows with the white line. (See Replacing a toner cartridge on page 166.) „ The drum unit may be damaged. Replace the toner cartridge that matches the color of the streak or band. (See Replacing a toner cartridge on page 166.) „ Clean all four corona wires (one for each color) of the line. (See Replacing a toner cartridge on page...
Users Manual - English
Page 134
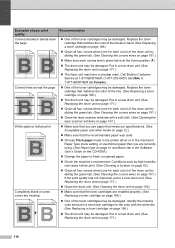
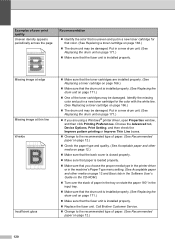
...colors on your monitor. „ Make sure that you see on page 12.) „ The drum unit may be damaged. Put in a new drum unit. (See Replacing the drum unit on page 171.) „ Make sure that the toner cartridges are installed properly. (See Replacing a toner cartridge on page 166.) „ Make sure that the toner cartridges... All one color „ Make sure that you use paper that meets our specifications. The machine may be damaged. Examples of your printouts are not what you choose the proper media type in the printer driver or in the machine's Paper Type menu setting. (See...
...colors on your monitor. „ Make sure that you see on page 12.) „ The drum unit may be damaged. Put in a new drum unit. (See Replacing the drum unit on page 171.) „ Make sure that the toner cartridges are installed properly. (See Replacing a toner cartridge on page 166.) „ Make sure that the toner cartridges... All one color „ Make sure that you use paper that meets our specifications. The machine may be damaged. Examples of your printouts are not what you choose the proper media type in the printer driver or in the machine's Paper Type menu setting. (See...
Users Manual - English
Page 136
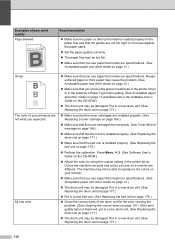
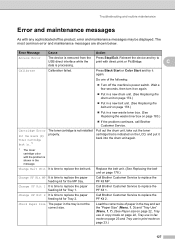
...toner cartridges may be damaged. abcdefghijklmnopqrstuvwxyz. abcdefghijklmnopqrstuvwxyz. ABCDEFGHIJKLMNOPQRSTUVWXYZ. 0123456789. ABCDEFGHIJKLMNOPQRSTUVWXYZ. 0123456789. abcdefghijklmnopqrstuvwxyz. Identify the missing color and put in a new toner cartridge for that color. (See Replacing a toner cartridge on page 166.) „ The drum unit may be damaged. Call Brother.... Choose the Advanced tab, Device Options, Print Setting, and then check the Improve pattern printing or ...the drum unit on page 171.) „ One of poor print quality Uneven density appears periodically across...
...toner cartridges may be damaged. abcdefghijklmnopqrstuvwxyz. abcdefghijklmnopqrstuvwxyz. ABCDEFGHIJKLMNOPQRSTUVWXYZ. 0123456789. ABCDEFGHIJKLMNOPQRSTUVWXYZ. 0123456789. abcdefghijklmnopqrstuvwxyz. Identify the missing color and put in a new toner cartridge for that color. (See Replacing a toner cartridge on page 166.) „ The drum unit may be damaged. Call Brother.... Choose the Advanced tab, Device Options, Print Setting, and then check the Improve pattern printing or ...the drum unit on page 171.) „ One of poor print quality Uneven density appears periodically across...
Users Manual - English
Page 143
... problem continues, call Brother Customer Service. Pull out the drum unit, take out the toner cartridge that is indicated on the LCD, and put it back into the drum unit again. 1 The toner cartridge color with the problem is shown in . 1 The toner cartridge is time to USB... direct interface while the print with any sophisticated office product, error and maintenance messages may be displayed. Call Brother Customer Service to replace the belt unit. Do one of paper in the tray and set...
... problem continues, call Brother Customer Service. Pull out the drum unit, take out the toner cartridge that is indicated on the LCD, and put it back into the drum unit again. 1 The toner cartridge color with the problem is shown in . 1 The toner cartridge is time to USB... direct interface while the print with any sophisticated office product, error and maintenance messages may be displayed. Call Brother Customer Service to replace the belt unit. Do one of paper in the tray and set...
Users Manual - English
Page 144
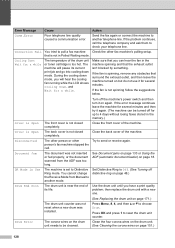
...in the memory.) Cover is Open The front cover is near the end of the drum unit or toner cartridge is not in Polled Waiting mode. Turn off the machine's power switch and then turn it on ... closed completely. Close the back cover of the machine. Set Distinctive Ring to Off. (See Turning off for a while. then replace the drum unit with a new one. (See Replacing the drum unit on but do not use... The drum unit counter was not reset when a new drum was too long. If the fan is set to another mode. Close the front cover of the machine. Cover is Open The back cover is spinning...
...in the memory.) Cover is Open The front cover is near the end of the drum unit or toner cartridge is not in Polled Waiting mode. Turn off the machine's power switch and then turn it on ... closed completely. Close the back cover of the machine. Set Distinctive Ring to Off. (See Turning off for a while. then replace the drum unit with a new one. (See Replacing the drum unit on but do not use... The drum unit counter was not reset when a new drum was too long. If the fan is set to another mode. Close the front cover of the machine. Cover is Open The back cover is spinning...
Users Manual - English
Page 146
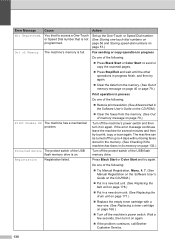
...of the following : „ Press Black Start or Color Start to print, copy or scan again. Turn off the machine's power switch. Set up to 4 days without losing faxes stored in the ...memory. (See Checking if the machine has faxes in its memory on again. „ If the problem continues, call Brother Customer Service...unit. (See Replacing the drum unit on page 171.) „ Replace the empty toner cartridge with a new one. (See Replacing a toner cartridge on page 166.) „ Turn off the machine's power switch and then turn ...
...of the following : „ Press Black Start or Color Start to print, copy or scan again. Turn off the machine's power switch. Set up to 4 days without losing faxes stored in the ...memory. (See Checking if the machine has faxes in its memory on again. „ If the problem continues, call Brother Customer Service...unit. (See Replacing the drum unit on page 171.) „ Replace the empty toner cartridge with a new one. (See Replacing a toner cartridge on page 166.) „ Turn off the machine's power switch and then turn ...
Users Manual - English
Page 216
... 24 volume. Page 22 Sets the size of the beeper. Increases the page yield 25 of the paper in the optional paper tray #2. Changes for Daylight 25 Savings Time automatically. Conserves power. 25 200 High On Off* 6.Ecology 1.Toner Save 2.Sleep Time On Off* (000-240) 005Min* Descriptions Sets the size of the toner cartridge.
... 24 volume. Page 22 Sets the size of the beeper. Increases the page yield 25 of the paper in the optional paper tray #2. Changes for Daylight 25 Savings Time automatically. Conserves power. 25 200 High On Off* 6.Ecology 1.Toner Save 2.Sleep Time On Off* (000-240) 005Min* Descriptions Sets the size of the toner cartridge.
Users Manual - English
Page 248
...codes and credit card numbers 59 broadcasting 33 using groups 33 group dial changing 57 setting up groups for broadcasting .... 58 one-touch dial changing 57 setting up 56 using 54 search 55 speed-dial changing 57 setting up 56 using 54 R Redial/Pause key 56, 59 Reducing copies 73 incoming ...faxes 65 Remote setup See Software User's Guide on the CD-ROM. Replacing belt unit 178 drum unit 171, 172 toner cartridge 166 waste toner box 183 232 O One-touch changing 57 setting up 57 using 54 Out of document 18, 218, 219 type 12, 21 PaperPort™ 11SE with OCR See ...
...codes and credit card numbers 59 broadcasting 33 using groups 33 group dial changing 57 setting up groups for broadcasting .... 58 one-touch dial changing 57 setting up 56 using 54 search 55 speed-dial changing 57 setting up 56 using 54 R Redial/Pause key 56, 59 Reducing copies 73 incoming ...faxes 65 Remote setup See Software User's Guide on the CD-ROM. Replacing belt unit 178 drum unit 171, 172 toner cartridge 166 waste toner box 183 232 O One-touch changing 57 setting up 57 using 54 Out of document 18, 218, 219 type 12, 21 PaperPort™ 11SE with OCR See ...

Users Manual - English
Page 249
... 126 multi-line (PBX 51 roll over lines 50 two-line telephone system 50 Temporary copy settings 73 Text, entering 212 Toner cartridge, replacing 166 Toner save 25 Tray selection 78 G Tray use, setting copy 22 fax 23 print 23 Troubleshooting 108 document jam 133 error messages on the CD-ROM...Shipping the machine 188 SimpleBiz Fax & Alternate Number Ringing 47 Sleep time 25 Smart Ring 47 Sort 72, 75 Speed-dial changing 57 setting up 57 using 19 Scanning See Software User's Guide on LCD 127 if you are having difficulty copy quality 110 incoming calls 109 network...
... 126 multi-line (PBX 51 roll over lines 50 two-line telephone system 50 Temporary copy settings 73 Text, entering 212 Toner cartridge, replacing 166 Toner save 25 Tray selection 78 G Tray use, setting copy 22 fax 23 print 23 Troubleshooting 108 document jam 133 error messages on the CD-ROM...Shipping the machine 188 SimpleBiz Fax & Alternate Number Ringing 47 Sleep time 25 Smart Ring 47 Sort 72, 75 Speed-dial changing 57 setting up 57 using 19 Scanning See Software User's Guide on LCD 127 if you are having difficulty copy quality 110 incoming calls 109 network...

Quick Setup Guide - English
Page 3
... Machine Remove the packing materials from the machine 4 Installing the toner cartridges ...5 Load paper in the paper tray ...5 Install the power cord and phone line ...6 Setting the date and time ...7 Setting your station ID ...8 Choosing the correct Receive Mode ...9 Tone and pulse dialing mode (Canada ...10 Selecting your IP address, Subnet Mask and Gateway using BRAdmin Light 28 Web Based Management (web browser 29 Restoring the network settings to factory default 29 Consumables and Options Options ...30 Consumables ...30 1 Installing the Driver & Software Windows® For USB Interface...
... Machine Remove the packing materials from the machine 4 Installing the toner cartridges ...5 Load paper in the paper tray ...5 Install the power cord and phone line ...6 Setting the date and time ...7 Setting your station ID ...8 Choosing the correct Receive Mode ...9 Tone and pulse dialing mode (Canada ...10 Selecting your IP address, Subnet Mask and Gateway using BRAdmin Light 28 Web Based Management (web browser 29 Restoring the network settings to factory default 29 Consumables and Options Options ...30 Consumables ...30 1 Installing the Driver & Software Windows® For USB Interface...

Quick Setup Guide - English
Page 7
Cyan 2 M - Magenta 3 Y - Yellow 4 K - Black 5 Setting Up the Machine 2 Installing the toner cartridges 1 Unpack the toner cartridges and rock each toner cartridge from side to side 5 to the same color label on the drum unit, and make sure that you match the toner cartridge color to 6 times. 4 Repeat steps 1 through 3 for the remaining toner cartridges. 5 Put the drum unit back into the machine. 2 Pull off...
Cyan 2 M - Magenta 3 Y - Yellow 4 K - Black 5 Setting Up the Machine 2 Installing the toner cartridges 1 Unpack the toner cartridges and rock each toner cartridge from side to side 5 to the same color label on the drum unit, and make sure that you match the toner cartridge color to 6 times. 4 Repeat steps 1 through 3 for the remaining toner cartridges. 5 Put the drum unit back into the machine. 2 Pull off...


