Users Manual - English
Page 144
...in the machine spinning and that you will pause its life. Set Distinctive Ring to another mode. then replace the drum unit with a new one. (See Replacing the drum unit on page 18. Send the fax again or connect the machine to Off. (See Turning off distinctive ring on...See Document jams on page 133 or Using the ADF (automatic document feeder) on page 171.) The drum unit counter was not reset when a new drum was installed. During the cooling down mode. Use the drum unit until you have a print quality problem; Press OK and press 1 to Distinctive Ring mode....
...in the machine spinning and that you will pause its life. Set Distinctive Ring to another mode. then replace the drum unit with a new one. (See Replacing the drum unit on page 18. Send the fax again or connect the machine to Off. (See Turning off distinctive ring on...See Document jams on page 133 or Using the ADF (automatic document feeder) on page 171.) The drum unit counter was not reset when a new drum was installed. During the cooling down mode. Use the drum unit until you have a print quality problem; Press OK and press 1 to Distinctive Ring mode....
Users Manual - English
Page 193
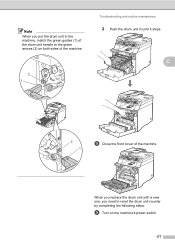
C 2 1 h Close the front cover of the machine. 2 1 Troubleshooting and routine maintenance 2 Push the drum unit in until it stops. When you replace the drum unit with a new one, you put the drum unit in the machine, match the green guides (1) of the drum unit handle to reset the drum unit counter by completing the following steps: i Turn on both sides of the machine. Note When you need to the green arrows (2) on the machine's power switch. 177
C 2 1 h Close the front cover of the machine. 2 1 Troubleshooting and routine maintenance 2 Push the drum unit in until it stops. When you replace the drum unit with a new one, you put the drum unit in the machine, match the green guides (1) of the drum unit handle to reset the drum unit counter by completing the following steps: i Turn on both sides of the machine. Note When you need to the green arrows (2) on the machine's power switch. 177
Users Manual - English
Page 194
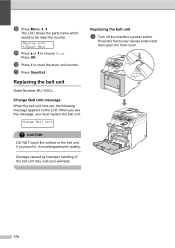
Machine Info. 4.Reset Menu k Press a or b to reset the drum unit counter. If you must replace the belt unit: Change Belt Unit Replacing the belt unit C a Turn off the machine's power switch. Press OK. l Press 1 to choose Drum. m Press Stop/Exit. CAUTION DO NOT touch the surface of the belt unit may void your warranty. 178... degrade print quality. Press the front cover release button and then open the front cover. The LCD shows the parts name which needs to be reset the counter. Damage caused by improper handling of the belt unit.
Machine Info. 4.Reset Menu k Press a or b to reset the drum unit counter. If you must replace the belt unit: Change Belt Unit Replacing the belt unit C a Turn off the machine's power switch. Press OK. l Press 1 to choose Drum. m Press Stop/Exit. CAUTION DO NOT touch the surface of the belt unit may void your warranty. 178... degrade print quality. Press the front cover release button and then open the front cover. The LCD shows the parts name which needs to be reset the counter. Damage caused by improper handling of the belt unit.

Users Manual - English
Page 198
Note When you need to the green arrows (2) on the machine's power switch. 182 When you replace the belt unit with a new one, you put the drum unit in the machine, match the green guides (1) of the drum unit handle to reset the belt unit counter by completing the following steps: i Turn on both sides of the machine. 2 Push the drum unit in until it stops. 2 1 2 1 h Close the front cover of the machine.
Note When you need to the green arrows (2) on the machine's power switch. 182 When you replace the belt unit with a new one, you put the drum unit in the machine, match the green guides (1) of the drum unit handle to reset the belt unit counter by completing the following steps: i Turn on both sides of the machine. 2 Push the drum unit in until it stops. 2 1 2 1 h Close the front cover of the machine.
Users Manual - English
Page 212
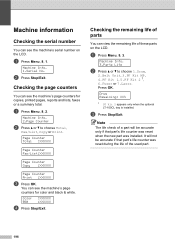
...if that part's life counter was reset when the new part was reset during the life of these parts on the LCD. b Press Stop/Exit. a Press Menu, 8, 2. Page Counter Total :XXXXXX Page Counter Fax/List:XXXXXX Page Counter Copy :XXXXXX Page Counter Print :XXXXXX c Press ... Menu, 8, 1. Color :XXXXXX B&W :XXXXXX d Press Stop/Exit. Press OK. Drum Remaining: XX% 1 PF Kit 2 appears only when the optional LT-100CL tray is installed. Machine Info. 2.Page Counter b Press a or b to choose 1.Drum, 2.Belt Unit, 3.PF Kit MP, 4.PF Kit 1, 5.PF Kit 2 1, 6.Fuser or 7.Laser. c Press Stop/Exit...
...if that part's life counter was reset when the new part was reset during the life of these parts on the LCD. b Press Stop/Exit. a Press Menu, 8, 2. Page Counter Total :XXXXXX Page Counter Fax/List:XXXXXX Page Counter Copy :XXXXXX Page Counter Print :XXXXXX c Press ... Menu, 8, 1. Color :XXXXXX B&W :XXXXXX d Press Stop/Exit. Press OK. Drum Remaining: XX% 1 PF Kit 2 appears only when the optional LT-100CL tray is installed. Machine Info. 2.Page Counter b Press a or b to choose 1.Drum, 2.Belt Unit, 3.PF Kit MP, 4.PF Kit 1, 5.PF Kit 2 1, 6.Fuser or 7.Laser. c Press Stop/Exit...
Users Manual - English
Page 226
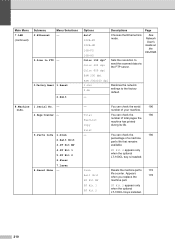
.... 210 Resets the machine part's 172 life counter. Sets the resolution to FTP - 0.Factory Reset 1.Reset 2.Exit Options Descriptions Page Auto* 100B-FD 100B-HD 10B-FD 10B-HD Color 150 dpi* Color 300 dpi Color 600 dpi... Chooses the Ethernet link mode. Appears when you replace the 178 machine part. B&W 200 dpi B&W 200x100 dpi 1.Yes 2.No Restores the network settings to the factory default. - 8.Machine Info. 1.Serial No. - 2.Page Counter - 3.Parts Life 1.Drum 2.Belt Unit 3.PF Kit MP 4.PF Kit 1 5.PF Kit 2 6.Fuser 7.Laser 4.Reset...
.... 210 Resets the machine part's 172 life counter. Sets the resolution to FTP - 0.Factory Reset 1.Reset 2.Exit Options Descriptions Page Auto* 100B-FD 100B-HD 10B-FD 10B-HD Color 150 dpi* Color 300 dpi Color 600 dpi... Chooses the Ethernet link mode. Appears when you replace the 178 machine part. B&W 200 dpi B&W 200x100 dpi 1.Yes 2.No Restores the network settings to the factory default. - 8.Machine Info. 1.Serial No. - 2.Page Counter - 3.Parts Life 1.Drum 2.Belt Unit 3.PF Kit MP 4.PF Kit 1 5.PF Kit 2 6.Fuser 7.Laser 4.Reset...


