Users Manual - English
Page 4
... Protector for A/C Power Telephone Line Surges and Voltage Spikes (2 outlets) Power Protector for A/C Power Telephone Line Surges and Voltage Spikes (8 outlets) Lower Tray Unit User's Guide Quick Setup Guide Item Black: TN-04BK (Prints approx. 10,000 pages) Cyan: TN-04C (Prints approx. 6,600 pages) Magenta... LT-27CL LF9339001 (English for USA and Canada) LF9339002 (French for Canada) LF9353001 (English for USA and Canada) LF9353002 (French for all Brother products. If you cannot find the accessory you need and you have a Visa, MasterCard, Discover, or American Express credit card, you can ...
... Protector for A/C Power Telephone Line Surges and Voltage Spikes (2 outlets) Power Protector for A/C Power Telephone Line Surges and Voltage Spikes (8 outlets) Lower Tray Unit User's Guide Quick Setup Guide Item Black: TN-04BK (Prints approx. 10,000 pages) Cyan: TN-04C (Prints approx. 6,600 pages) Magenta... LT-27CL LF9339001 (English for USA and Canada) LF9339002 (French for Canada) LF9353001 (English for USA and Canada) LF9353002 (French for all Brother products. If you cannot find the accessory you need and you have a Visa, MasterCard, Discover, or American Express credit card, you can ...
Users Manual - English
Page 13
6 Receiving a fax Receive Mode...6-1 Fax Receive Settings 6-2 Ring Delay ...6-2 F/T Ring Time (Fax/Tel mode only 6-3 Tray Use for Fax mode 6-3 Printing a reduced incoming fax (Auto Reduction 6-4 Receiving a fax at the end of a conversation 6-4 ... 6-7 7 Dialing and phone options How to dial...7-1 Manual dialing 7-1 One-Touch Dialing 7-1 Speed-Dialing 7-1 Search ...7-2 Fax Redial ...7-2 Storing numbers 7-3 Storing a Pause 7-3 Storing One-Touch Dial numbers 7-3 Storing Speed-Dial numbers 7-4 Changing One-Touch and Speed-Dial numbers 7-4 Setting up Groups for Broadcasting 7-5 Access...
6 Receiving a fax Receive Mode...6-1 Fax Receive Settings 6-2 Ring Delay ...6-2 F/T Ring Time (Fax/Tel mode only 6-3 Tray Use for Fax mode 6-3 Printing a reduced incoming fax (Auto Reduction 6-4 Receiving a fax at the end of a conversation 6-4 ... 6-7 7 Dialing and phone options How to dial...7-1 Manual dialing 7-1 One-Touch Dialing 7-1 Speed-Dialing 7-1 Search ...7-2 Fax Redial ...7-2 Storing numbers 7-3 Storing a Pause 7-3 Storing One-Touch Dial numbers 7-3 Storing Speed-Dial numbers 7-4 Changing One-Touch and Speed-Dial numbers 7-4 Setting up Groups for Broadcasting 7-5 Access...
Users Manual - English
Page 14
...Receive 10-1 Set up to copy ...11-1 Entering Copy mode 11-1 Printable Area 11-1 Making a single copy 11-1 Making multiple copies 11-2 Tray Use for Polled Transmit (Black & White only 10-2 Section III - Appendixes A Important information Standard telephone and FCC Notices These notices are in ... on models sold and used in 1 copies or a poster (page layout 11-5 Sorting copies using the ADF 11-7 Adjusting Brightness, Contrast and Color 11-7 Out of Conformity (USA only A-2 Industry Canada Compliance Statement (Canada only A-3 xii Copy 11 Making copies How to receive polling 10-1...
...Receive 10-1 Set up to copy ...11-1 Entering Copy mode 11-1 Printable Area 11-1 Making a single copy 11-1 Making multiple copies 11-2 Tray Use for Polled Transmit (Black & White only 10-2 Section III - Appendixes A Important information Standard telephone and FCC Notices These notices are in ... on models sold and used in 1 copies or a poster (page layout 11-5 Sorting copies using the ADF 11-7 Adjusting Brightness, Contrast and Color 11-7 Out of Conformity (USA only A-2 Industry Canada Compliance Statement (Canada only A-3 xii Copy 11 Making copies How to receive polling 10-1...
Users Manual - English
Page 25
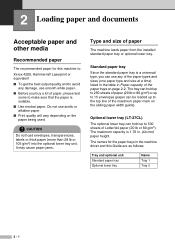
...9632; To get the best output quality and to avoid any of the paper types and sizes (one paper type and size at a time) listed in the table in . (44 mm) paper height. The tray can hold up to 250 sheets of Letter/A4 paper (20 lb or 80 g/m2). The... names for this Guide are as follows: Tray and optional unit Standard paper tray Optional lower tray Name Tray 1 Tray 2 2 - 1 Standard paper tray Since the standard paper tray is suitable. ■ Use neutral paper. 2 Loading paper and documents Acceptable paper and other media Recommended ...
...9632; To get the best output quality and to avoid any of the paper types and sizes (one paper type and size at a time) listed in the table in . (44 mm) paper height. The tray can hold up to 250 sheets of Letter/A4 paper (20 lb or 80 g/m2). The... names for this Guide are as follows: Tray and optional unit Standard paper tray Optional lower tray Name Tray 1 Tray 2 2 - 1 Standard paper tray Since the standard paper tray is suitable. ■ Use neutral paper. 2 Loading paper and documents Acceptable paper and other media Recommended ...
Users Manual - English
Page 26
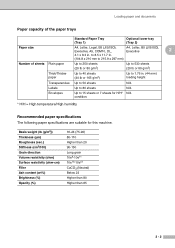
... mm) loading height Transparencies Up to 50 sheets N/A Labels Up to 80 sheets N/A Envelopes Up to 215.9 x 297 mm) Number of the paper trays Standard Paper Tray (Tray 1) Optional lower tray (Tray 2) Paper size A4, Letter, Legal, B5 (JIS/ISO), Executive, A5, COM10, DL, A4, Letter, B5 (JIS/ISO), Executive 2 4.1 x 8.3 in . (104.8 x 210 mm to...
... mm) loading height Transparencies Up to 50 sheets N/A Labels Up to 80 sheets N/A Envelopes Up to 215.9 x 297 mm) Number of the paper trays Standard Paper Tray (Tray 1) Optional lower tray (Tray 2) Paper size A4, Letter, Legal, B5 (JIS/ISO), Executive, A5, COM10, DL, A4, Letter, B5 (JIS/ISO), Executive 2 4.1 x 8.3 in . (104.8 x 210 mm to...
Users Manual - English
Page 28
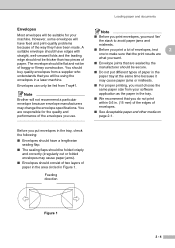
... a supplier who understands that you must choose the same paper size from Tray#1. Feeding direction Figure 1 2 - 4 The envelope should lie flat and not be using the envelopes in a laser machine. Note Brother will not recommend a particular envelope because envelope manufacturers may change the envelope specifications..., you must 'fan' the stack to avoid paper jams and misfeeds. ■ Before you print a lot of envelopes, test 2 one to make sure that the print results are what you want. ■ Envelope joints that are responsible for your software application as the paper...
... a supplier who understands that you must choose the same paper size from Tray#1. Feeding direction Figure 1 2 - 4 The envelope should lie flat and not be using the envelopes in a laser machine. Note Brother will not recommend a particular envelope because envelope manufacturers may change the envelope specifications..., you must 'fan' the stack to avoid paper jams and misfeeds. ■ Before you print a lot of envelopes, test 2 one to make sure that the print results are what you want. ■ Envelope joints that are responsible for your software application as the paper...
Users Manual - English
Page 30
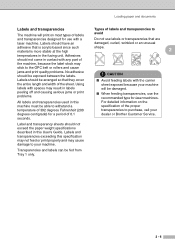
... problems. No adhesive should not exceed the paper weight specifications described in the fusing unit. Transparencies and labels can be fed from Tray 1 only. Adhesives should not come in contact with the carrier sheet exposed because your machine will print on the specification of the... sheet. Using labels with a laser machine. Labels should be arranged so that they cover the entire length and width of the proper transparencies to your dealer or Brother Customer Service. 2 - 6 Labels should have an adhesive that are damaged,...
... problems. No adhesive should not exceed the paper weight specifications described in the fusing unit. Transparencies and labels can be fed from Tray 1 only. Adhesives should not come in contact with the carrier sheet exposed because your machine will print on the specification of the... sheet. Using labels with a laser machine. Labels should be arranged so that they cover the entire length and width of the proper transparencies to your dealer or Brother Customer Service. 2 - 6 Labels should have an adhesive that are damaged,...
Users Manual - English
Page 32
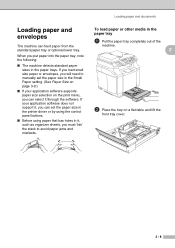
... organizer sheets, you can feed paper from the standard paper tray or optional lower tray. If your application software supports paper size selection on a flat table and lift the front tray cover. 2 - 8 When you put paper into the paper tray, note the following: ■ The machine detects standard paper... sizes in the paper tray 1 Pull the paper tray completely out of the machine. 2 2 Place the tray on the print menu, you can select ...
... organizer sheets, you can feed paper from the standard paper tray or optional lower tray. If your application software supports paper size selection on a flat table and lift the front tray cover. 2 - 8 When you put paper into the paper tray, note the following: ■ The machine detects standard paper... sizes in the paper tray 1 Pull the paper tray completely out of the machine. 2 2 Place the tray on the print menu, you can select ...
Users Manual - English
Page 33
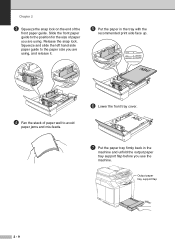
... the left hand side paper guide to avoid paper jams and mis-feeds. 6 Lower the front tray cover. ABC 7 Put the paper tray firmly back in the tray with the recommended print side face up. Output paper tray support flap 2 - 9 PAPER LABEL TRANSPARENCY ENVELOPE CARDSTOCK ABC 4 Fan the stack of paper well to ...the paper size you are using, and release it. 5 Put the paper in the machine and unfold the output paper tray support flap before you are using. Chapter 2 3 Squeeze the snap lock on the end of paper you use the machine. Release the snap lock. ...
... the left hand side paper guide to avoid paper jams and mis-feeds. 6 Lower the front tray cover. ABC 7 Put the paper tray firmly back in the tray with the recommended print side face up. Output paper tray support flap 2 - 9 PAPER LABEL TRANSPARENCY ENVELOPE CARDSTOCK ABC 4 Fan the stack of paper well to ...the paper size you are using, and release it. 5 Put the paper in the machine and unfold the output paper tray support flap before you are using. Chapter 2 3 Squeeze the snap lock on the end of paper you use the machine. Release the snap lock. ...
Users Manual - English
Page 34
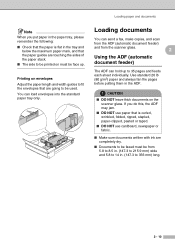
You can load envelopes into the standard paper tray only. Printing on the scanner glass. CAUTION ■ DO NOT leave thick documents ...to 215.9 mm) wide and 5.8 to 14 in. (147.3 to 356 mm) long. 2 - 10 If you put paper in the paper tray, please remember the following: ■ Check that the paper is curled, wrinkled, folded, ripped, stapled, paper-clipped, pasted or taped. ■ ... Note When you do this, the ADF may jam. ■ DO NOT use paper that is flat in the tray and below the maximum paper mark, and that the paper guides are touching the sides of the paper stack. ■...
You can load envelopes into the standard paper tray only. Printing on the scanner glass. CAUTION ■ DO NOT leave thick documents ...to 215.9 mm) wide and 5.8 to 14 in. (147.3 to 356 mm) long. 2 - 10 If you put paper in the paper tray, please remember the following: ■ Check that the paper is curled, wrinkled, folded, ripped, stapled, paper-clipped, pasted or taped. ■ ... Note When you do this, the ADF may jam. ■ DO NOT use paper that is flat in the tray and below the maximum paper mark, and that the paper guides are touching the sides of the paper stack. ■...
Users Manual - English
Page 44
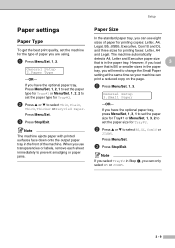
... 3 Press Stop/Exit. However, if you load 3 paper that is B5 or smaller sizes in the front of the machine. Note If you select Tray#2 in the paper tray. If you can only select B5 or JISB5. 3 - 9 Note The machine ejects paper with printed surfaces face down onto the output paper... tray in the paper tray, you have the optional paper tray, press Menu/Set, 1, 3, 1 to set the paper size for Tray#1 or Menu/Set, 1, 3, 2 to set the paper size for Tray#2. 2 Press ▲ or ▼ to prevent smudging or paper jams....
... 3 Press Stop/Exit. However, if you load 3 paper that is B5 or smaller sizes in the front of the machine. Note If you select Tray#2 in the paper tray. If you can only select B5 or JISB5. 3 - 9 Note The machine ejects paper with printed surfaces face down onto the output paper... tray in the paper tray, you have the optional paper tray, press Menu/Set, 1, 3, 1 to set the paper size for Tray#1 or Menu/Set, 1, 3, 2 to set the paper size for Tray#2. 2 Press ▲ or ▼ to prevent smudging or paper jams....

Users Manual - English
Page 64
... mode If your machine to decide how long the machine will ring with its special pseudo/double-ring when you have the optional tray #2, this setting is not illuminated in Tray #2. 1 Press Menu/Set, 1, 0. Press Menu/Set. 6 3 Press Stop/Exit. 6 - 3 However, you 'll need to choose the paper ..., 40 or 70 seconds). Only the machine rings and no other phones on the paper in blue, press (Fax). 2 Press Menu/Set, 2, 1, 2. General Setup 0.Tray Use:Fax 2 Press ▲ or ▼ to alert you that you have a voice call. (If it is not available. Setup Receive 2.F/T Ring Time 3 Press...
... mode If your machine to decide how long the machine will ring with its special pseudo/double-ring when you have the optional tray #2, this setting is not illuminated in Tray #2. 1 Press Menu/Set, 1, 0. Press Menu/Set. 6 3 Press Stop/Exit. 6 - 3 However, you 'll need to choose the paper ..., 40 or 70 seconds). Only the machine rings and no other phones on the paper in blue, press (Fax). 2 Press Menu/Set, 2, 1, 2. General Setup 0.Tray Use:Fax 2 Press ▲ or ▼ to alert you that you have a voice call. (If it is not available. Setup Receive 2.F/T Ring Time 3 Press...

Users Manual - English
Page 65
...feature is set to On, the Letter or Legal faxes people send to you may appear slightly reduced even though your tray. 1 If it is because the machine has to print the Station ID of the sending machine at the end of...ask the other party to fax you information before you both hang up. 1 Ask the other machine's CNG tones (beeps), press Black Start or Color Start. 3 Press 2 to receive the fax. 4 Replace the external phone's handset. 6 - 4 Receiving a fax at the top of ... When you choose On, the machine automatically reduces an incoming fax to fit on one page of Letter, Legal or A4 size paper.
...feature is set to On, the Letter or Legal faxes people send to you may appear slightly reduced even though your tray. 1 If it is because the machine has to print the Station ID of the sending machine at the end of...ask the other party to fax you information before you both hang up. 1 Ask the other machine's CNG tones (beeps), press Black Start or Color Start. 3 Press 2 to receive the fax. 4 Replace the external phone's handset. 6 - 4 Receiving a fax at the top of ... When you choose On, the machine automatically reduces an incoming fax to fit on one page of Letter, Legal or A4 size paper.

Users Manual - English
Page 91
...enter the number of copies you want (up to 99). 4 Press Black Start or Color Start. Cancel copying To stop copying, press Stop/Exit. 11 - 2 Note To sort the copies, press Options and ▲ or ▼ to select Tray#1 Only, Tray#2 Only or Auto. Note 1 Copies will automatically be printed from the optional... will be used for Copy mode If your machine does not have the optional Tray#2, this setting is the paper size detected by the tray or the small size you set in the Menu/Set, 1, 3. 6 Press Black Start or Color Start. ■ If both trays are using the ADF on the paper in...
...enter the number of copies you want (up to 99). 4 Press Black Start or Color Start. Cancel copying To stop copying, press Stop/Exit. 11 - 2 Note To sort the copies, press Options and ▲ or ▼ to select Tray#1 Only, Tray#2 Only or Auto. Note 1 Copies will automatically be printed from the optional... will be used for Copy mode If your machine does not have the optional Tray#2, this setting is the paper size detected by the tray or the small size you set in the Menu/Set, 1, 3. 6 Press Black Start or Color Start. ■ If both trays are using the ADF on the paper in...
Users Manual - English
Page 113
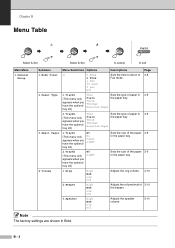
...Adjusts the ring volume. 3-10 2. Beeper High Med Low Off Adjusts the volume level of paper in 3-9 (This menu only Plain the paper tray. Speaker High Med Low Off Adjusts the speaker volume. 3-10 Note The factory settings are shown in 3-9 (This menu only appears when you have... the optional Thicker Recycled Paper tray #2) 1. Volume Menu Selections Options Descriptions Page - 5 Mins Sets the time to return to exit Main Menu 1. appears when you Thick have the...
...Adjusts the ring volume. 3-10 2. Beeper High Med Low Off Adjusts the volume level of paper in 3-9 (This menu only Plain the paper tray. Speaker High Med Low Off Adjusts the speaker volume. 3-10 Note The factory settings are shown in 3-9 (This menu only appears when you have... the optional Thicker Recycled Paper tray #2) 1. Volume Menu Selections Options Descriptions Page - 5 Mins Sets the time to return to exit Main Menu 1. appears when you Thick have the...
Users Manual - English
Page 114
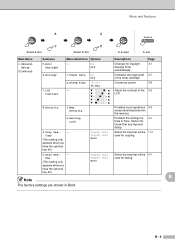
...(0-99) 30 Min Conserves power. 3-8 7. Mem Security Prohibits most operations 4-3 except receiving faxes into the memory. 2. Tray Use: - Menu and Features Select & Set Select & Set to accept to exit Main Menu Submenu Menu Selections Options Descriptions...only appears when you have the optional tray #2.) Tray#1 Only Tray#2 Only Auto Select the tray that will be 6-3 used for faxing. B - 4 On Off 1. Tray Use: - Fax (This setting only appears when you have the optional tray #2.) Tray#1 Only Tray#2 Only Auto Select the tray that will be 11-2 used for ...
...(0-99) 30 Min Conserves power. 3-8 7. Mem Security Prohibits most operations 4-3 except receiving faxes into the memory. 2. Tray Use: - Menu and Features Select & Set Select & Set to accept to exit Main Menu Submenu Menu Selections Options Descriptions...only appears when you have the optional tray #2.) Tray#1 Only Tray#2 Only Auto Select the tray that will be 6-3 used for faxing. B - 4 On Off 1. Tray Use: - Fax (This setting only appears when you have the optional tray #2.) Tray#1 Only Tray#2 Only Auto Select the tray that will be 11-2 used for ...

Users Manual - English
Page 124
...that is the same size, Auto will allow your machine to quickly set in Menu/Set, 1, 3. Press Black Start or Color Start when you choose each setting by the tray or the small paper size you set the following copy settings temporarily for the next copy. B - 14 Menu and Features ...Copy options key Use the Options key to take paper from Tray#2 if Tray#1 is out of paper. ■ The factory settings are shown in Bold. After you have #1 (XXX)* the optional tray#2.) #2 (XXX)* B * XXX is the paper size detected by pressing Menu/Set, the LCD ...
...that is the same size, Auto will allow your machine to quickly set in Menu/Set, 1, 3. Press Black Start or Color Start when you choose each setting by the tray or the small paper size you set the following copy settings temporarily for the next copy. B - 14 Menu and Features ...Copy options key Use the Options key to take paper from Tray#2 if Tray#1 is out of paper. ■ The factory settings are shown in Bold. After you have #1 (XXX)* the optional tray#2.) #2 (XXX)* B * XXX is the paper size detected by pressing Menu/Set, the LCD ...
Users Manual - English
Page 126
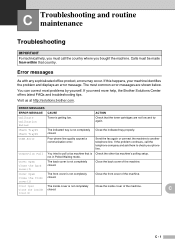
...bought the machine. Check Tray#1 Check Tray#2 The indicated tray is not completely closed . Comm.Error Poor phone line quality caused a communication error. not in Polled Waiting mode. C Troubleshooting and routine maintenance Troubleshooting IMPORTANT For technical help , the Brother Solutions Center offers latest ... your machine identifies the problem and displays an error message. If this happens, your phone line. Visit us at http://solutions.brother.com. Close the back cover of the machine. C cover(1) C - 1 Error messages As with any sophisticated office product,...
...bought the machine. Check Tray#1 Check Tray#2 The indicated tray is not completely closed . Comm.Error Poor phone line quality caused a communication error. not in Polled Waiting mode. C Troubleshooting and routine maintenance Troubleshooting IMPORTANT For technical help , the Brother Solutions Center offers latest ... your machine identifies the problem and displays an error message. If this happens, your phone line. Visit us at http://solutions.brother.com. Close the back cover of the machine. C cover(1) C - 1 Error messages As with any sophisticated office product,...
Users Manual - English
Page 127
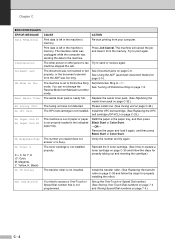
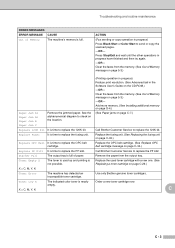
... taking out and inserting the cartridge.) No TR Roller The transfer roller is not properly loaded in the paper tray, and then press Black Start or Color Start. -OR- Install the OPC belt cartridge. (See Replacing the OPC belt cartridge (OP-4CL) on ..., M: Magenta, Y: Yellow, K: Black) The toner cartridge is busy. Re-start printing from the memory. See Document jams on page 7-4.) C - 2 Set Distinctive Ring to access a One-Touch or Speed Dial number that is set to send or receive again. Remove the paper and load it from your computer. No Response/Busy...
... taking out and inserting the cartridge.) No TR Roller The transfer roller is not properly loaded in the paper tray, and then press Black Start or Color Start. -OR- Install the OPC belt cartridge. (See Replacing the OPC belt cartridge (OP-4CL) on ..., M: Magenta, Y: Yellow, K: Black) The toner cartridge is busy. Re-start printing from the memory. See Document jams on page 7-4.) C - 2 Set Distinctive Ring to access a One-Touch or Speed Dial number that is set to send or receive again. Remove the paper and load it from your computer. No Response/Busy...
Users Manual - English
Page 128
... the OPC belt cartridge. (See Replace OPC belt cartridge message on page C-33.) Replace PF Kit2 It is time to replace the 120K kit. Call Brother Customer Service to replace the 120K kit. X = C, M, Y, K C C - 3 See the alphanumerical diagram to check on the location. (See Paper ... on page 5-3.) -OR- Toner Low X The indicated color toner is time to send or copy the scanned pages. -OR- Replace Fuser It is not possible. Clear the faxes from the output tray. Toner Empty X The toner is used toner cartridge with a new one. (See Replacing a toner cartridge on page C-29.) ...
... the OPC belt cartridge. (See Replace OPC belt cartridge message on page C-33.) Replace PF Kit2 It is time to replace the 120K kit. Call Brother Customer Service to replace the 120K kit. X = C, M, Y, K C C - 3 See the alphanumerical diagram to check on the location. (See Paper ... on page 5-3.) -OR- Toner Low X The indicated color toner is time to send or copy the scanned pages. -OR- Replace Fuser It is not possible. Clear the faxes from the output tray. Toner Empty X The toner is used toner cartridge with a new one. (See Replacing a toner cartridge on page C-29.) ...


