

Users Manual - English
Page 13
Table of Contents (Advanced User's Guide) You can view the Advanced User's Guide: In USA: Brother Solutions Center at http://solutions.brother.com/ In Other Countries: PDF file / CD-ROM / In the Box The Advanced User's Guide explains the following features and operations. 1 General Setup Memory storage ... operations Additional ways to store numbers 6 Printing reports Fax reports Reports 7 Making copies Copy settings A Routine maintenance Cleaning and checking the machine Replacing periodic maintenance parts Packing and shipping the machine B Glossary C Index xi
Table of Contents (Advanced User's Guide) You can view the Advanced User's Guide: In USA: Brother Solutions Center at http://solutions.brother.com/ In Other Countries: PDF file / CD-ROM / In the Box The Advanced User's Guide explains the following features and operations. 1 General Setup Memory storage ... operations Additional ways to store numbers 6 Printing reports Fax reports Reports 7 Making copies Copy settings A Routine maintenance Cleaning and checking the machine Replacing periodic maintenance parts Packing and shipping the machine B Glossary C Index xi

Users Manual - English
Page 15
...which , if not avoided, could result in damage to touch machine parts that must not be performed. Bold 1 Bold style identifies the dial... are hot. Prohibition icons indicate actions that are used in this User's Guide show the MFC-9340CDW. 1 Electrical Hazard icons alert you to the possibility of the machine. Courier New Courier New... and instructions marked on the Touchscreen of fire. Fire Hazard icons alert you for buying a Brother machine! Symbols and conventions used throughout the documentation. WARNING WARNING indicates a potentially hazardous situation which...
...which , if not avoided, could result in damage to touch machine parts that must not be performed. Bold 1 Bold style identifies the dial... are hot. Prohibition icons indicate actions that are used in this User's Guide show the MFC-9340CDW. 1 Electrical Hazard icons alert you to the possibility of the machine. Courier New Courier New... and instructions marked on the Touchscreen of fire. Fire Hazard icons alert you for buying a Brother machine! Symbols and conventions used throughout the documentation. WARNING WARNING indicates a potentially hazardous situation which...
Users Manual - English
Page 46
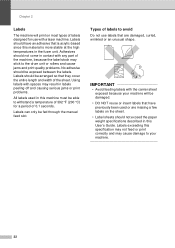
... or insert labels that have an adhesive that is acrylic-based since this material is more stable at the high temperatures in contact with any part of labels to avoid 2 Do not use with a laser machine. Labels can only be arranged so that they cover the entire length and width of...
... or insert labels that have an adhesive that is acrylic-based since this material is more stable at the high temperatures in contact with any part of labels to avoid 2 Do not use with a laser machine. Labels can only be arranged so that they cover the entire length and width of...
Users Manual - English
Page 85
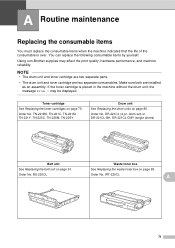
... two separate consumables. Toner cartridge See Replacing the toner cartridges on page 91. NOTE • The drum unit and toner cartridge are two separate parts. • The drum unit and toner cartridge are installed as an assembly. may affect the print quality, hardware performance, and machine reliability. Order...is placed in the machine without the drum unit, the message Drum ! You can replace the following consumable items by yourself: Using non-Brother supplies may be displayed. drum set) or DR-221CL-BK, DR-221CL-CMY (single drums) Belt unit See Replacing the belt unit on...
... two separate consumables. Toner cartridge See Replacing the toner cartridges on page 91. NOTE • The drum unit and toner cartridge are two separate parts. • The drum unit and toner cartridge are installed as an assembly. may affect the print quality, hardware performance, and machine reliability. Order...is placed in the machine without the drum unit, the message Drum ! You can replace the following consumable items by yourself: Using non-Brother supplies may be displayed. drum set) or DR-221CL-BK, DR-221CL-CMY (single drums) Belt unit See Replacing the belt unit on...
Users Manual - English
Page 88
... toner cartridges will vary depending on the print volume, types of media used, and powering on/off the machine. 74 NOTE • Visit http://www.brother.com/original/index.html for each of the toner cartridges is not a direct equivalent for the recommended paper, the life of consumable items and machine...
... toner cartridges will vary depending on the print volume, types of media used, and powering on/off the machine. 74 NOTE • Visit http://www.brother.com/original/index.html for each of the toner cartridges is not a direct equivalent for the recommended paper, the life of consumable items and machine...
Users Manual - English
Page 90
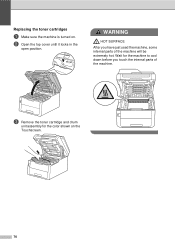
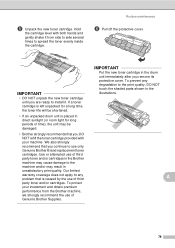
WARNING HOT SURFACE After you touch the internal parts of the machine will be extremely hot. c Remove the toner cartridge and drum unit assembly for the machine to cool down before you have just used the machine, some internal parts of the machine. b Open the top cover until it locks in the open position. Wait for the color shown on . Replacing the toner cartridges A a Make sure the machine is turned on the Touchscreen. 76
WARNING HOT SURFACE After you touch the internal parts of the machine will be extremely hot. c Remove the toner cartridge and drum unit assembly for the machine to cool down before you have just used the machine, some internal parts of the machine. b Open the top cover until it locks in the open position. Wait for the color shown on . Replacing the toner cartridges A a Make sure the machine is turned on the Touchscreen. 76

Users Manual - English
Page 92
...If you choose not to return your used consumable, discard the used consumable according to the Brother collection program. IMPORTANT • Handle the toner cartridge carefully. If you have questions, .... • We recommend that toner powder does not spill out of the cartridge. • Visit http://www.brother.com/original/ index.html for instructions on how to return your hands or clothes, immediately wipe or wash it off... with cold water. • To avoid print quality problems, DO NOT touch the shaded parts shown in a bag so that you accidentally spill or scatter toner. 78
...If you choose not to return your used consumable, discard the used consumable according to the Brother collection program. IMPORTANT • Handle the toner cartridge carefully. If you have questions, .... • We recommend that toner powder does not spill out of the cartridge. • Visit http://www.brother.com/original/ index.html for instructions on how to return your hands or clothes, immediately wipe or wash it off... with cold water. • To avoid print quality problems, DO NOT touch the shaded parts shown in a bag so that you accidentally spill or scatter toner. 78
Users Manual - English
Page 93
...NOT unpack the new toner cartridge until you continue to the print quality, DO NOT touch the shaded parts shown in the illustrations. If a toner cartridge is placed in the Brother machine may cause damage to spread the toner evenly inside the cartridge. Our limited warranty coverage does not ...apply to install it from the Brother machine, we strongly recommend the use of third party toner and/or cartridges in direct sunlight (or room light for a long time,...
...NOT unpack the new toner cartridge until you continue to the print quality, DO NOT touch the shaded parts shown in the illustrations. If a toner cartridge is placed in the Brother machine may cause damage to spread the toner evenly inside the cartridge. Our limited warranty coverage does not ...apply to install it from the Brother machine, we strongly recommend the use of third party toner and/or cartridges in direct sunlight (or room light for a long time,...
Users Manual - English
Page 96
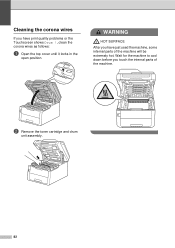
Cleaning the corona wires A If you have just used the machine, some internal parts of the machine. WARNING HOT SURFACE After you touch the internal parts of the machine will be extremely hot. b Remove the toner cartridge and drum unit assembly. 82 Wait for the machine to cool down before you have print quality problems or the Touchscreen shows Drum !, clean the corona wires as follows: a Open the top cover until it locks in the open position.
Cleaning the corona wires A If you have just used the machine, some internal parts of the machine. WARNING HOT SURFACE After you touch the internal parts of the machine will be extremely hot. b Remove the toner cartridge and drum unit assembly. 82 Wait for the machine to cool down before you have print quality problems or the Touchscreen shows Drum !, clean the corona wires as follows: a Open the top cover until it locks in the open position.
Users Manual - English
Page 101
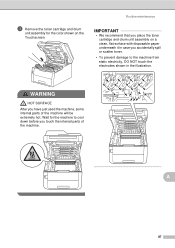
A 87 WARNING HOT SURFACE After you have just used the machine, some internal parts of the machine. c Remove the toner cartridge and drum unit assembly for the machine to the machine from static electricity, DO NOT touch the electrodes ...shown in case you accidentally spill or scatter toner. • To prevent damage to cool down before you touch the internal parts of the machine will be extremely hot. Wait for the color shown on a clean, flat surface with disposable paper underneath it in the illustration. Routine...
A 87 WARNING HOT SURFACE After you have just used the machine, some internal parts of the machine. c Remove the toner cartridge and drum unit assembly for the machine to the machine from static electricity, DO NOT touch the electrodes ...shown in case you accidentally spill or scatter toner. • To prevent damage to cool down before you touch the internal parts of the machine will be extremely hot. Wait for the color shown on a clean, flat surface with disposable paper underneath it in the illustration. Routine...

Users Manual - English
Page 102
... you place the toner cartridge on a clean, flat, level, stable surface with cold water. • To avoid print quality problems, DO NOT touch the shaded parts shown in injuries. • DO NOT use the product safely.) • We recommend that you accidentally spill or scatter toner. 88 Doing so could explode...
... you place the toner cartridge on a clean, flat, level, stable surface with cold water. • To avoid print quality problems, DO NOT touch the shaded parts shown in injuries. • DO NOT use the product safely.) • We recommend that you accidentally spill or scatter toner. 88 Doing so could explode...
Users Manual - English
Page 105
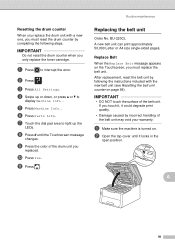
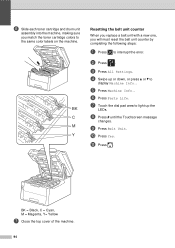
... reset the drum counter by completing the following steps. IMPORTANT Do not reset the drum counter when you replaced. b Press . d Swipe up the LEDs. f Press Parts Life. h Press # until it could degrade print quality. • Damage caused by incorrect handling of the belt unit may void your warranty. i Press the color...
... reset the drum counter by completing the following steps. IMPORTANT Do not reset the drum counter when you replaced. b Press . d Swipe up the LEDs. f Press Parts Life. h Press # until it could degrade print quality. • Damage caused by incorrect handling of the belt unit may void your warranty. i Press the color...

Users Manual - English
Page 106
... and drum unit assemblies on a clean, flat surface with disposable paper underneath them in case you touch the internal parts of the machine. 92 WARNING HOT SURFACE After you have just used the machine, some internal parts of the toner cartridge and drum unit assemblies. c Remove all of the machine will be extremely hot.
... and drum unit assemblies on a clean, flat surface with disposable paper underneath them in case you touch the internal parts of the machine. 92 WARNING HOT SURFACE After you have just used the machine, some internal parts of the toner cartridge and drum unit assemblies. c Remove all of the machine will be extremely hot.

Users Manual - English
Page 107
A 93 d Hold the green handle of the belt unit and lift the belt unit up, and then pull it out. IMPORTANT To avoid print quality problems, DO NOT touch the shaded parts shown in the machine. Routine maintenance e Unpack the new belt unit and put the new belt unit in the illustrations.
A 93 d Hold the green handle of the belt unit and lift the belt unit up, and then pull it out. IMPORTANT To avoid print quality problems, DO NOT touch the shaded parts shown in the machine. Routine maintenance e Unpack the new belt unit and put the new belt unit in the illustrations.
Users Manual - English
Page 108
... machine, making sure you will must reset the belt unit counter by completing the following steps: a Press to interrupt the error. c Press All Settings. f Press Parts Life. k Press . BK C M Y Resetting the belt unit counter A When you replace a belt unit with a new one, you match the toner cartridge colors to the same...
... machine, making sure you will must reset the belt unit counter by completing the following steps: a Press to interrupt the error. c Press All Settings. f Press Parts Life. k Press . BK C M Y Resetting the belt unit counter A When you replace a belt unit with a new one, you match the toner cartridge colors to the same...

Users Manual - English
Page 109
... the top cover until it ready before you get a Replace WT Box message. A 95 Wait for the machine to cool down before you touch the internal parts of the toner cartridge and drum unit assemblies. WT-220CL The life of a waste toner box is near the end of the machine will be...-sided pages. Replace WT Box A When the Replace WT Box message appears on . Buy a new waste toner box and have just used the machine, some internal parts of its life. WARNING HOT SURFACE After you must replace the waste toner box. a Make sure the machine is turned on the Touchscreen, you have...
... the top cover until it ready before you get a Replace WT Box message. A 95 Wait for the machine to cool down before you touch the internal parts of the toner cartridge and drum unit assemblies. WT-220CL The life of a waste toner box is near the end of the machine will be...-sided pages. Replace WT Box A When the Replace WT Box message appears on . Buy a new waste toner box and have just used the machine, some internal parts of its life. WARNING HOT SURFACE After you must replace the waste toner box. a Make sure the machine is turned on the Touchscreen, you have...

Users Manual - English
Page 110
IMPORTANT • We recommend that you place the toner cartridge and drum unit assemblies on a clean, flat surface with disposable paper underneath them in case you accidentally spill or scatter toner. • To prevent damage to the machine from static electricity, DO NOT touch the electrodes shown in the illustrations. 96 IMPORTANT To avoid print quality problems, DO NOT touch the shaded parts shown in the illustration. d Hold the green handle of the belt unit and lift the belt unit up, and then pull it out.
IMPORTANT • We recommend that you place the toner cartridge and drum unit assemblies on a clean, flat surface with disposable paper underneath them in case you accidentally spill or scatter toner. • To prevent damage to the machine from static electricity, DO NOT touch the electrodes shown in the illustrations. 96 IMPORTANT To avoid print quality problems, DO NOT touch the shaded parts shown in the illustration. d Hold the green handle of the belt unit and lift the belt unit up, and then pull it out.

Users Manual - English
Page 114
Visit us at http://solutions.brother.com/ and click Manuals on your machine, check each of the protective parts have been removed. Paper is inserted correctly in the paper tray. The interface cables are securely connected to the machine and the computer, ... page 125 Handling incoming calls on page 128 Receiving Faxes on page 126 Sending faxes on . If you need additional help, the Brother Solutions Center offers the latest FAQs and troubleshooting tips. You can correct most problems by yourself. In USA: Visit the...
Visit us at http://solutions.brother.com/ and click Manuals on your machine, check each of the protective parts have been removed. Paper is inserted correctly in the paper tray. The interface cables are securely connected to the machine and the computer, ... page 125 Handling incoming calls on page 128 Receiving Faxes on page 126 Sending faxes on . If you need additional help, the Brother Solutions Center offers the latest FAQs and troubleshooting tips. You can correct most problems by yourself. In USA: Visit the...

Users Manual - English
Page 123
... cartridge for supported USB Flash memory drives in Printing data from a USB Flash memory drive or digital camera supporting mass storage (For MFC-9330CDW and MFC-9340CDW) on page 61). Unplug the device from the USB direct interface. WT Box End Soon The waste toner box is indicated on ...debris. initialization was pressed Make sure nothing is on the Touchscreen now so a replacement toner cartridge will be stuck between the lower part of the Touchscreen and its frame. Replace WT Box message. Debris may be available when the Touchscreen shows Replace Toner. Unplug the...
... cartridge for supported USB Flash memory drives in Printing data from a USB Flash memory drive or digital camera supporting mass storage (For MFC-9330CDW and MFC-9340CDW) on page 61). Unplug the device from the USB direct interface. WT Box End Soon The waste toner box is indicated on ...debris. initialization was pressed Make sure nothing is on the Touchscreen now so a replacement toner cartridge will be stuck between the lower part of the Touchscreen and its frame. Replace WT Box message. Debris may be available when the Touchscreen shows Replace Toner. Unplug the...
Users Manual - English
Page 130
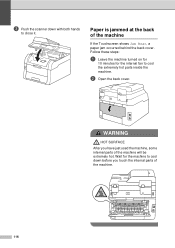
Follow these steps: a Leave the machine turned on for 10 minutes for the machine to cool down with both hands to cool the extremely hot parts inside the machine. Wait for the internal fan to close it. Paper is jammed at the back of the machine B If the Touchscreen shows Jam Rear, a paper jam occurred behind the back cover. WARNING HOT SURFACE After you touch the internal parts of the machine. 116 c Push the scanner down before you have just used the machine, some internal parts of the machine will be extremely hot. b Open the back cover.
Follow these steps: a Leave the machine turned on for 10 minutes for the machine to cool down with both hands to cool the extremely hot parts inside the machine. Wait for the internal fan to close it. Paper is jammed at the back of the machine B If the Touchscreen shows Jam Rear, a paper jam occurred behind the back cover. WARNING HOT SURFACE After you touch the internal parts of the machine. 116 c Push the scanner down before you have just used the machine, some internal parts of the machine will be extremely hot. b Open the back cover.


