Users Manual - English
Page 5
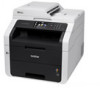
... Toner Cartridge Toner Cartridge 4 pcs. Black Drum Unit. 9 Contains 1 pc. Color Drum Unit. Drum Unit 1 pc. iii cartridge yield is declared in accordance with ISO/IEC 19798. 3 Standard toner cartridge 4 High yield toner cartridge 5 1 page per job 6 Drum life is approximate and may vary by type... of use. 7 Contains 4 pc. Drum Set. 8 Contains 1 pc. Drum Unit 1 pc. Drum Unit Belt Unit Waste Toner Box Telephone Line Cord Basic User's Guide Quick Setup Guide...
... Toner Cartridge Toner Cartridge 4 pcs. Black Drum Unit. 9 Contains 1 pc. Color Drum Unit. Drum Unit 1 pc. iii cartridge yield is declared in accordance with ISO/IEC 19798. 3 Standard toner cartridge 4 High yield toner cartridge 5 1 page per job 6 Drum life is approximate and may vary by type... of use. 7 Contains 4 pc. Drum Set. 8 Contains 1 pc. Drum Unit 1 pc. Drum Unit Belt Unit Waste Toner Box Telephone Line Cord Basic User's Guide Quick Setup Guide...
Users Manual - English
Page 11
... Stop copying 59 Copy preset settings 59 Copy Options 60 10 Printing data from a USB Flash memory drive or digital camera supporting mass storage (For MFC-9330CDW and MFC-9340CDW) 61 Creating a PRN file for direct printing 61 Printing data directly from the USB Flash memory drive or digital camera supporting mass storage... file using the Touchscreen 69 A Routine maintenance 71 Replacing the consumable items 71 Replacing the toner cartridges 75 Cleaning the corona wires 82 Replacing the drum units 85 Replacing the belt unit 91 Replacing the waste toner box 95 ix
... Stop copying 59 Copy preset settings 59 Copy Options 60 10 Printing data from a USB Flash memory drive or digital camera supporting mass storage (For MFC-9330CDW and MFC-9340CDW) 61 Creating a PRN file for direct printing 61 Printing data directly from the USB Flash memory drive or digital camera supporting mass storage... file using the Touchscreen 69 A Routine maintenance 71 Replacing the consumable items 71 Replacing the toner cartridges 75 Cleaning the corona wires 82 Replacing the drum units 85 Replacing the belt unit 91 Replacing the waste toner box 95 ix
Users Manual - English
Page 46
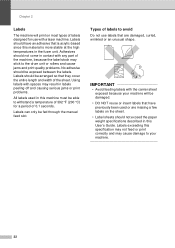
... length and width of 0.1 seconds. Using labels with the carrier sheet exposed because your machine. 32 Labels exceeding this machine must be able to the drum unit or rollers and cause jams and print quality problems. No adhesive should not come in this User's Guide. Types of labels to avoid 2 Do...
... length and width of 0.1 seconds. Using labels with the carrier sheet exposed because your machine. 32 Labels exceeding this machine must be able to the drum unit or rollers and cause jams and print quality problems. No adhesive should not come in this User's Guide. Types of labels to avoid 2 Do...
Users Manual - English
Page 85
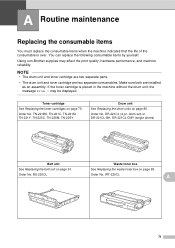
...BK, DR-221CL-CMY (single drums) Belt unit See Replacing the belt unit on page 95. BU-220CL Waste toner box See Replacing the waste toner box on page 91. You can replace the following consumable items by yourself: Using non-Brother supplies may be displayed. Order... No. may affect the print quality, hardware performance, and machine reliability. Order No. WT-220CL A 71 NOTE • The drum unit and toner cartridge are two separate parts. • The drum unit and toner cartridge are ...
...BK, DR-221CL-CMY (single drums) Belt unit See Replacing the belt unit on page 95. BU-220CL Waste toner box See Replacing the waste toner box on page 91. You can replace the following consumable items by yourself: Using non-Brother supplies may be displayed. Order... No. may affect the print quality, hardware performance, and machine reliability. Order No. WT-220CL A 71 NOTE • The drum unit and toner cartridge are two separate parts. • The drum unit and toner cartridge are ...
Users Manual - English
Page 86
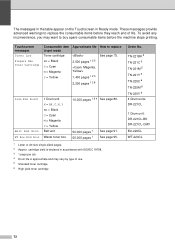
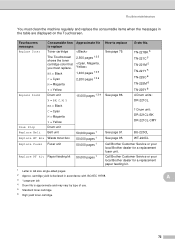
... any inconvenience, you may vary by type of life. TN-221BK 5 TN-221C 5 TN-221M 5 TN-221Y 5 TN-225C 6 TN-225M 6 TN-225Y 6 4 Drum units: DR-221CL 1 Drum unit: DR-221CL-BK DR-221CL-CMY BU-220CL WT-220CL 72 These messages provide advanced warnings to replace the consumable items before the... pages 1 50,000 pages 1 See page 91. The messages in the table appear on the Touchscreen in accordance with ISO/IEC 19798. 3 1 page per job 4 Drum life is approximate and may want to get ready Toner Low Toner cartridge See page 75. cartridge yield is declared in Ready mode.
... any inconvenience, you may vary by type of life. TN-221BK 5 TN-221C 5 TN-221M 5 TN-221Y 5 TN-225C 6 TN-225M 6 TN-225Y 6 4 Drum units: DR-221CL 1 Drum unit: DR-221CL-BK DR-221CL-CMY BU-220CL WT-220CL 72 These messages provide advanced warnings to replace the consumable items before the... pages 1 50,000 pages 1 See page 91. The messages in the table appear on the Touchscreen in accordance with ISO/IEC 19798. 3 1 page per job 4 Drum life is approximate and may want to get ready Toner Low Toner cartridge See page 75. cartridge yield is declared in Ready mode.
Users Manual - English
Page 87
... toner cartridge 73 Routine maintenance You must replace. Call Brother Customer Service or your local Brother dealer for a replacement paper feeding kit. 1 Letter or A4 size single-sided pages. 2 Approx. BK = Black 2,500 pages 1 2 5 1,400 pages 1 2 5 C = Cyan 2,200 pages 1 2 6 M = Magenta Y = Yellow Replace DrumX Drum unit X = BK, C, M, Y 15,000 pages 1 3 4 BK = Black C = Cyan M = Magenta...
... toner cartridge 73 Routine maintenance You must replace. Call Brother Customer Service or your local Brother dealer for a replacement paper feeding kit. 1 Letter or A4 size single-sided pages. 2 Approx. BK = Black 2,500 pages 1 2 5 1,400 pages 1 2 5 C = Cyan 2,200 pages 1 2 6 M = Magenta Y = Yellow Replace DrumX Drum unit X = BK, C, M, Y 15,000 pages 1 3 4 BK = Black C = Cyan M = Magenta...
Users Manual - English
Page 90
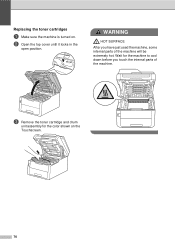
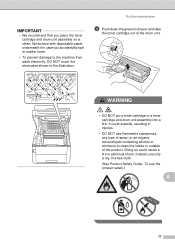
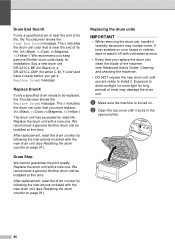
WARNING HOT SURFACE After you touch the internal parts of the machine will be extremely hot. Wait for the color shown on . b Open the top cover until it locks in the open position. c Remove the toner cartridge and drum unit assembly for the machine to cool down before you have just used the machine, some internal parts of the machine. Replacing the toner cartridges A a Make sure the machine is turned on the Touchscreen. 76
WARNING HOT SURFACE After you touch the internal parts of the machine will be extremely hot. Wait for the color shown on . b Open the top cover until it locks in the open position. c Remove the toner cartridge and drum unit assembly for the machine to cool down before you have just used the machine, some internal parts of the machine. Replacing the toner cartridges A a Make sure the machine is turned on the Touchscreen. 76
Users Manual - English
Page 91
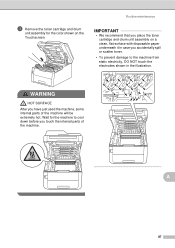
...; We recommend that you place the toner cartridge and drum unit assembly on a clean, flat surface with disposable paper underneath it in case you accidentally spill or scatter toner. • To prevent damage to clean the inside or outside of the drum unit. WARNING • DO NOT put a toner ...cartridge or a toner cartridge and drum unit assembly into a fire. Doing so could explode, resulting in the illustration. It could cause a fire ...
...; We recommend that you place the toner cartridge and drum unit assembly on a clean, flat surface with disposable paper underneath it in case you accidentally spill or scatter toner. • To prevent damage to clean the inside or outside of the drum unit. WARNING • DO NOT put a toner ...cartridge or a toner cartridge and drum unit assembly into a fire. Doing so could explode, resulting in the illustration. It could cause a fire ...

Users Manual - English
Page 92
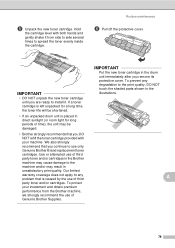
...call your local waste disposal office. • We recommend that toner powder does not spill out of the cartridge. • Visit http://www.brother.com/original/ index.html for instructions on a clean, flat, level, stable surface with cold water. • To avoid print quality problems, ... with disposable paper underneath it separate from domestic waste. NOTE • Be sure to seal up the used consumable according to the Brother collection program. IMPORTANT • Handle the toner cartridge carefully. If you place the toner cartridge on how to return your used consumable...
...call your local waste disposal office. • We recommend that toner powder does not spill out of the cartridge. • Visit http://www.brother.com/original/ index.html for instructions on a clean, flat, level, stable surface with cold water. • To avoid print quality problems, ... with disposable paper underneath it separate from domestic waste. NOTE • Be sure to seal up the used consumable according to the Brother collection program. IMPORTANT • Handle the toner cartridge carefully. If you place the toner cartridge on how to return your used consumable...
Users Manual - English
Page 93
... quality. We also strongly recommend that you remove its protective cover. A 79 If a toner cartridge is caused by the use only Genuine Brother Brand replacement toner cartridges. Our limited warranty coverage does not apply to spread the toner evenly inside the cartridge. e Unpack the new toner cartridge... recommend the use of third party toner and/or cartridges in the Brother machine may cause damage to the machine and/or may be shortened. • If an unpacked drum unit is placed in the drum unit immediately after you DO NOT refill the toner cartridge provided with both...
... quality. We also strongly recommend that you remove its protective cover. A 79 If a toner cartridge is caused by the use only Genuine Brother Brand replacement toner cartridges. Our limited warranty coverage does not apply to spread the toner evenly inside the cartridge. e Unpack the new toner cartridge... recommend the use of third party toner and/or cartridges in the Brother machine may cause damage to the machine and/or may be shortened. • If an unpacked drum unit is placed in the drum unit immediately after you DO NOT refill the toner cartridge provided with both...
Users Manual - English
Page 94
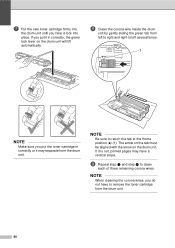
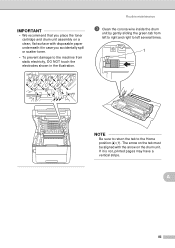
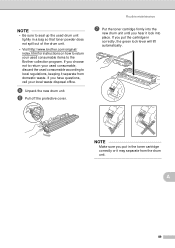
... each of three remaining corona wires. i Repeat step c and step h to the Home position (a) (1). If it may have to remove the toner cartridge from the drum unit. NOTE When cleaning the corona wires, you put it in correctly or it is not, printed pages may separate from the... drum unit. 80 h Clean the corona wire inside the drum unit by gently sliding the green tab from left to right and right to left several times. 1 NOTE Make sure you...
... each of three remaining corona wires. i Repeat step c and step h to the Home position (a) (1). If it may have to remove the toner cartridge from the drum unit. NOTE When cleaning the corona wires, you put it in correctly or it is not, printed pages may separate from the... drum unit. 80 h Clean the corona wire inside the drum unit by gently sliding the green tab from left to right and right to left several times. 1 NOTE Make sure you...
Users Manual - English
Page 95
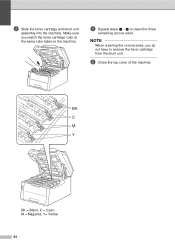
j Slide each toner cartridge and drum unit assembly into the machine. NOTE After replacing a toner cartridge, DO NOT turn off the machine or open the top cover until the Touchscreen clears the Please wait. BK C M Y BK = Black, C = Cyan, M = Magenta, Y= Yellow A 81 message and returns to the same color label on the machine. Routine maintenance k Close the top cover of the machine. Make sure you match the toner cartridge color to Ready mode.
j Slide each toner cartridge and drum unit assembly into the machine. NOTE After replacing a toner cartridge, DO NOT turn off the machine or open the top cover until the Touchscreen clears the Please wait. BK C M Y BK = Black, C = Cyan, M = Magenta, Y= Yellow A 81 message and returns to the same color label on the machine. Routine maintenance k Close the top cover of the machine. Make sure you match the toner cartridge color to Ready mode.
Users Manual - English
Page 96
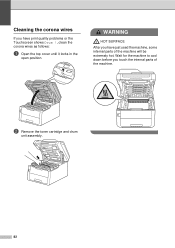
Cleaning the corona wires A If you have just used the machine, some internal parts of the machine. WARNING HOT SURFACE After you touch the internal parts of the machine will be extremely hot. b Remove the toner cartridge and drum unit assembly. 82 Wait for the machine to cool down before you have print quality problems or the Touchscreen shows Drum !, clean the corona wires as follows: a Open the top cover until it locks in the open position.
Cleaning the corona wires A If you have just used the machine, some internal parts of the machine. WARNING HOT SURFACE After you touch the internal parts of the machine will be extremely hot. b Remove the toner cartridge and drum unit assembly. 82 Wait for the machine to cool down before you have print quality problems or the Touchscreen shows Drum !, clean the corona wires as follows: a Open the top cover until it locks in the open position.
Users Manual - English
Page 97
A 83 IMPORTANT • We recommend that you place the toner cartridge and drum unit assembly on the drum unit. If it in the illustration. Routine maintenance c Clean the corona wire inside the drum unit by gently sliding the green tab from left to right and right to left several times. 1 NOTE Be sure to...
A 83 IMPORTANT • We recommend that you place the toner cartridge and drum unit assembly on the drum unit. If it in the illustration. Routine maintenance c Clean the corona wire inside the drum unit by gently sliding the green tab from left to right and right to left several times. 1 NOTE Be sure to...
Users Manual - English
Page 98
e Repeat steps b - BK C M Y BK = Black, C = Cyan, M = Magenta, Y= Yellow 84 d Slide the toner cartridge and drum unit assembly into the machine. Make sure you do not have to remove the toner cartridge from the drum unit. NOTE When cleaning the corona wires, you match the toner cartridge color to clean the three remaining corona wires. f Close the top cover of the machine. d to the same color label on the machine.
e Repeat steps b - BK C M Y BK = Black, C = Cyan, M = Magenta, Y= Yellow 84 d Slide the toner cartridge and drum unit assembly into the machine. Make sure you do not have to remove the toner cartridge from the drum unit. NOTE When cleaning the corona wires, you match the toner cartridge color to clean the three remaining corona wires. f Close the top cover of the machine. d to the same color label on the machine.
Users Manual - English
Page 99
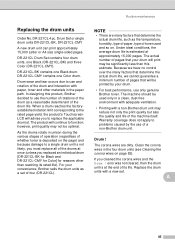
...only the print quality but also the quality and life of the drum and interaction with paper, toner and other than this estimate. Clean the corona wires in the paper path. Replace the drum units with a non-Brother drum unit may not be used and so on the page) and... (DR-221CL-BK) and three Color (DR-221CL-CMY). In designing this product, Brother decided to replace the applicable drum(s). Under ideal conditions, the average drum life is not likely, you cleaned the corona wires and the Drum ! Because we cannot guarantee a minimum number of its rated life). A 85 Routine ...
...only the print quality but also the quality and life of the drum and interaction with paper, toner and other than this estimate. Clean the corona wires in the paper path. Replace the drum units with a non-Brother drum unit may not be used and so on the page) and... (DR-221CL-BK) and three Color (DR-221CL-CMY). In designing this product, Brother decided to replace the applicable drum(s). Under ideal conditions, the average drum life is not likely, you cleaned the corona wires and the Drum ! Because we cannot guarantee a minimum number of its rated life). A 85 Routine ...
Users Manual - English
Page 100
...-221CL-CMY (for installation. After replacement, reset the drum counter by following the instructions included with the new drum unit (see Resetting the drum counter on your hands or clothes, wipe or wash it ready before you keep genuine Brother drum units ready for either C, M, Y color) and have... new one . We recommend you get a Replace DrumX message. Exposure to install it may damage the drum unit. Replace the drum unit with cold water at this time. We recommend a genuine Brother drum unit be installed at once. • Every time you must replace. (BK=Black, C=Cyan, M=...
...-221CL-CMY (for installation. After replacement, reset the drum counter by following the instructions included with the new drum unit (see Resetting the drum counter on your hands or clothes, wipe or wash it ready before you keep genuine Brother drum units ready for either C, M, Y color) and have... new one . We recommend you get a Replace DrumX message. Exposure to install it may damage the drum unit. Replace the drum unit with cold water at this time. We recommend a genuine Brother drum unit be installed at once. • Every time you must replace. (BK=Black, C=Cyan, M=...
Users Manual - English
Page 101
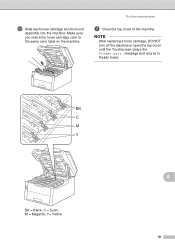
Routine maintenance IMPORTANT • We recommend that you place the toner cartridge and drum unit assembly on the Touchscreen. WARNING HOT SURFACE After you touch the internal parts of the machine will be extremely hot. A 87 Wait for the color shown on a clean, flat surface with disposable ...or scatter toner. • To prevent damage to cool down before you have just used the machine, some internal parts of the machine. c Remove the toner cartridge and drum unit assembly for the machine to the machine from static electricity, DO NOT touch the electrodes shown in the ...
Routine maintenance IMPORTANT • We recommend that you place the toner cartridge and drum unit assembly on the Touchscreen. WARNING HOT SURFACE After you touch the internal parts of the machine will be extremely hot. A 87 Wait for the color shown on a clean, flat surface with disposable ...or scatter toner. • To prevent damage to cool down before you have just used the machine, some internal parts of the machine. c Remove the toner cartridge and drum unit assembly for the machine to the machine from static electricity, DO NOT touch the electrodes shown in the ...

Users Manual - English
Page 102
... down the green lock lever and take the toner cartridge out of the product. WARNING • DO NOT put a toner cartridge or a toner cartridge and drum unit assembly into a fire. Doing so could explode, resulting in injuries. • DO NOT use the product safely.) • We recommend that you place the...: To use flammable substances, any type of spray, or an organic solvent/liquid containing alcohol or ammonia to clean the inside or outside of the drum unit. IMPORTANT • Handle the toner cartridge carefully.
... down the green lock lever and take the toner cartridge out of the product. WARNING • DO NOT put a toner cartridge or a toner cartridge and drum unit assembly into a fire. Doing so could explode, resulting in injuries. • DO NOT use the product safely.) • We recommend that you place the...: To use flammable substances, any type of spray, or an organic solvent/liquid containing alcohol or ammonia to clean the inside or outside of the drum unit. IMPORTANT • Handle the toner cartridge carefully.
Users Manual - English
Page 103
...bag so that toner powder does not spill out of the drum unit. • Visit http://www.brother.com/original/ index.html for instructions on how to return your used consumable according to the Brother collection program. e Unpack the new drum unit. If you put the cartridge in the toner cartridge ...correctly or it lock into the new drum unit until you put in correctly, the green lock lever will lift ...
...bag so that toner powder does not spill out of the drum unit. • Visit http://www.brother.com/original/ index.html for instructions on how to return your used consumable according to the Brother collection program. e Unpack the new drum unit. If you put the cartridge in the toner cartridge ...correctly or it lock into the new drum unit until you put in correctly, the green lock lever will lift ...


