
Users Manual - English
Page 12
Fax Functions 3-2 2. Printer Functions 3-5 3. Video Functions 3-5 5. PhotoCapture Center™ Functions 3-6 Initial Setup 4-1 Getting Started 4-1 Setting Date and Time 4-1 Setting Station ID ... a Reduced Incoming Document 5-3 Recommended Reductions 5-3 Setting Paper Size 5-3 Advanced Receiving Operations 5-4 Operation from Extension Telephone 5-4 3 4 5 x If you are installing the MFC to work with a PBX:...... 2-16 Custom Features on a Single Line 2-16 On-Screen Programming 3-1 User-Friendly Programming 3-1 Function Mode 3-1 Alternating Displays 3-2 Function Selection...
Fax Functions 3-2 2. Printer Functions 3-5 3. Video Functions 3-5 5. PhotoCapture Center™ Functions 3-6 Initial Setup 4-1 Getting Started 4-1 Setting Date and Time 4-1 Setting Station ID ... a Reduced Incoming Document 5-3 Recommended Reductions 5-3 Setting Paper Size 5-3 Advanced Receiving Operations 5-4 Operation from Extension Telephone 5-4 3 4 5 x If you are installing the MFC to work with a PBX:...... 2-16 Custom Features on a Single Line 2-16 On-Screen Programming 3-1 User-Friendly Programming 3-1 Function Mode 3-1 Alternating Displays 3-2 Function Selection...
Users Manual - English
Page 17
...MFC as a Printer 14-1 Features 14-1 Printer Driver 14-1 Choosing the Right Kind of Paper 14-2 Multi-purpose Paper Cassette 14-2 Loading Paper in Multi-purpose Paper Cassette 14-2 Adjusting for Thick Paper and Envelopes 14-2 Manual Feed Slot 14-3 Setup for Envelopes 14-4 Simultaneous Printing/Fax 14-4 Printer... 14-4 Reset Key 14-4 Ink Management Key 14-5 Turning Off Bi-directional Printing 14-5 15 Printer Driver Settings 15-1 Using the Brother MFC9200C Series Printer Driver ......... 15-1 The Paper Tab 15-1 Paper Size 15-2 User Defined Paper Size 15-2 Orientation...
...MFC as a Printer 14-1 Features 14-1 Printer Driver 14-1 Choosing the Right Kind of Paper 14-2 Multi-purpose Paper Cassette 14-2 Loading Paper in Multi-purpose Paper Cassette 14-2 Adjusting for Thick Paper and Envelopes 14-2 Manual Feed Slot 14-3 Setup for Envelopes 14-4 Simultaneous Printing/Fax 14-4 Printer... 14-4 Reset Key 14-4 Ink Management Key 14-5 Turning Off Bi-directional Printing 14-5 15 Printer Driver Settings 15-1 Using the Brother MFC9200C Series Printer Driver ......... 15-1 The Paper Tab 15-1 Paper Size 15-2 User Defined Paper Size 15-2 Orientation...
Users Manual - English
Page 20
...20-1 For Windows® 95/98/98SE, ME only 20-1 Main Features 20-1 To Access the On-Line Documentation 20-1 21 Using the Brother MFC with a New Power Macintosh® G3, G4 or iMac™/iBook 21-1 Set up Your USB Equipped Apple® Macintosh® G3,...G4 or iMac™ with Mac OS 8.5/8.51/8.6/9.0 21-1 Installing the Brother Printer and Scanner Drivers 21-1 Installing PaperPort 21-2 Using the Brother Printer Driver with your Apple® Macintosh 21-2 Using Brother TWAIN Scanner Driver with Your Apple® Macintosh 21-4 Accessing the Scanner 21-5 Scanning a ...
...20-1 For Windows® 95/98/98SE, ME only 20-1 Main Features 20-1 To Access the On-Line Documentation 20-1 21 Using the Brother MFC with a New Power Macintosh® G3, G4 or iMac™/iBook 21-1 Set up Your USB Equipped Apple® Macintosh® G3,...G4 or iMac™ with Mac OS 8.5/8.51/8.6/9.0 21-1 Installing the Brother Printer and Scanner Drivers 21-1 Installing PaperPort 21-2 Using the Brother Printer Driver with your Apple® Macintosh 21-2 Using Brother TWAIN Scanner Driver with Your Apple® Macintosh 21-4 Accessing the Scanner 21-5 Scanning a ...
Users Manual - English
Page 21
... Compliance Statement 22-3 Important Safety Instructions 22-3 Trademarks 22-5 23 Troubleshooting and Routine Maintenance 23-1 Troubleshooting 23-1 Brother fax-back system 23-1 Frequently Asked Questions (FAQs 23-1 Brother Bulletin Board 23-1 Error Messages 23-2 Document Jams and Paper Jams 23-4 Original is Jammed in the Top... Ink Cartridges 23-10 Turning Off Bi-directional Printing 23-11 Packing and Shipping the MFC 23-11 Routine Maintenance 23-14 Cleaning the Scanner 23-14 Cleaning the MFC Printer Platen 23-15 Cleaning the Pick-up Roller 23-15 Replacing the Ink Cartridges 23-...
... Compliance Statement 22-3 Important Safety Instructions 22-3 Trademarks 22-5 23 Troubleshooting and Routine Maintenance 23-1 Troubleshooting 23-1 Brother fax-back system 23-1 Frequently Asked Questions (FAQs 23-1 Brother Bulletin Board 23-1 Error Messages 23-2 Document Jams and Paper Jams 23-4 Original is Jammed in the Top... Ink Cartridges 23-10 Turning Off Bi-directional Printing 23-11 Packing and Shipping the MFC 23-11 Routine Maintenance 23-14 Cleaning the Scanner 23-14 Cleaning the MFC Printer Platen 23-15 Cleaning the Pick-up Roller 23-15 Replacing the Ink Cartridges 23-...
Users Manual - English
Page 22
Printer S-2 Printing S-2 Controller S-2 Print Media S-3 Consumable Items S-3 25 Glossary G-1 26 Index I-1 27 Remote Retrieval Access Card R-1 xx
Printer S-2 Printing S-2 Controller S-2 Print Media S-3 Consumable Items S-3 25 Glossary G-1 26 Index I-1 27 Remote Retrieval Access Card R-1 xx
Users Manual - English
Page 27
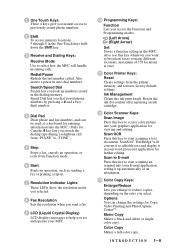
...Fax Resolution Sets the resolution when you send a fax. 9 LCD (Liquid Crystal Display) LCD displays messages to help you set and operate your MFC. 10 Programming Keys: Function Lets you dial stored phone numbers by pressing a # and a twodigit number. 4 Dial Pad Dials phone and fax... the dialing type during a telephone call from "PULSE" to "TONE". 5 Stop Stops a fax, cancels an operation, or exits from the printer memory, and restores factory default settings. Color Copy Makes a full-color copy. ScanSoft™ TextBridge® will handle incoming calls. Redial/Pause Redials...
...Fax Resolution Sets the resolution when you send a fax. 9 LCD (Liquid Crystal Display) LCD displays messages to help you set and operate your MFC. 10 Programming Keys: Function Lets you dial stored phone numbers by pressing a # and a twodigit number. 4 Dial Pad Dials phone and fax... the dialing type during a telephone call from "PULSE" to "TONE". 5 Stop Stops a fax, cancels an operation, or exits from the printer memory, and restores factory default settings. Color Copy Makes a full-color copy. ScanSoft™ TextBridge® will handle incoming calls. Redial/Pause Redials...
Users Manual - English
Page 32
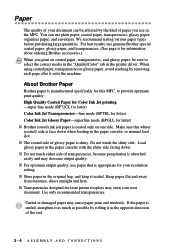
...When you print on one side. For best results, use genuine Brother special coated paper, glossy paper, and transparencies. (See page ii for your resolution setting. About Brother Paper Brother paper is manufactured specifically for laser printers/copiers may cause paper jams and misfeeds. s For optimum output..., glossy paper, organizer paper, and envelopes. When using coated paper, transparencies or glossy paper, avoid stacking by rolling it in the MFC. s Do not touch either side of glossy paper is absorbed easily and may decrease output quality. s The coated side of transparencies,...
...When you print on one side. For best results, use genuine Brother special coated paper, glossy paper, and transparencies. (See page ii for your resolution setting. About Brother Paper Brother paper is manufactured specifically for laser printers/copiers may cause paper jams and misfeeds. s For optimum output..., glossy paper, organizer paper, and envelopes. When using coated paper, transparencies or glossy paper, avoid stacking by rolling it in the MFC. s Do not touch either side of glossy paper is absorbed easily and may decrease output quality. s The coated side of transparencies,...
Users Manual - English
Page 33
... highly textured paper and envelopes s Envelopes with clasps s Envelopes of baggy construction s Envelopes not sharply creased s Embossed envelopes s Paper and envelopes already printed with a laser printer s Envelopes preprinted on top of 20 lb (75 g/m2) Retrieve transparencies and glossies as they exit the machine so they don't stack and smear. Do...
... highly textured paper and envelopes s Envelopes with clasps s Envelopes of baggy construction s Envelopes not sharply creased s Embossed envelopes s Paper and envelopes already printed with a laser printer s Envelopes preprinted on top of 20 lb (75 g/m2) Retrieve transparencies and glossies as they exit the machine so they don't stack and smear. Do...
Users Manual - English
Page 34
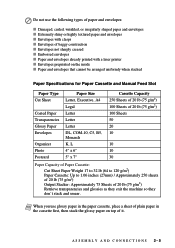
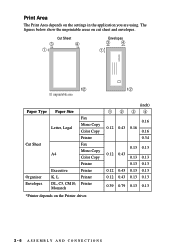
... Paper Size Letter, Legal A4 Executive K, L DL, C5, CM10, Monarch Fax Mono Copy Color Copy Printer Fax Mono Copy Color Copy Printer Printer Printer Printer *Printer depends on cut sheet and envelopes. The figures below show the unprintable areas on the Printer driver. (inch) 1234 0.16 0.12 0.43 0.16 0.16 0.34 0.13 0.13 0.12 0.43 0.13 0.13...
... Paper Size Letter, Legal A4 Executive K, L DL, C5, CM10, Monarch Fax Mono Copy Color Copy Printer Fax Mono Copy Color Copy Printer Printer Printer Printer *Printer depends on cut sheet and envelopes. The figures below show the unprintable areas on the Printer driver. (inch) 1234 0.16 0.12 0.43 0.16 0.16 0.34 0.13 0.13 0.12 0.43 0.13 0.13...

Users Manual - English
Page 45
...Stop. 3 On-Screen Programming 3 User-Friendly Programming We have designed your Multi-Function Center with on -screen prompts to help you program your MFC. Press 4 for Video Functions-OR- 5.PHOTOCAPTURE Press 5 for Copy Functions-OR- When you enter the Function Mode, your selection, press ... the function menu selections and programming options and settings. The LCD shows: Then Press 1 for Fax Functions-OR- 1.FAX 2.PRINTER 3.COPY Press 2 for Printer Functions-OR- 4.VIDEO Press 3 for PhotoCapture Center™ Functions. These function options appear one after the other on the LCD.
...Stop. 3 On-Screen Programming 3 User-Friendly Programming We have designed your Multi-Function Center with on -screen prompts to help you program your MFC. Press 4 for Video Functions-OR- 5.PHOTOCAPTURE Press 5 for Copy Functions-OR- When you enter the Function Mode, your selection, press ... the function menu selections and programming options and settings. The LCD shows: Then Press 1 for Fax Functions-OR- 1.FAX 2.PRINTER 3.COPY Press 2 for Printer Functions-OR- 4.VIDEO Press 3 for PhotoCapture Center™ Functions. These function options appear one after the other on the LCD.
Users Manual - English
Page 49
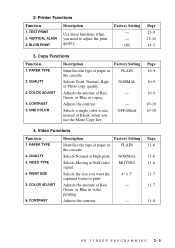
... key. 2. PLAIN Selects Draft, Normal, High or Photo copy quality. Video Functions Function 1. OFF=Black Page 10-9 10-9 10-9 10-10 10-10 4. VIDEO TYPE 4. Printer Functions Function 1. TEST PRINT 2. Factory Setting - - Copy Functions Function 1. QUALITY 3. Green, or Blue in video printing. Selects a single color to adjust the print quality. PRINT...
... key. 2. PLAIN Selects Draft, Normal, High or Photo copy quality. Video Functions Function 1. OFF=Black Page 10-9 10-9 10-9 10-10 10-10 4. VIDEO TYPE 4. Printer Functions Function 1. TEST PRINT 2. Factory Setting - - Copy Functions Function 1. QUALITY 3. Green, or Blue in video printing. Selects a single color to adjust the print quality. PRINT...
Users Manual - English
Page 113
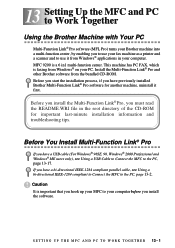
...H E M F C A N D P C T O W O R K T O G E T H E R 13 - 1 13 Setting Up the MFC and PC 13 to Work Together Using the Brother Machine with Your PC Multi-Function Link® Pro software (MFL Pro) turns your Brother machine into a multi-function center, by enabling you to use your fax machine as a printer and a scanner and to use it first... parallel cable, see Using a USB Cable to Connect the MFC to the PC, page 13-2. Before you install the Multi-Function Link® Pro, you have previously installed Brother Multi-Function Link® Pro software for important last-minute installation...
...H E M F C A N D P C T O W O R K T O G E T H E R 13 - 1 13 Setting Up the MFC and PC 13 to Work Together Using the Brother Machine with Your PC Multi-Function Link® Pro software (MFL Pro) turns your Brother machine into a multi-function center, by enabling you to use your fax machine as a printer and a scanner and to use it first... parallel cable, see Using a USB Cable to Connect the MFC to the PC, page 13-2. Before you install the Multi-Function Link® Pro, you have previously installed Brother Multi-Function Link® Pro software for important last-minute installation...
Users Manual - English
Page 116
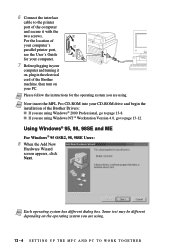
Note Please follow the instructions for your computer. 7 Before plugging in the electrical cord of the Brother machine, then turn on the operating system you are using . s If you are using . 13 - 4 S E T T I N G U P T H E M F C A N D P C T O W O R K T O G E T H E R Note Each operating system has... different depending on your CD-ROM drive and begin the installation of the Brother Drivers: s If you are using Windows NT ® Workstation Version 4.0, go to the printer port of your computer's parallel printer port, see the User's Guide for the operating system you are using ...
Note Please follow the instructions for your computer. 7 Before plugging in the electrical cord of the Brother machine, then turn on the operating system you are using . s If you are using . 13 - 4 S E T T I N G U P T H E M F C A N D P C T O W O R K T O G E T H E R Note Each operating system has... different depending on your CD-ROM drive and begin the installation of the Brother Drivers: s If you are using Windows NT ® Workstation Version 4.0, go to the printer port of your computer's parallel printer port, see the User's Guide for the operating system you are using ...
Users Manual - English
Page 119
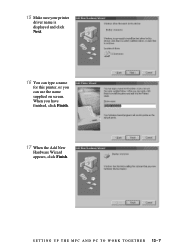
When you can type a name for this printer, or you have finished, click Finish. 17 When the Add New Hardware Wizard appears, click Finish. S E T T I N G U P T H E M F C A N D P C T O W O R K T O G E T H E R 13 - 7 15 Make sure your printer driver name is displayed and click Next. 16 You can use the name supplied on screen.
When you can type a name for this printer, or you have finished, click Finish. 17 When the Add New Hardware Wizard appears, click Finish. S E T T I N G U P T H E M F C A N D P C T O W O R K T O G E T H E R 13 - 7 15 Make sure your printer driver name is displayed and click Next. 16 You can use the name supplied on screen.
Users Manual - English
Page 123
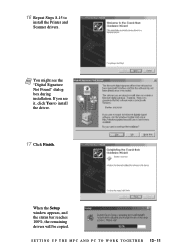
If you see the "Digital Signature Not Found" dialog box during installation. S E T T I N G U P T H E M F C A N D P C T O W O R K T O G E T H E R 13 - 11 16 Repeat Steps 8-15 to install the driver. 17 Click Finish. When the Setup window appears, and the status bar reaches 100%, the remaining drivers will be copied. Note You might see it, click Yes to install the Printer and Scanner drivers.
If you see the "Digital Signature Not Found" dialog box during installation. S E T T I N G U P T H E M F C A N D P C T O W O R K T O G E T H E R 13 - 11 16 Repeat Steps 8-15 to install the driver. 17 Click Finish. When the Setup window appears, and the status bar reaches 100%, the remaining drivers will be copied. Note You might see it, click Yes to install the Printer and Scanner drivers.
Users Manual - English
Page 124
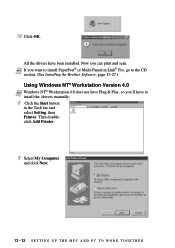
18 Click OK. Now you 'll have been installed. Then doubleclick Add Printer. 9 Select My Computer and click Next. 13 - 12 S E T T I N G U P T H E M F C A N D P C T O W O R K T O G E T H E R Note If you want to install PaperPort® or Multi-Function Link® Pro, go to ...install the drivers manually: 8 Click the Start button in the Task bar and select Setting, then Printer. All the drivers have to the CD section. (See Installing the Brother Software, page 13-27.) Using Windows NT® Workstation Version 4.0 Note Windows NT® Workstation 4.0 does not have ...
18 Click OK. Now you 'll have been installed. Then doubleclick Add Printer. 9 Select My Computer and click Next. 13 - 12 S E T T I N G U P T H E M F C A N D P C T O W O R K T O G E T H E R Note If you want to install PaperPort® or Multi-Function Link® Pro, go to ...install the drivers manually: 8 Click the Start button in the Task bar and select Setting, then Printer. All the drivers have to the CD section. (See Installing the Brother Software, page 13-27.) Using Windows NT® Workstation Version 4.0 Note Windows NT® Workstation 4.0 does not have ...
Users Manual - English
Page 126
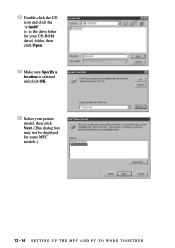
13 Double-click the CD icon and click the "x:\nt40" (x: is the drive letter for your CD-ROM drive) folder, then click Open. 14 Make sure Specify a location is selected and click OK. 15 Select your printer model, then click Next. (This dialog box may not be displayed for some MFC models.) 13 - 14 S E T T I N G U P T H E M F C A N D P C T O W O R K T O G E T H E R
13 Double-click the CD icon and click the "x:\nt40" (x: is the drive letter for your CD-ROM drive) folder, then click Open. 14 Make sure Specify a location is selected and click OK. 15 Select your printer model, then click Next. (This dialog box may not be displayed for some MFC models.) 13 - 14 S E T T I N G U P T H E M F C A N D P C T O W O R K T O G E T H E R
Users Manual - English
Page 128
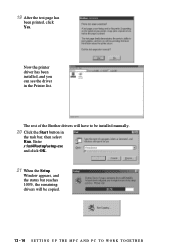
The rest of the Brother drivers will be installed manually. 20 Click the Start button in the Printer list. 19 After the test page has been printed, click Yes. Now the printer driver has been installed, and you can see the driver in the task bar, then select Run. Enter x:\nt40\setup\setup.exe and click OK. 21 When the Setup Window appears, and the status bar reaches 100%, the remaining drivers will have to be copied. 13 - 16 S E T T I N G U P T H E M F C A N D P C T O W O R K T O G E T H E R
The rest of the Brother drivers will be installed manually. 20 Click the Start button in the Printer list. 19 After the test page has been printed, click Yes. Now the printer driver has been installed, and you can see the driver in the task bar, then select Run. Enter x:\nt40\setup\setup.exe and click OK. 21 When the Setup Window appears, and the status bar reaches 100%, the remaining drivers will have to be copied. 13 - 16 S E T T I N G U P T H E M F C A N D P C T O W O R K T O G E T H E R

Users Manual - English
Page 134
16 When the Add New Hardware Wizard displays the message that installation is completed, click Finish. 17 To install all the drivers, repeat Steps 4 to 10. 18 After the USB Composite Device, PhotoCapture Center™ Fax Modem, Scanner and Printer Drivers have finished, click Next. 13 - 22 S E T T I N G U P T H E M F C A N D P C T O W O R K T O G E T H E R When you have been installed, select BRUSB: USB Printer Port as the printer port and click Next. 19 Enter a name for the printer, or you can use the displayed name.
16 When the Add New Hardware Wizard displays the message that installation is completed, click Finish. 17 To install all the drivers, repeat Steps 4 to 10. 18 After the USB Composite Device, PhotoCapture Center™ Fax Modem, Scanner and Printer Drivers have finished, click Next. 13 - 22 S E T T I N G U P T H E M F C A N D P C T O W O R K T O G E T H E R When you have been installed, select BRUSB: USB Printer Port as the printer port and click Next. 19 Enter a name for the printer, or you can use the displayed name.
Users Manual - English
Page 139
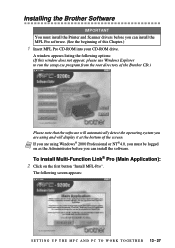
...174; Pro (Main Application): 2 Click on as the Administrator before you are using Windows® 2000 Professional or NT®4.0, you must install the Printer and Scanner drivers before you can install the MFL Pro software. (See the beginning of this window does not appear, please use Windows Explorer to... run the setup.exe program from the root directory of the Brother CD.) Please note that the software will automatically detect the operating system you are using and will display it at the bottom of the ...
...174; Pro (Main Application): 2 Click on as the Administrator before you are using Windows® 2000 Professional or NT®4.0, you must install the Printer and Scanner drivers before you can install the MFL Pro software. (See the beginning of this window does not appear, please use Windows Explorer to... run the setup.exe program from the root directory of the Brother CD.) Please note that the software will automatically detect the operating system you are using and will display it at the bottom of the ...


