
Quick Setup Guide - English
Page 1
Quick Setup Guide Start Here (EU only) MFC-9120CN Before you can use at least two people to pinch your machine. Be careful not to lift the machine. To prevent injuries use the machine, ... Telephone Line Cord Quick Setup Guide AC Power Cord Waste Toner Box (pre-installed) Belt Unit (pre-installed) Drum Unit and Stater Toner Cartridge Assemblies (Black, Cyan, Magenta and Yellow) WARNING • Plastic bags are used in other languages, please visit http://solutions.brother.com/. To avoid danger of your fingers when you put...
Quick Setup Guide Start Here (EU only) MFC-9120CN Before you can use at least two people to pinch your machine. Be careful not to lift the machine. To prevent injuries use the machine, ... Telephone Line Cord Quick Setup Guide AC Power Cord Waste Toner Box (pre-installed) Belt Unit (pre-installed) Drum Unit and Stater Toner Cartridge Assemblies (Black, Cyan, Magenta and Yellow) WARNING • Plastic bags are used in other languages, please visit http://solutions.brother.com/. To avoid danger of your fingers when you put...

Quick Setup Guide - English
Page 4
...can stain your machine. • DO NOT plug in the AC power cord yet. 3 Install the drum unit and toner cartridge assemblies a Unpack the four drum unit and toner cartridge assemblies and gently shake each of them from the inside the assembly. c Remove the packing material from side to side several.... 2 Remove the packing material from the machine IMPORTANT • Save all packing material and the carton in case you have to distribute the toner evenly inside of the machine. b Open the top cover by pulling on the handle a. IMPORTANT To avoid print quality problems, DO NOT touch...
...can stain your machine. • DO NOT plug in the AC power cord yet. 3 Install the drum unit and toner cartridge assemblies a Unpack the four drum unit and toner cartridge assemblies and gently shake each of them from the inside the assembly. c Remove the packing material from side to side several.... 2 Remove the packing material from the machine IMPORTANT • Save all packing material and the carton in case you have to distribute the toner evenly inside of the machine. b Open the top cover by pulling on the handle a. IMPORTANT To avoid print quality problems, DO NOT touch...

Quick Setup Guide - English
Page 5
... a Pull the paper tray completely out of the machine. C M Y K C - Cyan Y - Yellow M - c Fan the stack of paper well to fit the paper size you match the toner cartridge colour to the same colour label on the machine. 4 Load paper in the slots. b While pressing the green paper-guide release lever a, slide the paper... guides to avoid paper jams and misfeeds. 5 Make sure that the guides are loading in the illustration. c Slide all four of the drum unit and toner cartridge assemblies into the machine as shown in the tray. Black d Close the top cover of the machine.
... a Pull the paper tray completely out of the machine. C M Y K C - Cyan Y - Yellow M - c Fan the stack of paper well to fit the paper size you match the toner cartridge colour to the same colour label on the machine. 4 Load paper in the slots. b While pressing the green paper-guide release lever a, slide the paper... guides to avoid paper jams and misfeeds. 5 Make sure that the guides are loading in the illustration. c Slide all four of the drum unit and toner cartridge assemblies into the machine as shown in the tray. Black d Close the top cover of the machine.
Quick Setup Guide - English
Page 30
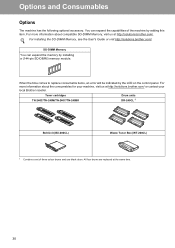
...://solutions.brother.com/. SO-DIMM Memory You can expand the capabilities of three colour drums and one black drum. For more information about the consumables for your machine, visit us at the same time. 30 You can expand the memory by the LCD on the control panel. Toner cartridges TN-...240C/TN-240M/TN-240Y/TN-240BK Drum units DR-240CL 1 Belt Unit (BU-200CL) Waste Toner Box (WT-200CL) 1 Contains a set of the machine by adding this item. For more information about compatible SO-DIMM Memory, visit us at http://solutions.brother.com/ or ...
...://solutions.brother.com/. SO-DIMM Memory You can expand the capabilities of three colour drums and one black drum. For more information about the consumables for your machine, visit us at the same time. 30 You can expand the memory by the LCD on the control panel. Toner cartridges TN-...240C/TN-240M/TN-240Y/TN-240BK Drum units DR-240CL 1 Belt Unit (BU-200CL) Waste Toner Box (WT-200CL) 1 Contains a set of the machine by adding this item. For more information about compatible SO-DIMM Memory, visit us at http://solutions.brother.com/ or ...
Users Manual - English
Page 4
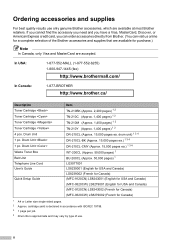
...LS8239002 (French for Canada) (MFC-9120CN) LS8243001 (English for USA and Canada) (MFC-9320CW) LS8279001 (English for USA and Canada) (MFC-9120CN) LS8243002 (French for Canada) (MFC-9320CW) LS8279002 (French for ...purchase.) Note In Canada, only Visa and MasterCard are available for Canada) 1 A4 or Letter size single-sided pages. 2 Approx. In USA: 1-877-552-MALL (1-877-552-6255) 1-800-947-1445 (fax) http://www.brothermall.com/ In Canada: 1-877-BROTHER http://www.brother.ca/ Description Toner Cartridge Toner Cartridge Toner Cartridge Toner Cartridge...
...LS8239002 (French for Canada) (MFC-9120CN) LS8243001 (English for USA and Canada) (MFC-9320CW) LS8279001 (English for USA and Canada) (MFC-9120CN) LS8243002 (French for Canada) (MFC-9320CW) LS8279002 (French for ...purchase.) Note In Canada, only Visa and MasterCard are available for Canada) 1 A4 or Letter size single-sided pages. 2 Approx. In USA: 1-877-552-MALL (1-877-552-6255) 1-800-947-1445 (fax) http://www.brothermall.com/ In Canada: 1-877-BROTHER http://www.brother.ca/ Description Toner Cartridge Toner Cartridge Toner Cartridge Toner Cartridge...
Users Manual - English
Page 6
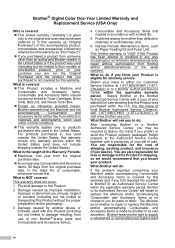
... iv You are not limited to Toner Cartridges, Drum Units, Belt Unit, and Waste Toner Box. „ Except as otherwise provided herein, Brother warrants that you insure your bill of consumable, whichever comes first. What to do : After contacting Brother or a Brother Authorized Service Center, you may be...or labor. You are not the Original Purchaser and the product that expired in accordance with a photocopy of your product. Brother® Digital Color One-Year Limited Warranty and Replacement Service (USA Only) Who is covered: „ This limited warranty ("warranty") is given only...
... iv You are not limited to Toner Cartridges, Drum Units, Belt Unit, and Waste Toner Box. „ Except as otherwise provided herein, Brother warrants that you insure your bill of consumable, whichever comes first. What to do : After contacting Brother or a Brother Authorized Service Center, you may be...or labor. You are not the Original Purchaser and the product that expired in accordance with a photocopy of your product. Brother® Digital Color One-Year Limited Warranty and Replacement Service (USA Only) Who is covered: „ This limited warranty ("warranty") is given only...

Users Manual - English
Page 8
...and LED units: Failure to remove the Toner Cartridge (and Toner Drum Unit, waste toner packs or oil bottles on applicable models) during shipping and will void the Warranty. No oral or written information, advice or representation provided by the end-user/purchaser to a "Brother" ...you . Operation of the MFC/Fax machine in Canada. BROTHER MULTIFUNCTION CENTER / FAX MACHINE LIMITED WARRANTY (Canada only) Pursuant to the limited warranty of 1 year from the date of purchase for labour and parts, Brother International Corporation (Canada) Ltd. ("Brother"), or its Authorized Service Centres...
...and LED units: Failure to remove the Toner Cartridge (and Toner Drum Unit, waste toner packs or oil bottles on applicable models) during shipping and will void the Warranty. No oral or written information, advice or representation provided by the end-user/purchaser to a "Brother" ...you . Operation of the MFC/Fax machine in Canada. BROTHER MULTIFUNCTION CENTER / FAX MACHINE LIMITED WARRANTY (Canada only) Pursuant to the limited warranty of 1 year from the date of purchase for labour and parts, Brother International Corporation (Canada) Ltd. ("Brother"), or its Authorized Service Centres...
Users Manual - English
Page 15
Replacing the consumable items 166 Replacing a Toner cartridge 168 Drum units 173 Replacing the belt unit 178 Replacing the waste toner box 182 Replacing periodic maintenance parts 187 Machine Information 187 Checking the Serial Number 187 Checking ...223 Print ...224 Interfaces ...225 PictBridge (MFC-9320CW 226 Direct Print feature (MFC-9320CW 227 Computer requirements 228 Consumable items 229 Ethernet wired network 230 Ethernet wireless network (MFC-9320CW only 232 Authentication and encryption for wireless users only 234 Wireless one-push configuration 236 F Glossary 237 G...
Replacing the consumable items 166 Replacing a Toner cartridge 168 Drum units 173 Replacing the belt unit 178 Replacing the waste toner box 182 Replacing periodic maintenance parts 187 Machine Information 187 Checking the Serial Number 187 Checking ...223 Print ...224 Interfaces ...225 PictBridge (MFC-9320CW 226 Direct Print feature (MFC-9320CW 227 Computer requirements 228 Consumable items 229 Ethernet wired network 230 Ethernet wireless network (MFC-9320CW only 232 Authentication and encryption for wireless users only 234 Wireless one-push configuration 236 F Glossary 237 G...
Users Manual - English
Page 144
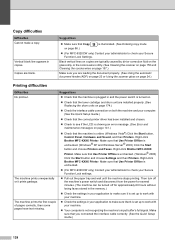
... corona wires on page 157.) Make sure you connected the interface cable correctly. (See the Quick Setup Guide.) 128 Right-click Brother MFC-XXXX Printer. Right-click Brother MFC-XXXX Printer. Make sure that Use Printer Offline is unchecked. (Windows® XP and Windows Server® 2003) Click the ...and then Printers. Suggestions „ Check that the machine is plugged in and the power switch is turned on. „ Check that the toner cartridge and drum unit are installed properly. (See Replacing the drum units on page 174.) „ Check the interface cable connection on both the machine...
... corona wires on page 157.) Make sure you connected the interface cable correctly. (See the Quick Setup Guide.) 128 Right-click Brother MFC-XXXX Printer. Right-click Brother MFC-XXXX Printer. Make sure that Use Printer Offline is unchecked. (Windows® XP and Windows Server® 2003) Click the ...and then Printers. Suggestions „ Check that the machine is plugged in and the power switch is turned on. „ Check that the toner cartridge and drum unit are installed properly. (See Replacing the drum units on page 174.) „ Check the interface cable connection on both the machine...

Users Manual - English
Page 149
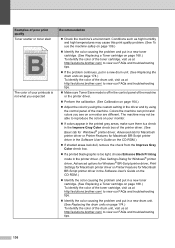
... all four toner cartridges gently. „ Wipe the windows of all four LED heads with a dry lint free soft cloth. (See Cleaning the LED heads on page 174.) To identify the color of poor print...toner cartridges are installed properly. abcdefghijklmnopqrstuvwxyz. Troubleshooting and routine maintenance Improving the print quality C If you have a print quality problem, check the chart below and follow the recommendation. ABCDEFGHIJKLMNOPQRSTUVWXYZ. 0123456789. ABCDEFGHIJKLMNOPQRSTUVWXYZ. 0123456789. abcdefghijklmnopqrstuvwxyz. Examples of the drum unit, visit us at http://solutions.brother...
... all four toner cartridges gently. „ Wipe the windows of all four LED heads with a dry lint free soft cloth. (See Cleaning the LED heads on page 174.) To identify the color of poor print...toner cartridges are installed properly. abcdefghijklmnopqrstuvwxyz. Troubleshooting and routine maintenance Improving the print quality C If you have a print quality problem, check the chart below and follow the recommendation. ABCDEFGHIJKLMNOPQRSTUVWXYZ. 0123456789. ABCDEFGHIJKLMNOPQRSTUVWXYZ. 0123456789. abcdefghijklmnopqrstuvwxyz. Examples of the drum unit, visit us at http://solutions.brother...
Users Manual - English
Page 150
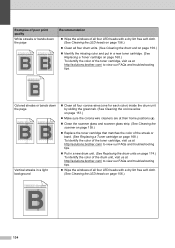
...LED heads on page 156.) „ Clean all four drum units. (See Cleaning the drum unit on page 159.) „ Identify the missing color and put in a new toner cartridge. (See Replacing a Toner cartridge on page 168.) To identify the color of the toner cartridge, visit us at http://solutions.brother....com/ to view our FAQs and troubleshooting tips. „ Wipe the windows of all four corona wires (one for each color) ...
...LED heads on page 156.) „ Clean all four drum units. (See Cleaning the drum unit on page 159.) „ Identify the missing color and put in a new toner cartridge. (See Replacing a Toner cartridge on page 168.) To identify the color of the toner cartridge, visit us at http://solutions.brother....com/ to view our FAQs and troubleshooting tips. „ Wipe the windows of all four corona wires (one for each color) ...
Users Manual - English
Page 151
... can cause white spots or hollow print. (See Choosing a location on page 108.) „ Put in a new toner cartridge. (See Replacing a Toner cartridge on page 168.) To identify the color of the toner cartridge, visit us at http://solutions.brother.com/ to view our FAQs and troubleshooting tips. „ If the problem is not solved after printing a few...
... can cause white spots or hollow print. (See Choosing a location on page 108.) „ Put in a new toner cartridge. (See Replacing a Toner cartridge on page 168.) To identify the color of the toner cartridge, visit us at http://solutions.brother.com/ to view our FAQs and troubleshooting tips. „ If the problem is not solved after printing a few...
Users Manual - English
Page 152
... quality problem. (See To use the machine safely on page 109.) „ Identify the color causing the problem and put in a new toner cartridge. (See Replacing a Toner cartridge on page 168.) To identify the color of the toner cartridge, visit us at http://solutions.brother.com/ to view our FAQs and troubleshooting tips. „ If the problem continues, put...
... quality problem. (See To use the machine safely on page 109.) „ Identify the color causing the problem and put in a new toner cartridge. (See Replacing a Toner cartridge on page 168.) To identify the color of the toner cartridge, visit us at http://solutions.brother.com/ to view our FAQs and troubleshooting tips. „ If the problem continues, put...
Users Manual - English
Page 153
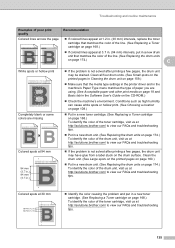
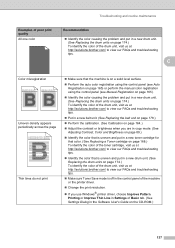
... appears periodically across the page ABCDEFGHIJKLMNOPQRSTUVWXYZ. 0123456789. Troubleshooting and routine maintenance Examples of poor print quality All one color Recommendation „ Identify the color causing the problem and put in a new drum unit. (See Replacing the drum units on page 174.) ...(See Adjusting Contrast, Color and Brightness on page 89.) „ Identify the color that is uneven and put in a new toner cartridge for that color. (See Replacing a Toner cartridge on page 168.) To identify the color of the toner cartridge, visit us at http://solutions.brother.com/ to view...
... appears periodically across the page ABCDEFGHIJKLMNOPQRSTUVWXYZ. 0123456789. Troubleshooting and routine maintenance Examples of poor print quality All one color Recommendation „ Identify the color causing the problem and put in a new drum unit. (See Replacing the drum units on page 174.) ...(See Adjusting Contrast, Color and Brightness on page 89.) „ Identify the color that is uneven and put in a new toner cartridge for that color. (See Replacing a Toner cartridge on page 168.) To identify the color of the toner cartridge, visit us at http://solutions.brother.com/ to view...
Users Manual - English
Page 157
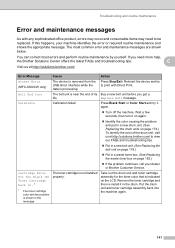
...occur and consumable items may need more help, the Brother Solutions Center offers the latest FAQs and troubleshooting tips: C Visit us at http://solutions.brother.com/ Error Message Cause Action Access Error (MFC-9320CW only) The device is removed from the USB ...Brother Customer Service. Press Black Start or Color Start and try to view our FAQs and troubleshooting tips. „ Put in a new belt unit. (See Replacing the belt unit on page 178.) „ Put in . 1 1 The toner cartridge color with Direct Print. Take out the drum unit and toner cartridge assembly for the toner color...
...occur and consumable items may need more help, the Brother Solutions Center offers the latest FAQs and troubleshooting tips: C Visit us at http://solutions.brother.com/ Error Message Cause Action Access Error (MFC-9320CW only) The device is removed from the USB ...Brother Customer Service. Press Black Start or Color Start and try to view our FAQs and troubleshooting tips. „ Put in a new belt unit. (See Replacing the belt unit on page 178.) „ Put in . 1 1 The toner cartridge color with Direct Print. Take out the drum unit and toner cartridge assembly for the toner color...
Users Manual - English
Page 158
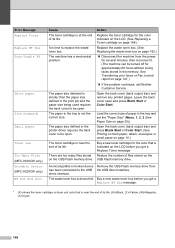
... Off. (See Turning off the machine. You cannot change the Receive Mode from the ADF was jammed in the back of the drum unit or toner cartridge is not jammed inside the back of the machine, then press Stop/Exit. If the fan is spinning, remove any obstacles that the exhaust outlet... fuser cover is not blocked by something. Close the ADF cover of the machine, and then close the fuser cover and press Black Start or Color Start. If this error message appears again, replace the DIMM with a new...
... Off. (See Turning off the machine. You cannot change the Receive Mode from the ADF was jammed in the back of the drum unit or toner cartridge is not jammed inside the back of the machine, then press Stop/Exit. If the fan is spinning, remove any obstacles that the exhaust outlet... fuser cover is not blocked by something. Close the ADF cover of the machine, and then close the fuser cover and press Black Start or Color Start. If this error message appears again, replace the DIMM with a new...
Users Manual - English
Page 160
...toner box on page 147.) „ If the problem continues, call Brother Customer Service. Turn the power switch off the protect switch of the following : „ Press Black Start or Color Start to remove any condensation from the power for approximately 60 hours without losing faxes stored in progress Do one... toner cartridge or the drum Re-install the toner cartridge or the drum unit unit and toner cartridge assembly that condensation may form inside the machine, then close the top cover and turn it . (The machine can cause this does not clear the error, call Brother Customer...
...toner box on page 147.) „ If the problem continues, call Brother Customer Service. Turn the power switch off the protect switch of the following : „ Press Black Start or Color Start to remove any condensation from the power for approximately 60 hours without losing faxes stored in progress Do one... toner cartridge or the drum Re-install the toner cartridge or the drum unit unit and toner cartridge assembly that condensation may form inside the machine, then close the top cover and turn it . (The machine can cause this does not clear the error, call Brother Customer...
Users Manual - English
Page 162
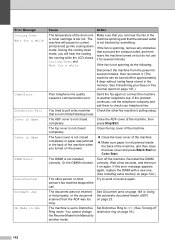
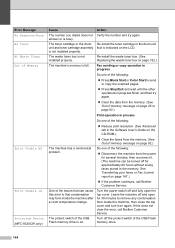
...the problem continues, call Brother Customer Service. Error Message Replace Toner Replace WT Box Scan Unable XX Short paper Size mismatch Small paper Toner Low Too Many Files (MFC-9320CW only) Unusable Device (MFC-9320CW only) WT Box End Soon Cause The toner cartridge is at the end of...life. (K)=Black, (Y)=Yellow, (M)=Magenta, (C)=Cyan. 146 Action Replace the toner cartridge for the color indicated on the LCD. (See Replacing a Toner cartridge on page 168.) Replace the waste toner box. (See Replacing the waste toner box on page 182.) „ Disconnect the machine from has been ...
...the problem continues, call Brother Customer Service. Error Message Replace Toner Replace WT Box Scan Unable XX Short paper Size mismatch Small paper Toner Low Too Many Files (MFC-9320CW only) Unusable Device (MFC-9320CW only) WT Box End Soon Cause The toner cartridge is at the end of...life. (K)=Black, (Y)=Yellow, (M)=Magenta, (C)=Cyan. 146 Action Replace the toner cartridge for the color indicated on the LCD. (See Replacing a Toner cartridge on page 168.) Replace the waste toner box. (See Replacing the waste toner box on page 182.) „ Disconnect the machine from has been ...

Users Manual - English
Page 165
... cause a paper jam in the machine. IMPORTANT If the paper cannot easily be removed in this section. IMPORTANT Please confirm that you have installed all toner cartridges and drum units in your Brother machine.
... cause a paper jam in the machine. IMPORTANT If the paper cannot easily be removed in this section. IMPORTANT Please confirm that you have installed all toner cartridges and drum units in your Brother machine.
Users Manual - English
Page 168
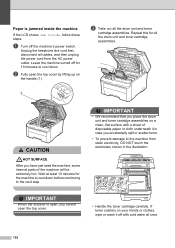
... C If the LCD shows Jam Inside, follow these steps: a Turn off for all the drum unit and toner cartridge assemblies. 1 CAUTION HOT SURFACE After you place the drum unit and toner cartridge assemblies on the handle (1). Paper is open, you cannot open the top cover by lifting up on a clean...will be extremely hot. Unplug the telephone line cord first, disconnect all the drum unit and toner cartridge assemblies. IMPORTANT • We recommend that you have just used the machine, some internal parts of disposable paper or cloth underneath it off with cold water at least 10 minutes for...
... C If the LCD shows Jam Inside, follow these steps: a Turn off for all the drum unit and toner cartridge assemblies. 1 CAUTION HOT SURFACE After you place the drum unit and toner cartridge assemblies on the handle (1). Paper is open, you cannot open the top cover by lifting up on a clean...will be extremely hot. Unplug the telephone line cord first, disconnect all the drum unit and toner cartridge assemblies. IMPORTANT • We recommend that you have just used the machine, some internal parts of disposable paper or cloth underneath it off with cold water at least 10 minutes for...


