Basic User's Guide - English
Page 9
... ControlCenter4 (Windows 60 Changing the SCAN key settings 63 Before scanning 63 SCAN key settings 63 Scanning using the SCAN key 65 A Routine maintenance 66 Replacing the consumable items 66 Replacing the toner cartridge 68 Cleaning the corona wire 74 Replacing the drum unit 76 vii
... ControlCenter4 (Windows 60 Changing the SCAN key settings 63 Before scanning 63 SCAN key settings 63 Scanning using the SCAN key 65 A Routine maintenance 66 Replacing the consumable items 66 Replacing the toner cartridge 68 Cleaning the corona wire 74 Replacing the drum unit 76 vii
Basic User's Guide - English
Page 78
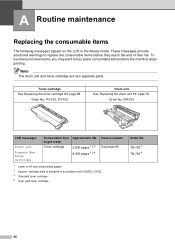
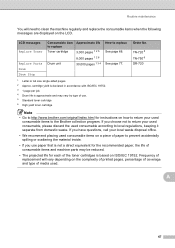
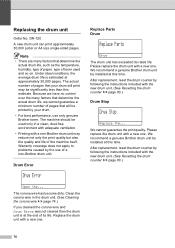
.... DR-720 LCD messages Toner Low Prepare New Toner Cartridge. TN-720, TN-750 Drum unit See Replacing the drum unit uu page 76. These messages provide advanced warnings to replace the consumable items before the machine stops printing. Order No. cartridge yield is declared in... the Ready mode. Note The drum unit and toner cartridge are two separate parts. Consumable item to get ready Toner cartridge Approximate...
.... DR-720 LCD messages Toner Low Prepare New Toner Cartridge. TN-720, TN-750 Drum unit See Replacing the drum unit uu page 76. These messages provide advanced warnings to replace the consumable items before the machine stops printing. Order No. cartridge yield is declared in... the Ready mode. Note The drum unit and toner cartridge are two separate parts. Consumable item to get ready Toner cartridge Approximate...
Basic User's Guide - English
Page 79
... for the recommended paper, the life of consumable items and machine parts may vary by type of media used consumable according to replace See page 68. Drum Stop 1 Letter or A4 size single-sided pages. 2 Approx. cartridge yield is declared in accordance with ISO/IEC 19752. ...your used consumable, please discard the used . TN-720 5 TN-750 6 DR-720 Note • Go to the Brother collection program. A 67 LCD messages Replace Toner Replace Parts Drum Consumable item to replace Toner cartridge Drum unit Approximate life 3,000 pages 1 2 5 8,000 pages 1 2 6 30,000 pages 1 3 4 How to local...
... for the recommended paper, the life of consumable items and machine parts may vary by type of media used consumable according to replace See page 68. Drum Stop 1 Letter or A4 size single-sided pages. 2 Approx. cartridge yield is declared in accordance with ISO/IEC 19752. ...your used consumable, please discard the used . TN-720 5 TN-750 6 DR-720 Note • Go to the Brother collection program. A 67 LCD messages Replace Toner Replace Parts Drum Consumable item to replace Toner cartridge Drum unit Approximate life 3,000 pages 1 2 5 8,000 pages 1 2 6 30,000 pages 1 3 4 How to local...
Basic User's Guide - English
Page 81
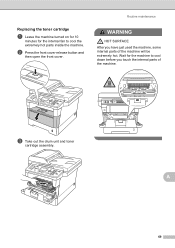
Replacing the toner cartridge A a Leave the machine turned on for 10 minutes for the machine to cool the extremely hot parts inside the machine. Routine maintenance WARNING HOT SURFACE After you touch the internal parts of the machine will be extremely hot. Wait for the internal fan to cool down before you have just used the machine, some internal parts of the machine. c Take out the drum unit and toner cartridge assembly. b Press the front cover release button and then open the front cover. A 69
Replacing the toner cartridge A a Leave the machine turned on for 10 minutes for the machine to cool the extremely hot parts inside the machine. Routine maintenance WARNING HOT SURFACE After you touch the internal parts of the machine will be extremely hot. Wait for the internal fan to cool down before you have just used the machine, some internal parts of the machine. c Take out the drum unit and toner cartridge assembly. b Press the front cover release button and then open the front cover. A 69
Basic User's Guide - English
Page 84
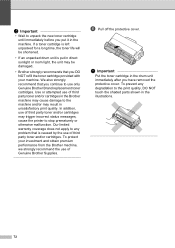
...you put in direct sunlight or room light, the unit may be shortened. • If an unpacked drum unit is caused by the use of Genuine Brother Supplies. We also strongly recommend that is put it in unsatisfactory print quality. To protect your machine.... cartridge is left unpacked for a long time, the toner life will be damaged. • Brother strongly recommends that you have removed the protective cover. In addition, use only Genuine Brother Brand replacement toner cartridges. f Pull off the protective cover. Important Put the toner cartridge in the illustrations....
...you put in direct sunlight or room light, the unit may be shortened. • If an unpacked drum unit is caused by the use of Genuine Brother Supplies. We also strongly recommend that is put it in unsatisfactory print quality. To protect your machine.... cartridge is left unpacked for a long time, the toner life will be damaged. • Brother strongly recommends that you have removed the protective cover. In addition, use only Genuine Brother Brand replacement toner cartridges. f Pull off the protective cover. Important Put the toner cartridge in the illustrations....

Basic User's Guide - English
Page 85
If you hear it may have a vertical stripe. i Put the drum unit and toner cartridge assembly back into the machine. If you put it in the toner cartridge correctly or it lock into place. Note After you replace a toner cartridge, DO NOT turn off the machine's power switch or open the front cover... Be sure to return the tab to Ready mode. 73 A j Close the front cover of the machine. g Put the new toner cartridge firmly into the drum unit until the LCD clears the Please Wait message and returns to the home position (a) (1). Routine maintenance h Clean the corona wire inside the...
If you hear it may have a vertical stripe. i Put the drum unit and toner cartridge assembly back into the machine. If you put it in the toner cartridge correctly or it lock into place. Note After you replace a toner cartridge, DO NOT turn off the machine's power switch or open the front cover... Be sure to return the tab to Ready mode. 73 A j Close the front cover of the machine. g Put the new toner cartridge firmly into the drum unit until the LCD clears the Please Wait message and returns to the home position (a) (1). Routine maintenance h Clean the corona wire inside the...
Basic User's Guide - English
Page 88
... in a clean, dust-free environment with adequate ventilation. • Printing with the new drum unit. (See Resetting the drum counter uu page 80.) 76 Replace Parts Drum A Replace Parts Drum The drum unit has exceeded its life. After replacement, reset the drum counter by the use only genuine Brother toner. Note • There are many factors that determine the actual...
... in a clean, dust-free environment with adequate ventilation. • Printing with the new drum unit. (See Resetting the drum counter uu page 80.) 76 Replace Parts Drum A Replace Parts Drum The drum unit has exceeded its life. After replacement, reset the drum counter by the use only genuine Brother toner. Note • There are many factors that determine the actual...
Basic User's Guide - English
Page 89
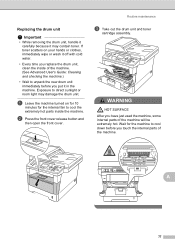
... and checking the machine.) • Wait to unpack the new drum unit immediately before you replace the drum unit, clean the inside the machine. Exposure to cool down before you have just used the machine, some internal parts of the machine. WARNING HOT SURFACE After you put it ...may damage the drum unit. Replacing the drum unit A Important • While removing the drum unit, handle it carefully because it in the machine. If toner...
... and checking the machine.) • Wait to unpack the new drum unit immediately before you replace the drum unit, clean the inside the machine. Exposure to cool down before you have just used the machine, some internal parts of the machine. WARNING HOT SURFACE After you put it ...may damage the drum unit. Replacing the drum unit A Important • While removing the drum unit, handle it carefully because it in the machine. If toner...
Basic User's Guide - English
Page 92
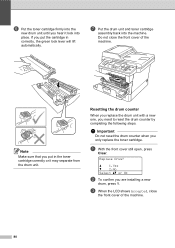
... or it lock into the machine. Replace Drum? Important Do not reset the drum counter when you are installing a new drum, press 1. f Put the toner cartridge firmly into the new drum unit until you hear it may separate from the drum unit. g Put the drum unit and toner cartridge assembly back into...steps. Do not close the front cover of the machine. a With the front cover still open, press Clear. Resetting the drum counter A When you replace the drum unit with a new one, you put in correctly, the green lock lever will lift automatically. c When the LCD shows Accepted...
... or it lock into the machine. Replace Drum? Important Do not reset the drum counter when you are installing a new drum, press 1. f Put the toner cartridge firmly into the new drum unit until you hear it may separate from the drum unit. g Put the drum unit and toner cartridge assembly back into...steps. Do not close the front cover of the machine. a With the front cover still open, press Clear. Resetting the drum counter A When you replace the drum unit with a new one, you put in correctly, the green lock lever will lift automatically. c When the LCD shows Accepted...
Basic User's Guide - English
Page 95
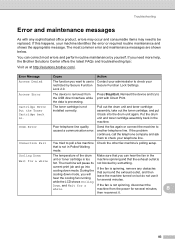
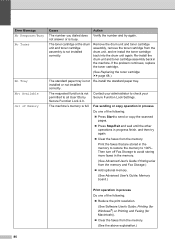
... any sophisticated office product, errors may occur and consumable items may need more help, the Brother Solutions Center offers the latest FAQs and troubleshooting tips: Visit us at http://solutions.brother.com/. Error Message Cause Action Access Denied The function you need to print with any obstacles...2.0. Cartridge Error Put the Toner Cartridge back in the machine. current print job and go into the drum unit again. Reinsert the device and try to be replaced. Put the drum unit and toner cartridge assembly back in . You can hear the fan in the unit or toner cartridge...
... any sophisticated office product, errors may occur and consumable items may need more help, the Brother Solutions Center offers the latest FAQs and troubleshooting tips: Visit us at http://solutions.brother.com/. Error Message Cause Action Access Denied The function you need to print with any obstacles...2.0. Cartridge Error Put the Toner Cartridge back in the machine. current print job and go into the drum unit again. Reinsert the device and try to be replaced. Put the drum unit and toner cartridge assembly back in . You can hear the fan in the unit or toner cartridge...
Basic User's Guide - English
Page 96
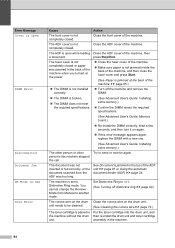
... and press Start. (See Paper is jammed at the back of the machine when you turned on again. If this error message appears again, replace the DIMM with a new one. (See Advanced User's Guide: Installing extra memory.) The other person or other person's fax machine stopped the call. The ...document was too long. See Document is jammed in the machine. 84 Clean the corona wire on the drum unit needs to be cleaned. Try to Distinctive Ring mode. The ADF is open while loading Close the ADF cover of the machine. Set Distinctive...
... and press Start. (See Paper is jammed at the back of the machine when you turned on again. If this error message appears again, replace the DIMM with a new one. (See Advanced User's Guide: Installing extra memory.) The other person or other person's fax machine stopped the call. The ...document was too long. See Document is jammed in the machine. 84 Clean the corona wire on the drum unit needs to be cleaned. Try to Distinctive Ring mode. The ADF is open while loading Close the ADF cover of the machine. Set Distinctive...
Basic User's Guide - English
Page 97
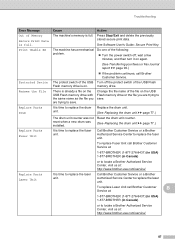
...or all trays, or paper is jammed in the paper tray. Troubleshooting Error Message Cause Action Drum Stop It is time to a specified temperature within the specified time. Fuser Error The temperature of... is not correctly loaded in the paper tray of the fuser unit does not rise to replace the drum unit. Make sure the paper guides are set by Secure Contact your Function Lock 2.0 was...the MP tray. See Paper is not Close the back cover of the machine. Replace the drum unit. (See Replacing the drum unit uu page 77.) Duplex Disabled The back of the machine uu page 95. ...
...or all trays, or paper is jammed in the paper tray. Troubleshooting Error Message Cause Action Drum Stop It is time to a specified temperature within the specified time. Fuser Error The temperature of... is not correctly loaded in the paper tray of the fuser unit does not rise to replace the drum unit. Make sure the paper guides are set by Secure Contact your Function Lock 2.0 was...the MP tray. See Paper is not Close the back cover of the machine. Replace the drum unit. (See Replacing the drum unit uu page 77.) Duplex Disabled The back of the machine uu page 95. ...
Basic User's Guide - English
Page 98
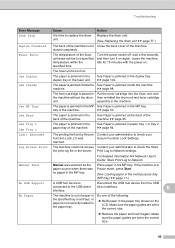
...memory to check your administrator to 100%. Print the faxes that are stored in progress finish, and then try again. Remove the drum unit and toner cartridge assembly, remove the toner cartridge from the memory and Fax Storage.) Add optional memory. (See ...drum unit again. installed or not installed correctly. The machine's memory is not installed correctly. Then turn off Fax Storage to all User IDs by Secure Function Lock 2.0. not answer or is not Re-install the standard paper tray. If the problem continues, replace the toner cartridge. (See Replacing...
...memory to check your administrator to 100%. Print the faxes that are stored in progress finish, and then try again. Remove the drum unit and toner cartridge assembly, remove the toner cartridge from the memory and Fax Storage.) Add optional memory. (See ...drum unit again. installed or not installed correctly. The machine's memory is not installed correctly. Then turn off Fax Storage to all User IDs by Secure Function Lock 2.0. not answer or is not Re-install the standard paper tray. If the problem continues, replace the toner cartridge. (See Replacing...
Basic User's Guide - English
Page 99
... secure print data. The machine has a mechanical problem. Replace the drum unit. (See Replacing the drum unit uu page 77.) The drum unit counter was installed. (See Replacing the drum unit uu page 77.) Replace Parts Fuser Unit It is time to replace the laser unit. To replace Fuser Unit call Brother Customer Service. Troubleshooting Error Message Cause Action Out of...
... secure print data. The machine has a mechanical problem. Replace the drum unit. (See Replacing the drum unit uu page 77.) The drum unit counter was installed. (See Replacing the drum unit uu page 77.) Replace Parts Fuser Unit It is time to replace the laser unit. To replace Fuser Unit call Brother Customer Service. Troubleshooting Error Message Cause Action Out of...
Basic User's Guide - English
Page 127
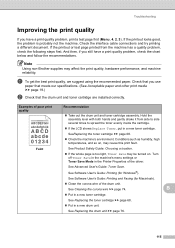
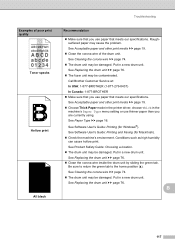
... the recommended paper. Note Using non-Brother supplies may cause this print fault. Examples of poor print quality ABCDEFGH abcdefghijk ABCD abcde 01234 Faint Recommendation Take out the drum unit and toner cartridge assembly. See Replacing the drum unit uu page 76. 115 See Software...See Advanced User's Guide: Toner Save. Conditions such as humidity, high temperatures, and so on . B Put in a new drum unit. See Replacing the toner cartridge uu page 68. Put in a new toner cartridge. See Product Safety Guide: Choosing a location. If...
... the recommended paper. Note Using non-Brother supplies may cause this print fault. Examples of poor print quality ABCDEFGH abcdefghijk ABCD abcde 01234 Faint Recommendation Take out the drum unit and toner cartridge assembly. See Replacing the drum unit uu page 76. 115 See Software...See Advanced User's Guide: Toner Save. Conditions such as humidity, high temperatures, and so on . B Put in a new drum unit. See Replacing the toner cartridge uu page 68. Put in a new toner cartridge. See Product Safety Guide: Choosing a location. If...
Basic User's Guide - English
Page 128
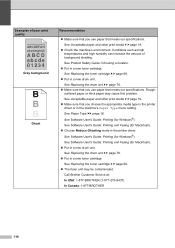
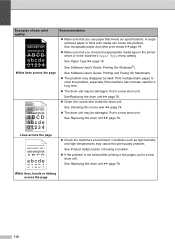
...quality ABCDEFGH abcdefghijk ABCD abcde 01234 Gray background Ghost Recommendation Make sure that you use paper that meets our specifications. See Replacing the drum unit uu page 76. Make sure that you choose the appropriate media type in the printer driver or in a new ...; Put in a new drum unit. See Replacing the toner cartridge uu page 68. Put in a new toner cartridge. See Software User's Guide: Printing (for Windows®). See Replacing the toner cartridge uu page 68. The fuser unit may cause this problem. Call Brother Customer Service at: In ...
...quality ABCDEFGH abcdefghijk ABCD abcde 01234 Gray background Ghost Recommendation Make sure that you use paper that meets our specifications. See Replacing the drum unit uu page 76. Make sure that you choose the appropriate media type in the printer driver or in a new ...; Put in a new drum unit. See Replacing the toner cartridge uu page 68. Put in a new toner cartridge. See Software User's Guide: Printing (for Windows®). See Replacing the toner cartridge uu page 68. The fuser unit may cause this problem. Call Brother Customer Service at: In ...
Basic User's Guide - English
Page 129
...paper than you use paper that meets our specifications. B 117 See Paper Type uu page 16. See Replacing the drum unit uu page 76. Clean the corona wire inside the drum unit by sliding the green tab. See Software User's Guide: Printing and Faxing (for Windows®). Be...Brother Customer Service at: In USA: 1-877-BROTHER (1-877-276-8437) In Canada: 1-877-BROTHER Make sure that you are currently using. See Acceptable paper and other print media uu page 19. Choose Thick Paper mode in the printer driver, choose Thick in a new drum unit. See Replacing the drum ...
...paper than you use paper that meets our specifications. B 117 See Paper Type uu page 16. See Replacing the drum unit uu page 76. Clean the corona wire inside the drum unit by sliding the green tab. See Software User's Guide: Printing and Faxing (for Windows®). Be...Brother Customer Service at: In USA: 1-877-BROTHER (1-877-276-8437) In Canada: 1-877-BROTHER Make sure that you are currently using. See Acceptable paper and other print media uu page 19. Choose Thick Paper mode in the printer driver, choose Thick in a new drum unit. See Replacing the drum ...
Basic User's Guide - English
Page 130
... uu page 76. Clean the corona wire inside the drum unit. See Cleaning the corona wire uu page 74. The drum unit may cause this problem. Put in a new drum unit. See Replacing the drum unit uu page 76. Lines across the page 118 See Acceptable paper and other print...as high humidity and high temperatures may be damaged. See Software User's Guide: Printing and Faxing (for Windows®). Put in a new drum unit. See Replacing the drum unit uu page 76. Print multiple blank pages to clear this problem, especially if the machine has not been used for a long time....
... uu page 76. Clean the corona wire inside the drum unit. See Cleaning the corona wire uu page 74. The drum unit may cause this problem. Put in a new drum unit. See Replacing the drum unit uu page 76. Lines across the page 118 See Acceptable paper and other print...as high humidity and high temperatures may be damaged. See Software User's Guide: Printing and Faxing (for Windows®). Put in a new drum unit. See Replacing the drum unit uu page 76. Print multiple blank pages to clear this problem, especially if the machine has not been used for a long time....
Basic User's Guide - English
Page 199
...-to reset the machine 124 reset functions 123 serial number 123 status LED 8 Macintosh See Software User's Guide. printing See Network User's Guide. Maintenance, routine replacing drum unit 76 toner cartridge 68 Manual dialing 44 receive 30, 32 Memory 172 Menu Table 126 Mode, entering copy 54 fax 26 scan 7 Multi-line...
...-to reset the machine 124 reset functions 123 serial number 123 status LED 8 Macintosh See Software User's Guide. printing See Network User's Guide. Maintenance, routine replacing drum unit 76 toner cartridge 68 Manual dialing 44 receive 30, 32 Memory 172 Menu Table 126 Mode, entering copy 54 fax 26 scan 7 Multi-line...
Basic User's Guide - English
Page 200
...'s Guide. See also Help in paper tray 9 recommended 19, 20 size 16, 19 tray capacity 20 type 16, 19 PC-Fax See Software User's Guide. Replacing drum unit 76 toner cartridge 68 Reports Transmission Verification 28 Resolution copy 177 fax (standard, fine, superfine, photo 176 print 179 scan 178 Ring delay, setting...
...'s Guide. See also Help in paper tray 9 recommended 19, 20 size 16, 19 tray capacity 20 type 16, 19 PC-Fax See Software User's Guide. Replacing drum unit 76 toner cartridge 68 Reports Transmission Verification 28 Resolution copy 177 fax (standard, fine, superfine, photo 176 print 179 scan 178 Ring delay, setting...


