Users Manual - English
Page 16
... 150 Cleaning the print head 151 Checking the print quality 151 Checking the print alignment 152 Checking the ink volume 153 Uninstalling and installing the handset and handset cradle (MFC-685CW only 153 Machine Information 155 Checking the serial number 155 Packing and shipping ... Menu table 159 Entering Text 174 D Specifications 175 General ...175 Print media...177 Fax ...178 Message Center 180 Digital Cordless Handset (MFC-885CW only 181 Cordless handset (BCL-D10 181 Battery ...182 Copy ...183 PhotoCapture Center 184 PictBridge ...185 Scanner ...186 Printer ...187 Interfaces...
... 150 Cleaning the print head 151 Checking the print quality 151 Checking the print alignment 152 Checking the ink volume 153 Uninstalling and installing the handset and handset cradle (MFC-685CW only 153 Machine Information 155 Checking the serial number 155 Packing and shipping ... Menu table 159 Entering Text 174 D Specifications 175 General ...175 Print media...177 Fax ...178 Message Center 180 Digital Cordless Handset (MFC-885CW only 181 Cordless handset (BCL-D10 181 Battery ...182 Copy ...183 PhotoCapture Center 184 PictBridge ...185 Scanner ...186 Printer ...187 Interfaces...

Users Manual - English
Page 149
...processing, sending and printing time. Machine feeds multiple pages. Try changing the printer driver setting. Make sure you uncheck Color Enhancement (True2Life®). Smudged stain at any one time. Also, click Settings, and make sure you use the photo bypass tray. (See Loading photo paper on Check... and other media on the reverse side Make sure the printer platen is set the correct paper type. Check the printing alignment. (See Checking the print alignment on page 12.) Don't handle the paper until it clicks and unfold the paper support flap. Stains appear on page ...
...processing, sending and printing time. Machine feeds multiple pages. Try changing the printer driver setting. Make sure you uncheck Color Enhancement (True2Life®). Smudged stain at any one time. Also, click Settings, and make sure you use the photo bypass tray. (See Loading photo paper on Check... and other media on the reverse side Make sure the printer platen is set the correct paper type. Check the printing alignment. (See Checking the print alignment on page 12.) Don't handle the paper until it clicks and unfold the paper support flap. Stains appear on page ...

Users Manual - English
Page 168
... Sheet. e Check the 600 dpi and 1200 dpi test prints to choose Alignment. Do one of the following: „ If all lines are gone. Press 1 (Yes). i After cleaning is still missing, call Brother Customer Service. (See Brother numbers on page i) CAUTION DO NOT touch the print head. After the print head nozzle is ...5 most closely matches number 0. 152 h The LCD asks you if you if the print quality is still poor, replace the ink cartridge for the clogged color. Touching the print head may cause permanent damage and may need to start cleaning. Press OK. d Press Black Start or...
... Sheet. e Check the 600 dpi and 1200 dpi test prints to choose Alignment. Do one of the following: „ If all lines are gone. Press 1 (Yes). i After cleaning is still missing, call Brother Customer Service. (See Brother numbers on page i) CAUTION DO NOT touch the print head. After the print head nozzle is ...5 most closely matches number 0. 152 h The LCD asks you if you if the print quality is still poor, replace the ink cartridge for the clogged color. Touching the print head may cause permanent damage and may need to start cleaning. Press OK. d Press Black Start or...
Users Manual - English
Page 169
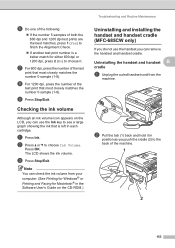
...appears on the CD-ROM.) Troubleshooting and Routine Maintenance Uninstalling and installing the handset and handset cradle (MFC-685CW only) B If you do not use the Ink key to see a large graph showing the... You can check the ink volume from the machine. Press OK. The LCD shows the ink volume. f Do one of the following: „ If the number 5 samples of both the 600 dpi and 1200 dpi test prints ...are the best matches, press 1 (Yes) to finish the Alignment Check. „ If another test print number is left in position as you can remove the handset and ...
...appears on the CD-ROM.) Troubleshooting and Routine Maintenance Uninstalling and installing the handset and handset cradle (MFC-685CW only) B If you do not use the Ink key to see a large graph showing the... You can check the ink volume from the machine. Press OK. The LCD shows the ink volume. f Do one of the following: „ If the number 5 samples of both the 600 dpi and 1200 dpi test prints ...are the best matches, press 1 (Yes) to finish the Alignment Check. „ If another test print number is left in position as you can remove the handset and ...

Users Manual - English
Page 170
Installing the handset and handset cradle B a Remove the side cover. c Connect the curled handset cord to open the cover with those on the machine, and then slide the cradle toward the front of the machine until it . 154 c Attach the side cover. b Align the recessed arrows on the cradle with your hand, use a coin to the machine. Note If you cannot open it clicks into place.
Installing the handset and handset cradle B a Remove the side cover. c Connect the curled handset cord to open the cover with those on the machine, and then slide the cradle toward the front of the machine until it . 154 c Attach the side cover. b Align the recessed arrows on the cradle with your hand, use a coin to the machine. Note If you cannot open it clicks into place.

Users Manual - English
Page 215
... xD-Picture Card 96 PictBridge DPOF Printing 113 Power failure 158 Presto!® PageManager® See Help in Presto!® PageManager® application Print checking alignment 152 checking quality 151 difficulties 132, 134 drivers 187 fax from memory 46 paper jams 143 report 84 resolution 187 specifications 187 Printing on small...
... xD-Picture Card 96 PictBridge DPOF Printing 113 Power failure 158 Presto!® PageManager® See Help in Presto!® PageManager® application Print checking alignment 152 checking quality 151 difficulties 132, 134 drivers 187 fax from memory 46 paper jams 143 report 84 resolution 187 specifications 187 Printing on small...

Software & Network Users Manual - English
Page 98
b Click File, then Print. Sending a file as your PC. The Print dialog box appears: 92 Brother PC-FAX Software (MFC models only) Entering cover page information 6 Note If you are sending a fax to more than one recipient, the recipient information will not be printed on the cover page. When Count cover page is checked.... Use the browse button to use. „ Cover page title If you choose Custom, you want to choose the BMP file, and then choose the alignment style. „ Count cover page When Count cover page is unchecked, the cover page will be included.
b Click File, then Print. Sending a file as your PC. The Print dialog box appears: 92 Brother PC-FAX Software (MFC models only) Entering cover page information 6 Note If you are sending a fax to more than one recipient, the recipient information will not be printed on the cover page. When Count cover page is checked.... Use the browse button to use. „ Cover page title If you choose Custom, you want to choose the BMP file, and then choose the alignment style. „ Count cover page When Count cover page is unchecked, the cover page will be included.


