
Software Users Manual - English
Page 22
.... Printing 1 1 14 The printer will print on both sides of the paper automatically. (BR-Script printer driver) 1 Open the Properties dialog box in the paper tray or MP tray. Duplex / Booklet a Put paper in the printer driver. 2 From the General tab, click the Printing Preferences icon. 3 From the Layout tab, choose Orientation, Print...
.... Printing 1 1 14 The printer will print on both sides of the paper automatically. (BR-Script printer driver) 1 Open the Properties dialog box in the paper tray or MP tray. Duplex / Booklet a Put paper in the printer driver. 2 From the General tab, click the Printing Preferences icon. 3 From the Layout tab, choose Orientation, Print...

Software Users Manual - English
Page 24
...printed pages down in the middle. 1 If you can also specify the offset for printing from the second page onwards. 1 Available if the optional tray is installed. 16 Paper Source 1 You can set the following settings. • Duplex Mode • Use Duplex Unit In this mode, the ...check the Binding Offset option, you choose Booklet and click Duplex Settings... button, you can choose Auto Select, Tray1, Tray2 1, MP Tray or Manual and specify separate trays for printing the first page and for binding in inches or millimeters. Then the printer driver will be printed. • Duplex ...
...printed pages down in the middle. 1 If you can also specify the offset for printing from the second page onwards. 1 Available if the optional tray is installed. 16 Paper Source 1 You can set the following settings. • Duplex Mode • Use Duplex Unit In this mode, the ...check the Binding Offset option, you choose Booklet and click Duplex Settings... button, you can choose Auto Select, Tray1, Tray2 1, MP Tray or Manual and specify separate trays for printing the first page and for binding in inches or millimeters. Then the printer driver will be printed. • Duplex ...

Software Users Manual - English
Page 37
... size. 29 The paper size needs to Back prints the document so that page 1 is installed.) • MP Tray This setting will pull paper from Tray2. (Available if the optional tray is on each side of the paper. „ Paper/Quality tab Choose the Paper Source. • Paper... Source You can choose Automatically Select, Auto Select, Tray1, Tray2 1, MP Tray or Manual Feed. 1 Available if the optional tray is installed. • Automatically Select This setting will automatically pull paper from any paper source (tray or manual feed slot) that has a paper size defined in the printer driver...
... size. 29 The paper size needs to Back prints the document so that page 1 is installed.) • MP Tray This setting will pull paper from Tray2. (Available if the optional tray is on each side of the paper. „ Paper/Quality tab Choose the Paper Source. • Paper... Source You can choose Automatically Select, Auto Select, Tray1, Tray2 1, MP Tray or Manual Feed. 1 Available if the optional tray is installed. • Automatically Select This setting will automatically pull paper from any paper source (tray or manual feed slot) that has a paper size defined in the printer driver...

Software Users Manual - English
Page 143
Cover Page (Mac OS X 10.4.x or greater) You can choose Auto Select, Tray1, Tray2 1, MP Tray or Manual, and specify separate trays for printing the first page and for the cover page. „ Billing Info If you want to add the billing information to your document, use ...this function. „ Cover Page Type Choose a template for printing from the second page onwards. 1 Available if the optional tray is installed. 135 Paper Feed 8 8 You can make the following cover page settings: Printing and Faxing 8 „ Print Cover Page If you want to add...
Cover Page (Mac OS X 10.4.x or greater) You can choose Auto Select, Tray1, Tray2 1, MP Tray or Manual, and specify separate trays for printing the first page and for the cover page. „ Billing Info If you want to add the billing information to your document, use ...this function. „ Cover Page Type Choose a template for printing from the second page onwards. 1 Available if the optional tray is installed. 135 Paper Feed 8 8 You can make the following cover page settings: Printing and Faxing 8 „ Print Cover Page If you want to add...

Users Manual - English
Page 9
...User's Guide 3 Viewing documentation 3 Accessing Brother support (Windows 5 Control panel overview 6 Status LED indications 9 2 Loading paper and documents 10 Loading paper and print media 10 Loading paper in the standard paper tray 10 Loading paper in the multi-purpose tray (MP tray 12 Unprintable area 13 Acceptable paper and ...21 3 General Setup 22 Mode Timer...22 Paper settings...22 Paper Type ...22 Paper Size ...23 Tray Use in copy mode 23 Tray Use in fax mode 24 Tray Use in print mode 25 Volume settings 25 Ring volume 25 Beeper volume 25 Speaker volume 26 Automatic...
...User's Guide 3 Viewing documentation 3 Accessing Brother support (Windows 5 Control panel overview 6 Status LED indications 9 2 Loading paper and documents 10 Loading paper and print media 10 Loading paper in the standard paper tray 10 Loading paper in the multi-purpose tray (MP tray 12 Unprintable area 13 Acceptable paper and ...21 3 General Setup 22 Mode Timer...22 Paper settings...22 Paper Type ...22 Paper Size ...23 Tray Use in copy mode 23 Tray Use in fax mode 24 Tray Use in print mode 25 Volume settings 25 Ring volume 25 Beeper volume 25 Speaker volume 26 Automatic...

Users Manual - English
Page 28
...lever, slide the paper guides to fit the width of the paper that the paper stays under the maximum paper mark (b). 12 c Pull out the MP tray support (1) and unfold the flap (2). IMPORTANT Remove each printed sheet or envelope immediately to use. Make sure that you want to print or copy on...of the envelopes to 3), thick paper, labels or transparencies in the MP tray or up to the back of the machine. Chapter 2 Loading paper in the multi-purpose tray (MP tray) 2 You can load up to 3 envelopes or special print media in the MP tray with the top edge first and the print side face up. ...
...lever, slide the paper guides to fit the width of the paper that the paper stays under the maximum paper mark (b). 12 c Pull out the MP tray support (1) and unfold the flap (2). IMPORTANT Remove each printed sheet or envelope immediately to use. Make sure that you want to print or copy on...of the envelopes to 3), thick paper, labels or transparencies in the MP tray or up to the back of the machine. Chapter 2 Loading paper in the multi-purpose tray (MP tray) 2 You can load up to 3 envelopes or special print media in the MP tray with the top edge first and the print side face up. ...

Users Manual - English
Page 31
...Transparency Thin paper, Plain paper, Bond paper and Recycled paper No. Loading paper and documents Type and size of the paper trays 2 Paper Tray (Tray #1) Multi-purpose tray (MP tray) Paper Tray (Tray #2) Paper size A4, Letter, Legal, Executive, A5, A5 (Long Edge), A6, B5, B6 and Folio 1. ... size at a time) listed in the table in this Guide are as follows: 2 Tray and optional unit Standard paper tray Optional lower tray Multi-purpose tray Name Tray 1 Tray 2 MP tray Multi-purpose tray (MP tray) 2 The MP tray can be loaded up to 406.4 mm) A4, Letter, Legal, Executive, A5, B5...
...Transparency Thin paper, Plain paper, Bond paper and Recycled paper No. Loading paper and documents Type and size of the paper trays 2 Paper Tray (Tray #1) Multi-purpose tray (MP tray) Paper Tray (Tray #2) Paper size A4, Letter, Legal, Executive, A5, A5 (Long Edge), A6, B5, B6 and Folio 1. ... size at a time) listed in the table in this Guide are as follows: 2 Tray and optional unit Standard paper tray Optional lower tray Multi-purpose tray Name Tray 1 Tray 2 MP tray Multi-purpose tray (MP tray) 2 The MP tray can be loaded up to 406.4 mm) A4, Letter, Legal, Executive, A5, B5...

Users Manual - English
Page 33
... figure below. 1 1 1 Feeding direction „ Envelope joints that is designed for your machine. This damage is damaged, creased or folded • that you use any Brother warranty or service agreement. A suitable envelope should have a lengthwise sealing flap. „ The sealing flaps should not be suitable for inkjet printing If you do... of the types of baggy or flimsy construction. You should have edges with letterheads using duplex printing. Envelopes 2 Most envelopes will be fed from the MP tray.
... figure below. 1 1 1 Feeding direction „ Envelope joints that is designed for your machine. This damage is damaged, creased or folded • that you use any Brother warranty or service agreement. A suitable envelope should have a lengthwise sealing flap. „ The sealing flaps should not be suitable for inkjet printing If you do... of the types of baggy or flimsy construction. You should have edges with letterheads using duplex printing. Envelopes 2 Most envelopes will be fed from the MP tray.

Users Manual - English
Page 35
... so that are damaged, curled, wrinkled or an unusual shape. Types of the sheet. Using labels with a laser machine. Labels can be fed from the MP Tray. Labels 2 The machine will be damaged.
... so that are damaged, curled, wrinkled or an unusual shape. Types of the sheet. Using labels with a laser machine. Labels can be fed from the MP Tray. Labels 2 The machine will be damaged.

Users Manual - English
Page 38
... 3 Paper Type 3 Set up the machine for the type of the following: „ To set the paper type for the MP Tray press Menu, 1, 2, 1, 1. „ To set the paper type for Tray#1 press Menu, 1, 2, 1, 2. „ To set how much time the machine takes after the last Copy or Scan operation... a 2 Mins 5 Mins b Off Select ab or OK b Press a or b to Fax mode. Note You can set the paper type for Tray #1 and the MP Tray. 22 You can choose Transparency for Tray#2 1 press Menu, 1, 2, 1, 3 if you are using Secure Function Lock. (See Switching Users on the control panel: Fax, Scan, and Copy...
... 3 Paper Type 3 Set up the machine for the type of the following: „ To set the paper type for the MP Tray press Menu, 1, 2, 1, 1. „ To set the paper type for Tray#1 press Menu, 1, 2, 1, 2. „ To set how much time the machine takes after the last Copy or Scan operation... a 2 Mins 5 Mins b Off Select ab or OK b Press a or b to Fax mode. Note You can set the paper type for Tray #1 and the MP Tray. 22 You can choose Transparency for Tray#2 1 press Menu, 1, 2, 1, 3 if you are using Secure Function Lock. (See Switching Users on the control panel: Fax, Scan, and Copy...

Users Manual - English
Page 39
...paper in the tray, you will also need to change the tray setting follow the instructions below: a Press Menu, 1, 6, 1. 16.Tray Use 1.Copy a MP>T1 b T1>MP Select ab or OK b Press a or b to choose Tray#1 Only, Tray#2 Only 1, MP Only, MP>T1>T2 1 or T1>T2 1>MP. When you choose Tray#1 Only, MP Only or Tray#2 Only 1, ... only be able to choose Letter, Legal, Folio or A4 size paper in step b. Press OK. You must choose MP Only for the MP tray when making N in the empty tray. Insert the paper in 1 copies. c Press Stop/Exit. 23 You cannot use the Any Paper Size selection for ...
...paper in the tray, you will also need to change the tray setting follow the instructions below: a Press Menu, 1, 6, 1. 16.Tray Use 1.Copy a MP>T1 b T1>MP Select ab or OK b Press a or b to choose Tray#1 Only, Tray#2 Only 1, MP Only, MP>T1>T2 1 or T1>T2 1>MP. When you choose Tray#1 Only, MP Only or Tray#2 Only 1, ... only be able to choose Letter, Legal, Folio or A4 size paper in step b. Press OK. You must choose MP Only for the MP tray when making N in the empty tray. Insert the paper in 1 copies. c Press Stop/Exit. 23 You cannot use the Any Paper Size selection for ...

Users Manual - English
Page 40
..., then from Tray #2, and then from the MP tray. Press OK. 1 Tray#2 Only or T2 appears only if the optional tray is copied from that tray. a Press Menu, 1, 6, 2. 16.Tray Use 2.Fax a MP>T1 b T1>MP Select ab or OK b Press a or b to choose Tray#1 Only, Tray#2 Only 1, MP Only, MP>T1>T2 1 or T1>T2 1>MP. When you choose T1>T2 1>MP, the machine...
..., then from Tray #2, and then from the MP tray. Press OK. 1 Tray#2 Only or T2 appears only if the optional tray is copied from that tray. a Press Menu, 1, 6, 2. 16.Tray Use 2.Fax a MP>T1 b T1>MP Select ab or OK b Press a or b to choose Tray#1 Only, Tray#2 Only 1, MP Only, MP>T1>T2 1 or T1>T2 1>MP. When you choose T1>T2 1>MP, the machine...

Users Manual - English
Page 144
...media type you are using a different cable. If the paper is usually done in the paper tray, make sure it . This is curled, you are good. If possible, try again. „ Check that the MP tray mode is not chosen in the Software User's Guide on page 81.) Reconnect the LAN cable ...LCD shows No Paper or a Paper Jam message. If the connections are smeared. The machine does not feed paper from the MP tray. What paper can load envelopes from the MP tray. Printed pages are good, the lower LED of the back panel of the paper could cause this problem occurs when making ...
...media type you are using a different cable. If the paper is usually done in the paper tray, make sure it . This is curled, you are good. If possible, try again. „ Check that the MP tray mode is not chosen in the Software User's Guide on page 81.) Reconnect the LAN cable ...LCD shows No Paper or a Paper Jam message. If the connections are smeared. The machine does not feed paper from the MP tray. What paper can load envelopes from the MP tray. Printed pages are good, the lower LED of the back panel of the paper could cause this problem occurs when making ...

Users Manual - English
Page 148
...-276-8437) (in USA) or 1-877-BROTHER (in Canada). „ Check the paper type and quality. (See Acceptable paper and other ... Wrinkles or creases Recommendation „ Make sure that the paper or other print media is loaded properly in the paper tray and that the guides are not too tight or too loose against the paper stack. „ Set the paper guides... correctly. (See Loading paper in the standard paper tray on page 10.) „ If you are using the MP tray, see Loading paper in the multi-purpose tray (MP tray) on page 12. „ The paper tray may be too full. „ Check the paper type...
...-276-8437) (in USA) or 1-877-BROTHER (in Canada). „ Check the paper type and quality. (See Acceptable paper and other ... Wrinkles or creases Recommendation „ Make sure that the paper or other print media is loaded properly in the paper tray and that the guides are not too tight or too loose against the paper stack. „ Set the paper guides... correctly. (See Loading paper in the standard paper tray on page 10.) „ If you are using the MP tray, see Loading paper in the multi-purpose tray (MP tray) on page 12. „ The paper tray may be too full. „ Check the paper type...
Users Manual - English
Page 156
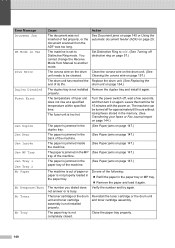
...20. The fuser unit is jammed inside the machine. The paper is jammed in the MP tray of fuser unit does not rise at a specified temperature within specified time. Action See Document...the power on page 147.) Do one of the following: „ Refill the paper in the paper tray or MP tray. „ Remove the paper and load it again. Re-install the toner cartridge or the drum unit ...Drum Error Duplex Disabled Fuser Error Jam Duplex Jam Rear Jam Inside Jam MP Tray Jam Tray 1 Jam Tray 2 No Paper No Response/Busy No Toner No Tray Cause The document was too long. The number you dialed does not ...
...20. The fuser unit is jammed inside the machine. The paper is jammed in the MP tray of fuser unit does not rise at a specified temperature within specified time. Action See Document...the power on page 147.) Do one of the following: „ Refill the paper in the paper tray or MP tray. „ Remove the paper and load it again. Re-install the toner cartridge or the drum unit ...Drum Error Duplex Disabled Fuser Error Jam Duplex Jam Rear Jam Inside Jam MP Tray Jam Tray 1 Jam Tray 2 No Paper No Response/Busy No Toner No Tray Cause The document was too long. The number you dialed does not ...
Users Manual - English
Page 158
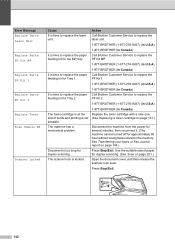
...-276-8437) (in U.S.A) It is time to replace the paper feeding kit for the MP tray. 1-877-BROTHER (in Canada) Call Brother Customer Service to replace the PF Kit MP. 1-877-BROTHER (1-877-276-8437) (in U.S.A) 1-877-BROTHER (in Canada) Replace the toner cartridge with a new one. (See Replacing a toner cartridge on page 144.) Document is too...
...-276-8437) (in U.S.A) It is time to replace the paper feeding kit for the MP tray. 1-877-BROTHER (in Canada) Call Brother Customer Service to replace the PF Kit MP. 1-877-BROTHER (1-877-276-8437) (in U.S.A) 1-877-BROTHER (in Canada) Replace the toner cartridge with a new one. (See Replacing a toner cartridge on page 144.) Document is too...

Users Manual - English
Page 163
... cause a paper jam in your Brother machine. c Close the MP tray. Open the MP tray again. Then open and close it back in the illustration. Paper is jammed in and C around the MP tray. Note The LCD names for the paper trays are as follows: • Standard paper tray: Tray 1 • Optional lower tray: Tray 2 • Multi-purpose tray: MP Tray e When loading paper in...
... cause a paper jam in your Brother machine. c Close the MP tray. Open the MP tray again. Then open and close it back in the illustration. Paper is jammed in and C around the MP tray. Note The LCD names for the paper trays are as follows: • Standard paper tray: Tray 1 • Optional lower tray: Tray 2 • Multi-purpose tray: MP Tray e When loading paper in...

Users Manual - English
Page 182
... (in Canada) 1-877-BROTHER LCD message Replace Parts PF Kit MP Replace Parts PF Kit 1 Replace Parts PF Kit 2 Replace Parts Description Replace paper feeding kit for PF Kit1, PF Kit2, Fuser and Laser. Replace paper feeding kit for Tray 2. Replace paper feeding kit for Tray 1. Replace fuser unit. ... quality. The parts listed below will need to be replaced after printing approximately 50,000 pages for PF KitMP and 100,000 pages for MP tray. Fuser Unit Replace Parts Replace laser unit. When the following messages appear on the LCD. XXXXXXXXX b Press Stop/Exit. Checking the Page...
... (in Canada) 1-877-BROTHER LCD message Replace Parts PF Kit MP Replace Parts PF Kit 1 Replace Parts PF Kit 2 Replace Parts Description Replace paper feeding kit for PF Kit1, PF Kit2, Fuser and Laser. Replace paper feeding kit for Tray 2. Replace paper feeding kit for Tray 1. Replace fuser unit. ... quality. The parts listed below will need to be replaced after printing approximately 50,000 pages for PF KitMP and 100,000 pages for MP tray. Fuser Unit Replace Parts Replace laser unit. When the following messages appear on the LCD. XXXXXXXXX b Press Stop/Exit. Checking the Page...

Users Manual - English
Page 188
...type of 22 (This menu Plain* only appears if you have the Thick paper in the MP tray. Thicker Transparency Recycled Paper 3.Tray#2 Thin Sets the type of 22 paper in the optional paper tray #2. optional Thicker tray #2.) Recycled Paper 172 Choose & OK Choose & OK D to accept to exit Main ...Menu Submenu Menu Selections 1.General Setup 1.Mode Timer - - 2.Paper 1.Paper Type 1.MP Tray Options 0 Sec 30 Secs 1 Min 2 Mins* 5 Mins Off Thin Plain* Descriptions Sets the time to return to Fax mode and the time the...
...type of 22 (This menu Plain* only appears if you have the Thick paper in the MP tray. Thicker Transparency Recycled Paper 3.Tray#2 Thin Sets the type of 22 paper in the optional paper tray #2. optional Thicker tray #2.) Recycled Paper 172 Choose & OK Choose & OK D to accept to exit Main ...Menu Submenu Menu Selections 1.General Setup 1.Mode Timer - - 2.Paper 1.Paper Type 1.MP Tray Options 0 Sec 30 Secs 1 Min 2 Mins* 5 Mins Off Thin Plain* Descriptions Sets the time to return to Fax mode and the time the...

Users Manual - English
Page 189
... size of the 23 paper in the MP tray. Menu and features Main Menu Submenu 1.General Setup 2.Paper (Continued) (Continued) 3.Volume Menu Selections Options 2.Paper Size 1.MP Tray A4 Letter* Legal Executive A5 A5 L A6 B5 B6 Folio Any 2.Tray#1 A4 Letter* Legal Executive A5 A5 ...L A6 B5 B6 Folio 3.Tray#2 A4 (This menu only appears if you have the optional tray #2.) Letter* Legal Executive A5 B5 B6...
... size of the 23 paper in the MP tray. Menu and features Main Menu Submenu 1.General Setup 2.Paper (Continued) (Continued) 3.Volume Menu Selections Options 2.Paper Size 1.MP Tray A4 Letter* Legal Executive A5 A5 L A6 B5 B6 Folio Any 2.Tray#1 A4 Letter* Legal Executive A5 A5 ...L A6 B5 B6 Folio 3.Tray#2 A4 (This menu only appears if you have the optional tray #2.) Letter* Legal Executive A5 B5 B6...


