

Users Manual - English
Page 3
... the World Wide Web. If you can 't resolve difficulty with your MFC machine using this manual, call our fax-back system, and follow the voice prompts to common technical questions and product information for Brother Printer Driver updates. USA: 1-800-521-2846 From within Montreal: 1-514-685-...6464 (voice) BROTHER NUMBERS i You can use fax-back system, so you can get instant answers to receive...
... the World Wide Web. If you can 't resolve difficulty with your MFC machine using this manual, call our fax-back system, and follow the voice prompts to common technical questions and product information for Brother Printer Driver updates. USA: 1-800-521-2846 From within Montreal: 1-514-685-...6464 (voice) BROTHER NUMBERS i You can use fax-back system, so you can get instant answers to receive...

Users Manual - English
Page 17
... Printing/Fax 15-3 Printer Operation Keys 15-4 Reset Key 15-4 Ink Management Key 15-4 Turning Off Bi-directional Printing 15-4 16 Printer Driver Settings 16-1 Using the Brother MFC 7300C/MFC 7400C Printer Driver.... 16-1 The Paper Tab 16-1 Paper Size 16-2 User Defined Paper Size 16-3 Orientation 16-3 Copies 16-3 Collate 16-3 Reverse Order 16...
... Printing/Fax 15-3 Printer Operation Keys 15-4 Reset Key 15-4 Ink Management Key 15-4 Turning Off Bi-directional Printing 15-4 16 Printer Driver Settings 16-1 Using the Brother MFC 7300C/MFC 7400C Printer Driver.... 16-1 The Paper Tab 16-1 Paper Size 16-2 User Defined Paper Size 16-3 Orientation 16-3 Copies 16-3 Collate 16-3 Reverse Order 16...

Users Manual - English
Page 20
... Center™ (MFC 7400C only 20-1 Introduction 20-1 PhotoPrinter 2000 Pro 20-2 Overview of Basic Steps 20-2 Using Automatic E-Mail Printing 21-1 For Windows® 95/98/98SE, ME only 21-1 To Access the On-Line Documentation 21-1 Using the Brother MFC with a New ... OS 8.5/8.51/8.6/9.0 22-1 Notice to Computer Users 22-1 Installing the Brother Printer and Scanner Drivers 22-2 Installing PaperPort 22-2 Using Brother Printer driver with your Apple® Macintosh® .... 22-3 Using Brother TWAIN Scanner Driver with Your Apple® Macintosh 22-5 Accessing the Scanner 22-6 Scanning...
... Center™ (MFC 7400C only 20-1 Introduction 20-1 PhotoPrinter 2000 Pro 20-2 Overview of Basic Steps 20-2 Using Automatic E-Mail Printing 21-1 For Windows® 95/98/98SE, ME only 21-1 To Access the On-Line Documentation 21-1 Using the Brother MFC with a New ... OS 8.5/8.51/8.6/9.0 22-1 Notice to Computer Users 22-1 Installing the Brother Printer and Scanner Drivers 22-2 Installing PaperPort 22-2 Using Brother Printer driver with your Apple® Macintosh® .... 22-3 Using Brother TWAIN Scanner Driver with Your Apple® Macintosh 22-5 Accessing the Scanner 22-6 Scanning...
Users Manual - English
Page 42
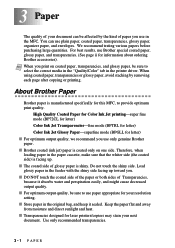
...NOT touch the coated side of the paper or both sides of Transparencies, because it sealed. s Store paper in the printer driver. You can be affected by removing each page after copying or printing. We recommend testing various papers before purchasing large quantities. s...glossy paper, be sure to use paper appropriate for your next document. About Brother Paper Brother paper is shiny. Therefore, when loading paper in the MFC. s Transparencies designed for information about ordering Brother accessories). When using coated paper, transparencies or glossy paper, avoid stacking by...
...NOT touch the coated side of the paper or both sides of Transparencies, because it sealed. s Store paper in the printer driver. You can be affected by removing each page after copying or printing. We recommend testing various papers before purchasing large quantities. s...glossy paper, be sure to use paper appropriate for your next document. About Brother Paper Brother paper is shiny. Therefore, when loading paper in the MFC. s Transparencies designed for information about ordering Brother accessories). When using coated paper, transparencies or glossy paper, avoid stacking by...

Users Manual - English
Page 44
... with clasps s Envelopes of baggy construction s Envelopes not sharply creased s Embossed envelopes s Paper and envelopes already printed with a laser printer s Envelopes preprinted on the Printer driver. Print Area The Print Area depends on cut sheets and envelopes. The figures below show the unprintable areas on the settings in the application you...
... with clasps s Envelopes of baggy construction s Envelopes not sharply creased s Embossed envelopes s Paper and envelopes already printed with a laser printer s Envelopes preprinted on the Printer driver. Print Area The Print Area depends on cut sheets and envelopes. The figures below show the unprintable areas on the settings in the application you...
Users Manual - English
Page 122
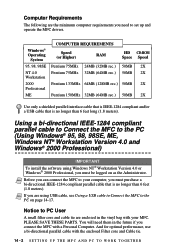
...cable that is no longer than 6 feet long (1.8 meters). Note If you are the minimum computer requirements you connect the MFC with a Personal Computer. And for optimal performance, use a bi-directional parallel cable with your computer, you must purchase ...Cable tie. 14 - 2 S E T T I N G U P T H E M F C A N D P C T O W O R K T O G E T H E R Note Before you can connect the MFC to set up and operate the MFC drivers. PLEASE SAVE THESE PARTS. Computer Requirements The following are using Windows NT® Workstation Version 4.0 or Windows® 2000 Professional, you must...
...cable that is no longer than 6 feet long (1.8 meters). Note If you are the minimum computer requirements you connect the MFC with a Personal Computer. And for optimal performance, use a bi-directional parallel cable with your computer, you must purchase ...Cable tie. 14 - 2 S E T T I N G U P T H E M F C A N D P C T O W O R K T O G E T H E R Note Before you can connect the MFC to set up and operate the MFC drivers. PLEASE SAVE THESE PARTS. Computer Requirements The following are using Windows NT® Workstation Version 4.0 or Windows® 2000 Professional, you must...

Users Manual - English
Page 125
Note The instructions in Step 9 to 18 are for Windows® 98SE. 9 Select (Recommended) and click Next. 10 Insert the MFL Pro CD-ROM into your CD-ROM drive. For Windows® ME user: Select "Specify the location of the driver (Advanced)" and click Next. S E T T I N G U P T H E M F C A N D P C T O W O R K T O G E T H E R 14 - 5 For Windows® 95 user: Select "Driver from disk provided by hardware manufacture" and click OK.
Note The instructions in Step 9 to 18 are for Windows® 98SE. 9 Select (Recommended) and click Next. 10 Insert the MFL Pro CD-ROM into your CD-ROM drive. For Windows® ME user: Select "Specify the location of the driver (Advanced)" and click Next. S E T T I N G U P T H E M F C A N D P C T O W O R K T O G E T H E R 14 - 5 For Windows® 95 user: Select "Driver from disk provided by hardware manufacture" and click OK.
Users Manual - English
Page 127
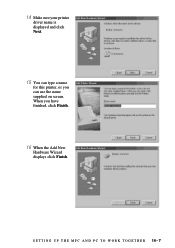
S E T T I N G U P T H E M F C A N D P C T O W O R K T O G E T H E R 14 - 7 14 Make sure your printer driver name is displayed and click Next. 15 You can use the name supplied on screen. When you can type a name for this printer, or you have finished, click Finish. 16 When the Add New Hardware Wizard displays click Finish.
S E T T I N G U P T H E M F C A N D P C T O W O R K T O G E T H E R 14 - 7 14 Make sure your printer driver name is displayed and click Next. 15 You can use the name supplied on screen. When you can type a name for this printer, or you have finished, click Finish. 16 When the Add New Hardware Wizard displays click Finish.
Users Manual - English
Page 128
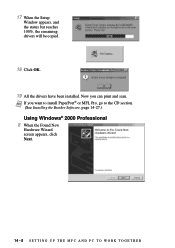
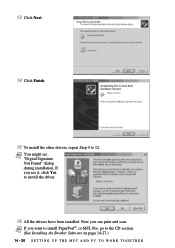
17 When the Setup Window appears, and the status bar reaches 100%, the remaining drivers will be copied. 18 Click OK. 19 All the drivers have been installed. Now you want to install PaperPort® or MFL Pro, go to the CD section. (See Installing the Brother Software, page 14-27.) Using Windows® 2000 Professional 8 When the Found New Hardware Wizard screen appears, click Next. 14 - 8 S E T T I N G U P T H E M F C A N D P C T O W O R K T O G E T H E R Note If you can print and scan.
17 When the Setup Window appears, and the status bar reaches 100%, the remaining drivers will be copied. 18 Click OK. 19 All the drivers have been installed. Now you want to install PaperPort® or MFL Pro, go to the CD section. (See Installing the Brother Software, page 14-27.) Using Windows® 2000 Professional 8 When the Found New Hardware Wizard screen appears, click Next. 14 - 8 S E T T I N G U P T H E M F C A N D P C T O W O R K T O G E T H E R Note If you can print and scan.
Users Manual - English
Page 131
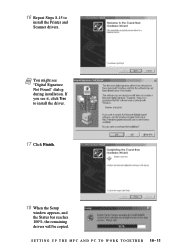
S E T T I N G U P T H E M F C A N D P C T O W O R K T O G E T H E R 14 - 11 16 Repeat Steps 8-15 to install the driver. 17 Click Finish. 18 When the Setup window appears, and the Status bar reaches 100%, the remaining drivers will be copied. If you see "Digital Signature Not Found" dialog during installation. Note You might see it, click Yes to install the Printer and Scanner drivers.
S E T T I N G U P T H E M F C A N D P C T O W O R K T O G E T H E R 14 - 11 16 Repeat Steps 8-15 to install the driver. 17 Click Finish. 18 When the Setup window appears, and the Status bar reaches 100%, the remaining drivers will be copied. If you see "Digital Signature Not Found" dialog during installation. Note You might see it, click Yes to install the Printer and Scanner drivers.

Users Manual - English
Page 132
Now you have to the CD section. (See Installing the Brother Software on page 14-27.) Using Windows NT® Workstation Version 4.0 8 Windows NT® Workstation 4.0 does not have been installed. 19 Click OK. 20 All the drivers have Plug & Play, so you can print and scan. Note If you want to install PaparPort® or MFLPro, go to install drivers manually. Then double click the Add Printer. 9 Select My Computer and click Next. 14 - 12 S E T T I N G U P T H E M F C A N D P C T O W O R K T O G E T H E R Click the Start button in the Task bar, and select Setting, Printer.
Now you have to the CD section. (See Installing the Brother Software on page 14-27.) Using Windows NT® Workstation Version 4.0 8 Windows NT® Workstation 4.0 does not have been installed. 19 Click OK. 20 All the drivers have Plug & Play, so you can print and scan. Note If you want to install PaparPort® or MFLPro, go to install drivers manually. Then double click the Add Printer. 9 Select My Computer and click Next. 14 - 12 S E T T I N G U P T H E M F C A N D P C T O W O R K T O G E T H E R Click the Start button in the Task bar, and select Setting, Printer.
Users Manual - English
Page 136
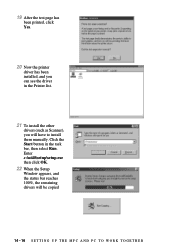
19 After the test page has been printed, click Yes. 20 Now the printer driver has been installed, and you can see the driver in the task bar, then select Run. Enter x:\nt40\setup\setup.exe then click OK. 22 When the Setup Window appears, and the status bar reaches 100%, the remaining drivers will have to install them manually. Click the Start button in the Printer list. 21 To install the other drivers (such as Scanner), you will be copied 14 - 16 S E T T I N G U P T H E M F C A N D P C T O W O R K T O G E T H E R
19 After the test page has been printed, click Yes. 20 Now the printer driver has been installed, and you can see the driver in the task bar, then select Run. Enter x:\nt40\setup\setup.exe then click OK. 22 When the Setup Window appears, and the status bar reaches 100%, the remaining drivers will have to install them manually. Click the Start button in the Printer list. 21 To install the other drivers (such as Scanner), you will be copied 14 - 16 S E T T I N G U P T H E M F C A N D P C T O W O R K T O G E T H E R

Users Manual - English
Page 137
...a click. Note If you want to install PaparPort®, MFLPro, go to the CD section. (See Installing the Brother Software on page 14-27.) Using a USB Cable to Connect the MFC to the PC (Using Windows® 98, 98SE, ME and Windows® 2000 Professional Only) IMPORTANT To install the...connected to the PC on as the Administrator. 23 Click OK. 24 All the drivers have been installed. Note Before you can print and scan. PLEASE SAVE THESE PARTS. For optimal performance, use a Computer with your MFC, please attach the enclosed Filter core to a Computer. Note If you are enclosed...
...a click. Note If you want to install PaparPort®, MFLPro, go to the CD section. (See Installing the Brother Software on page 14-27.) Using a USB Cable to Connect the MFC to the PC (Using Windows® 98, 98SE, ME and Windows® 2000 Professional Only) IMPORTANT To install the...connected to the PC on as the Administrator. 23 Click OK. 24 All the drivers have been installed. Note Before you can print and scan. PLEASE SAVE THESE PARTS. For optimal performance, use a Computer with your MFC, please attach the enclosed Filter core to a Computer. Note If you are enclosed...
Users Manual - English
Page 138
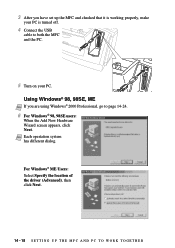
... are using Windows® 2000 Professional, go to both the MFC and the PC. 5 Turn on your PC is working properly, make your PC. Note Each opertation system has different dialog. For Windows® ME Users: Select Specify the location of the driver (Advanced), then click Next. 14 - 18 S E T T I N G U P T H E M F C A N D P C ...T O W O R K T O G E T H E R Using Windows® 98, 98SE, ME Note If you have set up the MFC and checked that it is turned off. 4 ...
... are using Windows® 2000 Professional, go to both the MFC and the PC. 5 Turn on your PC is working properly, make your PC. Note Each opertation system has different dialog. For Windows® ME Users: Select Specify the location of the driver (Advanced), then click Next. 14 - 18 S E T T I N G U P T H E M F C A N D P C ...T O W O R K T O G E T H E R Using Windows® 98, 98SE, ME Note If you have set up the MFC and checked that it is turned off. 4 ...

Users Manual - English
Page 140
If the Insert Disk Wizard appears, remove the MFL Pro CD-ROM and insert the Windows® 98/98SE/ME CD-ROM (to get the Windows® standard driver) and click OK. 13 Click Finish. (If you inserted the Windows® 98/98SE/ ME CD-ROM, remove the CD-ROM and reinsert the MFL Pro CD-ROM) 14 - 20 S E T T I N G U P T H E M F C A N D P C T O W O R K T O G E T H E R 11 Make sure Specify a location is selected and click Next. 12 Click Next.
If the Insert Disk Wizard appears, remove the MFL Pro CD-ROM and insert the Windows® 98/98SE/ME CD-ROM (to get the Windows® standard driver) and click OK. 13 Click Finish. (If you inserted the Windows® 98/98SE/ ME CD-ROM, remove the CD-ROM and reinsert the MFL Pro CD-ROM) 14 - 20 S E T T I N G U P T H E M F C A N D P C T O W O R K T O G E T H E R 11 Make sure Specify a location is selected and click Next. 12 Click Next.
Users Manual - English
Page 142
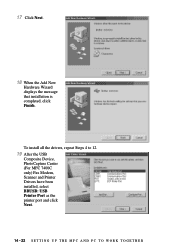
To install all the drivers, repeat Steps 4 to 12. 19 After the USB Composite Device, PhotoCapture Center (For MFC 7400C only) Fax Modem, Scanner and Printer Drivers have been installed, select BRUSB: USB Printer Port as the printer port and click Next. 14 - 22 S E T T I N G U P T H E M F C A N D P C T O W O R K T O G E T H E R 17 Click Next. 18 When the Add New Hardware Wizard displays the message that installation is completed, click Finish.
To install all the drivers, repeat Steps 4 to 12. 19 After the USB Composite Device, PhotoCapture Center (For MFC 7400C only) Fax Modem, Scanner and Printer Drivers have been installed, select BRUSB: USB Printer Port as the printer port and click Next. 14 - 22 S E T T I N G U P T H E M F C A N D P C T O W O R K T O G E T H E R 17 Click Next. 18 When the Add New Hardware Wizard displays the message that installation is completed, click Finish.

Users Manual - English
Page 144
23 When the Add New Hardware Wizard displays the message that the software has been installed, click Finish. 24 All the drivers have been installed. Now you want to install PaparPort® or MFLPro, go to the CD section. (See Installing the Brother Software, page 14-27.) Using Windows® 2000 Professional 6 When the Found New Hardware Wizard screen appears, then click Next. 7 Select (Recommended) and click Next. 14 - 24 S E T T I N G U P T H E M F C A N D P C T O W O R K T O G E T H E R Note If you can print and scan.
23 When the Add New Hardware Wizard displays the message that the software has been installed, click Finish. 24 All the drivers have been installed. Now you want to install PaparPort® or MFLPro, go to the CD section. (See Installing the Brother Software, page 14-27.) Using Windows® 2000 Professional 6 When the Found New Hardware Wizard screen appears, then click Next. 7 Select (Recommended) and click Next. 14 - 24 S E T T I N G U P T H E M F C A N D P C T O W O R K T O G E T H E R Note If you can print and scan.

Users Manual - English
Page 145
8 Insert the MFL Pro CD-ROM into your CD-ROM drive. 9 Select Specify a location and remove the other check marks, then click Next. 10 Click Browse to locate the file. 11 Double-click on the CD icon and click on the "x:\W2K\usb" (x: is the driver letter for your CD-ROM drive ) folder, then click OK. 12 Make sure Specify a location is displayed. S E T T I N G U P T H E M F C A N D P C T O W O R K T O G E T H E R 14 - 25
8 Insert the MFL Pro CD-ROM into your CD-ROM drive. 9 Select Specify a location and remove the other check marks, then click Next. 10 Click Browse to locate the file. 11 Double-click on the CD icon and click on the "x:\W2K\usb" (x: is the driver letter for your CD-ROM drive ) folder, then click OK. 12 Make sure Specify a location is displayed. S E T T I N G U P T H E M F C A N D P C T O W O R K T O G E T H E R 14 - 25
Users Manual - English
Page 146
13 Click Next. 14 Click Finish. 15 To install the other drivers, repeat Step 4 to install the driver. 16 All the drivers have been installed. Now you want to install PaparPort®, or MFL Pro, go to the CD section. (See Installing the Brother Software on page 14-27.) 14 - 26 S E T T I N G U P T H E M F C A N D P C T O W O R K T O G E T H E R Note If you can print and scan. Note You might see it, click Yes to 12. If you see "Digital Signature Not Found" dialog during installation.
13 Click Next. 14 Click Finish. 15 To install the other drivers, repeat Step 4 to install the driver. 16 All the drivers have been installed. Now you want to install PaparPort®, or MFL Pro, go to the CD section. (See Installing the Brother Software on page 14-27.) 14 - 26 S E T T I N G U P T H E M F C A N D P C T O W O R K T O G E T H E R Note If you can print and scan. Note You might see it, click Yes to 12. If you see "Digital Signature Not Found" dialog during installation.

Users Manual - English
Page 147
... at the bottom of this window does not appear, please use Windows Explorer to run the setup.exe program from the root directory of the Brother CD.) Please note that the software will automatically detect the operating system you are using and will appear: S E T T I N G U P T H E M F C A N D P C T O W O R K T O G E T H E... or NT®4.0, before you install the software (MFL Pro), See the beginning of the screen. Installing the Brother Software IMPORTANT You must install drivers for Printer and Scanner before you can install the software, you must be logged on the first button "Install ...
... at the bottom of this window does not appear, please use Windows Explorer to run the setup.exe program from the root directory of the Brother CD.) Please note that the software will automatically detect the operating system you are using and will appear: S E T T I N G U P T H E M F C A N D P C T O W O R K T O G E T H E... or NT®4.0, before you install the software (MFL Pro), See the beginning of the screen. Installing the Brother Software IMPORTANT You must install drivers for Printer and Scanner before you can install the software, you must be logged on the first button "Install ...


