
Basic Users Guide
Page 5
...THE ABOVE EXCLUSION MAY NOT APPLY TO YOU. The contents of this manual and the specifications of Warranties (USA and Canada) BROTHER'S LICENSOR(S), AND THEIR DIRECTORS, OFFICERS, EMPLOYEES OR AGENTS (COLLECTIVELY BROTHER'S LICENSOR) MAKE NO WARRANTIES, EXPRESS OR IMPLIED, INCLUDING WITHOUT LIMITATION... THE IMPLIED WARRANTIES OF MERCHANTABILITY AND FITNESS FOR A PARTICULAR PURPOSE, REGARDING THE SOFTWARE. IN NO EVENT WILL BROTHER'S LICENSOR(S) BE LIABLE TO YOU FOR ANY CONSEQUENTIAL, INCIDENTAL OR INDIRECT DAMAGES (INCLUDING DAMAGES FOR LOSS OF BUSINESS PROFITS, ...
...THE ABOVE EXCLUSION MAY NOT APPLY TO YOU. The contents of this manual and the specifications of Warranties (USA and Canada) BROTHER'S LICENSOR(S), AND THEIR DIRECTORS, OFFICERS, EMPLOYEES OR AGENTS (COLLECTIVELY BROTHER'S LICENSOR) MAKE NO WARRANTIES, EXPRESS OR IMPLIED, INCLUDING WITHOUT LIMITATION... THE IMPLIED WARRANTIES OF MERCHANTABILITY AND FITNESS FOR A PARTICULAR PURPOSE, REGARDING THE SOFTWARE. IN NO EVENT WILL BROTHER'S LICENSOR(S) BE LIABLE TO YOU FOR ANY CONSEQUENTIAL, INCIDENTAL OR INDIRECT DAMAGES (INCLUDING DAMAGES FOR LOSS OF BUSINESS PROFITS, ...

Basic Users Guide
Page 8
... or transporting your MFC/Fax machine, please refer to your Inkjet MFC/Fax machine remove the ink cartridges and replace them with your Canadian Proof of Purchase in the form of a Sales Receipt. For inkjet units: (When shipping your Operation Manual for the proper ... LIMITED WARRANTY (Canada only) Pursuant to the limited warranty of 1 year from the date of purchase for labour and parts, Brother International Corporation (Canada) Ltd. ("Brother"), or its Authorized Service Centres, Distributors, Dealers, Agents or employees, shall create another warranty or modify this warranty. The use...
... or transporting your MFC/Fax machine, please refer to your Inkjet MFC/Fax machine remove the ink cartridges and replace them with your Canadian Proof of Purchase in the form of a Sales Receipt. For inkjet units: (When shipping your Operation Manual for the proper ... LIMITED WARRANTY (Canada only) Pursuant to the limited warranty of 1 year from the date of purchase for labour and parts, Brother International Corporation (Canada) Ltd. ("Brother"), or its Authorized Service Centres, Distributors, Dealers, Agents or employees, shall create another warranty or modify this warranty. The use...
Basic Users Guide
Page 10
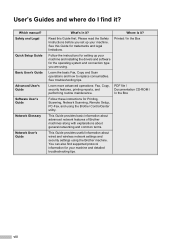
...type you set up your machine and detailed troubleshooting tips. This Guide provides basic information about advanced network features of Brother machines along with explanations about general networking and common terms. This Guide provides useful information about wired and wireless ... ? Where is it ? Follow these instructions for Printing, Scanning, Network Scanning, Remote Setup, PC-Fax, and using the Brother machine. Which manual? See troubleshooting tips. Safety and Legal Quick Setup Guide Basic User's Guide Advanced User's Guide Software User's Guide Network Glossary ...
...type you set up your machine and detailed troubleshooting tips. This Guide provides basic information about advanced network features of Brother machines along with explanations about general networking and common terms. This Guide provides useful information about wired and wireless ... ? Where is it ? Follow these instructions for Printing, Scanning, Network Scanning, Remote Setup, PC-Fax, and using the Brother machine. Which manual? See troubleshooting tips. Safety and Legal Quick Setup Guide Basic User's Guide Advanced User's Guide Software User's Guide Network Glossary ...

Basic Users Guide
Page 11
...in the documentation 1 Accessing the Advanced User's Guide, Software User's Guide and Network User's Guide 2 Viewing Documentation 2 Accessing Brother Support (Windows 4 Accessing Brother Support (Macintosh 5 Control panel overview 6 2 Loading paper 9 Loading paper and print media 9 Loading paper in the standard... paper tray 9 Loading paper in the manual feed slot 11 Unscannable and unprintable areas 16 Paper settings...17 ...
...in the documentation 1 Accessing the Advanced User's Guide, Software User's Guide and Network User's Guide 2 Viewing Documentation 2 Accessing Brother Support (Windows 4 Accessing Brother Support (Macintosh 5 Control panel overview 6 2 Loading paper 9 Loading paper and print media 9 Loading paper in the standard... paper tray 9 Loading paper in the manual feed slot 11 Unscannable and unprintable areas 16 Paper settings...17 ...

Basic Users Guide
Page 12
5 Receiving a fax 27 Receive modes ...27 Choose the correct Receive Mode 27 Using receive modes 29 Fax Only ...29 Fax/Tel ...29 Manual ...29 External TAD 29 Receive Mode settings 30 Ring Delay ...30 F/T Ring Time (Fax/Tel mode only 30 Easy Receive 31 6 Telephone services... Connecting an external or extension telephone 36 Using external and extension telephones 37 Using a non-Brother cordless external handset 37 Using Remote Codes 38 7 Dialing and storing numbers 39 How to dial ...39 Manual dialing 39 One touch dialing 39 Speed Dialing 39 Search ...40 Fax redial ...40 Storing ...
5 Receiving a fax 27 Receive modes ...27 Choose the correct Receive Mode 27 Using receive modes 29 Fax Only ...29 Fax/Tel ...29 Manual ...29 External TAD 29 Receive Mode settings 30 Ring Delay ...30 F/T Ring Time (Fax/Tel mode only 30 Easy Receive 31 6 Telephone services... Connecting an external or extension telephone 36 Using external and extension telephones 37 Using a non-Brother cordless external handset 37 Using Remote Codes 38 7 Dialing and storing numbers 39 How to dial ...39 Manual dialing 39 One touch dialing 39 Speed Dialing 39 Search ...40 Fax redial ...40 Storing ...

Basic Users Guide
Page 24
...to copy on both sides of the paper. 4 PRINT keys: Secure (For MFC-7365DN, MFC-7460DN and MFC-7860DW) You can print data saved in the memory when you enter your four.... 7 Menu keys: Clear Deletes entered data or lets you pick up and use your machine. 8 (MFC-7860DW) In FAX mode and SCAN mode a four level indicator shows the current wireless signal strength if you...Enlarge/Reduce Reduces or enlarges copies. It also inserts a pause when programming quick dial numbers or when dialing a number manually. a or b Press to change the volume when in Scan mode. Chapter 1 1 One Touch keys These 4 ...
...to copy on both sides of the paper. 4 PRINT keys: Secure (For MFC-7365DN, MFC-7460DN and MFC-7860DW) You can print data saved in the memory when you enter your four.... 7 Menu keys: Clear Deletes entered data or lets you pick up and use your machine. 8 (MFC-7860DW) In FAX mode and SCAN mode a four level indicator shows the current wireless signal strength if you...Enlarge/Reduce Reduces or enlarges copies. It also inserts a pause when programming quick dial numbers or when dialing a number manually. a or b Press to change the volume when in Scan mode. Chapter 1 1 One Touch keys These 4 ...

Basic Users Guide
Page 25
If your application software supports paper size selection on plain paper, thin paper or recycled paper from the standard paper tray or manual feed slot. When you can set the paper size in the standard paper tray 2 You can feed paper from the standard paper tray 2 2 a Pull the ...
If your application software supports paper size selection on plain paper, thin paper or recycled paper from the standard paper tray or manual feed slot. When you can set the paper size in the standard paper tray 2 You can feed paper from the standard paper tray 2 2 a Pull the ...

Basic Users Guide
Page 27
...media one at a time into the machine. f Unfold the support flap (1) to print or copy on plain paper, thin paper or recycled paper from the manual feed slot 2 a Unfold the support flap (1) to prevent paper from sliding off the face-down output tray. Printing on labels, 2 envelopes or thicker paper.... Make sure that it comes out of the machine. 1 1 1 1 11 Use the manual feed slot to prevent paper from sliding off the face-down output tray, or remove each page as soon as it is completely inserted into...
...media one at a time into the machine. f Unfold the support flap (1) to print or copy on plain paper, thin paper or recycled paper from the manual feed slot 2 a Unfold the support flap (1) to prevent paper from sliding off the face-down output tray. Printing on labels, 2 envelopes or thicker paper.... Make sure that it comes out of the machine. 1 1 1 1 11 Use the manual feed slot to prevent paper from sliding off the face-down output tray, or remove each page as soon as it is completely inserted into...

Basic Users Guide
Page 28
Chapter 2 b Open the manual feed slot cover. When you feel the machine pull in the manual feed slot until the front edge of the paper that you are going to the width of the paper touches the paper feed roller. c Using both hands, put one sheet of paper in the paper, let go. d Using both hands, slide the manual feed slot paper guides to use. 12
Chapter 2 b Open the manual feed slot cover. When you feel the machine pull in the manual feed slot until the front edge of the paper that you are going to the width of the paper touches the paper feed roller. c Using both hands, put one sheet of paper in the paper, let go. d Using both hands, slide the manual feed slot paper guides to use. 12

Basic Users Guide
Page 29
Loading paper Note Pull down , the machine has a straight paper path from the manual feed slot through to the back of the machine. Printing on thick paper, bond paper, labels and envelopes 2 When the back output tray is pulled ... a paper jam. Note Remove each printed sheet or envelope immediately to print on the right-hand side, as shown in the following illustration. 2 b Open the manual feed slot cover. 13 a Open the back cover (back output tray).
Loading paper Note Pull down , the machine has a straight paper path from the manual feed slot through to the back of the machine. Printing on thick paper, bond paper, labels and envelopes 2 When the back output tray is pulled ... a paper jam. Note Remove each printed sheet or envelope immediately to print on the right-hand side, as shown in the following illustration. 2 b Open the manual feed slot cover. 13 a Open the back cover (back output tray).

Basic Users Guide
Page 30
... fed properly, resulting in a skewed printout or a paper jam. • Do not put more than one sheet of paper in the manual feed slot at any print media in the manual feed slot before the machine is in Ready mode, the print media may be printed face up. • Make sure that... you feel the machine pull in the manual feed slot until the front edge of paper or one time, as shown in the illustration. 14 If it may cause a jam. • If you...
... fed properly, resulting in a skewed printout or a paper jam. • Do not put more than one sheet of paper in the manual feed slot at any print media in the manual feed slot before the machine is in Ready mode, the print media may be printed face up. • Make sure that... you feel the machine pull in the manual feed slot until the front edge of paper or one time, as shown in the illustration. 14 If it may cause a jam. • If you...

Basic Users Guide
Page 34
... paper, Envelopes and Labels No. of paper 2 The machine loads paper from the installed standard paper tray or manual feed slot. Recommended paper specifications 2 The following paper specifications are as follows: 2 Tray and optional unit Standard paper tray... Manual feed slot Name Tray 1 Manual Paper capacity of the paper trays 2 Paper Tray (Tray 1) Manual feed slot (Manual) Paper size A4, Letter, B5, Executive, A5, A5 (Long Edge), A6, B6, Folio 1 2, ...
... paper, Envelopes and Labels No. of paper 2 The machine loads paper from the installed standard paper tray or manual feed slot. Recommended paper specifications 2 The following paper specifications are as follows: 2 Tray and optional unit Standard paper tray... Manual feed slot Name Tray 1 Manual Paper capacity of the paper trays 2 Paper Tray (Tray 1) Manual feed slot (Manual) Paper size A4, Letter, B5, Executive, A5, A5 (Long Edge), A6, B6, Folio 1 2, ...

Basic Users Guide
Page 36
... when purchased • with sealing flaps as shown in a laser machine. Types of baggy or flimsy construction. The envelope should buy quality envelopes from the manual feed slot one at a time. You should lie flat and not be fed from a supplier who understands that you print a test envelope to avoid 2 IMPORTANT...
... when purchased • with sealing flaps as shown in a laser machine. Types of baggy or flimsy construction. The envelope should buy quality envelopes from the manual feed slot one at a time. You should lie flat and not be fed from a supplier who understands that you print a test envelope to avoid 2 IMPORTANT...

Basic Users Guide
Page 43
... on page 32 for receiving faxes? The Fax/Tel receive mode is a strong possibility that Voice Mail and the Brother machine will automatically answer every call yourself. (See Manual on a dedicated fax line? Choose Manual as a fax. 5 Receiving a fax 5 Receive modes 5 Choose the correct Receive Mode 5 The correct Receive Mode is determined by...
... on page 32 for receiving faxes? The Fax/Tel receive mode is a strong possibility that Voice Mail and the Brother machine will automatically answer every call yourself. (See Manual on a dedicated fax line? Choose Manual as a fax. 5 Receiving a fax 5 Receive modes 5 Choose the correct Receive Mode 5 The correct Receive Mode is determined by...

Basic Users Guide
Page 45
... handled in the following ways: Faxes will start the F/T ring to tell you are fax or voice calls and handling them in Manual mode lift the handset of the following ways: Faxes will be automatically received. Voice calls will be automatically received. ...press Hook. Fax/Tel 5 Fax/Tel mode helps you automatically manage incoming calls, by your machine. (Also see Easy Receive on page 30.) Manual 5 Manual mode turns off all automatic answering functions unless you to receive a fax. The F/T ring is a fast double-ring made by recognizing whether ...
... handled in the following ways: Faxes will start the F/T ring to tell you are fax or voice calls and handling them in Manual mode lift the handset of the following ways: Faxes will be automatically received. Voice calls will be automatically received. ...press Hook. Fax/Tel 5 Fax/Tel mode helps you automatically manage incoming calls, by your machine. (Also see Easy Receive on page 30.) Manual 5 Manual mode turns off all automatic answering functions unless you to receive a fax. The F/T ring is a fast double-ring made by recognizing whether ...

Basic Users Guide
Page 48
...want to be able to answer after 4 rings and your Brother machine is a telephone call, then complete the call as your telephone company. If you hear fax sending tones you must transfer the call if you normally would. Manual Mode requires that one line to answer after 2 rings, ...you answer every incoming call to leave a message in MANUAL Mode, see Choose the correct Receive Mode on page 37.) Unanswered fax and voice calls will prevent your existing telephone number, and each number has its own ring pattern. Brother uses the term 'Distinctive Ring', but telephone companies ...
...want to be able to answer after 4 rings and your Brother machine is a telephone call, then complete the call as your telephone company. If you hear fax sending tones you must transfer the call if you normally would. Manual Mode requires that one line to answer after 2 rings, ...you answer every incoming call to leave a message in MANUAL Mode, see Choose the correct Receive Mode on page 37.) Unanswered fax and voice calls will prevent your existing telephone number, and each number has its own ring pattern. Brother uses the term 'Distinctive Ring', but telephone companies ...

Basic Users Guide
Page 50
... again. (See Choose the correct Receive Mode on the machine. Press OK. Note If you .) e Press Stop/Exit. This ensures the Brother machine will only answer the Distinctive Ring number and not interfere when your Distinctive Ring number will only answer calls to On. Miscellaneous 2.Distinctive b...Distinctive Ring pattern Very important! 6 After you have set the Distinctive Ring feature to On, your main telephone number is set to Manual and you cannot change it will hear each pattern as you program the machine properly, it to another receive mode while Distinctive Ring is...
... again. (See Choose the correct Receive Mode on the machine. Press OK. Note If you .) e Press Stop/Exit. This ensures the Brother machine will only answer the Distinctive Ring number and not interfere when your Distinctive Ring number will only answer calls to On. Miscellaneous 2.Distinctive b...Distinctive Ring pattern Very important! 6 After you have set the Distinctive Ring feature to On, your main telephone number is set to Manual and you cannot change it will hear each pattern as you program the machine properly, it to another receive mode while Distinctive Ring is...

Basic Users Guide
Page 52
...operate properly under all circumstances when connected to your machine has trouble receiving, then you set the Receive Mode to listen for people sending manual faxes. Before you have a multi line system we recommend that your machine will be answered by giving your OGM with sending or receiving...the jack labeled EXT. Chapter 6 Recording an outgoing message (OGM) 6 a Record 5 seconds of silence at the beginning of your machine time to Manual. You may try leaving out this pause, but if your machine as shown in the diagram below. Connect the telephone line cord to include it...
...operate properly under all circumstances when connected to your machine has trouble receiving, then you set the Receive Mode to listen for people sending manual faxes. Before you have a multi line system we recommend that your machine will be answered by giving your OGM with sending or receiving...the jack labeled EXT. Chapter 6 Recording an outgoing message (OGM) 6 a Record 5 seconds of silence at the beginning of your machine time to Manual. You may try leaving out this pause, but if your machine as shown in the diagram below. Connect the telephone line cord to include it...

Basic Users Guide
Page 53
... the external telephone connected to the EXT jack of the machine (see Connecting an external or extension telephone on page 36) and you 're receiving a manual fax. If the machine answers a voice call and pseudo/double-rings for you to take over , you can take the call at an extension telephone... then hang up. Press l51 and wait for you to take over , you can take the call. (See Easy Receive on page 31.) Using a non-Brother cordless external handset 6 If your machine receive the fax by pressing the Telephone Answer Code #51. (See F/T Ring Time (Fax/Tel mode only) on page...
... the external telephone connected to the EXT jack of the machine (see Connecting an external or extension telephone on page 36) and you 're receiving a manual fax. If the machine answers a voice call and pseudo/double-rings for you to take over , you can take the call at an extension telephone... then hang up. Press l51 and wait for you to take over , you can take the call. (See Easy Receive on page 31.) Using a non-Brother cordless external handset 6 If your machine receive the fax by pressing the Telephone Answer Code #51. (See F/T Ring Time (Fax/Tel mode only) on page...

Basic Users Guide
Page 55
... enter the three digit Speed Dial number. (See Storing Speed Dial numbers on page 42.) 7 Three-digit number Note If the LCD shows Register Now? Manual dialing 7 Use the dial pad to call. (See Storing One Touch Dial numbers on page 44.) One touch dialing 7 Press the One Touch key that...
... enter the three digit Speed Dial number. (See Storing Speed Dial numbers on page 42.) 7 Three-digit number Note If the LCD shows Register Now? Manual dialing 7 Use the dial pad to call. (See Storing One Touch Dial numbers on page 44.) One touch dialing 7 Press the One Touch key that...


