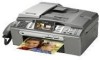

Users Manual - English
Page 5
... / 20 sheets) Matte Inkjet Paper (Letter size / 25 sheets) Inkjet Plain Paper (Letter size / 250 sheets) Telephone Line Cord Telephone Handset (MFC-685CW only) Handset Curled Cord (MFC-685CW only) Cordless Handset (MFC-885CW only) Battery (MFC-885CW only) User's Guide Item LC51BK (Prints approx. 500 pages) LC51C (Prints approx. 400 pages) LC51M (Prints approx. 400 pages) LC51Y (Prints approx. 400 pages...
... / 20 sheets) Matte Inkjet Paper (Letter size / 25 sheets) Inkjet Plain Paper (Letter size / 250 sheets) Telephone Line Cord Telephone Handset (MFC-685CW only) Handset Curled Cord (MFC-685CW only) Cordless Handset (MFC-885CW only) Battery (MFC-885CW only) User's Guide Item LC51BK (Prints approx. 500 pages) LC51C (Prints approx. 400 pages) LC51M (Prints approx. 400 pages) LC51Y (Prints approx. 400 pages...

Users Manual - English
Page 7
...resulting from use of local Brother Authorized Service Center(s), call 1-877-BROTHER (1-877-276-8437) or visit www.brother-usa.com. What Brother will be required to deliver (by this warranty. You are not limited to print heads, toner, drums, ink cartridges, print cartridges, cordless handset battery... States, this warranty covers only warranty service within the United States (and does not include shipping outside the United States). Brother® One Year Limited Warranty and Replacement Service (USA only) Who is covered: „ This limited warranty ("warranty") is given only...
...resulting from use of local Brother Authorized Service Center(s), call 1-877-BROTHER (1-877-276-8437) or visit www.brother-usa.com. What Brother will be required to deliver (by this warranty. You are not limited to print heads, toner, drums, ink cartridges, print cartridges, cordless handset battery... States, this warranty covers only warranty service within the United States (and does not include shipping outside the United States). Brother® One Year Limited Warranty and Replacement Service (USA only) Who is covered: „ This limited warranty ("warranty") is given only...

Users Manual - English
Page 9
...purchase for labour and parts, Brother International Corporation (Canada) Ltd. ("Brother"), or its Authorized Service Centres, Distributors, Dealers, Agents or employees, shall create another warranty or modify this warranty. For inkjet units: (When shipping your Inkjet MFC/Fax machine remove the ink cartridges... or shipped freight prepaid by the end-user/purchaser to a "Brother" Authorized Service Centre, together with your print head resulting from service, maintenance, modifications, or tampering by Brother, its Authorized Service Centres, will void your warranty. Please avoid ...
...purchase for labour and parts, Brother International Corporation (Canada) Ltd. ("Brother"), or its Authorized Service Centres, Distributors, Dealers, Agents or employees, shall create another warranty or modify this warranty. For inkjet units: (When shipping your Inkjet MFC/Fax machine remove the ink cartridges... or shipped freight prepaid by the end-user/purchaser to a "Brother" Authorized Service Centre, together with your print head resulting from service, maintenance, modifications, or tampering by Brother, its Authorized Service Centres, will void your warranty. Please avoid ...

Users Manual - English
Page 12
...44 F/T Ring Time (Fax/Tel mode only 44 Easy Receive 45 Additional receiving operations 46 Printing a reduced incoming fax 46 Receiving a fax at the end of a conversation (MFC-685CW only 46 Printing a fax from the memory 46 7 Telephone Services and External devices 47 Voice operations 47... and extension telephones 58 Connecting an external or extension telephone 58 Using external and extension telephones 58 Using a non-Brother cordless external telephone (MFC-685CW only)..........59 Using remote codes 59 8 Dialing and storing numbers 60 How to Dial ...60 Manual dialing 60 Speed...
...44 F/T Ring Time (Fax/Tel mode only 44 Easy Receive 45 Additional receiving operations 46 Printing a reduced incoming fax 46 Receiving a fax at the end of a conversation (MFC-685CW only 46 Printing a fax from the memory 46 7 Telephone Services and External devices 47 Voice operations 47... and extension telephones 58 Connecting an external or extension telephone 58 Using external and extension telephones 58 Using a non-Brother cordless external telephone (MFC-685CW only)..........59 Using remote codes 59 8 Dialing and storing numbers 60 How to Dial ...60 Manual dialing 60 Speed...
Users Manual - English
Page 13
...70 Additional Message Center operations 71 Setting maximum time for incoming messages 71 Setting toll saver 71 ICM Recording Monitor 72 Recording a conversation (MFC-685CW only 72 10 Advanced fax operations (Black & White only) 73 Fax Forwarding...73 Paging ...74 Fax Storage ...75 Fax Preview ......commands 81 Retrieving fax messages 82 Changing your Fax Forwarding number 82 11 Printing Reports 83 Fax reports...83 Transmission Verification Report 83 Fax Journal (activity report 83 Reports ...84 How to print a report 84 12 Polling 85 Polling overview 85 Polling receive ...85 ...
...70 Additional Message Center operations 71 Setting maximum time for incoming messages 71 Setting toll saver 71 ICM Recording Monitor 72 Recording a conversation (MFC-685CW only 72 10 Advanced fax operations (Black & White only) 73 Fax Forwarding...73 Paging ...74 Fax Storage ...75 Fax Preview ......commands 81 Retrieving fax messages 82 Changing your Fax Forwarding number 82 11 Printing Reports 83 Fax reports...83 Transmission Verification Report 83 Fax Journal (activity report 83 Reports ...84 How to print a report 84 12 Polling 85 Polling overview 85 Polling receive ...85 ...
Users Manual - English
Page 14
... ...98 Entering PhotoCapture mode 99 Print Images...99 View Photo(s 99 Print Index (Thumbnails 100 Print Photos 100 Photo Effects 101 Search by Date 103 Print All Photos 104 Slide show 104 Trimming ...105 DPOF printing 105 PhotoCapture Center® print settings 106 Print Quality 107 Paper options 107 Adjusting Brightness, Contrast and Color 108 Cropping ...109 Borderless...
... ...98 Entering PhotoCapture mode 99 Print Images...99 View Photo(s 99 Print Index (Thumbnails 100 Print Photos 100 Photo Effects 101 Search by Date 103 Print All Photos 104 Slide show 104 Trimming ...105 DPOF printing 105 PhotoCapture Center® print settings 106 Print Quality 107 Paper options 107 Adjusting Brightness, Contrast and Color 108 Cropping ...109 Borderless...
Users Manual - English
Page 15
... Flash memory drive 110 Understanding the Error Messages 111 15 Printing photos from a camera 112 Printing photos directly from a PictBridge camera 112 PictBridge requirements 112 Setting your digital camera 112 Printing Images 113 DPOF printing 113 Printing photos directly from a digital camera (without PictBridge 114 Printing Images 114 Understanding the Error Messages 115 Section V Software 16...
... Flash memory drive 110 Understanding the Error Messages 111 15 Printing photos from a camera 112 Printing photos directly from a PictBridge camera 112 PictBridge requirements 112 Setting your digital camera 112 Printing Images 113 DPOF printing 113 Printing photos directly from a digital camera (without PictBridge 114 Printing Images 114 Understanding the Error Messages 115 Section V Software 16...
Users Manual - English
Page 16
... the machine printer platen 150 Cleaning the paper pick-up roller 150 Cleaning the print head 151 Checking the print quality 151 Checking the print alignment 152 Checking the ink volume 153 Uninstalling and installing the handset and handset cradle (MFC-685CW only 153 Machine Information 155 Checking the serial number 155 Packing and shipping...
... the machine printer platen 150 Cleaning the paper pick-up roller 150 Cleaning the print head 151 Checking the print quality 151 Checking the print alignment 152 Checking the ink volume 153 Uninstalling and installing the handset and handset cradle (MFC-685CW only 153 Machine Information 155 Checking the serial number 155 Packing and shipping...
Users Manual - English
Page 19
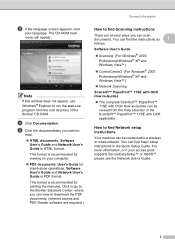
...; Network Scanning Scansoft™ PaperPort™ 11SE with OCR How-to -Guides can scan documents. d Click Documentation. Click to go to the Brother Solutions Center, where you can view or download the PDF documents. (Internet access and PDF Reader software are required.) General Information How to find ...start.exe program from the Help selection in HTML format. For more information, or if your computer. „ PDF documents: User's Guide for printing the manuals. c If the language screen appears, click your language. The CD-ROM main menu will appear. Note If this window does not ...
...; Network Scanning Scansoft™ PaperPort™ 11SE with OCR How-to -Guides can scan documents. d Click Documentation. Click to go to the Brother Solutions Center, where you can view or download the PDF documents. (Internet access and PDF Reader software are required.) General Information How to find ...start.exe program from the Help selection in HTML format. For more information, or if your computer. „ PDF documents: User's Guide for printing the manuals. c If the language screen appears, click your language. The CD-ROM main menu will appear. Note If this window does not ...

Users Manual - English
Page 24
... Will also flash if you speak to help you start a scanning operation (in color or black & white, depending on the LCD. 10 Microphone Picks up and use your voice when you have new messages. „ Play/Record (MFC-685CW) Plays voice messages stored in black & white. Also lets you start sending faxes...using Speaker Phone. 11 On/Off You can adjust the angle of the LCD display by lifting it. 8 Ink Lets you clean the print head, check the print quality, and check the available ink volume. 9 Fax Preview Lets you preview incoming and outgoing faxes on the scanning setting in the ...
... Will also flash if you speak to help you start a scanning operation (in color or black & white, depending on the LCD. 10 Microphone Picks up and use your voice when you have new messages. „ Play/Record (MFC-685CW) Plays voice messages stored in black & white. Also lets you start sending faxes...using Speaker Phone. 11 On/Off You can adjust the angle of the LCD display by lifting it. 8 Ink Lets you clean the print head, check the print quality, and check the available ink volume. 9 Fax Preview Lets you preview incoming and outgoing faxes on the scanning setting in the ...
Users Manual - English
Page 25
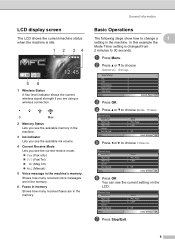
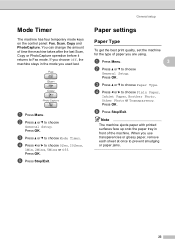
... message in the machine's memory. Basic Operations 1 The following steps show how to 30 seconds. d Press a or b to choose Mode Timer. General Setup Fax LAN Print Reports Machine Info. General Information LCD display screen 1 The LCD shows the current machine status when the machine is changed from 2 minutes to change a 1 setting...
... message in the machine's memory. Basic Operations 1 The following steps show how to 30 seconds. d Press a or b to choose Mode Timer. General Setup Fax LAN Print Reports Machine Info. General Information LCD display screen 1 The LCD shows the current machine status when the machine is changed from 2 minutes to change a 1 setting...

Users Manual - English
Page 28
...sunlight and heat. „ The coated side of paper you load. Chapter 2 Acceptable paper and other media 2 The print quality can use Brother paper. „ When you print on inkjet paper (coated paper), transparencies and photo paper, be completely dry and may stain your next document. Keep the paper flat ...and away from the output paper tray one page at once to choose the proper media in the 'Basic' tab...
...sunlight and heat. „ The coated side of paper you load. Chapter 2 Acceptable paper and other media 2 The print quality can use Brother paper. „ When you print on inkjet paper (coated paper), transparencies and photo paper, be completely dry and may stain your next document. Keep the paper flat ...and away from the output paper tray one page at once to choose the proper media in the 'Basic' tab...
Users Manual - English
Page 31
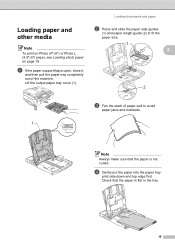
... the stack of the machine. Lift the output paper tray cover (1). d Gently put the paper into the paper tray print side down and top edge first. Loading paper and other media 2 Note To print on Photo (4"×6") or Photo L (3.5"×5") paper, see Loading photo paper on page 18. a If the paper support...
... the stack of the machine. Lift the output paper tray cover (1). d Gently put the paper into the paper tray print side down and top edge first. Loading paper and other media 2 Note To print on Photo (4"×6") or Photo L (3.5"×5") paper, see Loading photo paper on page 18. a If the paper support...
Users Manual - English
Page 33
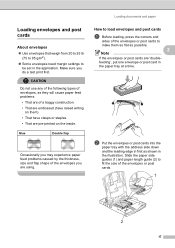
...loading, press the corners and sides of the envelopes or post cards to make them ). • That have clasps or staples. • That are pre-printed on the inside. CAUTION Do not use any of the following types of a baggy construction. • That are embossed (have raised writing on them as... post cards. 1 2 17 Slide the paper side guides (1) and paper length guide (2) to be set in the application. Make sure you are 'doublefeeding', put one envelope or post card in the illustration. b Put the envelopes or post cards into the paper tray with the address side down and the leading...
...loading, press the corners and sides of the envelopes or post cards to make them ). • That have clasps or staples. • That are pre-printed on the inside. CAUTION Do not use any of the following types of a baggy construction. • That are embossed (have raised writing on them as... post cards. 1 2 17 Slide the paper side guides (1) and paper length guide (2) to be set in the application. Make sure you are 'doublefeeding', put one envelope or post card in the illustration. b Put the envelopes or post cards into the paper tray with the address side down and the leading...
Users Manual - English
Page 34
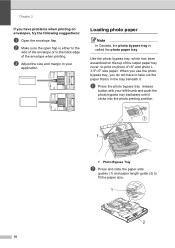
... Canada, the photo bypass tray is either to the side of the envelope or to the back edge of the output paper tray cover, to print on photo 4"×6" and photo L 3.5"×5" size paper. Use the photo bypass tray, which has been assembled on envelopes, try the following suggestions:2 a ...Open the envelope flap. c Adjust the size and margin in the tray beneath it clicks into the photo printing position. 1 1 Photo Bypass Tray b Press and slide the paper side guides (1) and paper length guide (2) to take out the paper that is in ...
... Canada, the photo bypass tray is either to the side of the envelope or to the back edge of the output paper tray cover, to print on photo 4"×6" and photo L 3.5"×5" size paper. Use the photo bypass tray, which has been assembled on envelopes, try the following suggestions:2 a ...Open the envelope flap. c Adjust the size and margin in the tray beneath it clicks into the photo printing position. 1 1 Photo Bypass Tray b Press and slide the paper side guides (1) and paper length guide (2) to take out the paper that is in ...
Users Manual - English
Page 35
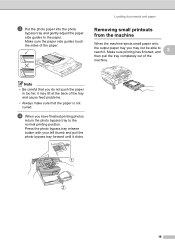
c Put the photo paper into the photo bypass tray and gently adjust the paper side guides to the normal printing position. Make sure printing has finished, and 2 then pull the tray completely out of the paper. Make sure the paper side guides touch the sides of the machine. Note &#... the output paper tray you may lift at the back of the tray and cause feed problems. • Always make sure that you have finished printing photos return the photo bypass tray to the paper.
c Put the photo paper into the photo bypass tray and gently adjust the paper side guides to the normal printing position. Make sure printing has finished, and 2 then pull the tray completely out of the paper. Make sure the paper side guides touch the sides of the machine. Note &#... the output paper tray you may lift at the back of the tray and cause feed problems. • Always make sure that you have finished printing photos return the photo bypass tray to the paper.
Users Manual - English
Page 36
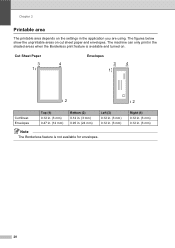
... unprintable areas on cut sheet paper and envelopes. Right (4) 0.12 in. (3 mm) 0.12 in the shaded areas when the Borderless print feature is not available for envelopes. The machine can only print in . (3 mm) 20 Chapter 2 Printable area 2 The printable area depends on the settings in . (3 mm) Note The Borderless feature is...
... unprintable areas on cut sheet paper and envelopes. Right (4) 0.12 in. (3 mm) 0.12 in the shaded areas when the Borderless print feature is not available for envelopes. The machine can only print in . (3 mm) 20 Chapter 2 Printable area 2 The printable area depends on the settings in . (3 mm) Note The Borderless feature is...
Users Manual - English
Page 37
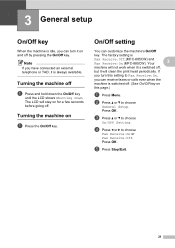
... key until the LCD shows Shutting Down. Press OK. The LCD will clean the print head periodically. Your 3 machine will not work when it is switched off, but it is Fax Receive:Off.(MFC-685CW) and Fax Receive:On (MFC-885CW). Turning the machine on 3 a Press the On/Off key. On/Off setting 3 You...
... key until the LCD shows Shutting Down. Press OK. The LCD will clean the print head periodically. Your 3 machine will not work when it is switched off, but it is Fax Receive:Off.(MFC-685CW) and Fax Receive:On (MFC-885CW). Turning the machine on 3 a Press the On/Off key. On/Off setting 3 You...

Users Manual - English
Page 38
...setting) Fax Receive: Fax Only On 1 2 Fax/Tel Manual 3 MC Available operations No machine operations will be available other than cleaning the print head. Off Available operations Fax Receive Easy Receive Delayed Fax 4 Fax Forward 4 Paging 4 Fax Storage 4 Fax Preview 4 PC Fax Receive ... cannot receive a fax with Black Start or Color Start. 2 You can receive telephone calls by using the cordless handset. 3 When an external TAD is connected and Easy Receive is turned on . 4 Set before you switch off the machine. Chapter 3 MFC-685CW On/Off setting Receive mode Fax Receive: ...
...setting) Fax Receive: Fax Only On 1 2 Fax/Tel Manual 3 MC Available operations No machine operations will be available other than cleaning the print head. Off Available operations Fax Receive Easy Receive Delayed Fax 4 Fax Forward 4 Paging 4 Fax Storage 4 Fax Preview 4 PC Fax Receive ... cannot receive a fax with Black Start or Color Start. 2 You can receive telephone calls by using the cordless handset. 3 When an external TAD is connected and Easy Receive is turned on . 4 Set before you switch off the machine. Chapter 3 MFC-685CW On/Off setting Receive mode Fax Receive: ...
Users Manual - English
Page 39
...Setup. Press OK. a Press Menu. 3 b Press a or b to choose Paper Type. e Press Stop/Exit. b Press a or b to choose Plain Paper, Inkjet Paper, Brother Photo, Other Photo or Transparency. Press OK. d Press d or c to choose General Setup. Press OK. When you are using. Press OK. e Press Stop/Exit... smudging or paper jams. 23 Paper settings 3 Paper Type 3 To get the best print quality, set the machine for the type of the machine. Note The machine ejects paper with printed surfaces face up onto the paper tray in the mode you choose Off, the machine stays...
...Setup. Press OK. a Press Menu. 3 b Press a or b to choose Paper Type. e Press Stop/Exit. b Press a or b to choose Plain Paper, Inkjet Paper, Brother Photo, Other Photo or Transparency. Press OK. d Press d or c to choose General Setup. Press OK. When you are using. Press OK. e Press Stop/Exit... smudging or paper jams. 23 Paper settings 3 Paper Type 3 To get the best print quality, set the machine for the type of the machine. Note The machine ejects paper with printed surfaces face up onto the paper tray in the mode you choose Off, the machine stays...


