Software & Network Users Manual - English
Page 5
... memory ...98 Checking the print quality ...98 Status Monitor ...99 Using the Brother Ink driver ...100 Choosing page setup options ...100 Choosing printing options ...101 Media Type...101 Quality ...102 Paper Feed (MFC-5860CN only)...103 Sending a fax (MFC models only) ...104 Drag a vCard from the Mac OS® X ...Scan to E-mail ...113 Scan to Image ...114 Scan to OCR ...114 Scan to File...115 Scan to Card (Not available for MFC-240C and MFC-3360C 115 Using Presto!® PageManager® ...119 Features ...119 System requirements for Presto!® PageManager 119 Technical support ...120 10...
... memory ...98 Checking the print quality ...98 Status Monitor ...99 Using the Brother Ink driver ...100 Choosing page setup options ...100 Choosing printing options ...101 Media Type...101 Quality ...102 Paper Feed (MFC-5860CN only)...103 Sending a fax (MFC models only) ...104 Drag a vCard from the Mac OS® X ...Scan to E-mail ...113 Scan to Image ...114 Scan to OCR ...114 Scan to File...115 Scan to Card (Not available for MFC-240C and MFC-3360C 115 Using Presto!® PageManager® ...119 Features ...119 System requirements for Presto!® PageManager 119 Technical support ...120 10...

Software & Network Users Manual - English
Page 18
... printed (1 to 999). 1 1 Collate 1 With Collate checked, one complete copy of your document in Tray 2. • Tray 2 does not support Borderless printing. 12 Paper Source (MFC-5860CN only) 1 The Paper Source selection sets the paper tray from Tray 1. If Collate is unchecked, then each page will feed the paper when printing. When Tray 1 is empty, Auto Select...
... printed (1 to 999). 1 1 Collate 1 With Collate checked, one complete copy of your document in Tray 2. • Tray 2 does not support Borderless printing. 12 Paper Source (MFC-5860CN only) 1 The Paper Source selection sets the paper tray from Tray 1. If Collate is unchecked, then each page will feed the paper when printing. When Tray 1 is empty, Auto Select...
Software & Network Users Manual - English
Page 107
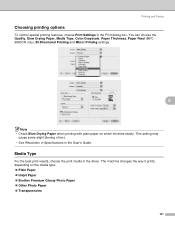
... the Print dialog box. You can choose the Quality, Slow Drying Paper, Media Type, Color/Grayscale, Paper Thickness, Paper Feed (MFC5860CN only), Bi-Directional Printing and Mirror Printing settings. 8 Note • Check Slow Drying Paper when printing with plain paper on the media type. „ Plain Paper „ Inkjet Paper „ Brother Premium Glossy Photo Paper „ Other Photo Paper „ Transparencies 101
... the Print dialog box. You can choose the Quality, Slow Drying Paper, Media Type, Color/Grayscale, Paper Thickness, Paper Feed (MFC5860CN only), Bi-Directional Printing and Mirror Printing settings. 8 Note • Check Slow Drying Paper when printing with plain paper on the media type. „ Plain Paper „ Inkjet Paper „ Brother Premium Glossy Photo Paper „ Other Photo Paper „ Transparencies 101
Software & Network Users Manual - English
Page 109
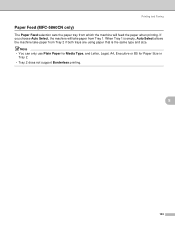
Note • You can only use Plain Paper for Media Type, and Letter, Legal, A4, Executive or B5 for Paper Size in Tray 2. • Tray 2 does not support Borderless printing. 8 103 Printing and Faxing Paper Feed (MFC-5860CN only) 8 The Paper Feed selection sets the paper tray from Tray 2 if both trays are using paper that is empty, Auto Select allows the machine take paper from Tray 1. When Tray 1 is the same type and size. If you choose Auto Select, the machine will take paper from which the machine will feed the paper when printing.
Note • You can only use Plain Paper for Media Type, and Letter, Legal, A4, Executive or B5 for Paper Size in Tray 2. • Tray 2 does not support Borderless printing. 8 103 Printing and Faxing Paper Feed (MFC-5860CN only) 8 The Paper Feed selection sets the paper tray from Tray 2 if both trays are using paper that is empty, Auto Select allows the machine take paper from Tray 1. When Tray 1 is the same type and size. If you choose Auto Select, the machine will take paper from which the machine will feed the paper when printing.
Users Manual - English
Page 7
...from someone other than an authorized Brother reseller in materials or workmanship. 6 Normal Periodic Maintenance Items, such as "this warranty as Paper Feeding Kit, Fuser and Laser Units. What is the length of the Warranty Periods: „ Machines: one year from the original purchase ...MFC and DCP and 1-800-276-7746 for parts or labor. and, 5 Problems arising from the original purchase date or the rated life of consumable, whichever comes first. You are not limited to print heads, toner, drums, ink cartridges, print cartridges, refill ribbons, therma PLUS paper, thermal paper...
...from someone other than an authorized Brother reseller in materials or workmanship. 6 Normal Periodic Maintenance Items, such as "this warranty as Paper Feeding Kit, Fuser and Laser Units. What is the length of the Warranty Periods: „ Machines: one year from the original purchase ...MFC and DCP and 1-800-276-7746 for parts or labor. and, 5 Problems arising from the original purchase date or the rated life of consumable, whichever comes first. You are not limited to print heads, toner, drums, ink cartridges, print cartridges, refill ribbons, therma PLUS paper, thermal paper...
Users Manual - English
Page 27
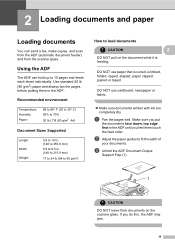
... or fabric. „ Make sure documents written with ink are completely dry. Use standard 20 lb (80 g/m2) paper and always fan the pages before putting them touch the feed roller. b Adjust the paper guides to load documents 2 CAUTION 2 DO NOT pull on the scanner glass. c Unfold the ADF Document Output Support Flap...
... or fabric. „ Make sure documents written with ink are completely dry. Use standard 20 lb (80 g/m2) paper and always fan the pages before putting them touch the feed roller. b Adjust the paper guides to load documents 2 CAUTION 2 DO NOT pull on the scanner glass. c Unfold the ADF Document Output Support Flap...
Users Manual - English
Page 34
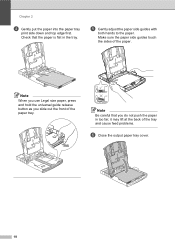
Note When you use Legal size paper, press and hold the universal guide release button as you do not push the paper in the tray. Note Be careful that the paper is flat in too far; it may lift at the back of the paper. Make sure the paper side guides touch the sides of the tray and cause feed problems. f Close the output paper tray cover. 18 Chapter 2 d Gently put the paper into the paper tray print side down and top edge first. e Gently adjust the paper side guides with both hands to the paper. Check that you slide out the front of the paper tray.
Note When you use Legal size paper, press and hold the universal guide release button as you do not push the paper in the tray. Note Be careful that the paper is flat in too far; it may lift at the back of the paper. Make sure the paper side guides touch the sides of the tray and cause feed problems. f Close the output paper tray cover. 18 Chapter 2 d Gently put the paper into the paper tray print side down and top edge first. e Gently adjust the paper side guides with both hands to the paper. Check that you slide out the front of the paper tray.
Users Manual - English
Page 35
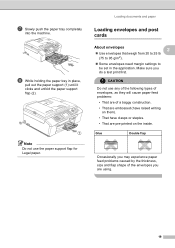
... completely into the machine. Make sure you are pre-printed on the inside. h While holding the paper tray in the application. Glue Double flap Occasionally you may experience paper feed problems caused by the thickness, size and flap shape of a baggy construction. • That are embossed (have raised writing...envelopes need margin settings to be set in place, pull out the paper support (1) until it clicks and unfold the paper support flap (2). Note Do not use any of the following types of envelopes, as they will cause paper feed problems: • That are of the envelopes you do a ...
... completely into the machine. Make sure you are pre-printed on the inside. h While holding the paper tray in the application. Glue Double flap Occasionally you may experience paper feed problems caused by the thickness, size and flap shape of a baggy construction. • That are embossed (have raised writing...envelopes need margin settings to be set in place, pull out the paper support (1) until it clicks and unfold the paper support flap (2). Note Do not use any of the following types of envelopes, as they will cause paper feed problems: • That are of the envelopes you do a ...
Users Manual - English
Page 37
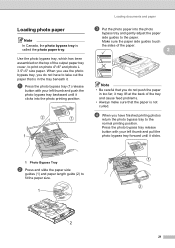
...your left thumb and pull the photo bypass tray forward until it clicks. 1 Photo Bypass Tray b Press and slide the paper side guides (1) and paper length guide (2) to the paper. d When you do not have finished printing photos return the photo bypass tray to print on photo 4"×6" and photo ...L 3.5"×5" size paper. Use the photo bypass tray, which has been assembled on the top of the tray and cause feed problems. • Always make sure that you have to take out the paper that is called the photo paper tray. Loading photo paper 2 Note In Canada, the photo ...
...your left thumb and pull the photo bypass tray forward until it clicks. 1 Photo Bypass Tray b Press and slide the paper side guides (1) and paper length guide (2) to the paper. d When you do not have finished printing photos return the photo bypass tray to print on photo 4"×6" and photo ...L 3.5"×5" size paper. Use the photo bypass tray, which has been assembled on the top of the tray and cause feed problems. • Always make sure that you have to take out the paper that is called the photo paper tray. Loading photo paper 2 Note In Canada, the photo ...
Users Manual - English
Page 136
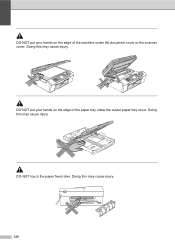
Doing this may cause injury. Doing this may cause injury. DO NOT touch the paper feed roller. DO NOT put your hands on the edge of the paper tray under the document cover or the scanner cover. Doing this may cause injury. 120 DO NOT put your hands on the edge of the machine under the output paper tray cover.
Doing this may cause injury. Doing this may cause injury. DO NOT touch the paper feed roller. DO NOT put your hands on the edge of the paper tray under the document cover or the scanner cover. Doing this may cause injury. 120 DO NOT put your hands on the edge of the machine under the output paper tray cover.
Users Manual - English
Page 147
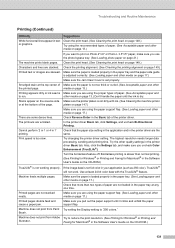
...is not too thick or curled. (See Acceptable paper and other quality settings in the paper tray and the paper side guide is adjusted correctly. (See Loading paper and other media on page 13.) If you want to '256 colors.' Machine feeds multiple pages. Printed pages are wrinkled. media on ...the Software User's Guide on the CD-ROM.) True2Life® is not dirty with the True2Life® feature. Smudged stain at any one time. In the printer driver Basic tab, click Settings, and uncheck Bi-Directional Printing. Turn the borderless feature off. Check that more...
...is not too thick or curled. (See Acceptable paper and other quality settings in the paper tray and the paper side guide is adjusted correctly. (See Loading paper and other media on page 13.) If you want to '256 colors.' Machine feeds multiple pages. Printed pages are wrinkled. media on ...the Software User's Guide on the CD-ROM.) True2Life® is not dirty with the True2Life® feature. Smudged stain at any one time. In the printer driver Basic tab, click Settings, and uncheck Bi-Directional Printing. Turn the borderless feature off. Check that more...
Quick Setup Guide - English
Page 7
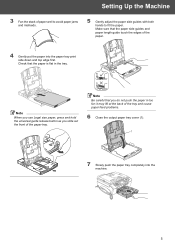
...Fan the stack of the paper. 4 Gently put the paper into the machine. 5 Note Be careful that you slide out the front of the tray and cause paper feed problems. 6 Close the output paper tray cover (1). 1 7 Slowly push the paper tray completely into the paper tray print side down ...and top edge first. Check that the paper side guides and paper length guide touch the edges of paper well to avoid paper jams and misfeeds. 5 Gently adjust the paper...
...Fan the stack of the paper. 4 Gently put the paper into the machine. 5 Note Be careful that you slide out the front of the tray and cause paper feed problems. 6 Close the output paper tray cover (1). 1 7 Slowly push the paper tray completely into the paper tray print side down ...and top edge first. Check that the paper side guides and paper length guide touch the edges of paper well to avoid paper jams and misfeeds. 5 Gently adjust the paper...


