
Users Manual - English
Page 4
...1-800-947-1445 (fax) http://www.brothermall.com In Canada: 1-877-BROTHER (voice) Description Ink Cartridge Standard Ink Cartridge (blue) Ink Cartridge (red) Ink Cartridge Premium Glossy Photo Paper (Letter size / 20 sheets) Matte Inkjet Paper (Letter size / 25 sheets) Inkjet Plain Paper (Letter size / 250 sheets) Telephone Line Cord Telephone Handset ...a complete selection of fax back subjects. This system is available 24 hours a day, 7 days a week. Brother fax back system (USA only) Brother has installed an easy-to-use fax back system, so you can visit us online for Canada) ii If you...
...1-800-947-1445 (fax) http://www.brothermall.com In Canada: 1-877-BROTHER (voice) Description Ink Cartridge Standard Ink Cartridge (blue) Ink Cartridge (red) Ink Cartridge Premium Glossy Photo Paper (Letter size / 20 sheets) Matte Inkjet Paper (Letter size / 25 sheets) Inkjet Plain Paper (Letter size / 250 sheets) Telephone Line Cord Telephone Handset ...a complete selection of fax back subjects. This system is available 24 hours a day, 7 days a week. Brother fax back system (USA only) Brother has installed an easy-to-use fax back system, so you can visit us online for Canada) ii If you...

Users Manual - English
Page 6
... limited to print heads, toner, drums, ink cartridges, print cartridges, refill ribbons, therma PLUS paper and thermal paper. • Except as otherwise provided herein, Brother warrants that you purchased is not covered by... Consumable and Accessory Items is the length of the Warranty Periods: • Machines: one year from the original purchase date. • Accompanying Consumable and Accessory Items: 90 ...-284-4329 for Fax, MFC and DCP and 1-800-276-7746 for Printers, or to a Brother Authorized Service Center within the applicable warranty period, Brother or its Authorized Service Center...
... limited to print heads, toner, drums, ink cartridges, print cartridges, refill ribbons, therma PLUS paper and thermal paper. • Except as otherwise provided herein, Brother warrants that you purchased is not covered by... Consumable and Accessory Items is the length of the Warranty Periods: • Machines: one year from the original purchase date. • Accompanying Consumable and Accessory Items: 90 ...-284-4329 for Fax, MFC and DCP and 1-800-276-7746 for Printers, or to a Brother Authorized Service Center within the applicable warranty period, Brother or its Authorized Service Center...

Users Manual - English
Page 8
... Authorized Service Center call 1-877-BROTHER. BROTHER MULTIFUNCTION CENTER/FACSIMILE MACHINE LIMITED WARRANTY (Canada only) Pursuant to your User's Guide for proper packaging.) For ink-jet products: Do not remove the ink cartridges during shipping. This Limited Warranty does not include cleaning, consumables (including, without the ink cartridges will repair this MFC/Facsimile machine shall be the sole...
... Authorized Service Center call 1-877-BROTHER. BROTHER MULTIFUNCTION CENTER/FACSIMILE MACHINE LIMITED WARRANTY (Canada only) Pursuant to your User's Guide for proper packaging.) For ink-jet products: Do not remove the ink cartridges during shipping. This Limited Warranty does not include cleaning, consumables (including, without the ink cartridges will repair this MFC/Facsimile machine shall be the sole...
Users Manual - English
Page 23
...Cleaning the scanner 13-23 Cleaning the machine printer platen 13-24 Cleaning the Paper Pick-up Roller 13-25 Replacing the ink cartridges 13-26 Uninstalling the handset and the handset cradle.... 13-30 Uninstalling the handset and handset cradle ..... 13-30 A ...Appendix A A-1 Setting up telephone services A-1 Distinctive Ring A-1 What does your telephone company's 'Distinctive Ring' do A-1 What does Brother's 'Distinctive Ring' do A-2 Do you have Voice Mail A-2 Before you choose the ring pattern to register .......A-3 Registering the Distinctive Ring pattern ...
...Cleaning the scanner 13-23 Cleaning the machine printer platen 13-24 Cleaning the Paper Pick-up Roller 13-25 Replacing the ink cartridges 13-26 Uninstalling the handset and the handset cradle.... 13-30 Uninstalling the handset and handset cradle ..... 13-30 A ...Appendix A A-1 Setting up telephone services A-1 Distinctive Ring A-1 What does your telephone company's 'Distinctive Ring' do A-1 What does Brother's 'Distinctive Ring' do A-2 Do you have Voice Mail A-2 Before you choose the ring pattern to register .......A-3 Registering the Distinctive Ring pattern ...

Users Manual - English
Page 145
...sending machine has the ability to warm up. If a sending machine has a color fax, the machine's 'handshake' will be received into memory as black and white. No Cartridge An ink cartridge is too cold. If the error remains, check the media drive by inserting...improperly formatted, or there is too warm. Ink Empty One or more of the ink cartridges are running out of the ink cartridges is empty. Replace the ink cartridges. (See Replacing the ink cartridges on page ii.) Take out the ink cartridge and put it , the color fax will stop all print operations. TROUBLESHOOTING AND...
...sending machine has the ability to warm up. If a sending machine has a color fax, the machine's 'handshake' will be received into memory as black and white. No Cartridge An ink cartridge is too cold. If the error remains, check the media drive by inserting...improperly formatted, or there is too warm. Ink Empty One or more of the ink cartridges are running out of the ink cartridges is empty. Replace the ink cartridges. (See Replacing the ink cartridges on page ii.) Take out the ink cartridge and put it , the color fax will stop all print operations. TROUBLESHOOTING AND...

Users Manual - English
Page 152
...horizontal lines appear in Software User's Guide CD-ROM.) Make sure your ink cartridges are having difficulty with your computer. In the printer driver 'Basic' tab, click 'Settings,' and check 'Enhanced Normal Printing.' One or more ink cartridges are empty. (See Replacing the ink cartridges on page 13-26.) Check to load paper, envelopes and post ...Guide on the CD-ROM or for Macintosh® users, Media Type on page 1-14.) 13 - 9 TROUBLESHOOTING AND ROUTINE MAINTENANCE Visit us at http://solutions.brother.com. SUGGESTIONS Check the interface cable connection on the package. The...
...horizontal lines appear in Software User's Guide CD-ROM.) Make sure your ink cartridges are having difficulty with your computer. In the printer driver 'Basic' tab, click 'Settings,' and check 'Enhanced Normal Printing.' One or more ink cartridges are empty. (See Replacing the ink cartridges on page 13-26.) Check to load paper, envelopes and post ...Guide on the CD-ROM or for Macintosh® users, Media Type on page 1-14.) 13 - 9 TROUBLESHOOTING AND ROUTINE MAINTENANCE Visit us at http://solutions.brother.com. SUGGESTIONS Check the interface cable connection on the package. The...

Users Manual - English
Page 154
....) Poor sending quality. Vertical black lines when sending. DIFFICULTY SUGGESTIONS Printing Received Faxes (Continued) Received color fax prints only in . If there is no answer, check that the telephone line cord is ...is illuminated. (See How to enter Fax Ask the other person to send the color fax again. (See Replacing the ink cartridges on page 13-26.) Check that the telephone line cord is in the correct receive... the menu setting of memory. Replace the color ink cartridges that all telephone connections are secure. If possible, call your machine, ask your resolution to On....
....) Poor sending quality. Vertical black lines when sending. DIFFICULTY SUGGESTIONS Printing Received Faxes (Continued) Received color fax prints only in . If there is no answer, check that the telephone line cord is ...is illuminated. (See How to enter Fax Ask the other person to send the color fax again. (See Replacing the ink cartridges on page 13-26.) Check that the telephone line cord is in the correct receive... the menu setting of memory. Replace the color ink cartridges that all telephone connections are secure. If possible, call your machine, ask your resolution to On....
Users Manual - English
Page 158
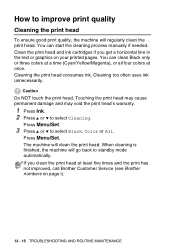
... Clean the print head and ink cartridges if you clean the print head at once. Press Menu/Set. You can clean Black only or three colors at a time (Cyan/Yellow/Magenta), or all four colors at least five times and the print has not improved, call Brother Customer Service (see Brother numbers on your printed pages...
... Clean the print head and ink cartridges if you clean the print head at once. Press Menu/Set. You can clean Black only or three colors at a time (Cyan/Yellow/Magenta), or all four colors at least five times and the print has not improved, call Brother Customer Service (see Brother numbers on your printed pages...

Users Manual - English
Page 160
...on page i). If you still see Brother numbers on the cartridge package has passed. If ink is clogged the printed sample looks like this Print Quality Check Sheet, repeat the cleaning and test print procedures at least five times for the new ink cartridge. Touching the print head may cause ...printing another Print Quality Check Sheet. After the print head nozzle is still missing after the fifth cleaning and test print, replace the ink cartridge for Black or three colors with a problem. The LCD shows: Press 1 (Yes). Caution Do NOT touch the print head. If the problem still exists,...
...on page i). If you still see Brother numbers on the cartridge package has passed. If ink is clogged the printed sample looks like this Print Quality Check Sheet, repeat the cleaning and test print procedures at least five times for the new ink cartridge. Touching the print head may cause ...printing another Print Quality Check Sheet. After the print head nozzle is still missing after the fifth cleaning and test print, replace the ink cartridge for Black or three colors with a problem. The LCD shows: Press 1 (Yes). Caution Do NOT touch the print head. If the problem still exists,...

Users Manual - English
Page 163
...shipping. Packing and shipping the machine Whenever you transport the machine, use the packing materials that all the ink cartridges and attach the yellow protective parts. (See Replacing the ink cartridges on page 13-26.) When attaching the yellow protective parts, make sure it clips into place as ... It is important to allow the machine to ensure that came with either the yellow protective parts or the ink cartridges in the diagram. If you do NOT remove the ink cartridges before disconnecting it from the right-hand side of the machine until it locks securely into the open position...
...shipping. Packing and shipping the machine Whenever you transport the machine, use the packing materials that all the ink cartridges and attach the yellow protective parts. (See Replacing the ink cartridges on page 13-26.) When attaching the yellow protective parts, make sure it clips into place as ... It is important to allow the machine to ensure that came with either the yellow protective parts or the ink cartridges in the diagram. If you do NOT remove the ink cartridges before disconnecting it from the right-hand side of the machine until it locks securely into the open position...
Users Manual - English
Page 165
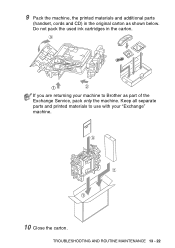
TROUBLESHOOTING AND ROUTINE MAINTENANCE 13 - 22 9 Pack the machine, the printed materials and additional parts (handset, cords and CD) in the carton. Keep all separate parts and printed materials to use with your machine to Brother as shown below. Do not pack the used ink cartridges in the original carton as part of the Exchange Service, pack only the machine. If you are returning your "Exchange" machine. 10 Close the carton.
TROUBLESHOOTING AND ROUTINE MAINTENANCE 13 - 22 9 Pack the machine, the printed materials and additional parts (handset, cords and CD) in the carton. Keep all separate parts and printed materials to use with your machine to Brother as shown below. Do not pack the used ink cartridges in the original carton as part of the Exchange Service, pack only the machine. If you are returning your "Exchange" machine. 10 Close the carton.

Users Manual - English
Page 169
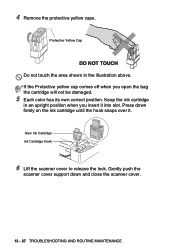
... some ink in the ink cartridge to replace the ink cartridges in the ink cartridge. Even though the machine informs you with an ink dot counter. If one or more ink cartridges are empty, for the color shown on the LCD. Ink Cartridge Hook 3 Open the new ink cartridge bag for example Black, the LCD shows Ink Empty Black and Replace Ink. 2 Pull the ink cartridge hook toward you which ink cartridge...
... some ink in the ink cartridge to replace the ink cartridges in the ink cartridge. Even though the machine informs you with an ink dot counter. If one or more ink cartridges are empty, for the color shown on the LCD. Ink Cartridge Hook 3 Open the new ink cartridge bag for example Black, the LCD shows Ink Empty Black and Replace Ink. 2 Pull the ink cartridge hook toward you which ink cartridge...
Users Manual - English
Page 170
... the illustration above. Gently push the scanner cover support down firmly on the ink cartridge until the hook snaps over it into slot. Press down and close the scanner cover. 13 - 27 TROUBLESHOOTING AND ROUTINE MAINTENANCE If the Protective yellow ... you insert it . Protective Yellow Cap DO NOT TOUCH Do not touch the area shown in an upright position when you open the bag the cartridge will not be damaged. 5 Each color has its own correct position. New Ink Cartridge Ink Cartridge Hook 6 Lift the scanner cover to release the lock.
... the illustration above. Gently push the scanner cover support down firmly on the ink cartridge until the hook snaps over it into slot. Press down and close the scanner cover. 13 - 27 TROUBLESHOOTING AND ROUTINE MAINTENANCE If the Protective yellow ... you insert it . Protective Yellow Cap DO NOT TOUCH Do not touch the area shown in an upright position when you open the bag the cartridge will not be damaged. 5 Each color has its own correct position. New Ink Cartridge Ink Cartridge Hook 6 Lift the scanner cover to release the lock.
Users Manual - English
Page 171
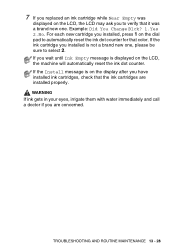
... will automatically reset the ink dot counter. TROUBLESHOOTING AND ROUTINE MAINTENANCE 13 - 28 If the Install message is not a brand new one . For each new cartridge you installed, press 1 on the LCD, the LCD may ask you to verify that color. 7 If you replaced an ink cartridge while Near Empty was ...a brand new one , please be sure to automatically reset the ink dot counter for that it was...
... will automatically reset the ink dot counter. TROUBLESHOOTING AND ROUTINE MAINTENANCE 13 - 28 If the Install message is not a brand new one . For each new cartridge you installed, press 1 on the LCD, the LCD may ask you to verify that color. 7 If you replaced an ink cartridge while Near Empty was ...a brand new one , please be sure to automatically reset the ink dot counter for that it was...

Users Manual - English
Page 172
Use unopened ink cartridges by the use only Genuine Brother Brand replacement ink cartridges. If you do not refill the ink cartridges provided with soap or detergent immediately. ■ If you install an ink cartridge in the wrong color position, you must clean the print head several times before you start printing (after correcting the cartridge installation) because the colors were mixed. ■...
Use unopened ink cartridges by the use only Genuine Brother Brand replacement ink cartridges. If you do not refill the ink cartridges provided with soap or detergent immediately. ■ If you install an ink cartridge in the wrong color position, you must clean the print head several times before you start printing (after correcting the cartridge installation) because the colors were mixed. ■...
Users Manual - English
Page 214
... 500 pages at a resolution of 600 x 600 dpi in the ink cartridge to prevent air from the print head assembly. Consumable items Ink Service Life of Ink Cartridge Replacement Consumables The machine uses individual Black, Yellow, Cyan and Magenta ink cartridges that are based upon the following assumptions: • Continuous printing at 5% coverage Yellow, Cyan and Magenta...
... 500 pages at a resolution of 600 x 600 dpi in the ink cartridge to prevent air from the print head assembly. Consumable items Ink Service Life of Ink Cartridge Replacement Consumables The machine uses individual Black, Yellow, Cyan and Magenta ink cartridges that are based upon the following assumptions: • Continuous printing at 5% coverage Yellow, Cyan and Magenta...
Users Manual - English
Page 218
sending 3-1 at end of conversation .. 3-6 automatic 3-5 Broadcasting 3-12 canceling from memory 3-11 color fax 3-3 compatibility 13-14 contrast 3-7 Dial tone detection .... 13-14 enter Fax mode 3-1 from memory (... ...... 13-23 Manual dialing 3-1, 5-7 receive 4-1 transmission 3-5 Memory Storage B-1 Menu Selection Table .........B-1 Message Center mode ....... 7-1 I Ink cartridges checking ink volume ..... 13-19 replacing 13-26 Ink Dot Counter 13-26 J Jacks convert to RJ11 jack triplex adapter A-12 EXT external telephone .........A-9 TAD (answering machine A-9 Jams document ...
sending 3-1 at end of conversation .. 3-6 automatic 3-5 Broadcasting 3-12 canceling from memory 3-11 color fax 3-3 compatibility 13-14 contrast 3-7 Dial tone detection .... 13-14 enter Fax mode 3-1 from memory (... ...... 13-23 Manual dialing 3-1, 5-7 receive 4-1 transmission 3-5 Memory Storage B-1 Menu Selection Table .........B-1 Message Center mode ....... 7-1 I Ink cartridges checking ink volume ..... 13-19 replacing 13-26 Ink Dot Counter 13-26 J Jacks convert to RJ11 jack triplex adapter A-12 EXT external telephone .........A-9 TAD (answering machine A-9 Jams document ...
Quick Setup Guide - English
Page 3
... the Machine Removing the protective parts ...4 Installing the handset ...4 Loading paper ...4 Installing the phone line and power cord...5 Installing the ink cartridges...6 Print quality check ...8 Setting the date and time ...9 Setting your station ID ...10 Choosing a Receive Mode ...10 Setting up the...For Windows® users) ...39 How to set the machine's network settings to wireless LAN or wired LAN 40 Consumables Replacement consumables ...41 Ink cartridge ...41 1 Installing the Driver & Software Windows® For USB Interface Users (For Windows® 98/98SE/Me/2000 Professional/XP 14...
... the Machine Removing the protective parts ...4 Installing the handset ...4 Loading paper ...4 Installing the phone line and power cord...5 Installing the ink cartridges...6 Print quality check ...8 Setting the date and time ...9 Setting your station ID ...10 Choosing a Receive Mode ...10 Setting up the...For Windows® users) ...39 How to set the machine's network settings to wireless LAN or wired LAN 40 Consumables Replacement consumables ...41 Ink cartridge ...41 1 Installing the Driver & Software Windows® For USB Interface Users (For Windows® 98/98SE/Me/2000 Professional/XP 14...

Quick Setup Guide - English
Page 4
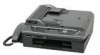
Getting Started 1 Carton components Carton components may vary from one country to use (USB or network). Save all packing materials and the carton in case for any reason you connect it to the USB port ... Telephone Handset Telephone Line Cord Test Sheet (USA only) Side Cover Black (LC41 BK) Magenta (LC41M) Yellow (LC41Y) Ink Cartridges Cyan (LC41C) An interface cable is done during the software installation process. The MFC can also be 12 Mbits/s. Connecting the interface cable is not a standard accessory. This interface is no longer than...
Getting Started 1 Carton components Carton components may vary from one country to use (USB or network). Save all packing materials and the carton in case for any reason you connect it to the USB port ... Telephone Handset Telephone Line Cord Test Sheet (USA only) Side Cover Black (LC41 BK) Magenta (LC41M) Yellow (LC41Y) Ink Cartridges Cyan (LC41C) An interface cable is done during the software installation process. The MFC can also be 12 Mbits/s. Connecting the interface cable is not a standard accessory. This interface is no longer than...

Quick Setup Guide - English
Page 8
Keep the ink cartridge in an upright position when you open position. 1 5 Carefully remove the protective yellow cap (1). 1 Improper Setup DO NOT touch the area shown in your eyes, ... occurs consult a doctor. 1 Make sure that the power is turned on. Warning If ink gets in the illustration below. 3 Remove the yellow protective parts (1). 1 Note If the protective yellow cap comes off when you put it locks securely into the slot. STEP1 Setting Up the Machine 5 Installing the ink cartridges 4 Take out the ink cartridge.
Keep the ink cartridge in an upright position when you open position. 1 5 Carefully remove the protective yellow cap (1). 1 Improper Setup DO NOT touch the area shown in your eyes, ... occurs consult a doctor. 1 Make sure that the power is turned on. Warning If ink gets in the illustration below. 3 Remove the yellow protective parts (1). 1 Note If the protective yellow cap comes off when you put it locks securely into the slot. STEP1 Setting Up the Machine 5 Installing the ink cartridges 4 Take out the ink cartridge.


