Software Users Manual - English
Page 2
...Using the Brother MFC printer driver 1-1 Features 1-1 Choosing the right type of paper 1-2 How to print your original 1-2 Simultaneous printing and faxing 1-3 Clearing data from the memory 1-3 Checking the Print Quality 1-3 Printer operation keys 1-3 Job Cancel (MFC-3420C only...Border Line 1-8 Orientation 1-9 Copies 1-9 Collate 1-9 Reverse Order 1-9 Advanced tab 1-10 Color 1-11 Color/Grayscale 1-11 Image Type 1-11 Custom Image Type 1-12 Halftone Pattern 1-13 Color Enhancement (True2Life 1-14 Scaling 1-16 Watermark 1-17 In background 1-17 In Outline ...
...Using the Brother MFC printer driver 1-1 Features 1-1 Choosing the right type of paper 1-2 How to print your original 1-2 Simultaneous printing and faxing 1-3 Clearing data from the memory 1-3 Checking the Print Quality 1-3 Printer operation keys 1-3 Job Cancel (MFC-3420C only...Border Line 1-8 Orientation 1-9 Copies 1-9 Collate 1-9 Reverse Order 1-9 Advanced tab 1-10 Color 1-11 Color/Grayscale 1-11 Image Type 1-11 Custom Image Type 1-12 Halftone Pattern 1-13 Color Enhancement (True2Life 1-14 Scaling 1-16 Watermark 1-17 In background 1-17 In Outline ...

Software Users Manual - English
Page 3
... 2-14 Scanning an original using the ADF 2-14 Pre-Scanning to crop a portion you want to scan using the scanner glass (MFC-3420C and MFC-3820CN only 2-16 Brother Scanner Utility 2-18 Using the Scan key (For USB cable users 2-19 Scan to E-mail 2-20 Scan to Image 2-20 Scan to OCR... 2-21 Scan to File 2-21 Scan to Card (MFC-3320CN and MFC-3820CN only 2-22 Changing the default quality 2-23 Changing the default Black & White file format ....2-23 Changing the default color file format 2-23 Using ScanSoft® PaperPort® and TextBridge® OCR ......2-24 ...
... 2-14 Scanning an original using the ADF 2-14 Pre-Scanning to crop a portion you want to scan using the scanner glass (MFC-3420C and MFC-3820CN only 2-16 Brother Scanner Utility 2-18 Using the Scan key (For USB cable users 2-19 Scan to E-mail 2-20 Scan to Image 2-20 Scan to OCR... 2-21 Scan to File 2-21 Scan to Card (MFC-3320CN and MFC-3820CN only 2-22 Changing the default quality 2-23 Changing the default Black & White file format ....2-23 Changing the default color file format 2-23 Using ScanSoft® PaperPort® and TextBridge® OCR ......2-24 ...
Software Users Manual - English
Page 9
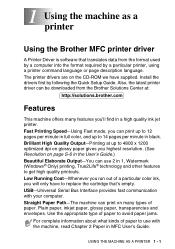
...A PRINTER 1 - 1 1 Using the machine as a printer Using the Brother MFC printer driver A Printer Driver is software that 's empty. Low Running Cost-Whenever you run out of a particular color ink, you will only have supplied. Plain paper, inkjet paper, glossy paper, transparencies and envelopes. Use the appropriate type of paper ... driver can print on the CD-ROM we have to replace the cartridge that translates data from the Brother Solutions Center at up to 14 pages per minute in full color, and up to 4800 x 1200 optimized dpi on glossy paper gives you highest resolution. (See Resolution...
...A PRINTER 1 - 1 1 Using the machine as a printer Using the Brother MFC printer driver A Printer Driver is software that 's empty. Low Running Cost-Whenever you run out of a particular color ink, you will only have supplied. Plain paper, inkjet paper, glossy paper, transparencies and envelopes. Use the appropriate type of paper ... driver can print on the CD-ROM we have to replace the cartridge that translates data from the Brother Solutions Center at up to 14 pages per minute in full color, and up to 4800 x 1200 optimized dpi on glossy paper gives you highest resolution. (See Resolution...
Software Users Manual - English
Page 12
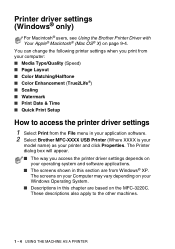
...dialog box will appear. ■ The way you print from your computer: ■ Media Type/Quality (Speed) ■ Page Layout ■ Color Matching/Halftone ■ Color Enhancement (True2Life®) ■ Scaling ■ Watermark ■ Print Date & Time ■ Quick Print Setup How to the other machines....(Mac OS® X) on your operating system and software applications. ■ The screens shown in your application software. 2 Select Brother MFC-XXXX USB Printer (Where XXXX is your model name) as your printer and click Properties. You can change the following printer settings ...
...dialog box will appear. ■ The way you print from your computer: ■ Media Type/Quality (Speed) ■ Page Layout ■ Color Matching/Halftone ■ Color Enhancement (True2Life®) ■ Scaling ■ Watermark ■ Print Date & Time ■ Quick Print Setup How to the other machines....(Mac OS® X) on your operating system and software applications. ■ The screens shown in your application software. 2 Select Brother MFC-XXXX USB Printer (Where XXXX is your model name) as your printer and click Properties. You can change the following printer settings ...
Software Users Manual - English
Page 13
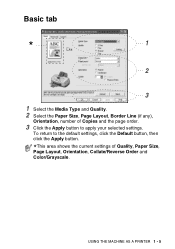
To return to the default settings, click the Default button, then click the Apply button. *This area shows the current settings of Copies and the page order. 3 Click the Apply button to apply your selected settings. USING THE MACHINE AS A PRINTER 1 - 5 Basic tab * 1 2 3 1 Select the Media Type and Quality. 2 Select the Paper Size, Page Layout, Border Line (if any), Orientation, number of Quality, Paper Size, Page Layout, Orientation, Collate/Reverse Order and Color/Grayscale.
To return to the default settings, click the Default button, then click the Apply button. *This area shows the current settings of Copies and the page order. 3 Click the Apply button to apply your selected settings. USING THE MACHINE AS A PRINTER 1 - 5 Basic tab * 1 2 3 1 Select the Media Type and Quality. 2 Select the Paper Size, Page Layout, Border Line (if any), Orientation, number of Quality, Paper Size, Page Layout, Orientation, Collate/Reverse Order and Color/Grayscale.
Software Users Manual - English
Page 14
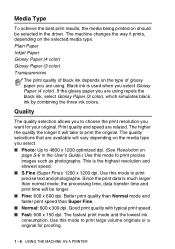
... 1200 x 1200 dpi. The machine changes the way it will vary depending on the media type you are using . Plain Paper Inkjet Paper Glossy Paper (4 color) Glossy Paper (3 color) Transparencies The print quality of black ink depends on the type of glossy paper you select. ■ Photo: Up to 4800 ...typical print speed. ■ Fast: 600 x 150 dpi. Quality The quality selection allows you to choose the print resolution you select Glossy Paper (4 color). This is much larger than Super Fine. ■ Normal: 600 x 300 dpi. Media Type To achieve the best print results, the media ...
... 1200 x 1200 dpi. The machine changes the way it will vary depending on the media type you are using . Plain Paper Inkjet Paper Glossy Paper (4 color) Glossy Paper (3 color) Transparencies The print quality of black ink depends on the type of glossy paper you select. ■ Photo: Up to 4800 ...typical print speed. ■ Fast: 600 x 150 dpi. Quality The quality selection allows you to choose the print resolution you select Glossy Paper (4 color). This is much larger than Super Fine. ■ Normal: 600 x 300 dpi. Media Type To achieve the best print results, the media ...
Software Users Manual - English
Page 15
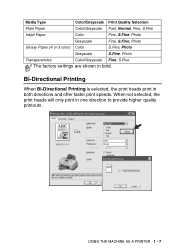
... is selected, the print heads print in one direction to provide higher quality printouts. Media Type Color/Grayscale Print Quality Selection Plain Paper Color/Grayscale Fast, Normal, Fine, S.Fine Inkjet Paper Color Fine, S.Fine, Photo Grayscale Fine, S.Fine, Photo Glossy Paper (4 or 3 color) Color S.Fine, Photo Grayscale S.Fine, Photo Transparencies Color/Grayscale Fine, S.Fine The factory settings are...
... is selected, the print heads print in one direction to provide higher quality printouts. Media Type Color/Grayscale Print Quality Selection Plain Paper Color/Grayscale Fast, Normal, Fine, S.Fine Inkjet Paper Color Fine, S.Fine, Photo Grayscale Fine, S.Fine, Photo Glossy Paper (4 or 3 color) Color S.Fine, Photo Grayscale S.Fine, Photo Transparencies Color/Grayscale Fine, S.Fine The factory settings are...
Software Users Manual - English
Page 18
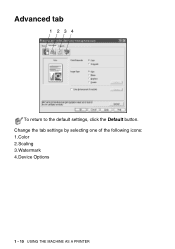
Advanced tab 1 234 To return to the default settings, click the Default button. Change the tab settings by selecting one of the following icons: 1.Color 2.Scaling 3.Watermark 4.Device Options 1 - 10 USING THE MACHINE AS A PRINTER
Advanced tab 1 234 To return to the default settings, click the Default button. Change the tab settings by selecting one of the following icons: 1.Color 2.Scaling 3.Watermark 4.Device Options 1 - 10 USING THE MACHINE AS A PRINTER

Software Users Manual - English
Page 19
... and half tone method, depending on your image type. USING THE MACHINE AS A PRINTER 1 - 11 Color Color/Grayscale This selection allows a color original to select the color matching and halftone method, manually select this mode. Generally, text and business graphics are printed vividly and photographic images are printed softly. ■ Auto: The ...
... and half tone method, depending on your image type. USING THE MACHINE AS A PRINTER 1 - 11 Color Color/Grayscale This selection allows a color original to select the color matching and halftone method, manually select this mode. Generally, text and business graphics are printed vividly and photographic images are printed softly. ■ Auto: The ...
Software Users Manual - English
Page 20
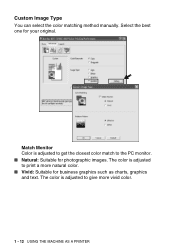
Match Monitor Color is adjusted to get the closest color match to give more natural color. ■ Vivid: Suitable for business graphics such as charts, graphics and text. The color is adjusted to the PC monitor. ■ Natural: Suitable for your original. The color is adjusted to print a more vivid color. 1 - 12 USING THE MACHINE AS A PRINTER Custom Image Type You can select the color matching method manually. Select the best one for photographic images.
Match Monitor Color is adjusted to get the closest color match to give more natural color. ■ Vivid: Suitable for business graphics such as charts, graphics and text. The color is adjusted to the PC monitor. ■ Natural: Suitable for your original. The color is adjusted to print a more vivid color. 1 - 12 USING THE MACHINE AS A PRINTER Custom Image Type You can select the color matching method manually. Select the best one for photographic images.
Software Users Manual - English
Page 21
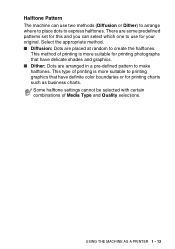
This type of printing is more suitable to printing graphics that have definite color boundaries or for printing charts such as business charts. USING THE MACHINE AS A PRINTER 1 - 13 There are some predefined patterns set for this and you ... photographs that have delicate shades and graphics. ■ Dither: Dots are placed at random to create the halftones. Halftone Pattern The machine can select which one to use two methods (Diffusion or Dither) to arrange where to place dots to express halftones. This method of Media Type and Quality selections. Select...
This type of printing is more suitable to printing graphics that have definite color boundaries or for printing charts such as business charts. USING THE MACHINE AS A PRINTER 1 - 13 There are some predefined patterns set for this and you ... photographs that have delicate shades and graphics. ■ Dither: Dots are placed at random to create the halftones. Halftone Pattern The machine can select which one to use two methods (Diffusion or Dither) to arrange where to place dots to express halftones. This method of Media Type and Quality selections. Select...
Software Users Manual - English
Page 22
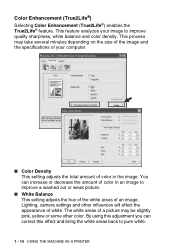
... size of the image and the specifications of your image to improve quality sharpness, white balance and color density. Lighting, camera settings and other color. This feature analyzes your computer. ■ Color Density This setting adjusts the total amount of an image. You can correct this adjustment you can ...increase or decrease the amount of color in the image. This process may be slightly pink, yellow or some other influences will effect the appearance of white. By using...
... size of the image and the specifications of your image to improve quality sharpness, white balance and color density. Lighting, camera settings and other color. This feature analyzes your computer. ■ Color Density This setting adjusts the total amount of an image. You can correct this adjustment you can ...increase or decrease the amount of color in the image. This process may be slightly pink, yellow or some other influences will effect the appearance of white. By using...
Software Users Manual - English
Page 23
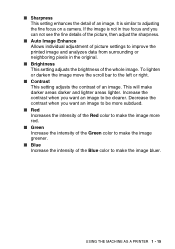
...improve the printed image and analyzes data from surrounding or neighboring pixels in the original. ■ Brightness This setting adjusts the brightness of the Blue color to adjusting the fine focus on a camera. ■ Sharpness This setting enhances the detail of an image. It is not in true focus and... you want an image to be more subdued. ■ Red Increases the intensity of the Red color to make the image more red. ■ Green Increase the intensity of the Green color to the left or right. ■ Contrast This setting adjusts the contrast of an image. If the...
...improve the printed image and analyzes data from surrounding or neighboring pixels in the original. ■ Brightness This setting adjusts the brightness of the Blue color to adjusting the fine focus on a camera. ■ Sharpness This setting enhances the detail of an image. It is not in true focus and... you want an image to be more subdued. ■ Red Increases the intensity of the Red color to make the image more red. ■ Green Increase the intensity of the Green color to the left or right. ■ Contrast This setting adjusts the contrast of an image. If the...

Software Users Manual - English
Page 26
... for the file location. You can also set the scaling size of your Watermark text into the Text Box, and then select the Font, Size, Color and Style. ■ Watermark Bitmap Enter the file name and location of the image. ■ Position This setting offers you want to be positioned on...
... for the file location. You can also set the scaling size of your Watermark text into the Text Box, and then select the Font, Size, Color and Style. ■ Watermark Bitmap Enter the file name and location of the image. ■ Position This setting offers you want to be positioned on...

Software Users Manual - English
Page 27
... date and time on your original from the settings of the Date and Time background. The actual Date and Time printed on the Color button to change the color of your computer's system clock. When Opaque is automatically retrieved from your computer. USING THE MACHINE AS A PRINTER 1 - 19 Device Options Lets you...
... date and time on your original from the settings of the Date and Time background. The actual Date and Time printed on the Color button to change the color of your computer's system clock. When Opaque is automatically retrieved from your computer. USING THE MACHINE AS A PRINTER 1 - 19 Device Options Lets you...

Software Users Manual - English
Page 36
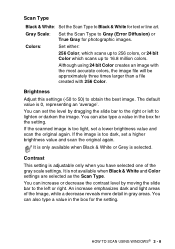
...dpi (For MFC-3420C and MFC-3820CN Only) 9600 x 9600 dpi (For MFC-3420C and MFC-3820CN Only) Black & White / Gray (Error Diffusion) Yes Yes Yes Yes Yes Yes Yes Yes Yes Yes 256 color Yes Yes ...Yes Yes Yes Yes No No No No True Gray / 24 bit color...photo images. The following table shows the resolution you can choose and the available colors. Web Select for each default setting. Settings in the Scanner window Image Type...
...dpi (For MFC-3420C and MFC-3820CN Only) 9600 x 9600 dpi (For MFC-3420C and MFC-3820CN Only) Black & White / Gray (Error Diffusion) Yes Yes Yes Yes Yes Yes Yes Yes Yes Yes 256 color Yes Yes ...Yes Yes Yes Yes No No No No True Gray / 24 bit color...photo images. The following table shows the resolution you can choose and the available colors. Web Select for each default setting. Settings in the Scanner window Image Type...
Software Users Manual - English
Page 37
... default value is not available when Black & White and Color settings are selected as the Scan Type. An increase emphasizes dark and light areas of the gray scale settings. If the scanned image is adjustable only when you have selected one of the Image, while a decrease reveals more detail in the box...
... default value is not available when Black & White and Color settings are selected as the Scan Type. An increase emphasizes dark and light areas of the gray scale settings. If the scanned image is adjustable only when you have selected one of the Image, while a decrease reveals more detail in the box...
Software Users Manual - English
Page 49
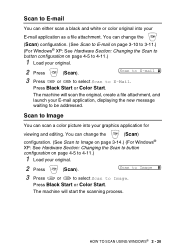
...3-11.) (For Windows® XP: See Hardware Section: Changing the Scan to button configuration on page 4-5 to E-Mail. Scan to be addressed. You can scan a color picture into your original. 2 Press (Scan). The machine will start the scanning process. Scan to Image. Press Black Start or... Color Start. HOW TO SCAN USING WINDOWS® 2 - 20 Scan to Image 3 Press or to select Scan to Image You can change the (Scan) configuration. (...
...3-11.) (For Windows® XP: See Hardware Section: Changing the Scan to button configuration on page 4-5 to E-Mail. Scan to be addressed. You can scan a color picture into your original. 2 Press (Scan). The machine will start the scanning process. Scan to Image. Press Black Start or... Color Start. HOW TO SCAN USING WINDOWS® 2 - 20 Scan to Image 3 Press or to select Scan to Image You can change the (Scan) configuration. (...
Software Users Manual - English
Page 50
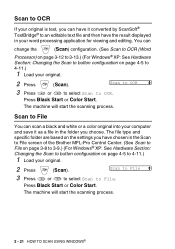
... file and then have chosen in your word processing application for viewing and editing. Press Black Start or Color Start. Scan to File 3 Press or to select Scan to OCR. Scan to OCR If your original...it as a file in the folder you have the result displayed in the Scan to File screen of the Brother MFL-Pro Control Center. (See Scan to File on page 3-8 to 3-9.) (For Windows® XP:...will start the scanning process. Scan to File You can scan a black and white or a color original into your original. 2 Press (Scan). The file type and specific folder are based on the settings ...
... file and then have chosen in your word processing application for viewing and editing. Press Black Start or Color Start. Scan to File 3 Press or to select Scan to OCR. Scan to OCR If your original...it as a file in the folder you have the result displayed in the Scan to File screen of the Brother MFL-Pro Control Center. (See Scan to File on page 3-8 to 3-9.) (For Windows® XP:...will start the scanning process. Scan to File You can scan a black and white or a color original into your original. 2 Press (Scan). The file type and specific folder are based on the settings ...

Software Users Manual - English
Page 51
Scan to Card (MFC-3320CN and MFC-3820CN only) You can change the color, quality and file name as you want . File names default to select the quality you want . To change quality, press Menu/Set and go to Step 6. -OR- You can scan black and white and color originals into your original. 3 Press (Scan... file type, press Menu/Set and go to Card. HOW TO SCAN USING WINDOWS® 2 - 22 Quality B/W 200x100 dpi B/W 200 dpi Color 150 dpi Color 300 dpi Color 600 dpi Selectable File Format TIFF / PDF TIFF / PDF JPEG / PDF JPEG / PDF JPEG / PDF Default File Format TIFF TIFF PDF PDF...
Scan to Card (MFC-3320CN and MFC-3820CN only) You can change the color, quality and file name as you want . File names default to select the quality you want . To change quality, press Menu/Set and go to Step 6. -OR- You can scan black and white and color originals into your original. 3 Press (Scan... file type, press Menu/Set and go to Card. HOW TO SCAN USING WINDOWS® 2 - 22 Quality B/W 200x100 dpi B/W 200 dpi Color 150 dpi Color 300 dpi Color 600 dpi Selectable File Format TIFF / PDF TIFF / PDF JPEG / PDF JPEG / PDF JPEG / PDF Default File Format TIFF TIFF PDF PDF...


