
Software & Network Users Manual - English
Page 2
...of Contents Section I Windows® 1 Printing Using the Brother printer driver...2 Features ...2 Choosing the right type of paper... 10 Paper Size ...10 Page Layout ...11 Orientation ...11 Copies ...12 Paper Source (MFC-5860CN only 12 Advanced tab...13 Color ...14 Scaling ...16 Watermark ...17 Device Options ...19 Support tab ...21 2 Scanning ...Scanning a document using the TWAIN driver 22 TWAIN compliant...22 Accessing the Scanner...23 Scanning a document into the PC ...24 Settings in the Scanner Setup...
...of Contents Section I Windows® 1 Printing Using the Brother printer driver...2 Features ...2 Choosing the right type of paper... 10 Paper Size ...10 Page Layout ...11 Orientation ...11 Copies ...12 Paper Source (MFC-5860CN only 12 Advanced tab...13 Color ...14 Scaling ...16 Watermark ...17 Device Options ...19 Support tab ...21 2 Scanning ...Scanning a document using the TWAIN driver 22 TWAIN compliant...22 Accessing the Scanner...23 Scanning a document into the PC ...24 Settings in the Scanner Setup...
Software & Network Users Manual - English
Page 3
Scan to Card (Not available for MFC-240C and MFC-3360C 36 Using ScanSoft® PaperPort® SE with OCR ... AutoLoad feature off...46 SCAN...47 CUSTOM SCAN ...47 PHOTOCAPTURE (USB only) (Not available for MFC-3360C 47 COPY ...48 PC-FAX (MFC models only) ...48 DEVICE SETTING...48 SCAN...49 Image (example: Microsoft® Paint)...49 OCR...Receive/View Received (Not available for MFC-240C and MFC-3360C 64 Address Book ...65 Setup ...65 DEVICE SETTING...66 Remote Setup (Not available for DCP models and MFC-240C 66 Quick-Dial (Not available for DCP models and MFC-240C 67 Ink Level ...67 User's...
Scan to Card (Not available for MFC-240C and MFC-3360C 36 Using ScanSoft® PaperPort® SE with OCR ... AutoLoad feature off...46 SCAN...47 CUSTOM SCAN ...47 PHOTOCAPTURE (USB only) (Not available for MFC-3360C 47 COPY ...48 PC-FAX (MFC models only) ...48 DEVICE SETTING...48 SCAN...49 Image (example: Microsoft® Paint)...49 OCR...Receive/View Received (Not available for MFC-240C and MFC-3360C 64 Address Book ...65 Setup ...65 DEVICE SETTING...66 Remote Setup (Not available for DCP models and MFC-240C 66 Quick-Dial (Not available for DCP models and MFC-240C 67 Ink Level ...67 User's...
Software & Network Users Manual - English
Page 4
...72 Scan to OCR ...72 Scan to File...73 5 Remote Setup (Not available for DCP models and MFC-240C) Remote Setup...74 6 Brother PC-FAX Software (MFC models only) PC-FAX sending ...76 Setting up user information...77 Sending setup...78 Setting up a cover page...79 Entering cover page information......79 Address Book ...80 Speed Dial setup ...81 Brother Address Book ...82 Setting...
...72 Scan to OCR ...72 Scan to File...73 5 Remote Setup (Not available for DCP models and MFC-240C) Remote Setup...74 6 Brother PC-FAX Software (MFC models only) PC-FAX sending ...76 Setting up user information...77 Sending setup...78 Setting up a cover page...79 Entering cover page information......79 Address Book ...80 Speed Dial setup ...81 Brother Address Book ...82 Setting...
Software & Network Users Manual - English
Page 5
...memory ...98 Checking the print quality ...98 Status Monitor ...99 Using the Brother Ink driver ...100 Choosing page setup options ...100 Choosing printing options ...101 Media Type...101 Quality ...102 Paper Feed (MFC-5860CN only)...103 Sending a fax (MFC models only) ...104 Drag a vCard from the Mac OS® X...Scan to E-mail ...113 Scan to Image ...114 Scan to OCR ...114 Scan to File...115 Scan to Card (Not available for MFC-240C and MFC-3360C 115 Using Presto!® PageManager® ...119 Features ...119 System requirements for Presto!® PageManager 119 Technical support ...120 10 ...
...memory ...98 Checking the print quality ...98 Status Monitor ...99 Using the Brother Ink driver ...100 Choosing page setup options ...100 Choosing printing options ...101 Media Type...101 Quality ...102 Paper Feed (MFC-5860CN only)...103 Sending a fax (MFC models only) ...104 Drag a vCard from the Mac OS® X...Scan to E-mail ...113 Scan to Image ...114 Scan to OCR ...114 Scan to File...115 Scan to Card (Not available for MFC-240C and MFC-3360C 115 Using Presto!® PageManager® ...119 Features ...119 System requirements for Presto!® PageManager 119 Technical support ...120 10 ...
Software & Network Users Manual - English
Page 6
...COPY / PC-FAX (PC-FAX is not available for DCP models 135 DEVICE SETTINGS ...136 Remote Setup (Not available for DCP models and MFC-240C 136 Quick-Dial (Not available for DCP models and MFC-240C 137 Ink Level ...137 11 Network Scanning (For models with built-in network support) Before using ......140 Scan to Image ...141 Scan to OCR ...141 Scan to File...142 12 Remote Setup & PhotoCapture Center® Remote Setup (Not available for DCP models and MFC-240C 143 PhotoCapture Center® (Not available for MFC-3360C 145 For USB cable users ...145 For network users (For models with built-in ...
...COPY / PC-FAX (PC-FAX is not available for DCP models 135 DEVICE SETTINGS ...136 Remote Setup (Not available for DCP models and MFC-240C 136 Quick-Dial (Not available for DCP models and MFC-240C 137 Ink Level ...137 11 Network Scanning (For models with built-in network support) Before using ......140 Scan to Image ...141 Scan to OCR ...141 Scan to File...142 12 Remote Setup & PhotoCapture Center® Remote Setup (Not available for DCP models and MFC-240C 143 PhotoCapture Center® (Not available for MFC-3360C 145 For USB cable users ...145 For network users (For models with built-in ...
Software & Network Users Manual - English
Page 7
Section I Windows® I Printing 2 Scanning 22 ControlCenter3 44 Network Scanning (For models with built-in network support) 68 Remote Setup (Not available for DCP models and MFC-240C) 74 Brother PC-FAX Software (MFC models only) 76 PhotoCapture Center® (Not available for MFC-3360C) 94
Section I Windows® I Printing 2 Scanning 22 ControlCenter3 44 Network Scanning (For models with built-in network support) 68 Remote Setup (Not available for DCP models and MFC-240C) 74 Brother PC-FAX Software (MFC models only) 76 PhotoCapture Center® (Not available for MFC-3360C) 94
Software & Network Users Manual - English
Page 8
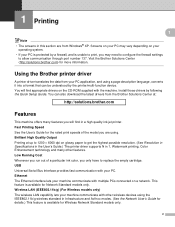
... through port number 137. Install those drivers by a firewall, and is protected by following the Quick Setup Guide. Ethernet The Ethernet interface lets your PC. Using the Brother printer driver 1 A printer driver translates the data from Windows® XP. USB Universal Serial Bus ... get the highest possible resolution. (See Resolution in Specifications in the User's Guide.) The printer driver supports N in 1, Watermark printing, Color Enhancement technology and many features you are from your PC application, and using a page description language, converts it into a format that can...
... through port number 137. Install those drivers by a firewall, and is protected by following the Quick Setup Guide. Ethernet The Ethernet interface lets your PC. Using the Brother printer driver 1 A printer driver translates the data from Windows® XP. USB Universal Serial Bus ... get the highest possible resolution. (See Resolution in Specifications in the User's Guide.) The printer driver supports N in 1, Watermark printing, Color Enhancement technology and many features you are from your PC application, and using a page description language, converts it into a format that can...
Software & Network Users Manual - English
Page 11
...; Paper Size „ Page Layout „ Color Matching/Halftone „ Color Enhancement „ Scaling „ Watermark „ Print Date & Time „ Quick Print Setup Accessing the printer driver settings 1 a Click File, then Print in your application. b Right-click again then click Exit. b Choose Brother MFC-XXXX USB Printer or Brother MFC-XXXX Printer (where XXXX is off...
...; Paper Size „ Page Layout „ Color Matching/Halftone „ Color Enhancement „ Scaling „ Watermark „ Print Date & Time „ Quick Print Setup Accessing the printer driver settings 1 a Click File, then Print in your application. b Right-click again then click Exit. b Choose Brother MFC-XXXX USB Printer or Brother MFC-XXXX Printer (where XXXX is off...
Software & Network Users Manual - English
Page 26
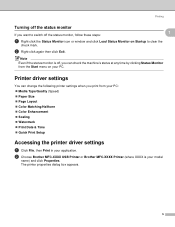
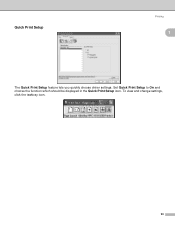
To view and change settings, click the tasktray icon. 20 Set Quick Print Setup to On and choose the function which should be displayed in the Quick Print Setup icon. Quick Print Setup Printing 1 1 The Quick Print Setup feature lets you quickly choose driver settings.
To view and change settings, click the tasktray icon. 20 Set Quick Print Setup to On and choose the function which should be displayed in the Quick Print Setup icon. Quick Print Setup Printing 1 1 The Quick Print Setup feature lets you quickly choose driver settings.

Software & Network Users Manual - English
Page 29
... LAN. • For other software applications. Or click the Scan button. The Scan panel appears in this Guide are using other operating systems: Choose Brother MFC-XXXX USB or Brother MFC-XXXX LAN. (Where XXXX is your model name) d Click Scan. c Choose the scanner you use ScanSoft® PaperPort® SE. b Click File, then... MFL-Pro Suite installation to scan a document. 2 Note The instructions for when you are for scanning in the left side of the screen. The Scanner Setup dialog box appears: 23
... LAN. • For other software applications. Or click the Scan button. The Scan panel appears in this Guide are using other operating systems: Choose Brother MFC-XXXX USB or Brother MFC-XXXX LAN. (Where XXXX is your model name) d Click Scan. c Choose the scanner you use ScanSoft® PaperPort® SE. b Click File, then... MFL-Pro Suite installation to scan a document. 2 Note The instructions for when you are for scanning in the left side of the screen. The Scanner Setup dialog box appears: 23
Software & Network Users Manual - English
Page 30
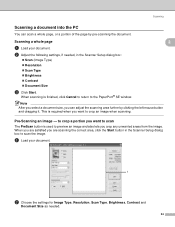
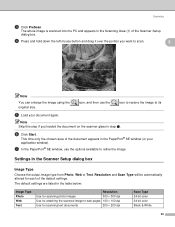
... your document. This is finished, click Cancel to return to crop a portion you are scanning the correct area, click the Start button in the Scanner Setup dialog box: „ Scan (Image Type) „ Resolution „ Scan Type „ Brightness „ Contrast „ Document Size c Click Start. to the PaperPort® SE... Scanning a whole page a Load your document. 1 b Choose the settings for Image Type, Resolution, Scan Type, Brightness, Contrast and Document Size as needed , in the Scanner Setup dialog box to crop an image when scanning.
... your document. This is finished, click Cancel to return to crop a portion you are scanning the correct area, click the Start button in the Scanner Setup dialog box: „ Scan (Image Type) „ Resolution „ Scan Type „ Brightness „ Contrast „ Document Size c Click Start. to the PaperPort® SE... Scanning a whole page a Load your document. 1 b Choose the settings for Image Type, Resolution, Scan Type, Brightness, Contrast and Document Size as needed , in the Scanner Setup dialog box to crop an image when scanning.
Software & Network Users Manual - English
Page 31
This time only the chosen area of the Scanner Setup dialog box. g In the PaperPort® SE window, use the icon to restore the image to web...step a. Resolution and Scan Type will be automatically altered for scanning text documents 200 × 200 dpi Scan Type 24 bit color 24 bit color Black & White 25 f Click Start. The default settings are listed in the PaperPort® SE window (or your document ... and drag it over the portion you loaded the document on the scanner glass in the Scanner Setup dialog box 2 Image Type 2 Choose the output image type from Photo, Web or Text.
This time only the chosen area of the Scanner Setup dialog box. g In the PaperPort® SE window, use the icon to restore the image to web...step a. Resolution and Scan Type will be automatically altered for scanning text documents 200 × 200 dpi Scan Type 24 bit color 24 bit color Black & White 25 f Click Start. The default settings are listed in the PaperPort® SE window (or your document ... and drag it over the portion you loaded the document on the scanner glass in the Scanner Setup dialog box 2 Image Type 2 Choose the output image type from Photo, Web or Text.
Software & Network Users Manual - English
Page 52
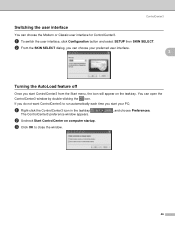
a To switch the user interface, click Configuration button and select SETUP then SKIN SELECT. b From the SKIN SELECT dialog, you can open the ControlCenter3 window by double-clicking the icon. b Uncheck Start ControlCenter on the tasktray. ...
a To switch the user interface, click Configuration button and select SETUP then SKIN SELECT. b From the SKIN SELECT dialog, you can open the ControlCenter3 window by double-clicking the icon. b Uncheck Start ControlCenter on the tasktray. ...
Software & Network Users Manual - English
Page 54
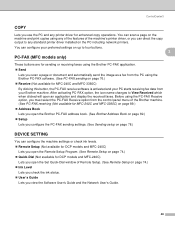
... data from the control panel menu of the Brother machine. (See PC-FAX receiving (Not available for MFC-240C and MFC-3360C) on page 89.) „ Address Book Lets you open the Brother PC-FAX address book. (See Brother Address Book on page 82.) „ Setup Lets you configure the PC-FAX sending settings.... (See Sending setup on page 78.) DEVICE SETTING 3 You ...
... data from the control panel menu of the Brother machine. (See PC-FAX receiving (Not available for MFC-240C and MFC-3360C) on page 89.) „ Address Book Lets you open the Brother PC-FAX address book. (See Brother Address Book on page 82.) „ Setup Lets you configure the PC-FAX sending settings.... (See Sending setup on page 78.) DEVICE SETTING 3 You ...
Software & Network Users Manual - English
Page 71
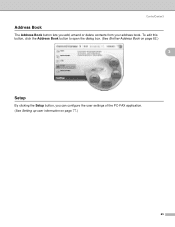
To edit this button, click the Address Book button to open the dialog box. (See Brother Address Book on page 77.) 65 ControlCenter3 Address Book 3 The Address Book button lets you can configure the user settings of the PC-FAX application. (See Setting up user information on page 82.) 3 Setup 3 By clicking the Setup button, you add, amend or delete contacts from your address book.
To edit this button, click the Address Book button to open the dialog box. (See Brother Address Book on page 77.) 65 ControlCenter3 Address Book 3 The Address Book button lets you can configure the user settings of the PC-FAX application. (See Setting up user information on page 82.) 3 Setup 3 By clicking the Setup button, you add, amend or delete contacts from your address book.
Software & Network Users Manual - English
Page 72
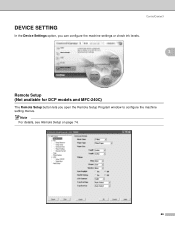
Note For details, see Remote Setup on page 74. 66 ControlCenter3 DEVICE SETTING 3 In the Device Settings option, you can configure the machine settings or check ink levels. 3 Remote Setup (Not available for DCP models and MFC-240C) 3 The Remote Setup button lets you open the Remote Setup Program window to configure the machine setting menus.
Note For details, see Remote Setup on page 74. 66 ControlCenter3 DEVICE SETTING 3 In the Device Settings option, you can configure the machine settings or check ink levels. 3 Remote Setup (Not available for DCP models and MFC-240C) 3 The Remote Setup button lets you open the Remote Setup Program window to configure the machine setting menus.
Software & Network Users Manual - English
Page 73
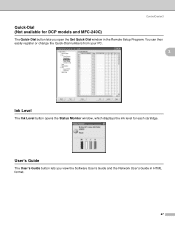
User's Guide 3 The User's Guide button lets you open the Set Quick-Dial window in HTML format. 67 ControlCenter3 Quick-Dial (Not available for each cartridge. You can then easily register or change the Quick-Dial numbers from your PC. 3 Ink Level 3 The Ink Level button opens the Status Monitor window, which displays the ink level for DCP models and MFC-240C) 3 The Quick-Dial button lets you view the Software User's Guide and the Network User's Guide in the Remote Setup Program.
User's Guide 3 The User's Guide button lets you open the Set Quick-Dial window in HTML format. 67 ControlCenter3 Quick-Dial (Not available for each cartridge. You can then easily register or change the Quick-Dial numbers from your PC. 3 Ink Level 3 The Ink Level button opens the Status Monitor window, which displays the ink level for DCP models and MFC-240C) 3 The Quick-Dial button lets you view the Software User's Guide and the Network User's Guide in the Remote Setup Program.
Software & Network Users Manual - English
Page 74
... 2 PCs with a TCP/IP address. Before using the BRAdmin Professional software. To buy the Brother NL-5 pack which is unable to scan, you may need to configure the firewall settings to one machine on the network. If you installed the machine following the instructions for up to 2 Users...or by a firewall and is a multiple PC license agreement pack for a network user in the Quick Setup Guide then the machine should already be shown on the LCD. 4 • If your Brother dealer. 68 For example, if 30 clients try to 5 additional users. You can be configured with ScanSoft...
... 2 PCs with a TCP/IP address. Before using the BRAdmin Professional software. To buy the Brother NL-5 pack which is unable to scan, you may need to configure the firewall settings to one machine on the network. If you installed the machine following the instructions for up to 2 Users...or by a firewall and is a multiple PC license agreement pack for a network user in the Quick Setup Guide then the machine should already be shown on the LCD. 4 • If your Brother dealer. 68 For example, if 30 clients try to 5 additional users. You can be configured with ScanSoft...
Software & Network Users Manual - English
Page 75
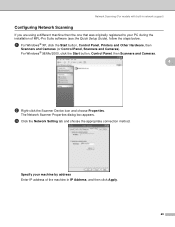
... the machine in network support) Configuring Network Scanning If you are using a different machine than the one that was originally registered to your PC during the installation of MFL-Pro Suite software (see the Quick Setup Guide), follow the steps below. c Click the Network Setting tab and choose the appropriate connection method...
... the machine in network support) Configuring Network Scanning If you are using a different machine than the one that was originally registered to your PC during the installation of MFL-Pro Suite software (see the Quick Setup Guide), follow the steps below. c Click the Network Setting tab and choose the appropriate connection method...
Software & Network Users Manual - English
Page 80
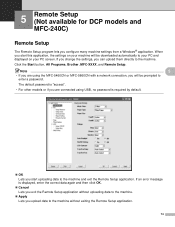
... settings on your machine will be downloaded automatically to your PC and displayed on your PC screen. 5 Remote Setup (Not available for DCP models and MFC-240C) 5 Remote Setup 5 The Remote Setup program lets you start uploading data to the machine. If an error message is required by default. „...uploading data to the machine. „ Apply Lets you can upload them directly to the machine and exit the Remote Setup application. Click the Start button, All Programs, Brother, MFC-XXXX, and Remote Setup. When you configure many machine settings from a Windows® application.
... settings on your machine will be downloaded automatically to your PC and displayed on your PC screen. 5 Remote Setup (Not available for DCP models and MFC-240C) 5 Remote Setup 5 The Remote Setup program lets you start uploading data to the machine. If an error message is required by default. „...uploading data to the machine. „ Apply Lets you can upload them directly to the machine and exit the Remote Setup application. Click the Start button, All Programs, Brother, MFC-XXXX, and Remote Setup. When you configure many machine settings from a Windows® application.


