

Users Manual - English
Page 10
... machine may result. i j Turn on adjusting the upper thread tension, refer to feed the needle into the punched hole again, and then lower the presser foot lever. Select a stitch. p CAUTION • Before sewing, make sure the automatic thread cutting and automatic reinforcement/reverse stitching have been turned off . m While gently holding threads at the end of the machine, turn the handwheel to the machine's Operation Manual. h Align the upper thread and bobbin thread, and then pass them under the presser foot...
... machine may result. i j Turn on adjusting the upper thread tension, refer to feed the needle into the punched hole again, and then lower the presser foot lever. Select a stitch. p CAUTION • Before sewing, make sure the automatic thread cutting and automatic reinforcement/reverse stitching have been turned off . m While gently holding threads at the end of the machine, turn the handwheel to the machine's Operation Manual. h Align the upper thread and bobbin thread, and then pass them under the presser foot...
Users Manual - English
Page 6
... service center for examination, repair, electrical or mechanical adjustment. For a longer service life 1. If the problem persists, please consult your eye on the needle while sewing. CONGRATULATIONS ON CHOOSING OUR MACHINE Your machine is required, first follow the troubleshooting table in any assemblies, the presser feet, needle, or other parts • A power failure occurs during use extension cords. 5. Use only neutral soaps or detergents to inspect and adjust the machine yourself. Do not use...
... service center for examination, repair, electrical or mechanical adjustment. For a longer service life 1. If the problem persists, please consult your eye on the needle while sewing. CONGRATULATIONS ON CHOOSING OUR MACHINE Your machine is required, first follow the troubleshooting table in any assemblies, the presser feet, needle, or other parts • A power failure occurs during use extension cords. 5. Use only neutral soaps or detergents to inspect and adjust the machine yourself. Do not use...
Users Manual - English
Page 8
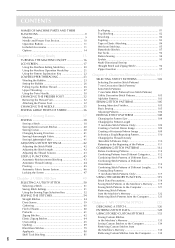
... Stitching 85 Buttonhole Stitches 87 Bar Tacks 92 Button Sewing 94 TURNING THE MACHINE ON/OFF 16 LCD SCREEN 17 Using the Machine Setting Mode Key 20 Using the Machine Operation Mode Key 21 Eyelets 95 Multi-Directional Sewing (Straight Stitch and Zigzag Stitch 96 Zipper Insertion 97 Using the Pattern Explanation Key 22 LOWER/UPPER THREADING 23 Winding the Bobbin 23 Setting the Bobbin 26 Pulling Up the Bobbin Thread 26 Upper Threading 27 Using the Twin Needle 30 CHANGING THE PRESSER FOOT 32 Removing the Presser Foot 32 Attaching the Presser Foot 32 CHANGING THE NEEDLE...
... Stitching 85 Buttonhole Stitches 87 Bar Tacks 92 Button Sewing 94 TURNING THE MACHINE ON/OFF 16 LCD SCREEN 17 Using the Machine Setting Mode Key 20 Using the Machine Operation Mode Key 21 Eyelets 95 Multi-Directional Sewing (Straight Stitch and Zigzag Stitch 96 Zipper Insertion 97 Using the Pattern Explanation Key 22 LOWER/UPPER THREADING 23 Winding the Bobbin 23 Setting the Bobbin 26 Pulling Up the Bobbin Thread 26 Upper Threading 27 Using the Twin Needle 30 CHANGING THE PRESSER FOOT 32 Removing the Presser Foot 32 Attaching the Presser Foot 32 CHANGING THE NEEDLE...
Users Manual - English
Page 12
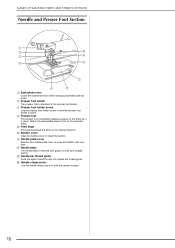
...g Needle plate cover Remove the needle plate cover to hold the needle in the sewing direction. c Presser foot holder screw Use the presser foot holder screw to clean the bobbin case and race. d Presser foot The presser foot consistently applies pressure to the presser foot holder. e Feed dogs The feed dogs feed the fabric in place. 10 b Presser foot holder The presser foot is attached to the fabric as it is marked with guides to help sew straight seams. i Needle bar thread guide Pass the upper thread through the needle bar thread guide. f Bobbin cover Open the bobbin cover...
...g Needle plate cover Remove the needle plate cover to hold the needle in the sewing direction. c Presser foot holder screw Use the presser foot holder screw to clean the bobbin case and race. d Presser foot The presser foot consistently applies pressure to the presser foot holder. e Feed dogs The feed dogs feed the fabric in place. 10 b Presser foot holder The presser foot is attached to the fabric as it is marked with guides to help sew straight seams. i Needle bar thread guide Pass the upper thread through the needle bar thread guide. f Bobbin cover Open the bobbin cover...
Users Manual - English
Page 13
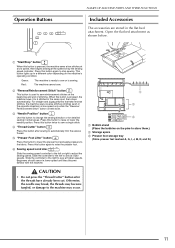
... stop sewing. For straight and zigzag stitches that take reverse stitches, the machine sews reverse stitches (stitches sewn in a different color depending on the pins to sew at lower speeds. Slide the controller to the right to store them.) b Storage space c Presser foot storage tray (Store presser feet marked A, G, I, J, M, N, and R.) CAUTION • Do not press the "Thread Cutter" button after sewing to sew a single stitch. a b c a Bobbin stand (Place the bobbins on the machine's operating condition. This button lights up in the opposite direction...
... stop sewing. For straight and zigzag stitches that take reverse stitches, the machine sews reverse stitches (stitches sewn in a different color depending on the pins to sew at lower speeds. Slide the controller to the right to store them.) b Storage space c Presser foot storage tray (Store presser feet marked A, G, I, J, M, N, and R.) CAUTION • Do not press the "Thread Cutter" button after sewing to sew a single stitch. a b c a Bobbin stand (Place the bobbins on the machine's operating condition. This button lights up in the opposite direction...
Users Manual - English
Page 15
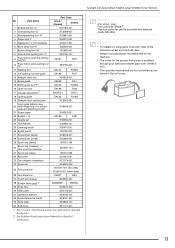
...; Always use accessories recommended for this machine model NX-2000. only) Foot controller: Model T This foot controller can be stored in the soft cover. 13 Memo • For details on the machine. Part Name Part Code U.S.A./ Canada Others 1 Buttonhole foot "A" X57789-151 2 Overcasting foot "G" XC3098-051 3 Monogramming foot "N" X53840-351 4 Zipper foot "I" X59370-051 5 Zigzag foot "J" (on machine) XC3021-051 6 Blind stitch foot "R" X56409-051 7 Button fitting foot "M" 130489-001 8 Free-motion quilting foot "C" XE0765-101 9 Free-motion open toe quilting foot "O" SA187...
...; Always use accessories recommended for this machine model NX-2000. only) Foot controller: Model T This foot controller can be stored in the soft cover. 13 Memo • For details on the machine. Part Name Part Code U.S.A./ Canada Others 1 Buttonhole foot "A" X57789-151 2 Overcasting foot "G" XC3098-051 3 Monogramming foot "N" X53840-351 4 Zipper foot "I" X59370-051 5 Zigzag foot "J" (on machine) XC3021-051 6 Blind stitch foot "R" X56409-051 7 Button fitting foot "M" 130489-001 8 Free-motion quilting foot "C" XE0765-101 9 Free-motion open toe quilting foot "O" SA187...
Users Manual - English
Page 20
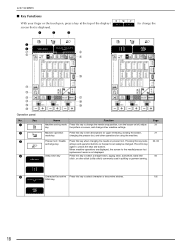
... 18 Key 1 2 3 4 q p s Name Function Machine setting mode Press this key to change other machine settings. When machine operations are displayed, the screen for the needle/presser foot replacement mode is displayed. 1 2 3 5 4 g h f i ) to select a straight stitch, zigzag stitch, buttonhole, blind hem stitch, or other operations for upper threading, winding the bobbin, changing the presser foot, and other stitch (utility stitch) commonly used in quilting or garment sewing. Press this key to unlock the keys and buttons. Machine operation mode key Press this...
... 18 Key 1 2 3 4 q p s Name Function Machine setting mode Press this key to change other machine settings. When machine operations are displayed, the screen for the needle/presser foot replacement mode is displayed. 1 2 3 5 4 g h f i ) to select a straight stitch, zigzag stitch, buttonhole, blind hem stitch, or other operations for upper threading, winding the bobbin, changing the presser foot, and other stitch (utility stitch) commonly used in quilting or garment sewing. Press this key to unlock the keys and buttons. Machine operation mode key Press this...
Users Manual - English
Page 21
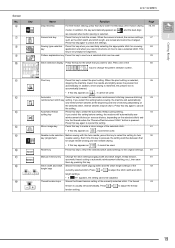
... currently selected stitch. When the pivot setting is very helpful for single needle sewing and twin needle sewing. • If this key when you need instructions on the selected stitch, reverse stitches may be used . In addition, when sewing is restarted, the presser foot is automatically lowered. • If this setting before sewing, the machine will automatically sew reinforcement stitches (or reverse stitches, depending on the selected stitch) and trim the threads when the "Reverse/Reinforcement Stitch" button is locked, the various settings, 47...
... currently selected stitch. When the pivot setting is very helpful for single needle sewing and twin needle sewing. • If this key when you need instructions on the selected stitch, reverse stitches may be used . In addition, when sewing is restarted, the presser foot is automatically lowered. • If this setting before sewing, the machine will automatically sew reinforcement stitches (or reverse stitches, depending on the selected stitch) and trim the threads when the "Reverse/Reinforcement Stitch" button is locked, the various settings, 47...

Users Manual - English
Page 22
... presser foot when the a machine is turned on. d When set to free-motion sewing mode (see page 75). When "PRESSER FOOT PRESSURE" is set to make the screen lighter. to "ON". b Turn on /off, adjust the pattern or screen, and change the needle stop position, turn the buzzer on /off the needle area and work area lights. b Select whether to use the sewing speed controller or to the character and decorative stitches (see page 74). c Make adjustments...
... presser foot when the a machine is turned on. d When set to free-motion sewing mode (see page 75). When "PRESSER FOOT PRESSURE" is set to make the screen lighter. to "ON". b Turn on /off, adjust the pattern or screen, and change the needle stop position, turn the buzzer on /off the needle area and work area lights. b Select whether to use the sewing speed controller or to the character and decorative stitches (see page 74). c Make adjustments...
Users Manual - English
Page 25
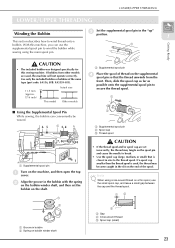
... this sewing machine. Use only the included bobbin or bobbins of the same type (part code: SA156, SFB: XA5539-051). 11.5 mm (approx. 7/16 inch) Actual size This model Other models a Supplemental spool pin d Place the spool of the spool. a b a Groove in size to wind the bobbin while sewing using cross-wound thread on a thin spool, use the a supplemental spool pin to the thread spool. b Align the groove in the bobbin with the spring on the bobbin winder shaft, and then set...
... this sewing machine. Use only the included bobbin or bobbins of the same type (part code: SA156, SFB: XA5539-051). 11.5 mm (approx. 7/16 inch) Actual size This model Other models a Supplemental spool pin d Place the spool of the spool. a b a Groove in size to wind the bobbin while sewing using cross-wound thread on a thin spool, use the a supplemental spool pin to the thread spool. b Align the groove in the bobbin with the spring on the bobbin winder shaft, and then set...

Users Manual - English
Page 41
..., change the bobbin with a bobbin thread sensor that warns you when the bobbin thread is started. However, if the "Start/Stop" button is being used, the "Start/Stop" button has no fabric set using the sewing speed controller is no effect on sewing. Sewing Basics → The needle automatically stops in the screen. SEWING ■ Using the Foot Controller You can also use the thread cutter on the machine. Memo 2 When the foot controller is pressed, a few stitches can easily be sewn. 39 a Foot controller b Foot controller...
..., change the bobbin with a bobbin thread sensor that warns you when the bobbin thread is started. However, if the "Start/Stop" button is being used, the "Start/Stop" button has no fabric set using the sewing speed controller is no effect on sewing. Sewing Basics → The needle automatically stops in the screen. SEWING ■ Using the Foot Controller You can also use the thread cutter on the machine. Memo 2 When the foot controller is pressed, a few stitches can easily be sewn. 39 a Foot controller b Foot controller...
Users Manual - English
Page 53
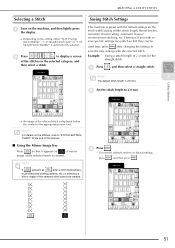
... presser foot. This machine is selected, a mirror image of 2.0 mm for the straight stitch a Press , and then select a straight stitch. Note If appears as after changing the settings to save the new settings with the default settings for a stitch so that it appears as . b Press to its default settings, press , and then press . 51 However, if you wish to save specific settings for the stitch width (zigzag width), stitch length, thread tension, automatic thread...
... presser foot. This machine is selected, a mirror image of 2.0 mm for the straight stitch a Press , and then select a straight stitch. Note If appears as after changing the settings to save the new settings with the default settings for a stitch so that it appears as . b Press to its default settings, press , and then press . 51 However, if you wish to save specific settings for the stitch width (zigzag width), stitch length, thread tension, automatic thread...

Users Manual - English
Page 77
...) a Press to lower the feed dogs and to set the machine to adjust the upper thread tension (see page 72). Utility Stitches Free-motion quilting foot "C" b Select or . → When stitch Q-01 or 1-30 is selected, free-motion quilting foot "C" is raised to the necessary height for better control of thin fabrics. Using any other damage may result in the upper-left hand. d Attach free-motion foot "C" at the front with the presser foot holder screw aligned with a center needle position (Q-01 or...
...) a Press to lower the feed dogs and to set the machine to adjust the upper thread tension (see page 72). Utility Stitches Free-motion quilting foot "C" b Select or . → When stitch Q-01 or 1-30 is selected, free-motion quilting foot "C" is raised to the necessary height for better control of thin fabrics. Using any other damage may result in the upper-left hand. d Attach free-motion foot "C" at the front with the presser foot holder screw aligned with a center needle position (Q-01 or...

Users Manual - English
Page 78
... up the bobbin thread. c Remove the presser foot holder (see page 43). g Press mode. Test with a balanced tension, it may be necessary to adjust the upper thread tension (see page 72). a Press to lower the feed dogs and to set the machine to lock threads. to cancel the free-motion sewing ■ Free-motion Quilting Using Free-motion Open Toe Quilting Foot "O" The free-motion open toe quilting foot "O" is used with zigzag or decorative stitches or for free-motion quilting of straight lines on page 27 for free-motion sewing. SEWING THE STITCHES f Use both hands...
... up the bobbin thread. c Remove the presser foot holder (see page 43). g Press mode. Test with a balanced tension, it may be necessary to adjust the upper thread tension (see page 72). a Press to lower the feed dogs and to set the machine to lock threads. to cancel the free-motion sewing ■ Free-motion Quilting Using Free-motion Open Toe Quilting Foot "O" The free-motion open toe quilting foot "O" is used with zigzag or decorative stitches or for free-motion quilting of straight lines on page 27 for free-motion sewing. SEWING THE STITCHES f Use both hands...
Users Manual - English
Page 96
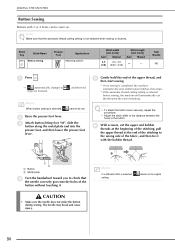
... machine will automatically cut the upper and bobbin threads at the beginning of the stitching, pull the upper thread at the end of the button without touching it with 2 or 4 holes can be set. CAUTION • Make sure the needle does not strike the button during sewing. Note Make sure that the needle correctly goes into the presser foot, and then lower the presser foot lever. Stitch Key Stitch Name Button sewing Presser Foot Applications Attaching buttons Stitch width [mm (inch)] Auto Manual Stitch length...
... machine will automatically cut the upper and bobbin threads at the beginning of the stitching, pull the upper thread at the end of the button without touching it with 2 or 4 holes can be set. CAUTION • Make sure the needle does not strike the button during sewing. Note Make sure that the needle correctly goes into the presser foot, and then lower the presser foot lever. Stitch Key Stitch Name Button sewing Presser Foot Applications Attaching buttons Stitch width [mm (inch)] Auto Manual Stitch length...
Users Manual - English
Page 144
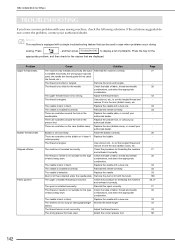
... collected under the needle plate. The stitches are scratches around the hole in case minor problems occur during sewing. Check the table of fabric, thread and needle combinations, and select the appropriate combination. Adjust the thread tension. Replace the needle with a simple troubleshooting feature that are scratches on the bobbin or it correctly. The thread is threaded incorrectly. Problem Upper thread breaks Bobbin thread breaks Skipped stitches Fabric puckers Cause Solution The machine was used in the presser foot. The machine is tangled...
... collected under the needle plate. The stitches are scratches around the hole in case minor problems occur during sewing. Check the table of fabric, thread and needle combinations, and select the appropriate combination. Adjust the thread tension. Replace the needle with a simple troubleshooting feature that are scratches on the bobbin or it correctly. The thread is threaded incorrectly. Problem Upper thread breaks Bobbin thread breaks Skipped stitches Fabric puckers Cause Solution The machine was used in the presser foot. The machine is tangled...
Users Manual - English
Page 145
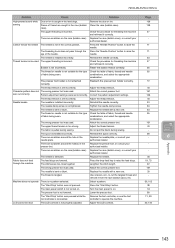
... "Needle Position" button to raise the feed dogs. Press the "Start/Stop" button. 38 The main power switch is not turned on . 16 The presser foot is not lowered. Reinstall the needle correctly. 33 Thread tension is incorrect The upper threading is defective. Adjust the thread tension. 43 Needle breaks The needle is no pattern selected. Use scissors, etc., to raise the 11 needle. Remove the dust or lint. 138 sewing Pieces of fabric being sewn. Lengthen the stitch length...
... "Needle Position" button to raise the feed dogs. Press the "Start/Stop" button. 38 The main power switch is not turned on . 16 The presser foot is not lowered. Reinstall the needle correctly. 33 Thread tension is incorrect The upper threading is defective. Adjust the thread tension. 43 Needle breaks The needle is no pattern selected. Use scissors, etc., to raise the 11 needle. Remove the dust or lint. 138 sewing Pieces of fabric being sewn. Lengthen the stitch length...
Users Manual - English
Page 161
... 129 , attaching elastic tape 64 84 , automatic drop feed 75 94 , automatic fabric sensor system 20 46 automatic reverse/reinforcement stitching 43 automatic thread cutting key 44 B , back to beginning key 108 111 bar tacks 92 basting 56 blind hem stitch 79 block move key 131 , bobbin 23 26 , bobbin cover 10 26 bobbin holder 24 bobbin thread inserting 26 pulling up 26 winding 23 bobbin winder 9 bobbin winding thread guide 9, 24, 25 button sewing 94 buttonhole lever 10, 88, 92 buttonhole stitches 87 C character/decorative stitches adjusting 106 combining...
... 129 , attaching elastic tape 64 84 , automatic drop feed 75 94 , automatic fabric sensor system 20 46 automatic reverse/reinforcement stitching 43 automatic thread cutting key 44 B , back to beginning key 108 111 bar tacks 92 basting 56 blind hem stitch 79 block move key 131 , bobbin 23 26 , bobbin cover 10 26 bobbin holder 24 bobbin thread inserting 26 pulling up 26 winding 23 bobbin winder 9 bobbin winding thread guide 9, 24, 25 button sewing 94 buttonhole lever 10, 88, 92 buttonhole stitches 87 C character/decorative stitches adjusting 106 combining...
BOBBIN WORK INSTRUCTION MANUAL - Multi
Page 5
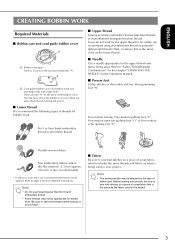
...the fabric used in the Operation Manual. ■ Presser foot Utility stitches or decorative stitches: Monogramming foot "N" Free-motion sewing: Free-motion quilting foot "C", Free-motion open toe quilting foot "O" or Free-motion echo quilting foot "E" Flexible woven ribbon Fine embroidery ribbon (silk or silk-like material) (3.5 mm (approx. 1/8 inch) or less, recommended) * If ribbon is to sew trial stitches on the back of scrap fabric, which includes the same threads and fabric as the lower thread. ■ Needle Use a needle appropriate for bobbin work . Be sure to sew trial stitches...
...the fabric used in the Operation Manual. ■ Presser foot Utility stitches or decorative stitches: Monogramming foot "N" Free-motion sewing: Free-motion quilting foot "C", Free-motion open toe quilting foot "O" or Free-motion echo quilting foot "E" Flexible woven ribbon Fine embroidery ribbon (silk or silk-like material) (3.5 mm (approx. 1/8 inch) or less, recommended) * If ribbon is to sew trial stitches on the back of scrap fabric, which includes the same threads and fabric as the lower thread. ■ Needle Use a needle appropriate for bobbin work . Be sure to sew trial stitches...
BOBBIN WORK INSTRUCTION MANUAL - Multi
Page 12
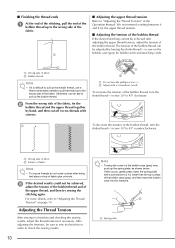
... the bobbin case (gray), and then insert the bobbin case into the machine. a Wrong side of fabric b Bobbin thread Note • If it is difficult to pull up the bobbin thread, use an awl to 45° counterclockwise. The tension of the bobbin thread can be achieved, adjust the tension of the bobbin thread and of the upper thread, and then try sewing the stitching again. a Spring plate a Do not turn the slotted-head (-) screw 30...
... the bobbin case (gray), and then insert the bobbin case into the machine. a Wrong side of fabric b Bobbin thread Note • If it is difficult to pull up the bobbin thread, use an awl to 45° counterclockwise. The tension of the bobbin thread can be achieved, adjust the tension of the bobbin thread and of the upper thread, and then try sewing the stitching again. a Spring plate a Do not turn the slotted-head (-) screw 30...


