

Users Manual - English and Spanish
Page 14
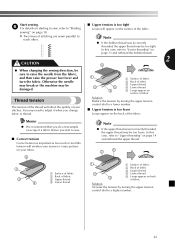
...turning the 2 handwheel toward you (counterclockwise) and raise the presser foot lever. Prepare the bobbin wound properly 1 before threading the lower thread. • See page 11 for the details about bobbin winding. CAUTION ● Make sure you turn off the machine while threading. Hold the ... 1 Wound evenly 2 Wound poorly Lower threading Install the bobbin wound with your finger, and then pass the thread through the slit, as shown. • If the thread is not correctly inserted through the tension-adjusting spring of the bobbin case, it may cause the thread tension to be injured.
...turning the 2 handwheel toward you (counterclockwise) and raise the presser foot lever. Prepare the bobbin wound properly 1 before threading the lower thread. • See page 11 for the details about bobbin winding. CAUTION ● Make sure you turn off the machine while threading. Hold the ... 1 Wound evenly 2 Wound poorly Lower threading Install the bobbin wound with your finger, and then pass the thread through the slit, as shown. • If the thread is not correctly inserted through the tension-adjusting spring of the bobbin case, it may cause the thread tension to be injured.
Users Manual - English and Spanish
Page 23
... tension is too tight Loops will affect the quality of your fabric. 2 1 3 4 1 Surface of fabric 2 Back of the fabric. Note ● If the bobbin thread was incorrectly threaded, the upper thread may need to adjust it when you start to raise the needle from the fabric, and then raise... upper tension control dial to "Starting sewing" on page 18. In this case, refer to "Lower threading" on page 13 and rethread the bobbin thread. 2 CAUTION 2 ● When changing the sewing direction, be too loose. In this case, refer to "Upper threading" on page 14 and rethread the upper thread....
... tension is too tight Loops will affect the quality of your fabric. 2 1 3 4 1 Surface of fabric 2 Back of the fabric. Note ● If the bobbin thread was incorrectly threaded, the upper thread may need to adjust it when you start to raise the needle from the fabric, and then raise... upper tension control dial to "Starting sewing" on page 18. In this case, refer to "Lower threading" on page 13 and rethread the bobbin thread. 2 CAUTION 2 ● When changing the sewing direction, be too loose. In this case, refer to "Upper threading" on page 14 and rethread the upper thread....
Users Manual - English and Spanish
Page 39
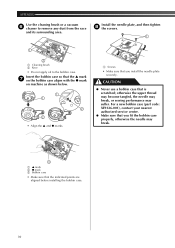
Using the oval screwdriver, remove the 4 two screws. Grasp the bobbin case, and then lift it . Lift up the needle plate as difficulty turning the handwheel or an unusual noise, immediately stop using it , otherwise you clean ...
Using the oval screwdriver, remove the 4 two screws. Grasp the bobbin case, and then lift it . Lift up the needle plate as difficulty turning the handwheel or an unusual noise, immediately stop using it , otherwise you clean ...
Users Manual - English and Spanish
Page 40
...machine as shown below. 1 1 2 2 • Align the ▲ and ● marks. 1 Screws • Make sure that you fit the bobbin case properly, otherwise the needle may suffer. otherwise the upper thread may become tangled, the needle may break, or sewing performance may break. 3 1 ▲... mark 2 ● mark 3 Bobbin case • Make sure that the indicated points are aligned before installing the bobbin case. 39 For a new bobbin case (part code: XE9326-001), contact your nearest authorized service center. ● Make sure that ...
...machine as shown below. 1 1 2 2 • Align the ▲ and ● marks. 1 Screws • Make sure that you fit the bobbin case properly, otherwise the needle may suffer. otherwise the upper thread may become tangled, the needle may break, or sewing performance may break. 3 1 ▲... mark 2 ● mark 3 Bobbin case • Make sure that the indicated points are aligned before installing the bobbin case. 39 For a new bobbin case (part code: XE9326-001), contact your nearest authorized service center. ● Make sure that ...

Users Manual - English and Spanish
Page 41
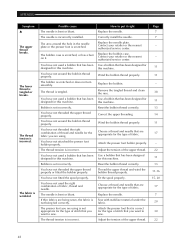
...needle plate. The needle want to - Fit the spool properly. - 15, 20 6 The area around the hole in the thread. Replace the bobbin case. Contact your dealer or the nearest authorized service center. authorized service center. Correctly install the needle. 7 The needle clamp screw is scratched. Loosen...it right Page The main power switch is correct appropriate for the type of stitch that you need additional help, the Brother Solutions Center offers the latest FAQs and troubleshooting tips. Use the oval screwdriver to sew. Replace the needle plate. You have ...
...needle plate. The needle want to - Fit the spool properly. - 15, 20 6 The area around the hole in the thread. Replace the bobbin case. Contact your dealer or the nearest authorized service center. authorized service center. Correctly install the needle. 7 The needle clamp screw is scratched. Loosen...it right Page The main power switch is correct appropriate for the type of stitch that you need additional help, the Brother Solutions Center offers the latest FAQs and troubleshooting tips. Use the oval screwdriver to sew. Replace the needle plate. You have ...
Users Manual - English and Spanish
Page 42
..., or has a burr on it right Replace the needle. You have not used a bobbin that has been designed for this machine. How to sew. Replace the bobbin. The bobbin case is set incorrectly. If thin fabrics are appropriate for the type of fabric. Remove the tangled... machine. Correct the upper threading. Adjust the tension of the upper thread. You have not wound the bobbin thread properly. Replace the needle plate. Replace the bobbin case. Sew with stabilizer material under the fabric. You have not attached the presser foot holder properly. Contact...
..., or has a burr on it right Replace the needle. You have not used a bobbin that has been designed for this machine. How to sew. Replace the bobbin. The bobbin case is set incorrectly. If thin fabrics are appropriate for the type of fabric. Remove the tangled... machine. Correct the upper threading. Adjust the tension of the upper thread. You have not wound the bobbin thread properly. Replace the needle plate. Replace the bobbin case. Sew with stabilizer material under the fabric. You have not attached the presser foot holder properly. Contact...
Users Manual - English and Spanish
Page 43
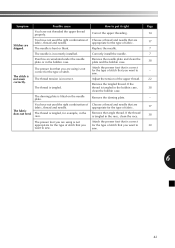
.... How to sew. Attach the presser foot that is correct for the type of stitch that you are appropriate for example, in the bobbin case, clean the bobbin case. Remove the tangle thread. Attach the presser foot that is correct for the type of stitch that you want to sew. Possible cause ...not sewn correctly. Correctly install the needle. Symptom Stitches are using is not correct for the type of fabric. The stitch is tangled in the bobbin case. The needle is incorrect. Dust has accumulated under the needle plate or in the race, clean the race. The thread tension is bent or...
.... How to sew. Attach the presser foot that is correct for the type of stitch that you are appropriate for example, in the bobbin case, clean the bobbin case. Remove the tangle thread. Attach the presser foot that is correct for the type of stitch that you want to sew. Possible cause ...not sewn correctly. Correctly install the needle. Symptom Stitches are using is not correct for the type of fabric. The stitch is tangled in the bobbin case. The needle is incorrect. Dust has accumulated under the needle plate or in the race, clean the race. The thread tension is bent or...


