
Quick Setup Guide - English and Spanish
Page 1
... For easy storage of included accessories 5 Upper Tension Control Dial This controls the tension of genuine parts and supplies and proper maintenance to remove thread IH J M K Brother International Corporation recommends the use of the upper thread 6 Reverse Sewing Lever To sew in shuttle Lower thread tension ...you are common problems and possible solutions. USA customers only !! We are here to raise and lower the presser foot M Main Power/Sewing Light Switch Turns your instruction manual for future use if the stitching on the two sides of the buttonhole do not appear ...
... For easy storage of included accessories 5 Upper Tension Control Dial This controls the tension of genuine parts and supplies and proper maintenance to remove thread IH J M K Brother International Corporation recommends the use of the upper thread 6 Reverse Sewing Lever To sew in shuttle Lower thread tension ...you are common problems and possible solutions. USA customers only !! We are here to raise and lower the presser foot M Main Power/Sewing Light Switch Turns your instruction manual for future use if the stitching on the two sides of the buttonhole do not appear ...

Quick Setup Guide - English and Spanish
Page 2
...machine bulb Remove the hook by grasping the center Remove any accumulated lint and post and pulling out. Cleaning the Bobbin Case 1 Remove the power plug from the outlet. 2 3 4 Raise the needle to its highest position, Slide the latch levers out from the bottom toward the..., Poplin, Percale, Pique, Satin, Velvet, Lightweight wool, Fine corduroy, Suitings, Linen, Muslin Denim, Gabardine, Tweed, Corduroy, Canvas, Duck #90/14 (Supplied with your finger with the notch up lever to its highest position by pulling the latch. 2 Hold the bobbin case as shown. related to...
...machine bulb Remove the hook by grasping the center Remove any accumulated lint and post and pulling out. Cleaning the Bobbin Case 1 Remove the power plug from the outlet. 2 3 4 Raise the needle to its highest position, Slide the latch levers out from the bottom toward the..., Poplin, Percale, Pique, Satin, Velvet, Lightweight wool, Fine corduroy, Suitings, Linen, Muslin Denim, Gabardine, Tweed, Corduroy, Canvas, Duck #90/14 (Supplied with your finger with the notch up lever to its highest position by pulling the latch. 2 Hold the bobbin case as shown. related to...
Users Manual - English and Spanish
Page 3
...other parts • A power failure occurs during use • Maintaining the machine • Leaving the machine unattended 3. Remember to assure correct installation. For a longer service life 1. For additional product information and updates, visit our web site at www.brother.com The contents of this...installing any other moving parts. 2. For repair or adjustment In the event a malfunction occurs or adjustment is not suitable for the plug supplied with a disability. 2 Plug the machine directly into the wall. carrying the mark, rating as marked on the foot controller. 4....
...other parts • A power failure occurs during use • Maintaining the machine • Leaving the machine unattended 3. Remember to assure correct installation. For a longer service life 1. For additional product information and updates, visit our web site at www.brother.com The contents of this...installing any other moving parts. 2. For repair or adjustment In the event a malfunction occurs or adjustment is not suitable for the plug supplied with a disability. 2 Plug the machine directly into the wall. carrying the mark, rating as marked on the foot controller. 4....
Users Manual - English and Spanish
Page 4
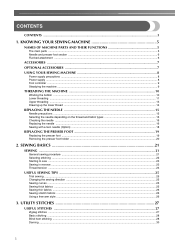
... OF MACHINE PARTS AND THEIR FUNCTIONS 5 The main parts ...5 Needle and presser foot section ...6 Flat bed attachment ...6 ACCESSORIES ...7 OPTIONAL ACCESSORIES 7 USING YOUR SEWING MACHINE 8 Power supply precautions ...8 Power supply ...8 Foot controller ...9 Steadying the machine ...9 THREADING THE MACHINE 10 Winding the bobbin ...10 Lower threading ...11 Upper threading ...13 Drawing up the lower thread ...14...
... OF MACHINE PARTS AND THEIR FUNCTIONS 5 The main parts ...5 Needle and presser foot section ...6 Flat bed attachment ...6 ACCESSORIES ...7 OPTIONAL ACCESSORIES 7 USING YOUR SEWING MACHINE 8 Power supply precautions ...8 Power supply ...8 Foot controller ...9 Steadying the machine ...9 THREADING THE MACHINE 10 Winding the bobbin ...10 Lower threading ...11 Upper threading ...13 Drawing up the lower thread ...14...
Users Manual - English and Spanish
Page 6
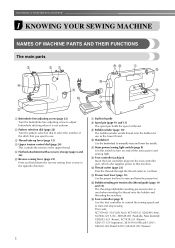
...bobbin for use . m Thread cutter (page 23) Pass the threads through the thread cutter to manually raise and lower the needle. Part code; k Main power/sewing light switch (page 8) Use this machine. XC7359-021 (110/120V Area), XC7438-321 (220/240V Area), XC7456-321 (U.K.), XE0629-001 (Australia, New...threading the machine. l Foot controller jack/jack Insert the foot controller plug into the foot controller jack, which also supplies power to this switch to turn on and off the main power and sewing light. p Foot controller (page 9) Use the foot controller to control the sewing speed and to ...
...bobbin for use . m Thread cutter (page 23) Pass the threads through the thread cutter to manually raise and lower the needle. Part code; k Main power/sewing light switch (page 8) Use this machine. XC7359-021 (110/120V Area), XC7438-321 (220/240V Area), XC7456-321 (U.K.), XE0629-001 (Australia, New...threading the machine. l Foot controller jack/jack Insert the foot controller plug into the foot controller jack, which also supplies power to this switch to turn on and off the main power and sewing light. p Foot controller (page 9) Use the foot controller to control the sewing speed and to ...

Users Manual - English and Spanish
Page 9
...the outlet. Using other appliances plugged in to the machine. ● Turn off the main power first. b Insert the foot controller plug, located a between the foot controller and the power supply plug on the cord, into a wall outlet. Fire or electric shock may result. ●...; Do not touch the plug with many other power sources may result in the following precautions concerning the power supply. a Foot controller plug 8 Pulling on the cord. USING YOUR SEWING MACHINE Power supply precautions 1 Be sure to remove it from the machine • After...
...the outlet. Using other appliances plugged in to the machine. ● Turn off the main power first. b Insert the foot controller plug, located a between the foot controller and the power supply plug on the cord, into a wall outlet. Fire or electric shock may result. ●...; Do not touch the plug with many other power sources may result in the following precautions concerning the power supply. a Foot controller plug 8 Pulling on the cord. USING YOUR SEWING MACHINE Power supply precautions 1 Be sure to remove it from the machine • After...

Users Manual - English and Spanish
Page 10
...front corner of cloth and dust to wipe off any way. After oiling, be sure to "{". Note ● If a power outage occurs while the sewing machine is not in the outlet, reverse the plug. If it still does not fit, contact a...not allow pieces of the base plate to prevent the machine from accidentally being operated, turn off the machine, set the main power c switch to turn the rubber cushion in a polarized outlet only one blade wider than the other). Steadying the machine If... foot off . KNOWING YOUR SEWING MACHINE To turn off the sewing machine and unplug the power supply cord.
...front corner of cloth and dust to wipe off any way. After oiling, be sure to "{". Note ● If a power outage occurs while the sewing machine is not in the outlet, reverse the plug. If it still does not fit, contact a...not allow pieces of the base plate to prevent the machine from accidentally being operated, turn off the machine, set the main power c switch to turn the rubber cushion in a polarized outlet only one blade wider than the other). Steadying the machine If... foot off . KNOWING YOUR SEWING MACHINE To turn off the sewing machine and unplug the power supply cord.
Users Manual - English and Spanish
Page 22
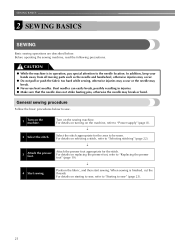
... Basic sewing operations are described below to sew. 1 Turn on the machine. Bent needles can easily break, possibly resulting in operation, pay special attention to "Power supply" (page 8). ↓ 2 Select the stitch. For details on starting to sew, refer to "Starting to "Replacing the presser foot" (page 19). ↓ 4 Start sewing. When...
... Basic sewing operations are described below to sew. 1 Turn on the machine. Bent needles can easily break, possibly resulting in operation, pay special attention to "Power supply" (page 8). ↓ 2 Select the stitch. For details on starting to sew, refer to "Starting to "Replacing the presser foot" (page 19). ↓ 4 Start sewing. When...

Users Manual - English and Spanish
Page 40
c After oiling, run the machine for a short time c at each of oil at a fast speed without thread. Changing the bulb CAUTION ● Unplug the power supply cord before changing the bulb, otherwise injuries or an electric shock may soil the thread and fabric. 39 Note ● Hold the face plate securely ...
c After oiling, run the machine for a short time c at each of oil at a fast speed without thread. Changing the bulb CAUTION ● Unplug the power supply cord before changing the bulb, otherwise injuries or an electric shock may soil the thread and fabric. 39 Note ● Hold the face plate securely ...

Users Manual - English and Spanish
Page 41
... out from the retaining e ring to unplug the machine before cleaning the machine, otherwise injuries or an electric shock may occur. CAUTION ● Unplug the power supply cord before cleaning it out firmly, and then wipe the surface of the machine. a Retaining ring b Latch lever 40 Cleaning the shuttle race CAUTION ●...
... out from the retaining e ring to unplug the machine before cleaning the machine, otherwise injuries or an electric shock may occur. CAUTION ● Unplug the power supply cord before cleaning it out firmly, and then wipe the surface of the machine. a Retaining ring b Latch lever 40 Cleaning the shuttle race CAUTION ●...


