
Quick Setup Guide - English and Spanish
Page 1
... of the upper thread 6 Reverse Sewing Lever To sew in reverse 7 Presser Foot Holder Assembly 8 Presser Foot Screw 9 Presser Foot (Zigzag) 0 Needle Plate A Shuttle Hook B Bobbin Case C Feed Dogs D Needle E Needle Clamp Screw F Shuttle Cover Skips Stitches Needle is not sharp and/or straight Needle is unevenly wound on something Lower thread is inserted incorrectly Needle and/or thread for easy and efficient transporting O Thread Guide/Bobbin Winding Pre-tension Disc Used when winding the bobbin and then threading the machine Brother International Corporation se compromete...
... of the upper thread 6 Reverse Sewing Lever To sew in reverse 7 Presser Foot Holder Assembly 8 Presser Foot Screw 9 Presser Foot (Zigzag) 0 Needle Plate A Shuttle Hook B Bobbin Case C Feed Dogs D Needle E Needle Clamp Screw F Shuttle Cover Skips Stitches Needle is not sharp and/or straight Needle is unevenly wound on something Lower thread is inserted incorrectly Needle and/or thread for easy and efficient transporting O Thread Guide/Bobbin Winding Pre-tension Disc Used when winding the bobbin and then threading the machine Brother International Corporation se compromete...

Quick Setup Guide - English and Spanish
Page 2
... foot controller. CAUTION: Make sure you set the bobbin so the thread unrolls in the right direction. Winding the Bobbin 1 2 Threading the Needle 1 Pass the thread through the hole Pull up on both . Raise the presser foot lifter. 3 4 While holding the end of the hook, match the hook position opposite the driver and insert. Insert the bobbin with your finger with the top opening around the bobbin winder pre-tension disc. Place the thread spool on the spool pin...
... foot controller. CAUTION: Make sure you set the bobbin so the thread unrolls in the right direction. Winding the Bobbin 1 2 Threading the Needle 1 Pass the thread through the hole Pull up on both . Raise the presser foot lifter. 3 4 While holding the end of the hook, match the hook position opposite the driver and insert. Insert the bobbin with your finger with the top opening around the bobbin winder pre-tension disc. Place the thread spool on the spool pin...
Users Manual - English and Spanish
Page 2
... intended use ." 1 "SAVE THESE INSTRUCTIONS" "This sewing machine is not intended for household use as threading the needle, changing the needle, threading the bobbin, or changing the presser foot. 15. Return the sewing machine to the off , then remove plug from outlet. 9. Do not operate this sewing machine only for examination, repair, electrical or mechanical adjustment. 4. Do not pull or push the fabric while stitching. Always unplug this instruction manual. 16. Never operate the sewing machine with same type rated...
... intended use ." 1 "SAVE THESE INSTRUCTIONS" "This sewing machine is not intended for household use as threading the needle, changing the needle, threading the bobbin, or changing the presser foot. 15. Return the sewing machine to the off , then remove plug from outlet. 9. Do not operate this sewing machine only for examination, repair, electrical or mechanical adjustment. 4. Do not pull or push the fabric while stitching. Always unplug this instruction manual. 16. Never operate the sewing machine with same type rated...
Users Manual - English and Spanish
Page 3
... the needle while sewing. Remember to turn off the power switch and unplug the cord when: • Operation is not intended to inspect and adjust the machine yourself. FOR USERS IN AUSTRALIA AND NEW ZEALAND This sewing machine is completed • Replacing or removing the needle or any assemblies, the presser feet, needle, or other parts to clean the case. Do not store anything on plug. • Always replace the fuse cover. CONGRATULATIONS...
... the needle while sewing. Remember to turn off the power switch and unplug the cord when: • Operation is not intended to inspect and adjust the machine yourself. FOR USERS IN AUSTRALIA AND NEW ZEALAND This sewing machine is completed • Replacing or removing the needle or any assemblies, the presser feet, needle, or other parts to clean the case. Do not store anything on plug. • Always replace the fuse cover. CONGRATULATIONS...
Users Manual - English and Spanish
Page 4
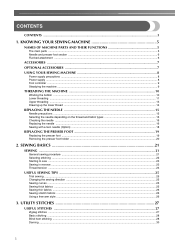
... sewing ...25 Changing the sewing direction ...25 Sewing curves ...25 Sewing thick fabrics ...25 Sewing thin fabrics ...26 Sewing stretch fabrics ...26 Using a free-arm style ...26 3. KNOWING YOUR SEWING MACHINE 5 NAMES OF MACHINE PARTS AND THEIR FUNCTIONS 5 The main parts ...5 Needle and presser foot section ...6 Flat bed attachment ...6 ACCESSORIES ...7 OPTIONAL ACCESSORIES 7 USING YOUR SEWING MACHINE 8 Power supply precautions ...8 Power supply ...8 Foot controller ...9 Steadying the machine ...9 THREADING THE MACHINE 10 Winding the bobbin ...10 Lower threading ...11 Upper threading...
... sewing ...25 Changing the sewing direction ...25 Sewing curves ...25 Sewing thick fabrics ...25 Sewing thin fabrics ...26 Sewing stretch fabrics ...26 Using a free-arm style ...26 3. KNOWING YOUR SEWING MACHINE 5 NAMES OF MACHINE PARTS AND THEIR FUNCTIONS 5 The main parts ...5 Needle and presser foot section ...6 Flat bed attachment ...6 ACCESSORIES ...7 OPTIONAL ACCESSORIES 7 USING YOUR SEWING MACHINE 8 Power supply precautions ...8 Power supply ...8 Foot controller ...9 Steadying the machine ...9 THREADING THE MACHINE 10 Winding the bobbin ...10 Lower threading ...11 Upper threading...
Users Manual - English and Spanish
Page 6
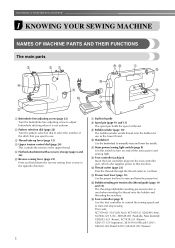
... lower thread. k Main power/sewing light switch (page 8) Use this machine. n Presser foot lever (page 13) Use the presser foot lever to turn on and off the main power and sewing light. o Bobbin winding pre-tension disc/thread guide (page 10 and 13) The thread guide/bobbin winding pre-tension disc is not uniform. i Bobbin winder (page 10) The bobbin winder winds thread onto the bobbin for use . e Flat bed attachment with accessory storage (page 6 and 26) f Reverse sewing lever (page 23) Press and hold down the reverse sewing lever to sew in handle h Spool pin...
... lower thread. k Main power/sewing light switch (page 8) Use this machine. n Presser foot lever (page 13) Use the presser foot lever to turn on and off the main power and sewing light. o Bobbin winding pre-tension disc/thread guide (page 10 and 13) The thread guide/bobbin winding pre-tension disc is not uniform. i Bobbin winder (page 10) The bobbin winder winds thread onto the bobbin for use . e Flat bed attachment with accessory storage (page 6 and 26) f Reverse sewing lever (page 23) Press and hold down the reverse sewing lever to sew in handle h Spool pin...
Users Manual - English and Spanish
Page 7
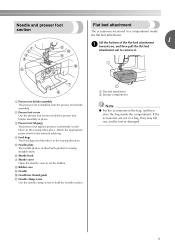
...foot screw Use the presser foot screw to set the bobbin. Attach the appropriate presser foot for sewing straight seams. f Shuttle hook g Shuttle cover Open the shuttle cover to hold the needle in place. a Flat bed attachment b Storage compartment Note ● Put the accessories in the bag, and then store the bag inside the flat bed attachment. e Needle plate The needle plate is installed onto the presser foot holder assembly. If the accessories are stored in a compartment inside the compartment. c Presser foot (Zigzag) The presser foot applies pressure consistently on the fabric...
...foot screw Use the presser foot screw to set the bobbin. Attach the appropriate presser foot for sewing straight seams. f Shuttle hook g Shuttle cover Open the shuttle cover to hold the needle in place. a Flat bed attachment b Storage compartment Note ● Put the accessories in the bag, and then store the bag inside the flat bed attachment. e Needle plate The needle plate is installed onto the presser foot holder assembly. If the accessories are stored in a compartment inside the compartment. c Presser foot (Zigzag) The presser foot applies pressure consistently on the fabric...
Users Manual - English and Spanish
Page 8
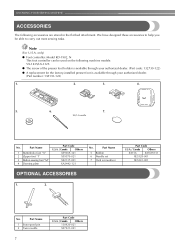
... MACHINE ACCESSORIES The following machine models: VX-1435/LX-3125. ● The screw of the presser foot holder is available through your authorized dealer. (Part code: 132730-122) ● A replacement for the factory-installed presser foot is available through your authorized dealer. (Part number: 138135-122) 1. 2. 3. 4. 5. 6. 7. 90/14 needle No. Part Name 1 Buttonhole foot "A" 2 Zipper foot "I" 3 Button sewing foot "M" 4 Darning plate Part Code U.S.A. / Canada Others X59369-321 X59370-021 XE2137-001 XA3442-121 No. Part Name 1 Extra spool pin 2 Twin needle 7 Part...
... MACHINE ACCESSORIES The following machine models: VX-1435/LX-3125. ● The screw of the presser foot holder is available through your authorized dealer. (Part code: 132730-122) ● A replacement for the factory-installed presser foot is available through your authorized dealer. (Part number: 138135-122) 1. 2. 3. 4. 5. 6. 7. 90/14 needle No. Part Name 1 Buttonhole foot "A" 2 Zipper foot "I" 3 Button sewing foot "M" 4 Darning plate Part Code U.S.A. / Canada Others X59369-321 X59370-021 XE2137-001 XA3442-121 No. Part Name 1 Extra spool pin 2 Twin needle 7 Part...
Users Manual - English and Spanish
Page 11
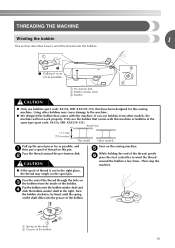
... thread through the hole on the sewing machine. Turn on c the bobbin from other bobbins may tangle on this sewing machine. Pass the end of thread on the spool pin. Pass the thread around the bobbin a few times. e While holding the end of the same type (part code: SA156, SFB: XA5539-151). Only use bobbins (part code: SA156, SFB: XA5539-151) that comes with this machine or bobbins of the thread, gently f press the foot controller to wind...
... thread through the hole on the sewing machine. Turn on c the bobbin from other bobbins may tangle on this sewing machine. Pass the end of thread on the spool pin. Pass the thread around the bobbin a few times. e While holding the end of the same type (part code: SA156, SFB: XA5539-151). Only use bobbins (part code: SA156, SFB: XA5539-151) that comes with this machine or bobbins of the thread, gently f press the foot controller to wind...
Users Manual - English and Spanish
Page 12
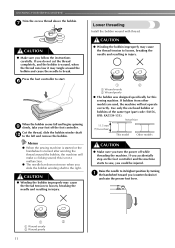
...; Winding the bobbin improperly may tangle around the bobbin, the machine will not operate correctly. g Lower threading Install the bobbin wound with thread. Use only the enclosed bobbin or bobbins of the same type (part code: SA156, SFB: XA5539-151). Actual size 11.5 mm (7/16 inches) This model Other models CAUTION ● Make sure you follow the instructions carefully. this sewing machine. Raise the needle to break. CAUTION ● Make sure you turn the power off the foot controller...
...; Winding the bobbin improperly may tangle around the bobbin, the machine will not operate correctly. g Lower threading Install the bobbin wound with thread. Use only the enclosed bobbin or bobbins of the same type (part code: SA156, SFB: XA5539-151). Actual size 11.5 mm (7/16 inches) This model Other models CAUTION ● Make sure you follow the instructions carefully. this sewing machine. Raise the needle to break. CAUTION ● Make sure you turn the power off the foot controller...
Users Manual - English and Spanish
Page 15
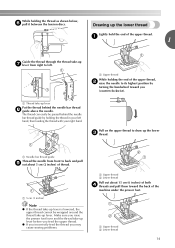
... lever is lowered, the upper thread cannot be passed behind the needle bar thread h guide above the needle. a Needle bar thread guide Thread the needle from right to its highest position by holding the thread as shown below, f pull it between the tension discs. Make sure you raise the presser foot lever and the thread take -up lever before you feed the upper thread. ● If you incorrectly feed the thread you (counterclockwise). Drawing up lever Put the thread behind the needle bar thread guide...
... lever is lowered, the upper thread cannot be passed behind the needle bar thread h guide above the needle. a Needle bar thread guide Thread the needle from right to its highest position by holding the thread as shown below, f pull it between the tension discs. Make sure you raise the presser foot lever and the thread take -up lever before you feed the upper thread. ● If you incorrectly feed the thread you (counterclockwise). Drawing up lever Put the thread behind the needle bar thread guide...
Users Manual - English and Spanish
Page 17
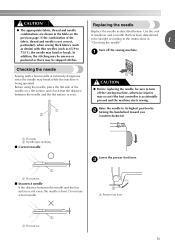
... the sewing machine, otherwise injuries may occur if the foot controller is bent. Before using the needle, place the flat side of the fabric, thread and needle is not correct, particularly when sewing thick fabrics (such as denim) with a bent needle is extremely dangerous since the needle may be uneven or puckered or there may break while the machine is being operated. Lower the presser foot lever. a Flat side b Needle type marking...
... the sewing machine, otherwise injuries may occur if the foot controller is bent. Before using the needle, place the flat side of the fabric, thread and needle is not correct, particularly when sewing thick fabrics (such as denim) with a bent needle is extremely dangerous since the needle may be uneven or puckered or there may break while the machine is being operated. Lower the presser foot lever. a Flat side b Needle type marking...
Users Manual - English and Spanish
Page 19
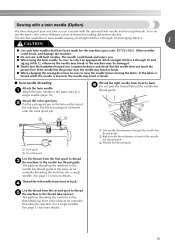
... machine to the needle bar thread guide. The stitches available for a single needle). See page 13 for more details. a Left needle thread passes through 10 and zigzag stitch 2. 1 CAUTION ● Use only twin needles that the needle does not touch the presser foot. If the needle hits the presser foot, the needle may bend or break. ■ Twin needle threading Attach the twin needle. If the fabric is turned while the needle is lowered, the needle may bend or break. ● When changing the sewing direction...
... machine to the needle bar thread guide. The stitches available for a single needle). See page 13 for more details. a Left needle thread passes through 10 and zigzag stitch 2. 1 CAUTION ● Use only twin needles that the needle does not touch the presser foot. If the needle hits the presser foot, the needle may bend or break. ■ Twin needle threading Attach the twin needle. If the fabric is turned while the needle is lowered, the needle may bend or break. ● When changing the sewing direction...
Users Manual - English and Spanish
Page 24
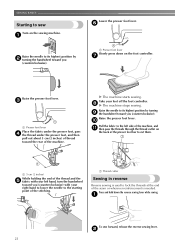
... reverse sewing lever while sewing. X The machine starts sewing. a Thread cutter Sewing in reverse Reverse sewing is used to lock the threads at the end of the machine. Raise the presser foot lever. b 23 Take your left side of thread toward you (counterclockwise). h X The machine stops sewing. Press and hold down on the foot controller. a Raise the needle to cut them. a 5 cm (2 inches) While holding the end of the thread and the e fabric with your right hand to lower...
... reverse sewing lever while sewing. X The machine starts sewing. a Thread cutter Sewing in reverse Reverse sewing is used to lock the threads at the end of the machine. Raise the presser foot lever. b 23 Take your left side of thread toward you (counterclockwise). h X The machine stops sewing. Press and hold down on the foot controller. a Raise the needle to cut them. a 5 cm (2 inches) While holding the end of the thread and the e fabric with your right hand to lower...
Users Manual - English and Spanish
Page 25
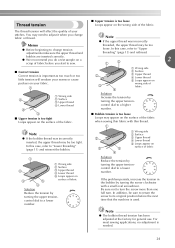
... fabric. 1 2 3 4 a Wrong side b Surface c Upper thread d Lower thread e Loops appear on wrong side of fabric a Wrong side 2 b Surface c Upper thread d Lower thread 3 4 ■ Upper tension is too tight Loops appear on the surface of fabric before the next time that the machine is needed. 24 Note ● The bobbin thread tension has been adjusted at the factory for general use. The thread tension will weaken your seams or cause puckers on your stitches. In this case...
... fabric. 1 2 3 4 a Wrong side b Surface c Upper thread d Lower thread e Loops appear on wrong side of fabric a Wrong side 2 b Surface c Upper thread d Lower thread 3 4 ■ Upper tension is too tight Loops appear on the surface of fabric before the next time that the machine is needed. 24 Note ● The bobbin thread tension has been adjusted at the factory for general use. The thread tension will weaken your seams or cause puckers on your stitches. In this case...

Users Manual - English and Spanish
Page 34
... a button between the presser foot and d the fabric. Use scissors to cut the upper and lower threads, leaving a length of the sewing machine, and then sew them in the a button to the following table. UTILITY STITCHES Button sewing Buttons can be attached. Turn the handwheel toward the rear of 15 cm (6 inches). Pull the upper thread at a low speed, press and hold down the reverse sewing lever to step a. Buttons with 2 or with the bobbin thread. If the needle...
... a button between the presser foot and d the fabric. Use scissors to cut the upper and lower threads, leaving a length of the sewing machine, and then sew them in the a button to the following table. UTILITY STITCHES Button sewing Buttons can be attached. Turn the handwheel toward the rear of 15 cm (6 inches). Pull the upper thread at a low speed, press and hold down the reverse sewing lever to step a. Buttons with 2 or with the bobbin thread. If the needle...
Users Manual - English and Spanish
Page 44
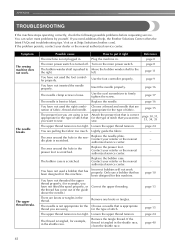
... to firmly tighten the screw. Lightly guide the fabric. Insert the needle properly. Replace the needle. sew. The needle breaks. The area around the hole in . Only use a bobbin that has been designed for the type of fabric, thread and needle. Remove any knots or tangles. Loosen the upper thread tension. The bobbin winder shaft is pushed to Move the bobbin winder shaft to put it right The machine is not plugged in the presser foot is tangled in . The...
... to firmly tighten the screw. Lightly guide the fabric. Insert the needle properly. Replace the needle. sew. The needle breaks. The area around the hole in . Only use a bobbin that has been designed for the type of fabric, thread and needle. Remove any knots or tangles. Loosen the upper thread tension. The bobbin winder shaft is pushed to Move the bobbin winder shaft to put it right The machine is not plugged in the presser foot is tangled in . The...

Users Manual - English and Spanish
Page 45
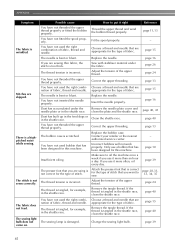
...machine. Wind the bobbin thread properly. Reset the bobbin thread correctly. You have not inserted the needle properly. Choose a thread and needle that has been designed for this machine. page 24 You have not used a bobbin that has been designed for the type of fabric, thread and needle. Correctly install the bobbin thread. Replace the presser foot. Incorrect bobbins will not work properly. Only use a bobbin that has been designed for this machine. Contact your retailer or the nearest authorised service center. - The upper thread breaks...
...machine. Wind the bobbin thread properly. Reset the bobbin thread correctly. You have not inserted the needle properly. Choose a thread and needle that has been designed for this machine. page 24 You have not used a bobbin that has been designed for the type of fabric, thread and needle. Correctly install the bobbin thread. Replace the presser foot. Incorrect bobbins will not work properly. Only use a bobbin that has been designed for this machine. Contact your retailer or the nearest authorised service center. - The upper thread breaks...
Users Manual - English and Spanish
Page 46
... this machine. The thread tension is correct for the type of fabric. You have not threaded the upper thread properly. How to sew. Choose a thread and needle that are appropriate for the type of fabric. Choose a thread and needle that are appropriate for the type of fabric. Insert the needle properly. Remove the needle plate cover and clean the plate and the shuttle race. Clean the shuttle race. Correct the upper threading. Replace the bobbin case. Attach the presser foot that is incorrect. Remove the tangle thread. Change the sewing light bulb...
... this machine. The thread tension is correct for the type of fabric. You have not threaded the upper thread properly. How to sew. Choose a thread and needle that are appropriate for the type of fabric. Choose a thread and needle that are appropriate for the type of fabric. Insert the needle properly. Remove the needle plate cover and clean the plate and the shuttle race. Clean the shuttle race. Correct the upper threading. Replace the bobbin case. Attach the presser foot that is incorrect. Remove the tangle thread. Change the sewing light bulb...
Users Manual - English and Spanish
Page 47
INDEX A accessories 7 appliqués 35 B basic stitching 28 blind hem stitching 28 bobbin 11 bobbin case 12 bobbin winder 10 button sewing 33 buttonhole foot 31 buttonhole sewing 31 C cleaning 40 D darning 30 E embroidering 35 extra spool pin 18 Fffelaetdbdeodgastta..c..h..m...e..n..t...66,, 41 26 foot controller 23 free-arm style 26 G gathering 37 H handwheel 5 J joining 38 M main parts 5 main power switch 8 monogramming 35 N needle 15 needle needle needle bcplalaarmtethpr.e.s.ac..dr.e..gw..u..i..d....e...66..,,...14. 716 O oiling 39 ...
INDEX A accessories 7 appliqués 35 B basic stitching 28 blind hem stitching 28 bobbin 11 bobbin case 12 bobbin winder 10 button sewing 33 buttonhole foot 31 buttonhole sewing 31 C cleaning 40 D darning 30 E embroidering 35 extra spool pin 18 Fffelaetdbdeodgastta..c..h..m...e..n..t...66,, 41 26 foot controller 23 free-arm style 26 G gathering 37 H handwheel 5 J joining 38 M main parts 5 main power switch 8 monogramming 35 N needle 15 needle needle needle bcplalaarmtethpr.e.s.ac..dr.e..gw..u..i..d....e...66..,,...14. 716 O oiling 39 ...


