

Hand Book - English
Page 1
speed Max. .stitch length Needle bar stroke Thread take-up stroke Height of Presser bar lifter Presser foot Auto Height of feed dog Needle Hook Single needle stop device Thread trimmer Thread wiper Quick reverse −1 For thin materials 3,000 rpm 4 mm 33.4 mm 49.9 mm 7 mm 13 mm (With thread wiper :10 mm) 1 mm DP × 5 #9 − #14 Horizontal rotary hook (vertical axis) Standard −400 Scissors type (Solenoid) Solenoid type Solenoid type 2000...
speed Max. .stitch length Needle bar stroke Thread take-up stroke Height of Presser bar lifter Presser foot Auto Height of feed dog Needle Hook Single needle stop device Thread trimmer Thread wiper Quick reverse −1 For thin materials 3,000 rpm 4 mm 33.4 mm 49.9 mm 7 mm 13 mm (With thread wiper :10 mm) 1 mm DP × 5 #9 − #14 Horizontal rotary hook (vertical axis) Standard −400 Scissors type (Solenoid) Solenoid type Solenoid type 2000...
Hand Book - English
Page 2
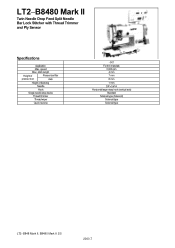
speed Max. .stitch length Height of Presser bar lifter presser foot Auto Height of feed dog Needle Hook Single needle stop device Thread trimmer Thread wiper Quick reverse −901 For thin materials 3,000 rpm 4 mm 7 mm 8 mm 1 mm DP × 5 #14 Horizontal large rotary hook (vertical axis) Standard Scissors type (Solenoid) Solenoid type Solenoid type LT2−B848 Mark II, B8480 Mark II 2/5 2000.7 LT2−B8480 Mark II Twin Needle Drop Feed Split Needle Bar Lock Stitcher with Thread Trimmer and Ply Sensor Specifications Application Max.
speed Max. .stitch length Height of Presser bar lifter presser foot Auto Height of feed dog Needle Hook Single needle stop device Thread trimmer Thread wiper Quick reverse −901 For thin materials 3,000 rpm 4 mm 7 mm 8 mm 1 mm DP × 5 #14 Horizontal large rotary hook (vertical axis) Standard Scissors type (Solenoid) Solenoid type Solenoid type LT2−B848 Mark II, B8480 Mark II 2/5 2000.7 LT2−B8480 Mark II Twin Needle Drop Feed Split Needle Bar Lock Stitcher with Thread Trimmer and Ply Sensor Specifications Application Max.
Hand Book - English
Page 3
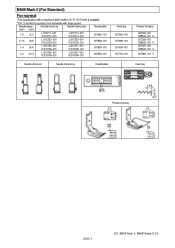
...B848 Mark II (For Standard) For normal *The specification with a maximum stitch width of 5 / 8" (15.9 mm) is available. *The ¡ symbol is a presser foot assembly with finger guard. Needle gauge Needle clamp set Needle clamp assy Needle plate ...Needle clamp set Needle clamp assy Needle plate Feed dog S07696−001 S07698−001 S07699−001 S07703−001 Presser foot assy S07393−001 S38544−001 ¡ S07395−001 S38542−001 ¡ S07397−001 S38543−001 ¡ S07684−101 ¡ Feed dog Presser foot assy 2000.7 LT2−B848...
...B848 Mark II (For Standard) For normal *The specification with a maximum stitch width of 5 / 8" (15.9 mm) is available. *The ¡ symbol is a presser foot assembly with finger guard. Needle gauge Needle clamp set Needle clamp assy Needle plate ...Needle clamp set Needle clamp assy Needle plate Feed dog S07696−001 S07698−001 S07699−001 S07703−001 Presser foot assy S07393−001 S38544−001 ¡ S07395−001 S38542−001 ¡ S07397−001 S38543−001 ¡ S07684−101 ¡ Feed dog Presser foot assy 2000.7 LT2−B848...
Hand Book - English
Page 4
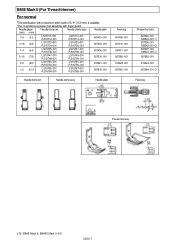
B848 Mark II (For Thread trimmer) For normal *The specification with a maximum stitch width of 5 / 8" (15.9 mm) is available. *The ¡ symbol is a presser foot assembly with finger guard. Needle gauge (inch) (mm) Needle clamp set Needle clamp assy Needle plate 1 /8 (3.2) 3 /16 (4.8) L:S15711−001 R:S15712−001 L:S15723−001 ... Presser foot assy S07393−001 S38544−001 ¡ S07395−001 S38542−001 ¡ S07397−001 S38543−001 ¡ S07682−001 S13624−001 S07684−101 ¡ Feed dog Presser foot assy LT2−B848 Mark...
B848 Mark II (For Thread trimmer) For normal *The specification with a maximum stitch width of 5 / 8" (15.9 mm) is available. *The ¡ symbol is a presser foot assembly with finger guard. Needle gauge (inch) (mm) Needle clamp set Needle clamp assy Needle plate 1 /8 (3.2) 3 /16 (4.8) L:S15711−001 R:S15712−001 L:S15723−001 ... Presser foot assy S07393−001 S38544−001 ¡ S07395−001 S38542−001 ¡ S07397−001 S38543−001 ¡ S07682−001 S13624−001 S07684−101 ¡ Feed dog Presser foot assy LT2−B848 Mark...
Hand Book - English
Page 5
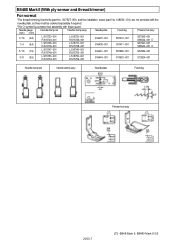
... Needle clamp set Needle clamp assy Needle plate Feed dog Presser foot assy 2000.7 LT2−B848 Mark II, B8480 Mark II 5/5 S07527−001) and the installation screw (part No. 148539−101) are not provided with the needle plate, so they must be ordered separately if required. *The ¡ symbol is a presser foot assembly with finger guard. B8480 Mark II (With ply sensor and thread trimmer) For normal *The thread trimming fixed...
... Needle clamp set Needle clamp assy Needle plate Feed dog Presser foot assy 2000.7 LT2−B848 Mark II, B8480 Mark II 5/5 S07527−001) and the installation screw (part No. 148539−101) are not provided with the needle plate, so they must be ordered separately if required. *The ¡ symbol is a presser foot assembly with finger guard. B8480 Mark II (With ply sensor and thread trimmer) For normal *The thread trimming fixed...

Instruction Manual - Multi
Page 1
...' LT2-B848 MarkII LT2-B872 MarkII LT2-B875 MarkII INSTRUCTION MANUAL BEDIENUNGSANLEITUNG MANUEL D'INSTRUCTIONS MANUAL DE INSTRUCCIONES TWIN NEEDLE LOCK STITCHER Please read this manual within easy reach for quick reference. Por favor guarde este manual al alcance de la mano para una rapida referencia. 4=1 OM all Bitte halten Sie diese Anleitung stets griffbereit zur schnellen Orientierung! DOS AGUJAS DOBLE ARRASTRE Por favor lea este manual antes de usar la maquina...
...' LT2-B848 MarkII LT2-B872 MarkII LT2-B875 MarkII INSTRUCTION MANUAL BEDIENUNGSANLEITUNG MANUEL D'INSTRUCTIONS MANUAL DE INSTRUCCIONES TWIN NEEDLE LOCK STITCHER Please read this manual within easy reach for quick reference. Por favor guarde este manual al alcance de la mano para una rapida referencia. 4=1 OM all Bitte halten Sie diese Anleitung stets griffbereit zur schnellen Orientierung! DOS AGUJAS DOBLE ARRASTRE Por favor lea este manual antes de usar la maquina...

Instruction Manual - Multi
Page 2
... out inspection, adjustment and maintenance check that they operate correctly before starting A moved, be cov- and inspection of the sew- . with other than sewing. • Turn off the power switch at the following times, otherwise the damage to re-install work. the motor stops fully before using the sewing machine. ered by operators who have been re- LT2-B840 Mark II LT2-B870 Mark II A Cleaning • Turn...
... out inspection, adjustment and maintenance check that they operate correctly before starting A moved, be cov- and inspection of the sew- . with other than sewing. • Turn off the power switch at the following times, otherwise the damage to re-install work. the motor stops fully before using the sewing machine. ered by operators who have been re- LT2-B840 Mark II LT2-B870 Mark II A Cleaning • Turn...

Instruction Manual - Multi
Page 11
...BEFORE SEWING 22 6-1. SEWING 35 7-1. Adjusting of the feed dog height 49 11-2. Adjusting the thread tension spring 51 11-4. TROUBLESHOOTING GUIDE 75 Model No. CONTENTS 1. To stop the needle bars (right and left) 33 6-7-2. Installing the bobbin or cap 26 6-4-1. Clearance between rotary hooks and needle plate 54 11-4-3. Adjusting the presser foot pressure 38 9. STANDARD ADJUSTMENTS 48 11-1. Adjusting the presser foot height 50 11-3. Winding the lower thread 24 6-4. Adjusting the stitch length 31 6-7. Replacing the upper thread tension assembly 74...
...BEFORE SEWING 22 6-1. SEWING 35 7-1. Adjusting of the feed dog height 49 11-2. Adjusting the thread tension spring 51 11-4. TROUBLESHOOTING GUIDE 75 Model No. CONTENTS 1. To stop the needle bars (right and left) 33 6-7-2. Installing the bobbin or cap 26 6-4-1. Clearance between rotary hooks and needle plate 54 11-4-3. Adjusting the presser foot pressure 38 9. STANDARD ADJUSTMENTS 48 11-1. Adjusting the presser foot height 50 11-3. Winding the lower thread 24 6-4. Adjusting the stitch length 31 6-7. Replacing the upper thread tension assembly 74...

Instruction Manual - Multi
Page 12
...13-2. Installing the bobbin or cap 26 6-4-1. Adjusting the presser foot pressure 38 9. Adjusting of the needles and feed timing 63 12. Adjusting the rotary hook lubrication amount.. 61 11-6. Checking the machine pulley rotating direction 21 6. Backtacking [B842, B845, B847, B848, 8872, 8875] 36 8. Needle bar height and lift amount 56 11-5. CONTENTS 1. MACHINE SPECIFICATIONS 3 3. Winding the lower thread 24 6-4. Number of stitches: quick-reference guide 34 7. STANDARD ADJUSTMENTS 48 11-1. REPLACING GAUGE PARTS (CHANGING THE NEEDLE WIDTH...
...13-2. Installing the bobbin or cap 26 6-4-1. Adjusting the presser foot pressure 38 9. Adjusting of the needles and feed timing 63 12. Adjusting the rotary hook lubrication amount.. 61 11-6. Checking the machine pulley rotating direction 21 6. Backtacking [B842, B845, B847, B848, 8872, 8875] 36 8. Needle bar height and lift amount 56 11-5. CONTENTS 1. MACHINE SPECIFICATIONS 3 3. Winding the lower thread 24 6-4. Number of stitches: quick-reference guide 34 7. STANDARD ADJUSTMENTS 48 11-1. REPLACING GAUGE PARTS (CHANGING THE NEEDLE WIDTH...

Instruction Manual - Multi
Page 23
...aprox. 0,3 kgf) Model No. PARTES OPCIONALES ■ Upper thread tension assembly The following types of shipment for use with different thread take -up spring types (single or double) and different thread tension spring strengths. ■ ...tension de fil. ■ Conjunto de tension de hilo superior Se dispone de los siguientes tipos conjuntos de tension de hilo superior para usar con los diferentes tipos de resortes de tirahilos (sencillos o dobles) y las diferentes fuerzas de resorte de tension de hilo. PIECES EN OPTION 3. SONDERZUBEHORTEILE 3. LT2-B840 Mark II LT2...
...aprox. 0,3 kgf) Model No. PARTES OPCIONALES ■ Upper thread tension assembly The following types of shipment for use with different thread take -up spring types (single or double) and different thread tension spring strengths. ■ ...tension de fil. ■ Conjunto de tension de hilo superior Se dispone de los siguientes tipos conjuntos de tension de hilo superior para usar con los diferentes tipos de resortes de tirahilos (sencillos o dobles) y las diferentes fuerzas de resorte de tension de hilo. PIECES EN OPTION 3. SONDERZUBEHORTEILE 3. LT2-B840 Mark II LT2...

Instruction Manual - Multi
Page 63
... Brother dealer or a qualified electrician to carry out any maintenance and inspection of the electrical system. • If any safety devices have been removed, be absolutely sure to re-install them to their original positions and check that they operate correctly before starting work. • When carrying out inspection, adjustment and maintenance • When replacing consumable parts such as a result of the sewing machine...
... Brother dealer or a qualified electrician to carry out any maintenance and inspection of the electrical system. • If any safety devices have been removed, be absolutely sure to re-install them to their original positions and check that they operate correctly before starting work. • When carrying out inspection, adjustment and maintenance • When replacing consumable parts such as a result of the sewing machine...

Instruction Manual - Multi
Page 74
... machine head, loosen the three screws m, and then align the rotary hook tip with the center of the needle. 8. The distance from the upper edge of the needle hole to adjust so that the distance from its will go, and check that the distance is aligned with the lower edge of the needle bar supporter e. Remove the feed dog. 3. Loosen the set screw e. 11. Install the needle plate. - 59 - Set the stitch length...
... machine head, loosen the three screws m, and then align the rotary hook tip with the center of the needle. 8. The distance from the upper edge of the needle hole to adjust so that the distance from its will go, and check that the distance is aligned with the lower edge of the needle bar supporter e. Remove the feed dog. 3. Loosen the set screw e. 11. Install the needle plate. - 59 - Set the stitch length...

Instruction Manual - Multi
Page 79
... remplacement des jauges doit etre effectue exclusivement par un technicien qualifie. Model No. REPLACING GAUGE PARTS (CHANGING THE NEEDLE WIDTH) 12. REMPLACEMENT DES JAUGES (CHANGEMENT DE LA LARGEUR D'AIGUILLE) 12. REPLACING GAUGE PARTS (CHANGING THE NEEDLE WIDTH) 12. The motor will keep turning even after the power is pressed by Brother. • Das Austauschen von Teilen darf nur von einem qualifizierten Fachmann...
... remplacement des jauges doit etre effectue exclusivement par un technicien qualifie. Model No. REPLACING GAUGE PARTS (CHANGING THE NEEDLE WIDTH) 12. REMPLACEMENT DES JAUGES (CHANGEMENT DE LA LARGEUR D'AIGUILLE) 12. REPLACING GAUGE PARTS (CHANGING THE NEEDLE WIDTH) 12. The motor will keep turning even after the power is pressed by Brother. • Das Austauschen von Teilen darf nur von einem qualifizierten Fachmann...

Instruction Manual - Multi
Page 90
... the power cord before starting work. If the needle tip is bent or broken, replace the needle. • Is the needle properly installed? 22 If it is 10-20 mm of the motor's inertia. Seams don't match • Is the presser foot pressure too weak? 38 Adjust the presser foot pressure. • Is the feed dog too low? 48 Adjust the feed dog height. • Is the bobbin scratched? Model No. LT2-6840 Mark II (English) LT2-6870...
... the power cord before starting work. If the needle tip is bent or broken, replace the needle. • Is the needle properly installed? 22 If it is 10-20 mm of the motor's inertia. Seams don't match • Is the presser foot pressure too weak? 38 Adjust the presser foot pressure. • Is the feed dog too low? 48 Adjust the feed dog height. • Is the bobbin scratched? Model No. LT2-6840 Mark II (English) LT2-6870...

Instruction Manual - Multi
Page 91
... the feed dog, re-install the feed dog. [B841, B842, B847, B872I If the needle bar has been turned, turn off the power and contact the place of your particular model and sewing specifications is within the standard speed range. Check the needle down position. Broken needles il t, , --/ I%, 14. FEHLERSUCHE 14. If the bobbin is incorrect, thread the thread correctly. • Is the presser foot pressure too weak? If it to set...
... the feed dog, re-install the feed dog. [B841, B842, B847, B872I If the needle bar has been turned, turn off the power and contact the place of your particular model and sewing specifications is within the standard speed range. Check the needle down position. Broken needles il t, , --/ I%, 14. FEHLERSUCHE 14. If the bobbin is incorrect, thread the thread correctly. • Is the presser foot pressure too weak? If it to set...

Instruction Manual - Multi
Page 98
INSTRUCTION MANUAL BEDIENUNGSANLEITUNG MANUEL D'INSTRUCTIONS MANUAL DE INSTRUCCIONES BROTHER INDUSTRIES, LTD. NAGOYA, JAPAN Printed in Japan / Gedruckt in Japan/Improme au Japon/Impreso en Japon 118-W42 S92W42-002 1996, 02, BC)
INSTRUCTION MANUAL BEDIENUNGSANLEITUNG MANUEL D'INSTRUCTIONS MANUAL DE INSTRUCCIONES BROTHER INDUSTRIES, LTD. NAGOYA, JAPAN Printed in Japan / Gedruckt in Japan/Improme au Japon/Impreso en Japon 118-W42 S92W42-002 1996, 02, BC)


